✔Spring MVC
1. MVC
◾MVC(Model-View-Controller) Pattern
- 어플리케이션의 확장을 위해 Model, View, Controller 세가지 영역으로 분리.
- 유지 보수 용이 : 컴포넌트의 변경이 다른 영역에 영향을 끼치지 않음.
- 높은 확장성 : 컴포넌트 간의 결합성이 낮아 프로그램 수정이 용이.
◾장점
- 화면과 비지니스 로직 분리하여 작업 가능.
- 영역별 개발로 인하여 확장성이 뛰어남.
- 표준화된 코드를 사용하므로 공동작업이 용이하고 유지보수성이 좋음.
◾단점
- 개발 과정이 복잡해 초기 개발 속도가 늦음.
- 초보자가 이해하고 개발하기 다소 어려움.
◾Model
- 어플리케이션 상태의 캡슐화.
- 상태 쿼리에 대한 응답.
- 어플리케이션의 기능 표현
- 변경을 view에 통지
◾View
- 모델을 화면에 시각적으로 표현.
- 모델에게 업데이트 요청
- 사용자의 입력을 컨트롤러에 전달.
- 컨트롤러가 view를 선택하도록 허용
◾Controller
- 어플리케이션의 행위 정의
- 사용자 액션을 모델 업데이트와 mapping
- 응답에 대한 view 선택
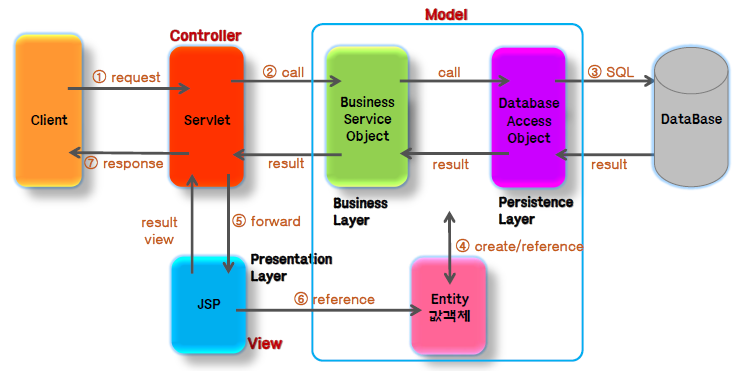
◾Model2 (Web MVC) 요청 흐름
2. Spring MVC
◾Spring MVC 특징
- DI나 AOP같은 기능 뿐 아니라, Servlet 기반의 WEB 개발의 위한 MVC Framework 제공.
- Model2 Architecture와 Front Controller Pattern을 Framework 차원에서 제공.
- Spring이 제공하는 Transaction처리나 DI 및 AOP 등을 손쉽게 사용 가능.
◾Spring MVC 구성 요소
DispatcherServlet(Front Controller)- 모든 클라이언트의 요청을 전달받음.
- Controller에게 클라이언트의 요청을 전달하고, Controller가 리턴한 결과값을 View에 전달하여 알맞은 응답 생성.
HandlerMapping- 클라이언트의 요청 URL을 어떤 Controller가 처리할지 결정.
- URL과 요청 정보를 기준으로 어떤 핸들러 객체를 사용할지 결정하는 객체. DispatcherServlet은 하나 이상의 핸들러 매핑을 가질 수 있음.
Controller- 클라이언트의 요청을 처리한 뒤, Model을 호출하고 그 결과를 DispatcherServlet에게 알려준다.
ModelAndView- Controller가 처리한 데이터 및 화면에 대한 정보를 보유한 객체.
ViewResolver- Controller가 리턴한 뷰 이름을 기반으로 Controller의 처리 결과를 보여줄 View 결정.
View- Controller의 처리 결과를 보여줄 응답화면 생성.
◾Spring MVC 요청 흐름.
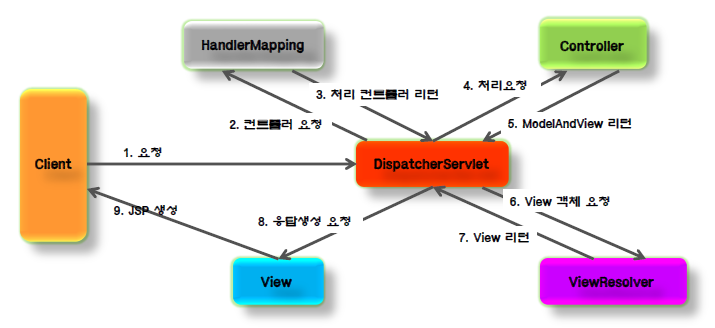
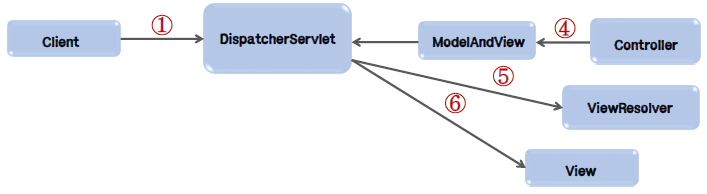
- DispatcherServlet이 요청 수신.
- 단일 Front Controller Servlet
- 요청을 수신하여 처리를 다른 컴포넌트에 위임.
- 어느 Controller에 요청을 전송할지 결정.
- DispatcherServlet은 Handler Mapping에 어느 Controller를 사용할 것인지 문의
- URL과 Mapping.
- DispatcherServlet은 요청을 Controller에게 전송하고 Controller는 요청을 처리한 후 결과 리턴.
- Business Logic 수행 후 결과 정보(Model)가 생성되어 JSP와 같은 view에 사용.
- ModelAndView Object에 수행결과가 포함되어 DispatcherServlet에 리턴.
- ModelAndView는 실제 JSP 정보를 갖고 있지 않으며, ViewResolver가 논리적 이름을 실제 JSP 이름으로 변환.
- View는 결과 정보를 사용하여 화면 표현.
◾Spring MVC 구현
-
구현 과정
- web.xml에 DispatcherServlet 등록 및 Spring 설정 파일 등록.
- 설정 파일에 HandlerMapping 설정
- Controller 구현 및 Context 설정 파일(servlet-context.xml)에 등록.
- Controller와 JSP의 연결을 위해 View Resolver 설정
- JSP 코드 작성.
-
Controller 작성 : Controller가 많은 일을 하지 않고 Service에 처리 위임.

-
web.xml- DispatcherServlet 설정- 1개 이상의 DispatcherServlet 설정 가능.
<!-- The definition of the Root Spring Container shared by all Servlets and Filters -->
<context-param>
  <param-name>contextConfigLocation</param-name>
  <param-value>/WEB-INF/spring/root-context.xml</param-value>
</context-param>

<!-- Processes application requests -->
<servlet>
  <servlet-name>appServlet</servlet-name>
  <servlet-class>org.springframework.web.servlet.DispatcherServlet</servlet-class>
  <init-param>
    <param-name>contextConfigLocation</param-name>
    <param-value>/WEB-INF/spring/appServlet/servlet-context.xml</param-value>
  </init-param>
  <init-param>
    <param-name>throwExceptionIfNoHandlerFound</param-name>
    <param-value>true</param-value>
  </init-param>
  <load-on-startup>1</load-on-startup>
</servlet>web.xml- 최상위 Root ContextLoader 설정
<!-- Creates the Spring Container shared by all Servlets and Filters -->
<listener>
  <listener-class>org.springframework.web.context.ContextLoaderListener</listener-class>
</listener>- 어플리케이션 레이어에 따라 어플리케이션 컨텍스트 분리.
- Controller 작성 후 Annotation 또는 xml 파일에 bean 작성.
3. Controller
◾@Controller
- Clinet의 요청 처리.
- Class 타입에 설저 가능.
- @Controller와 @RequestMapping을 통해 메서드 단위의 mapping가능
- DefaultAnnotationHandlerMapping을 사용하므로 Spring 3.0부터는 추가 설정없이 사용 가능.
context:component-scan을 통해 자동 스캔 설정을 해주어야함.
@Controller				// Clinet 요청을 처리하기 위한 Annotation.
@RequestMapping("path")	// 해당 주소로 전달이 되면 이 컨트롤러에서 처리.
public class TestController{
	...
}
◾@RequestMapping
- 요청 URL Mapping 정보 설정.
- 클래스 타입과 메소드에 설정 가능.
- HTTP method(GET, POST, ..)를 설정하여 서로 다른 메소드 mapping 가능.
- @GetMapping, @PostMapping도 가능.
- 이때, 설정하지 않은 방식으로 전달될 경우 오류 발생(HTTP Error 404)
@Controller				// Clinet 요청을 처리하기 위한 Annotation.
@RequestMapping("path")	// 해당 주소로 전달이 되면 이 컨트롤러에서 처리.
public class TestController{
	@RequestMapping(value = "path2", method=RequestMethod.GET)
    public void test(){
    	...
    }
    @RequestMapping(value = "path2", method=RequestMethod.POST)
    public void test2(){
    	...
    }
}
◾Controller Method Parameter Type
-
parameter로 다양한 Object 설정 가능.
|Parameter Type|설명|
|-|-|
|HttpServletRequest
HttpServletResponse
HttpSession|필요시 Servlet API 사용 가능.|
|Java.util.Locale|현재 요청에 대한 Locale|
|InputStrema, Reader|요청 컨텐츠에 직접 접근할 때 사용|
|outputStream, Writer|응답 컨텐츠를 생성할 때 사용|
|@PathVariable annotation 적용 파라미터|URI 템플릿 변수에 접근할 때 사용|
|@RequestParam annotation 적용 파라미터|HTTP 요청 파라미터를 매핑|
|@RequestHeader annotation 적용 파라미터|HTTP 요청 헤더 매핑|
|@CookieValue annotation 적용 파라미터|HTTP 쿠키 매핑|
|@RequestBody annotation 적용 파라미터|HTTP 요청의 body 내용에 접근할 때 사용|
|Map, Model, ModelMap|view에 전달할 model data를 설정할 때 사용|
|커맨드 객체(DTO)|HTTP 요청 parameter를 저장한 객체
기본적으로 클래스 이름을 모델명으로 사용
@ModelAttribute annotation 설정으로 모델명을 설정할 수 있음.|
|Errors, BindingResult|HTTP 요청 파라미터를 커맨드 객체에 저장한 결과
커맨드 객체를 위한 파라미터 바로 다음에 위치|
|SessionStatus|폼 처리를 완료 했음을 처리하기 위해 사용
@SessionAttributes annotation을 명시한 session 속성을 제거하도록 이벤트 발생.| -
RequestParam
- 사용할 값을 선택할 수 있음.
value: 키 값required: 필수 여부defaultValue: 기본값- JavaBena(DTO) 객체를 이용해서 전송할 수 있음.
@Controller
public class Controller{
	@GetMapping("/index")
    public String home(@RequestParam("name") String name, Model model){
    	model.addAttribute("msg", name);
    	return "index";
    }

    @GetMapping("/index2")
    public String home(@RequestParam(value="name", required=false) String name, Model model){
    	if(name != null) model.addAttribute("msg", name);
    	return "index";
    }

    @GetMapping("/index3")
    public String home(TestDto testDto, Model model){
    	model.addAttribute("dto", testDto);
    	return "index";
    }
}
4. View
◾View 지정
- Controller에서 처리 결과를 보여줄 View 이름이나 객체 리턴.
- DispatcherServlet은 View 이름이나 View 객체를 이용하여 View 생성.
- 명시적 지정.
- 자동 지정.
ViewResolver: 논리적 view와 실제 JSP 파일의 mapping- prefix + 논리뷰 + suffix
<!-- servlet-context.xml -->
<!-- Resolves views selected for rendering by @Controllers to .jsp resources in the /WEB-INF/views directory -->
<beans:bean class="org.springframework.web.servlet.view.InternalResourceViewResolver">
  <beans:property name="prefix" value="/WEB-INF/views/" />
  <beans:property name="suffix" value=".jsp" />
</beans:bean>
◾명시적 지정.
- ModelAndView와 String 리턴 타입
@Controller
public class Controller{
	@GetMapping("/index1")
    public ModelAndView hello1(){
    	ModelAndView mav = new ModelAndView("hello");
        return mav;
    }

    @GetMapping("/index2")
    public ModelAndView hello2(){
    	ModelAndView mav = new ModelAndView();
        mav.setViewName("hello");
        return mav;
    }

    @GetMapping("/index3")
    public ModelAndView hello3(){
        return "hello";
    }
}
◾View 자동 지정
- RequestToViewNameTranslator를 이용하여 URL로 부터 view 이름 결정.
- return type이 Model이나 Map인 경우.
- return type이 void이면서 ServletResponse나 HttpServletResponse 타입의 parameter가 없는 경우.
@Controller
public class Controller{
	@GetMapping("/index")
    public ModelAndView hello1(){
		Map<String, Object> model = new HashMap<String, Object>();
		return model;
    }
}
◾Redirect View
redirect:접두어를 붙여 redirect 사용 가능.
@Controller
public class Controller{
	@GetMapping("/index")
    public ModelAndView hello1(){
		return "redirect:index";
    }
}
5. Model
◾Model
- View에 전달하는 데이터
- @RequestMapping이 적용된 Map, Model, ModelMap
- @RequestMapping이 반환하는 ModelAndView
- @ModelAttribute 반환하는 객체
◾Model 주요 메서드
- Model addAttribute(String name, Object value)
- Model addAttribute(Object value)
- Model addAllAttributes(Collection<?> values)
- Model addAllAttributes(Map<String, ?> attributes)
- Model mergeributes(Map<String, ?> attributes)
- boolean containsAttribute(String name)
◾요청 URL 매칭
- 전체 경로와 Servlet 기반 경로 매칭.
- Default로 Context 내의 경로가 아닌 Servlet 경로를 제외한 나머지 경로에 대해 mapping
- @RequestMapping, @GetMapping, @PostMapping, ... 등을 이용하여 연결.
- @RequestMapping류의 추가설정
- Ant 스타일의 URI 패턴 지원
- ? : 하나의 문자열과 대치
- : 하나 이상의 문자열과 대치
- ** : 하나 이상의 디렉토리와 대치
- Ant 스타일의 URI 패턴 지원
- @PathVariable을 이용한 URI 템플릿 :
RESTful 방식- 형식 : 주소/../변수/..
@PathVariable("변수명") 파라미터_타입 파라미터명- 파라미터와 변수명이 동일한 경우 ("변수명") 생략 가능.
5. Spring Web MVC 동작 원리
◾실행 순서
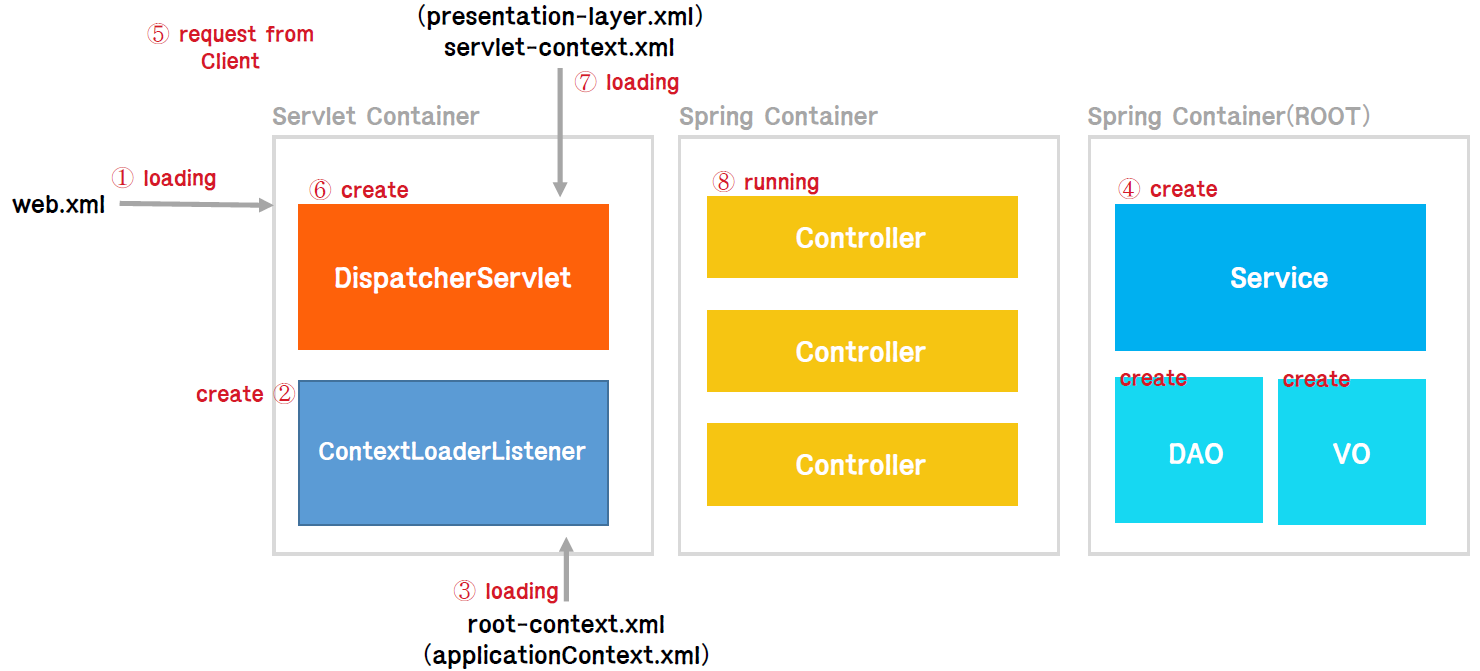
- 웹 어플리케이션이 실행되면 WAS에 의해 web.xml 로딩.
- web.xml에 등록되어 있는 ContextLoaderListener(Java Class)가 생성. ContextLoaderListener class는 ServletContextListener interface를 구현하고 있으며, ApplicationContext를 생성하는 역할 수행.
- 생성된 ContextLoaderListener는 root-context.xml 로딩.
- root-context.xml에 등록되어 있는 Spring Container 구동. Business Logic(Service)에 대한 부분과 Database Logic(DAO), VO 객체 생성.
- Client로 부터 요청(Request).
- DispatcherServlet(Servlet) 생성. DispatcherServlet은 FrontController 역할을 수행.
- Client의 요청을 분석하여 알맞은 PageController에게 전달하고 응답을 받아 요청에 따른 응답을 어떻게 할지 경정. 실질적인 장버은 PageController에서 이루어짐.
- 이러한 클래스들을 HandlerMapping, ViewResolver Class라고 한다.
- DispatcherServlet은 servlet-context.xml 로딩.
- 두번째 Spring Container가 구동되며 응답에 맞는 PageController들이 동작. 이 때 첫번째 Spring Container가 구동되면서 생성된 DAO, VO, Service 클래스들과 협업하여 알맞은 작업 처리.
