1. 드디어 TypeScript를 배우다!

2. TypeScript
1) 정의
'Type'이 있는 JS로, JS의 기본 문법에 자료형을 체크하는 기능을 추가한 것을 말한다.
JS가 자의적으로 type을 해석하고 코드를 실행시켰을 때 의도와 다른 방식으로 쓰이지 않도록 방지한다.
TS는 정적 파일 언어이며, 실행하지 않고도 코드 상의 에러를 알려준다.(실시간 디버깅)
2) 특징
TS는 JS의 Superset으로, JS에서 지원하지 않는 기능을 지원한다.
TS의 대표 기능은 다음과 같다.
- 엄격한 타입 관리(Strongly Typed)
- 제네릭(Generics)
- 인터페이스(Interface) 등등
① 트랜스파일러(Transpiler)
TS는 웹 브라우저에서 바로 해석될 수 없고, TS가 JS로 변환되어야 브라우저가 해석할 수 있다.
TS가 JS로 출력되기 때문에 트랜스파일러라고 부른다.

② Type과 함께 선언하는 TS
TS는 변수나 함수를 만들어줄 때 Type까지 명시해서 선언한다.
let 변수이름: 타입;- 문자 타입
let str: string = "hello"; - 숫자 타입
let num: number; - undefined 타입
let undif: undefined; - null 타입
let na: null = null; - 숫자로 이루어진 배열 타입
let nArr: number[] = [1, 2, 3, 4];- 위와 동일하나 표현 방법이 다른 코드
let nArr2: Array<number> = [1, 2, 3, 4];
- 위와 동일하나 표현 방법이 다른 코드
- 문자로 이루어진 배열 타입
let sArr: string[] = ["죠르디", "앙몬드"];- 위와 동일하나 표현 방법이 다른 코드
let sArr2: Array<string> = ["죠르디", "앙몬드"];
- 위와 동일하나 표현 방법이 다른 코드
- 한 배열에 여러 타입 : '|'은 or 같은 뜻이다. (number이거나 string이거나)
let numStrArr: (number | string)[] = [1, "죠르디", 2, "스카피"];- 위와 동일하나 표현 방법이 다른 코드
let numStrArr2: Array<number | string> = [1, "죠르디", 2, "스카피"]; - 위와 동일하나 표현 방법이 다른 코드2
let abc: number | string = "a";
 abc = 2;
- 위와 동일하나 표현 방법이 다른 코드
- 객체 타입
let obj: object = { name: "jordy", age: "999", gender: "?", }; - any : typescript에서 any를 사용하는 건 지양해야 한다.
any는 모든 자료형을 다 받을 수 있다.
let anyArr: any[] = [1, "죠르디", null, undefined, {}];
3) 사용 방법
① TS 설치
npm i typescript

// 설치 후 설치 잘 되었는지 확인
npx tsc -v // 버전이 나오면 정상적으로 설치된 것이다.
② tsconfig 파일 생성
npx tsc --init③ ts -> js 변환
npx tsc 파일명.ts웹 브라우저는 ts 파일을 읽을 수 없기 때문에 ts -> js 변환 과정이 필요하며, 실제 사용은 변환한 js 파일을 사용하면 된다. (node 파일명.js)
④ 변환 + 실행 자동화
ts 파일을 일일이 변환 후 js 파일을 실행해야 하는 번거로움을 해소해주는 ts-node 모듈을 설치한다.
// 설치
npm i ts-node

// 실행
npx ts-node 파일명.ts
4) TS Type
JS의 자료형에는 number, string, boolean, null, undefined, object가 있다. JS에 없는 TS의 type들을 알아보자.
① Tuple
JS의 배열과 같으나, 순서와 갯수가 정해져 있는 배열(요소의 길이와 타입 고정)이다.
일반 배열과 차이점은 각 타입에 모두 type을 지정해줘야 한다.
순서와 규칙이 있는 배열이 있다면 Tuple을 이용한다.
//Tuple : 각 배열의 element에 개별적으로 type을 선언한다.
let food: [string, number] = ["치킨", 29500];
food[0] = "피자"; // 의미: 0번째 element를 "피자"로 할당한다.

// food[2]="햄버거" -> 에러 발생! (2번째 element가 없음!)
// Tuple의 한계 :  위 처럼 할당하는 건 오류로 잡지만 push 메소드를 이용하면 오류를 잡지 않고, 실제로 값이 들어가기까지 한다.
food.push("aaaa");
console.log(food);- readonly : 읽기만 가능한 data type이다.
readonly로 만들어진 tuple은 데이터를 변경할 수 없다.
// readonly : 읽기만 가능한 data type!
let food2: readonly [string, number] = ["치킨", 29500];
// food2[0] = "피자"; -> 에러 발생! (읽기만 가능!)
② Enum(열거형)
값들에 미리 이름을 정의하고 사용하는 타입이다. (숫자 열거형, 문자 열거형 등)
JS의 오브젝트와 유사하나, 선언 이후로는 내용을 추가/삭제할 수 없다.
Enum의 value로는 문자/숫자만 허용된다.
-
숫자 열거형
열거형을 정의하며 멤버의 값을 초기화하지 않을 경우, 해당 멤버의 값은 0부터 순차적으로 증가하는 숫자 값을 갖는다.enum NINIZ { jordy, // 0 angmond, // 1 scapy, // 2 } let aaa: NINIZ = 2; // let aaaaa: NINIZ = 3; // error숫자 열거형으로 사용할 때, 개발자는 0,1,2를 사용하여 코드를 짤 수 있으나 개발자들 모두가 0,1,2가 각각 jordy, angmond, scapy를 의미하고 있다는 것을 외우고 있어야 한다는 한계점이 있다.
Enum의 문자열이나 숫자에 미리 의미를 지정해두고 그룹화할 수 있는 속성을 이용하여 위 한계점을 극복할 수 있다.
Enum으로 정의된 타입 'NINIZ'에 정의된 0,1,2 를 사용할 때 점 접근법으로 사용할 수 있다.console.log(NINIZ.jordy); // 출력 : 0 if (user !== NINIZ.jordy) { alert("죠르디만 들어갈 수 있습니다!"); } -
문자 열거형
숫자 열거형과 달리 문자열을 ‘자동 증가’ 시킨다는 개념은 성립하지 않는다.// ② 문자 열거형(String enums) enum NINIZ2 { jordy = "죠르디", angmond = "앙몬드", scapy = "스카피", } console.log(NINIZ2.jordy); // 출력: 죠르디
③ any
any는 모든 자료형을 다 받을 수 있다.
- 사용하는 경우
- 빈 배열을 먼저 선언할 때
- 받아오는 데이터 타입이 확실하지 않을 때
- 어떤 타입을 할당해야 할지 알지 못할 때
(외부 라이브러리를 사용하거나 동적 콘텐츠를 사용하는 경우)
하지만 정말 어쩔 수 없는 경우가 아니라면 any를 사용하는 건 지양해야 한다.
5) 사용자 정의 Type
Type 키워드로 복잡한 타입을 type alias(타입 별칭)을 정의한다. 즉, 사용자 정의 타입을 만들어 준다.
오브젝트뿐만 아니라 문자열이나 숫자로 제한을 둘 수 있다.
Type 만드는 방법 ex) type gender = "Men" | "Women";
// 특정 옵션값에 타입을 주는 방법 (|: or 의미)
type gender = "Men" | "Women";
const Nardy: gender = "Women";

// 많이 쓰일 것 같은 tuple은 미리 type으로 정의해둘 수 있다.
// [상품명, 가격]
type productInfo = [string, number];
const cola: productInfo = ["cola", 2500];
① interface
여러가지 오브젝트 타입을 정의하는 규칙이다.
interface 만드는 방법 ex)
interface Student {
	name: string;
   grade: number;
   studentID: number;
}
객체에 대한 Type을 지정할 경우 이름을 대문자로 지정하는 것이 관례이다.
대체로 객체는 'interface'를 사용하지만 'type'도 사용 가능하다!
interface ProductInfo2 {
  productName: string;
  price: number;
}

const cider: ProductInfo2 = { productName: "cider", price: 2500 };
// 미리 지정한 값이 아닌 걸 넣으면 아래와 같이 오류가 발생
// const cider: ProductInfo2 = {
//	productName: "cider",
//	price: 2500,
//	sale: 10
//}; // 오류 발생!
만약 optional한 자료형을 넣고 싶다면?
? 를 붙여서 적어도 되고 안적어도 되는(optional) 자료형을 만들어준다.
interface ProductInfo3 {
  productName: string;
  price: number;
  sale?: number; // undefined와 같은 의미라 생각하면 된다. sale이 있거나 없거나 라는 의미
}

const juice: ProductInfo3 = {
  productName: "juice",
  price: 3000,
  sale: 10
};
객체 안에 객체 자료형을 넣어야 한다면?(객체 안에 객체가 있는 경우)
interface Seller {
  name: string;
}

interface ProductInfo4 {
  productName: string;
  price: number;
  sale?: object;
  seller?: Seller;
}
Optional한 element를 선택하는 방법은?
옵셔널 체이닝(Optional chaining)을 사용하면 된다!
interface Seller {
  name: string;
}

interface ProductInfo4 {
  productName: string;
  price: number;
  sale?: object;
  seller?: Seller;
}

const beer: ProductInfo4 = {
  productName: "beer",
  price: 2500,
  seller: { name: JORODY },
};

console.log(beer.seller.name); // 오류 발생
// beer.seller -> seller는 optional한 key로 지정했기 때문에 값이 undefined도 될 수 있어 오류 발생!
// 그럼 해결하려면?  옵셔널 체이닝을 사용하면 된다.
console.log(beer.seller?.name); // 출력: undefined
interface 상속 (extends)
extends 를 사용해서 interface 상속를 시킬 수 있다.
interface Person {
  name: string;
  age: number;
  gender : string;
}

interface Student extends Person {
  studentID: string;
}
② Type VS interface
6) 함수에서의 Type 선언
선언시 타입을 설정하고, 호출할 땐 기존처럼 호출한다.
1. 매개 변수 타입 설정
2. 함수의 리턴 타입에 따라 함수 전체 타입 설정
(리턴 타입을 보고 타입을 추론할 수 있으므로 생략 가능하다.)
이미 알고 있는 타입 외에도 never와 void를 함수의 리턴 타입으로 설정 가능하다.
-
선언 방식
// 매개변수 a, b의 type 설정, 함수의 return type 설정 // 파라미터와 리턴 타입을 선언하는 기본 방식 function sum(a: number, b: number): number { return a + b ; } // 화살표 함수로 타입 선언 const sum = (a: number, b: number): number => { return a + b ; } // 리턴을 생략한 형태로 선언 const sum = (a: number, b: number): number => a + b ; // optional 매개변수 // b를 optional하게 하면 if를 사용해서 b값이 있을 때 작동하라고 지정해야 오류가 안남. const sum = (a: number, b?: number): number => { if (b) return a + b; return a; }; -
함수와 매개변수 갯수
- JS : 매개변수를 선언하고, 호출 시 parameter를 전달하지 않아도 오류 x
- TS : 매개변수를 2개 선언했다면, 호출했을 대 반드시 모든 값을 전달해줘야 함.
// JS function sum(a, b, c) { return a + b + c; } console.log(sum(1,2)); // 오류 발생 x // TS function sum(a:number, b:number, c:number) { return a + b + c; } console.log(sum(1,2)); // 2개의 parameter만 전달하여 오류 발생! // 만약, 세번째 매개변수인 c에게 값을 전달하지 않는 경우가 생기면? // '?'를 이용해 undefined가 될 수도 있음을 정의하면 된다! function sum(a:number, b:number, c?:number) { console.log(a); console.log(b); console.log(c); } print(1,2) -
오버로딩 : 함수의 이름이 같으나, 형태(매개변수, 반환값 등)가 다른 함수를 말한다.
-
JS : 오버로딩될 때 함수이름이 같은 함수 중 아래에 선언된 함수가 덮어쓰기되어 작동한다.
-
TS : 함수의 오버로딩을 할 수 있게됨.
function hihi(numb: number, numb2: number): void;
 function hihi(str: string, str2: string): string;

 function hihi(param: any, param2: any) {
  console.log(param);
  console.log(param2);
  return param;
}

 hihi(1, 2);
 hihi("hi", "world");
-
① void
void의 뜻은 '비어있다'로, 함수의 리턴 타입이 없을 때 사용한다.
리턴이 없는 함수는 void로 설정할 수 있다.
// void 함수 자체의 return 값이 없을 때 사용
const hello = (): void => {
  console.log("hello");
};

interface Calculator {
  sum: (a: number, b: number) => number;
  sub?: () => void;
}

const calc: Calculator = {
  sum: sum,
};
② never
어떤 조건에서도 함수의 끝에 도달할 수 없을 때 사용한다.
function goingOn(): never {
  while (true) {
    console.log("go");
  }
}
7) 함수와 generic <t>
① Generic
클래스, 함수, 인터페이스에서 다양한 타입으로 재사용이 가능하다.
선언할 때는 타입 파라미터만 명시하고, 생성 시점에 사용할 타입을 결정한다.
즉, 함수를 호출할 때 데이터 타입을 지정할 수 있는 문법이다.
-
선언 및 호출
// 선언
function arrLength<T>(arr:T[]):number{
	return arr.length
}
// 선언할 때 'T'라는 자료형을 쓰겠다는 의미고, 대부분 T로 쓰는게 관례다.

// 함수 호출
arrLength<string>(["a"])
arrLength<number>([1, 2, 3, 4])
// 함수를 호출할 때 매개변수로 들어갈 데이터 타입을 설정한다.
// 타입을 함수의 파라미터처럼 사용할 수 있다.
x,y에 숫자랑 문자 둘다 정의하려면??
-
방법1 : 오버 로딩 사용
function printXY(x: number, y: number): void; function printXY(x: string, y: string): void; function printXY(x: number | string, y: number | string) { console.log(x, y); } printXY(1, 2); -
방법2 : OR 사용
function printXY(x: number | string, y: number | string) { console.log(x, y); } printXY(1, 2); -
방법3 : 각각 number, string 함수 따로 선언
function printXY(x: number, y: number) { console.log(x, y); } printXY(1, 2); function strPrintXY(x: string, y: string) { console.log(x, y); } printXY("a", "b"); -
방법4 : Generic 사용
// 선언할 때 'T'라는 자료형을 쓰겠다는 의미고, 대부분 T로 쓰는게 관례
function printXYByGeneric<T>(x: T, y: T) {
 console.log(x, y);
}
printXYByGeneric<string>("a", "b");
printXYByGeneric<number>(1, 2);
배열 안에 숫자와 문자 length를 구하고 싶다면?
function numArrLength(arr: number[]): number {
  return arr.length;
}
// // 위 함수선언식으로 쓴걸 함수 표현식으로 쓰면 아래와 같음. 같은 코드임!
// const numArrLength = (arr: number[]): number => arr.length;

function strArrLength(arr: string[]): number {
  return arr.length;
}
만약 객체 배열, 이 외 다른 type의 배열도 length를 구하는 함수를 만들고 싶다면?
function arrLength<T>(arr: T[]): number {
  return arr.length;
}
arrLength<string>(["a", "b"]);
다른 종류의 문자형을 쓰는 경우는?
function exampleGeneric<T, U>(x: T, y: U) {
  console.log(x, y);
}
exampleGeneric<string, number>("a", 1);
let a: string[];
let b: Array<string>;
interface에서 generic 활용하는 법
interface Phone<T> {
  company: string;
  model: string;
  option: T;
}

interface SamsungOption {
  line: string;
  price: number;
}

const galaxyS23: Phone<SamsungOption> = {
  company: "samsung",
  model: "galaxy S23",
  option: {
    line: "Ultra",
    price: 18000000,
  },
};

interface AppleOption {
  line: string;
  price: number;
}

const iphone15: Phone<AppleOption> = {
  company: "apple",
  model: "iphone 15",
  option: {
    line: "Pro",
    price: 18000000,
  },
};
8) React with TypeScript
① 프로젝트 만들기
npm i create-react-app 프로젝트명 --template typescript💡 기존 프로젝트에 TypeScript를 적용하고 싶다면?
1. 모듈을 설치한다.
npm i typescript @types/node @types/react @types/react-dom @types/jest
2. js, jsx 파일 -> ts, tsx파일로 변경한다.
3. tsconfig.json파일
② props와 interface
props를 이용해서 데이터를 상위 컴포넌트에 받을 때는 props가 어떤 형태로 넘어오는지 type을 미리 적어둬야 한다.
// js을 사용한 react에서 props를 받아올 때

function PropsType1({ name }) {
	return (
      <>
        <h2>Hi {name}</h2>
      </>
    );
}

// TypeScript를 사용한 react에서 props를 받아올 때

interface Props {
  name: string;
}

function PropsType1({ name } : Props) {
	return (
      <>
        <h2>Hi {name}</h2>
      </>
    );
}
하위 컴포넌트에서 정의된 props가 상위 컴포넌트에서 사용되지 않아도, 타입스크립트는 그 props가 상위 컴포넌트에도 계속 제공되어야 한다고 요구하며 오류 메시지를 띄운다.
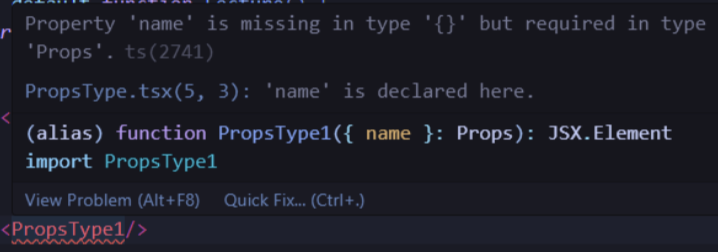
만약 넘겨주고 싶지 않은 props가 있다면 ?를 이용한다.

TypeScript를 사용할 때, 하위 컴포넌트의 props 타입 정의에 따라 필수적으로 제공해야 할 props와 선택적으로 제공할 수 있는 props가 결정되는데, 필수 props는 반드시 제공해야 하며, 선택적 props는 제공하지 않아도 된다.
컴포넌트의 props는 실제로 사용되는 것들만 포함되어야 하며, 사용되지 않는 props는 optional(?)을 사용하여 넘겨주지 않는 것이 바람직하다!
③ useState generic<T>
TypeScript는 useState의 초기값 type을 자동으로 유추하여 잘 해석한다.
즉, useState를 사용할 때 generic을 쓰지 않아도 괜찮다!
const [count, setCount] = useState<number>(0);
const [text, setText] = useState<string>('');
// 위와 같이 generic으로 초기값에 대한 type을 설정해주지 않아도,
// TypeScript는 알아서 잘 유추하여 해석한다!
state의 값이 null일 수도 있고 아닐 수도 있을 때, 반드시 generic으로 union type을 전달한다.
interface Data { name:string; age: number;}
const [data, setData] = useState<null | Data>(null)
④ useRef generic<T>
- 값 저장 : 초기값에 대한 type을 generic으로 작성해야 한다.
const refVal = useRef<number>(0) - DOM 접근 : DOM 객체에 접근하기 위한 useRef의 generic에는 type에 HTMLElement 타입을 이용한다.
const ref = useRef<HTMLInputElement>(nyll);
⑤ event 객체의 type
-
onClick, onDrag, .. (click과 관련된 event 객체)
const handleClick = (e: React.MouseEvent<HTMLButtonElement>) => {
 console.log("Button clicked", e.currentTarget);
};

<button onClick={handleClick}>클릭버튼</button>
💡 React. 로 시작하는 코드?
React.으로 시작하는 코드는 React 라이브러리의 일부분을 참조하는 것을 의미한다. React.~ 를import { ~ } form "react"로 적어도 된다.import { MouseEvent } from "react" const handleClick = (e: MouseEvent<HTMLButtonElement>) => { console.log("Button clicked", e.currentTarget); }; // 위 코드와 아래 코드는 같은 코드이다. const handleClick = (e: React.MouseEvent<HTMLButtonElement>) => { console.log("Button clicked", e.currentTarget); }; -
onChange
import { ChangeEvent } from "react" const handleChange = (e: ChangeEvent<HTMLInputElement>) => { console.log("Input value changed", e.target.value); }; <input type="text" onChange={handleChange} /> -
onSubmit
import { FormEvent } from "react" const handleSubmit = (e: FormEvent<HTMLFormElement>) => { e.PreventDefault(); // HTML 폼 제출 시 새로고침, 데이터 전송 방지 console.log("Form submitted") }; <form onSubmit={handleSubmit}> <button type="submit">제출</button> </form> -
onKeydown, onKeyup, .. (keyboard 이벤트와 관련된 event 객체)
import { KeyboardEvent } from "react"
 const handleKeyPress = (e: KeyboardEvent<HTMLInputElement>) => {
   if (e.key === 'enter') {
      console.log("Enter key pressed")
   }
 };
<input type="text" onKeyPress={hangleKeyPress} />
그때그때 사용하는 event 객체의 type을 인터넷에 검색해서 사용하면 된다.
4. 마치며
말로만 듣던 typescript를 배워서 신기하고 좋았는데.. 막상 이걸 내가 직접 쓸 생각을 하니 좀.. 막막하다. 흑흑... 그리고 역시 나는 파일들을 구조화하기 시작하면 멘붕이 시작된다. React에 TypeScript 적용하자마자 바로 멘붕😵
거기에 구조화까지 함께하니 아주 대환장 파티였다... 이걸 내가 능수능란하게 구조화하고 하는 그 날이 과연 올까.....😢
💻 본 글은 새싹X코딩온 풀스텍 웹 개발자 과정 수업과 수업자료를 참조하여 작성하였습니다.