1. Basic React + Typescript + Webpack5
Structure Looks like...
project
	- build / 정적인 폴더 리액트 파일 -> 번들 (webpack) -> 트랜스퍼 (babel) 해서 만들 페이지
	- src / 리액트 소스 파일들 넣을 폴더
		| App.tsx
		| index.tsx
		| index.html
	- .babelrc / babel 설정 파일
	- .package.json / package 관리 파일
	- .tsconfig.json / typescript 설정 파일
초기설정
mkdir <projectName>
cd <projectName>
npm init --y // create package.json
yarn add react react-dom
yarn add -D typescript @types/react @types/react-dom
tsc --init // create tsconfig.json
yarn add -D @babel/core @babel/preset-env @babel/preset-react @babel/preset-typescript
yarn add -D webpack webpack-cli webpack-dev-server html-webpack-plugin
yarn add -D babel-loader
Babel 이란?
자바스크립트 컴파일러
왜 인터프리터 언어에 컴파일러가 필요하지? 라는 의문이 들 수 있다.
정확히 바벨은 javascript 로 결과물을 만들어주는 컴파일러이다. 혹은 소스 투 소스 컴파일러 (transpiler) 라고도 부른다.
그렇다면, Babel 은 왜! 필요한가. 현재 프론트엔드의 시장 및 발전은 너무 빠르다. 심지어 최신 브라우저 조차도 지원하지 못하는 문법과 여러 기술들이 난무한다. (es5, es6, ESNext!!!! ESNext and Legacy...)
이러한 새로운 ESNext 의 문법을 기존 브라우저에 사용하기 위해서 Babel 은 필수적이다.
결론, Babel 은 javascript 의 새로운 문법을 지원하는 혹은 안하는 브라우저 간의 호환을 돕기 위한 트랜스파일러이다.
참고 : https://bravenamme.github.io/2020/02/12/what-is-babel/
-
.babelrc 설정
{
  "presets": [
    "@babel/preset-env",
    [
      "@babel/preset-react",
      {
        "runtime": "automatic"
      }
    ],
    "@babel/preset-typescript"
  ],
  "plugins": [
    [
      "@babel/plugin-transform-runtime",
      {
        "regenerator": true
      }
    ]
  ]
}
yarn add -D @babel/core @babel/preset-env @babel/preset-react @babel/preset-typescript@babel/preset-env : ES5+ 를 변환할 때 사용한다.
@babel/preset-react : React 를 변환할 때 사용한다.
@babel/preset-typescript : Typescript 를 변환할 때 사용한다.
@babel/plugin-transform-runtime
babel-polyfill
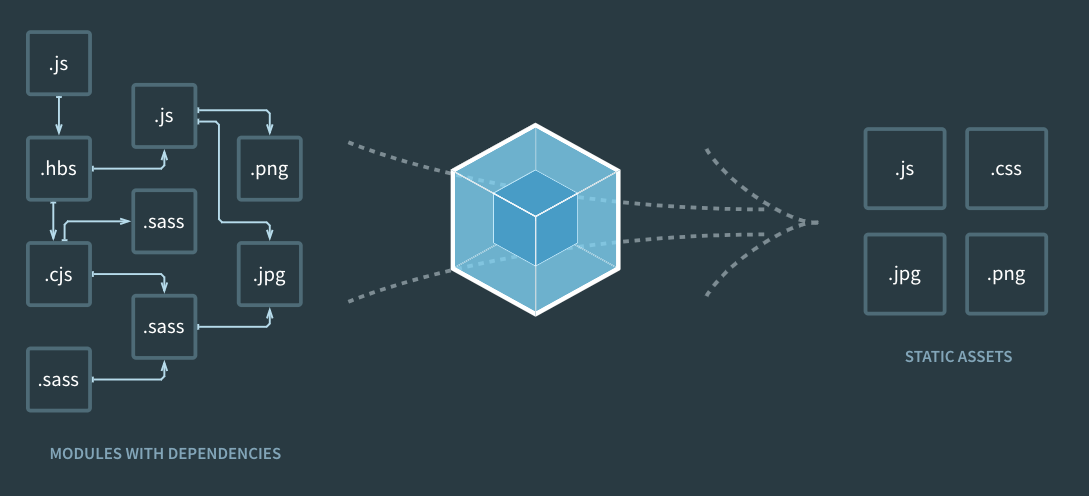
Webpack 이란?
자바스크립트 모듈 번들러
규모 있는 시스템에서는 많은 자바스크립트 파일이 존재한다. 이 많은 자바스크립트 파일을 관리하기에는 어려움이 있고, 서버와의 통신 양이 많아짐으로 인한 네트워크 비용 지출 및 반응속도 느려짐의 이슈가 있다.
이러한 문제를 해결하기 위해 javascript Bundler 가 탄생하게 되었다.
자바스크립트 번들러 중 가장 인기 있는 번들러는 Webpack 이다. 그 이유는 번들러들 중 퍼포먼스가 가장 우수하기 때문이다.
-
Webpack Core Concept
Entry
-
dependency graph를 만들기 위해 필요한
Input Source이다. -
직/간접적으로 의존성을 가진 모듈들을 이해한다.
-
여러개의
entry가 존재할 수 있다. -
Default:
./src/index.jsmodule.exports = { entry: './path/to/my/entry/file.js' };Output
-
Webpack 이 생성한 bundles 의 결과물의 위치를 지정할 수 있다.
-
Default:
./dist/main.jsconst path = require('path'); module.exports = { entry: './path/to/my/entry/file.js', output: { path: path.resolve(__dirname, 'dist'), filename: 'my-first-webpack.bundle.js' } };Loaders
-
Webpack 은 오직 Javascript 와 Json 만 이해할 수 있다.
-
Loader와 다른 Type의 파일을 Webpack 이 이해하고 처리가능한 모듈로 변환시키는 작업을 담당
const path = require('path');

module.exports = {
  output: {
    filename: 'my-first-webpack.bundle.js'
  },
  module: {
    rules: [
      { test: /\.txt$/, use: 'raw-loader' }
    ]
  }
};
Plugins
-
Loader가 변환하는 동안 Plugin은 번들 최적화, 어셋 관리, 환경 추가 등의 일을 진행 할 수 있다.
const HtmlWebpackPlugin = require('html-webpack-plugin'); //installed via npm
const webpack = require('webpack'); //to access built-in plugins

module.exports = {
  module: {
    rules: [
      { test: /\.txt$/, use: 'raw-loader' }
    ]
  },
  plugins: [
    new HtmlWebpackPlugin({template: './src/index.html'})
  ]
};
Mode
-
다양한 Profile로 지정하여 진행할 수 있다.
-
development, production, none
-
Default:
productionmodule.exports = { mode: 'production' };Browser Compatibility
-
웹팩은 ES5를 사용하는 모든 브라우저를 지원한다. 단 IE8아래의 버전은 지원하지 않는다.
참고: https://webpack.jakoblind.no/ / https://nesoy.github.io/articles/2019-02/Webpack
-
-
webpack/webpack.config.js
const path = require("path");
const HtmlWebpackPlugin = require("html-webpack-plugin");

module.exports = {
  entry: path.resolve(__dirname, "..", "./src/index.tsx"),
  resolve: {
    extensions: [".tsx", ".ts", ".js"],
  },
  module: {
    rules: [
      {
        test: /\.(ts|js)x?$/,
        exclude: /node_modules/,
        use: [
          {
            loader: "babel-loader",
          },
        ],
      },
      {
        test: /\.css$/,
        use: ["style-loader", "css-loader"],
      },
      {
        test: /\.(?:ico|gif|png|jpg|jpeg)$/i,
        type: "asset/resource",
      },
      {
        test: /\.(woff(2)?|eot|ttf|otf|svg|)$/,
        type: "asset/inline",
      },
    ],
  },
  output: {
    path: path.resolve(__dirname, "..", "./build"),
    filename: "bundle.js",
  },
  plugins: [
    new HtmlWebpackPlugin({
      template: path.resolve(__dirname, "..", "./src/index.html"),
    }),
  ],
  mode: "development",
  stats: "errors-only",
};
yarn add -D webpack webpack-cli webpack-dev-server html-webpack-plugin
yarn add -D babel-loaderTo Run React App using Webpack
package.json scripts start
webpack serve --config webpack/webpack.config.js --open2. Webpack 설정 및 Typescript 로 이미지 렌더링하기
Asset Modules
에셋 모듈은 로더를 추가로 구성하지 않아도 에셋 파일(폰트, 아이콘 등)을 사용할 수 있도록 해주는 모듈이다.
Webpack 을 통해 css 파일 로드하기
웹팩은 따로 모듈을 설치해주지 않으면 css 파일을 로드 하지 못한다. 아래와 같이 에러가 나옴.

우리는 이 문제를 해결하기 위해 아래의 패키지 로더를 다운로드 받아준다.
yarn add -D css-loader style-loader그리고 webpack/webpack.config.js 에 들어가서
module: {
    rules: [
      {
        test: /\.(ts|js)x?$/,
        exclude: /node_modules/,
        use: [
          {
            loader: "babel-loader",
          },
        ],
      },
      {
        test: /\.css$/,
        use: ["style-loader", "css-loader"],
      }
css 파일들에 따른 로더를 추가 해준다.
Webpack을 통해 img / svg / font 로드하기
그냥 root 파일에서 이미지를 로드하면

이런 타입스크립트 에러가 난다.
이를 해결하기 위해 루트에 declarations.d.ts 파일을 생성한 후
declare module "*.png";
declare module "*.svg";
를 추가해준다.
-
*.d.ts파일이란?타입스크립트 선언 파일
d.ts는 타입스크립트 코드의 타입 추론을 돕는 파일이다. 예를 들어, 전역 변수로 선언한 변수를 특정 파일에서import구문 없이 사용하는 경우 해당 변수를 인식하지 못한다. 그럴 때 아래와 같이 해당 변수를 선언해서 에러가 나지 않게 할 수 있다.declare module declare function declare class declare global declare plugin declare namespace
webpack.config.js
module: {
	rules: [
		...rules,
		{
        test: /\.(?:ico|gif|png|jpg|jpeg)$/i,
        type: "asset/resource",
      },
      {
        test: /\.(woff(2)?|eot|ttf|otf|svg|)$/,
        type: "asset/inline",
      }
	]
}
Asset Module 를 추가해준다.
3. Webpack dev / prod 모드 설정하기
Webpack 은 상황에 따른 개발을 위해 mode 를 지원하고 있다.
mode 에는 development , production , none 을 지원한다.
Devtool
devtool 옵션은 소스맵 생성 여부와 방법을 제어한다. 이를 이용하여 모드를 제어 할 수도 있다.
-
webpack.common.js
const path = require("path"); const HtmlWebpackPlugin = require("html-webpack-plugin"); module.exports = { entry: path.resolve(__dirname, "..", "./src/index.tsx"), resolve: { extensions: [".tsx", ".ts", ".js"], }, module: { rules: [ { test: /\.(ts|js)x?$/, exclude: /node_modules/, use: [ { loader: "babel-loader", }, ], }, { test: /\.css$/, use: ["style-loader", "css-loader"], }, { test: /\.(?:ico|gif|png|jpg|jpeg)$/i, type: "asset/resource", }, { test: /\.(woff(2)?|eot|ttf|otf|svg|)$/, type: "asset/inline", }, ], }, output: { path: path.resolve(__dirname, "..", "./build"), filename: "bundle.js", }, plugins: [ new HtmlWebpackPlugin({ template: path.resolve(__dirname, "..", "./src/index.html"), }), ], stats: "errors-only", }; -
webpack.dev.js
const webpack = require('webpack') module.exports = { mode: "development", devtool: "cheap-module=source-map", plugins: [ new webpack.DefinePlugin({ 'process.env.name': JSON.stringify('Chloek') }) ] } -
webpack.prod.js
module.exports = { mode: "production", devtool: "source-map", }; -
webpack.config.js
const { merge } = require('webpack-merge');
const commonConfig = require('./webpack.common.js')

module.exports = (envVars) => {
	const { env } = envVars;
	const envConfig = require(`./webpack.${env}.js`);
	const config = merge(commonConfig, envConfig);
	return config;
}
yarn add -D webpack-merge위에 패키지를 이용하여 common.js 를 dev 와 prod 에 다 적용할 수 있다.
package.json
"start": "webpack serve --config webpack/webpack.config.js --env env=dev --open",
"build": "webpack --config webpack/webpack.config.js --env env=prod",
Development Mode

Production Mode