
도입
바텀 네비게이션 바는 앱 전체에 사용되는 전역 컴포넌트이다. 그렇다고 모든 페이지마다 같은 컴포넌트를 직접 넣는건 너무 불편한 일이다. 공식문서 에 나와있는 대로 전체 레이아웃을 잡았다.
[인스타그램 예시]
AppLayout 구현
먼저 바텀 네비게이션을 적용했을때의 레이아웃 구성을 잡아보자.
아래와 같이 MainComponent와 BottomNavBar 를 분리시켜 서로 침범하지 않도록 한다.

const AppLayout = ({ children }: AppLayoutProps) => {
  return (
    <Layout>
      <MainComponent>
        {children}
      </MainComponent>
      <BottomNavBar
        addModalState={addModalState}
        setAddModalState={setAddModalState}/>
    </Layout>
  );
};
GlobalStyle 적용
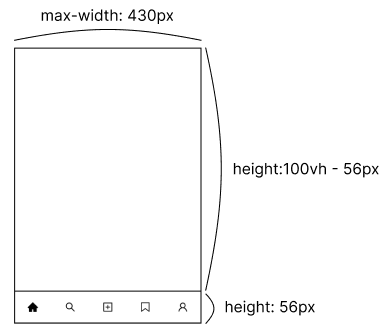
우리 서비스의 BottomNavBar의 높이는 56px로 고정하기로 했다.
또한 웹뷰 이기때문에 모바일 환경을 고려해 가로 최대 길이는 430px로 제한을 두기로 했다.
styled-component의 GlobalStyle을 활용해 최대 길이를 설정해주었다.
 body, html {
     height: 100vh;
     max-width: 430px;
     margin: 0 auto;
 }
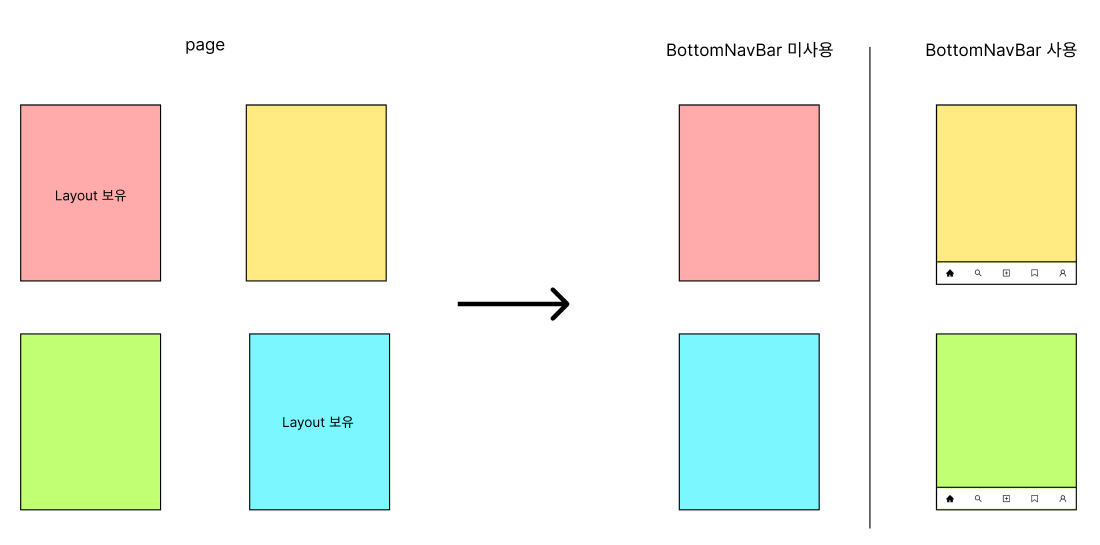
per page layout 적용
_app.tsx페이지에서 디폴트 레이아웃을AppLayout으로 지정한다.- 페이지에
Layout이 존재한다면 해당Layout을 사용하고 없다면 디폴트 레이아웃을 사용한다. - 만약
BottomNavBar를 사용하지 않는 페이지일 경우Layout설정을 해준다.
import AppLayout from '../AppLayout';

type NextPageWithLayout = NextPage & {
  Layout?: React.FC;
};
type AppPropsWithLayout = AppProps & {
  Component: NextPageWithLayout;
};

export default function App({ Component, pageProps }: AppPropsWithLayout) {
    const Layout = Component.Layout || AppLayout;

    return (
      <Layout>
        ...
        <Component {...pageProps} />
      </Layout>
    )
}
BottomNavBar 구현

요구사항
해당 페이지로 이동하는 경우 빈 아이콘에서 검정색으로 채워진 아이콘으로 변경한다.
const icons = [
  <AiOutlineHome />,
  <AiOutlineSearch />,
  <AiOutlinePlusSquare />,
  <BookmarkOutlined />,
  <AiOutlineUser />,
];

const activeIcons = [
  <AiFillHome />,
  <SearchFilled />,
  <FilledSquare />,
  <BookmarkFilled />,
  <UserFilled />,
];

const myId = useRecoilValue(userId);

const routes = [
    '/main/explore',
    '/search',
    '/plus',
    '/bookmark',
    `/mypage/${myId}`,
  ];

// 현재 url에 해당하는 인덱스 번호 반환
const getActiveIndex = () =>
    routes.findIndex((route) => path.includes(route));

const activeIndex = getActiveIndex();

const [bottomNavBarLinkers, setBottomNavBarLinkers] =
    useState<BottomNavBarType[]>();

//현재 url에 해당하는 인덱스의 아이콘은 active 상태로 바꾼다.
useEffect(() => {
    const newLinkers = icons.map((icon, index) => ({
      icon: index === activeIndex ? activeIcons[index] : icon,
      click: () => {
        router.push(routes[index]);
        setAddModalState(false);
      },
    }));
    setBottomNavBarLinkers(newLinkers);
}, [router, activeIndex]);

return (
  <BottomComponent>
    {bottomNavBarLinkers &&
        bottomNavBarLinkers.map((item, index) => {
          (
           <Link key={index} href={routes[index]}>
              <BottomComponentItem onClick={item.click}>
                {item.icon}
              </BottomComponentItem>
            </Link>
          )
        }}
  </BottomComponent>
)
정리
오늘은 전체적인 앱 라이아웃 잡기와 바텀 네비게이션에 대해 알아보았다.
next.js와React에서의 방식은 다를 수 있다.
이전 프로젝트에서는React의Outlet을 사용했었다.
자신의 기술스택과 맞는 방법을 찾기를 바란다.