인프런 강의 < 스프링 입문 - 코드로 배우는 스프링 부트, 웹 MVC, DB 접근 기술 > 정리
프로젝트 생성
- start.spring.io에 접속한다.
- Gradle: 요즘 추세
- Metadata
- Artifact: build의 결과물, project 이름
- Dependencies
- 어떤 라이브러리를 쓸 것인지 선택
- 설정된 프로젝트의 압축을 푼다.
- intelliJ로 해당 폴더의 gradle 파일을 클릭하여
Open as project로 연다.
라이브러리
- 스프링 부트 라이브러리
- spring-boot-starter-web
- spring-boot-startertomcat: 웹서버
- webmvc: 스프링 웹 mvc
- spring-boot-starter-thymeleaf: 타임리프 템플릿 엔진(View)
- spring-boot-starter: 스프링 부트 + 스프링 코어 + 로깅
- spring-boot
- spring-core
- spring-boot-starter-logging
- logback, slf4j
- spring-boot
- 테스트 라이브러리
- spring-boot-starter-test
- junit: 테스트 프레임워크
- mockito: 목 라이브러리
- assertj: 테스트 코드용 라이브러리
- spring-test: 스프링 통합 테스트 지원
기본적인 Web page 생성
- 동적페이지 생성
- main/java에 컨트롤러 생성
- main/resources/template에서 html 생성
@Controller
public class HelloController {
 @GetMapping("hello")
 public String hello(Model model) {
 model.addAttribute("data", "hello!!");
 return "hello"; // template에 있는 hello.html을 찾아서 데이터를 넘긴다.
 }
}
<!DOCTYPE HTML>
<html xmlns:th="http://www.thymeleaf.org">
<head>
<title>Hello</title>
<meta http-equiv="Content-Type" content="text/html; charset=UTF-8" />
</head>
<body>
<p th:text="'안녕하세요. ' + ${data}" >안녕하세요. 손님</p> // data가 치환됨
</body>
</html>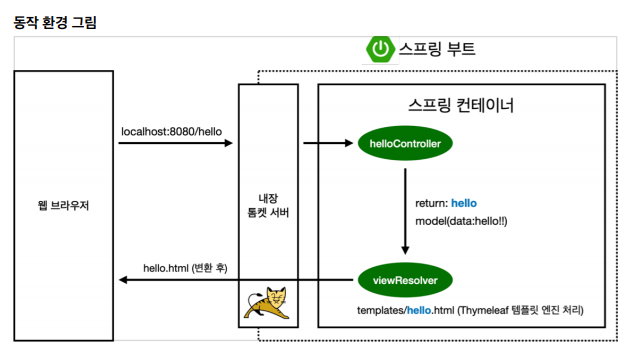
빌드 및 실행
- 해당 디렉토리에서
Git bash창 띄움 ./gradlew build입력해서 빌드cd/build/libs디렉토리 이동 후,java -jar hello-spring-0.0.1-SNAPSHOT.jar로 실행./gradlew build입력하면build디렉토리 삭제
- http://localhost:8080에서 확인.
< 자료 출처: 스프링 입문 - 코드로 배우는 스프링 부트, 웹 MVC, DB 접근 기술 >

💻Backend Developer