CloudNet@에서 진행하는 Istio Study 8주차 13장 내용입니다.
📕 This chapter cover
- Incorporating legacy workloads into Istio’s service mesh
- Installing and configuring the istio-agent in VMs
- Provisioning identity for VMs
- Exposing cluster services to VMs, and vice versa
- Using the local DNS proxy to resolve FQDNs of cluster services
실습 환경 구성
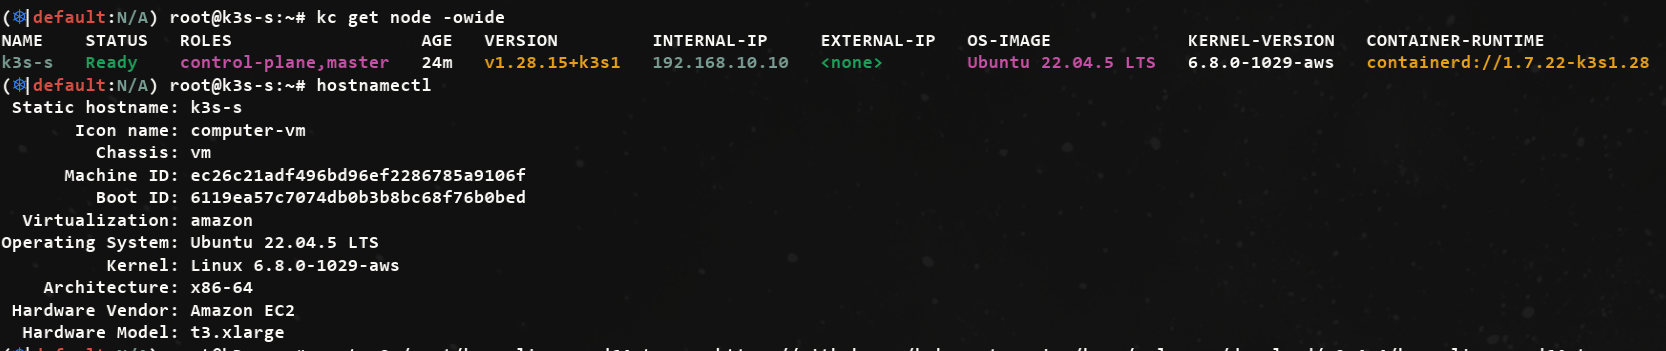
온프레미스 kind가 아닌 AWS EC2를 배치하여, k3s로 테스트 환경을 구성합니다.
# 리소스 목록
- VPC 1개
- EC2 2대
- k3s (t3.xlarge - 4/16)
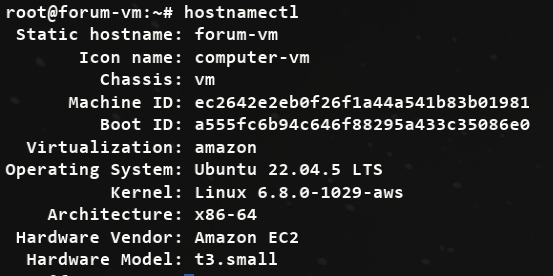
- forum-vm (t3.small - 2/2)
CloudFormation으로 구성
-> istio-8w.yaml 활용
- istio-8w.yaml
AWSTemplateFormatVersion: '2010-09-09'

Metadata:
  AWS::CloudFormation::Interface:
    ParameterGroups:
      - Label:
          default: "<<<<< Deploy EC2 >>>>>"
        Parameters:
          - KeyName
          - SgIngressSshCidr
          - MyInstanceType
          - LatestAmiId

      - Label:
          default: "<<<<< Region AZ >>>>>"
        Parameters:
          - TargetRegion
          - AvailabilityZone1
          - AvailabilityZone2

      - Label:
          default: "<<<<< VPC Subnet >>>>>"
        Parameters:
          - VpcBlock
          - PublicSubnet1Block
... 중략-
k3s 설치
-
forum-vm 설치
13.1 Incorporating virtual machine workloads into the mesh
13.1.1 Simplifying sidecar proxy installation and configuration in a VM
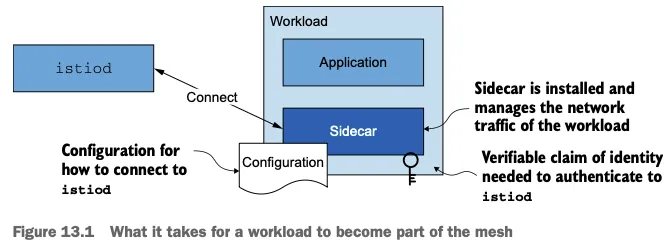
가상머신이 Mesh의 일부가 되기위한 작업
- 네트워크 트래픽을 관리할 사이드카 프록시 설치
- 프록시가 istiod에 연결해 메시 설정을 받도록 설정
- istiod에 인증하는 데 사용할 ID 토큰을 가상머신에 제공
전제 조건
쿠버네티스도 웹훅이나 istioctl이 자동으로 사이드카를 설치하고 설정, ID 토큰을 주입한다.
그러나 이런 편의성은 클러스터 외부 워크로드에는 확장되지 않으므로, 직접 작업이 필요합니다.
13.1.2 Virtual machine high availability
- 쿠버네티스는 다음 리소스로 고가용성을 달성한다.
- 디플로이먼트 Deployment : 고수준 리소스로, 복제본이 어떻게 만들어져야 하는지에 대한 설정을 담고 있다.
- 파드 Pod : 위 설정으로 만든 복제본이다. 이렇게 하면 파드에 고유한 부분이 없다는 것이 보장되므로 파드가 정상이 아닐 때마다 폐기하고 갈아치울 수 있다(혹은 불필요 할 때 줄일 수 있다). 그렇게 서비스 가용성을 유지 가능하다.
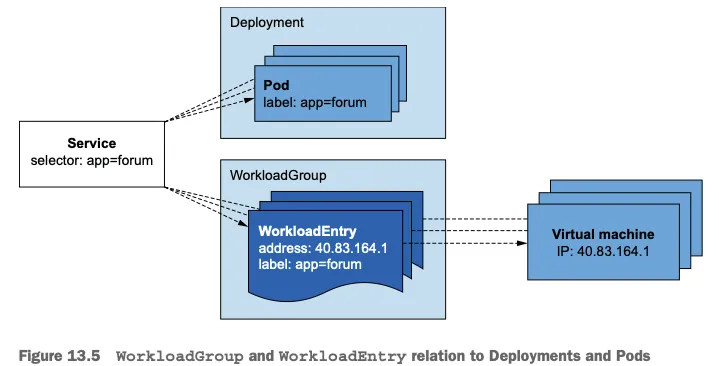
- Istio가 가상머신에 도입하는 리소스는 쿠버네티스의 디플로이먼트 및 파드 개념과 흡사
- WorkloadGroup 리소스는 쿠버네티스의 디플로이먼트와 유사
- 관리하는 워크로드를 설정하는 방법에 대한 템플릿을 정의
- 서비스 어카운트, 애플리케이션 상태 프로브 Probe 방법
- WorkloadEntry 리소스는 쿠버네티스의 파드와 유사
- WorkloadEntry는 최종 사용자 트래픽을 처리하는 개별 가상머신을 나타냄
- WorkloadEntry는 인스턴스의 상태와 주소 속성도 소유
- WorkloadGroup 리소스는 쿠버네티스의 디플로이먼트와 유사
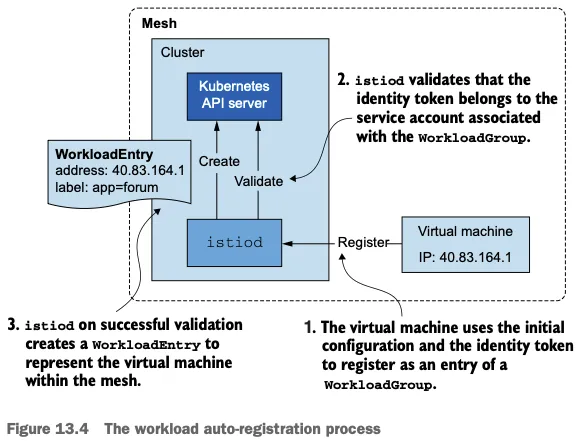
워크로드 자동 등록 이해하기
-
워크로드를 자동 등록하는 동안, 워크로드는 제공받은 설정을 사용해 컨트롤 플레인에 연결하고 ID 토큰으로 자신이 WorkloadGroup의 일원임을 인증합니다.
-
컨트롤 플레인은 메시에서 가상머신을 나타내는 WorkloadEntry를 생성한ㄷ.
-
쿠버네티스 서비스나 이스티오 ServiceEntry 리소스가 레이블 셀렉터로 워크로드를 선택해 트래픽을 라우팅할 백엔드로 사용할 수 있다.
-
실제 주소가 아니라 쿠버네티스 서비스(즉, 클러스터 내의 FQDN)로 워크로드를 선택하면, 클라이언트 측에 대한 별다른 지식이나 영향 없이도 정상적이지 않은 워크로드를 폐기하거나 늘어난 수요에 맞추기 위해 새 워크로드를 쉽게 띄울 수 있다.
-
아래 그림은 어떻게 서비스를 사용해 WorkloadEntry와 파드를 겨냥할 수 있는지 보여준다.
이스티오가 수행하는 헬스 체크 이해하기
- 워크로드가 서비스 메시의 일부가 되고 나면, 트래픽을 받을 준비가 돼야 하며 헬스 체크로 검사받는다.
- 서비스의 고가용성을 유지하려면 두 가지 헬스 체크가 필요하다 (쿠버네티스가 헬스 체크하는 방식과 비슷).
- readiness 프로브는 워크로드가 시작된 후 트래픽을 수신할 준비가 됐는지 확인한다.
- liveness 프로브는 애플리케이션이 실행 중일 때 정상인지 확인한다. 정상이 아니면 재시작해야 한다.
가상 머신은 liveness가 필요없다.
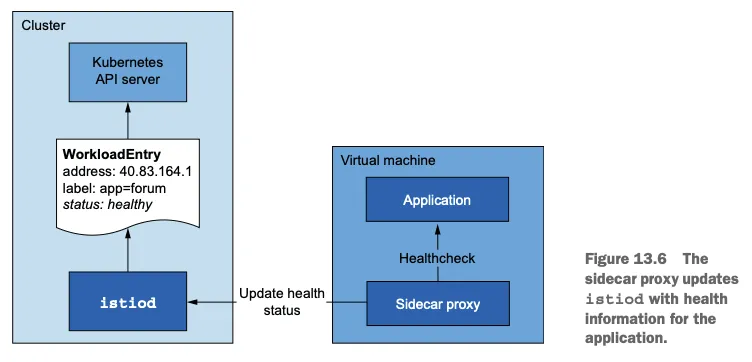
이스티오가 가상머신에서 readiness 프로브를 구현하는 방법
- 애플리케이션이 트래픽을 받을 준비가 됐는지는 WorkloadGroup 정의에 명세된 바에 따라 istio-agent 가 주기적으로 검사한다.
- 에이전트는 애플리케이션의 상태를 istiod에 보고하는데, 상태가 정상에서 비정상으로, 혹은 비정상에서 정상으로 바뀔 때 등이다. (아래 그림)
- 컨트롤 플레인은 상태를 사용해 그 워크로드로 라우팅할지 여부를 결정한다.
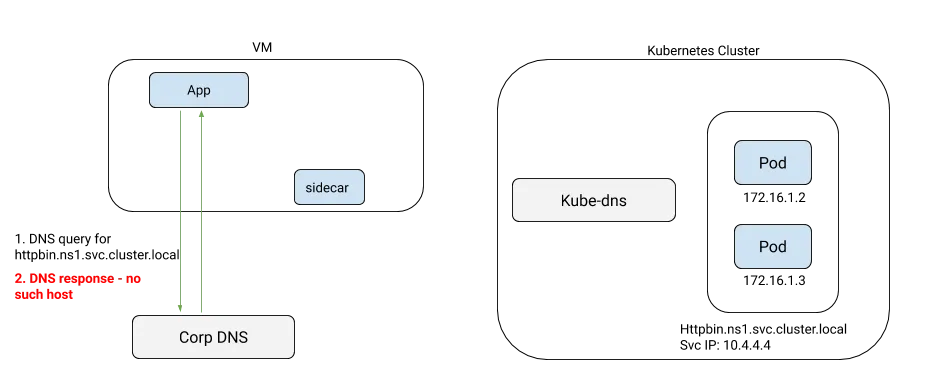
13.1.3 DNS resolution of in-mesh services
가상머신은 쿠버네티스 클러스터 외부에 있으므로 쿠버네티스 내부 DNS 서버에 접근할 수 없다.
https://istio.io/latest/blog/2020/dns-proxy/
가상머신은 클러스터 서비스의 호스트네임을 해석할 수 없어, 서비스 메시 통합의 마지막 단계이다.
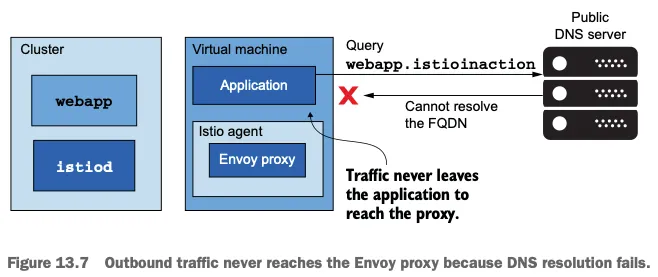
DNS 해석이 실패하므로 아웃바운드 트래픽은 절대 엔보이 프록시에 도달하지 않는다.
가상머신은 DNS 쿼리를 보내는 네임서버로 이 프라이빗 DNS 서버를 사용하도록 설정돼 있다. (A 레코드 동적 추가/변경/삭제 구현 필요)
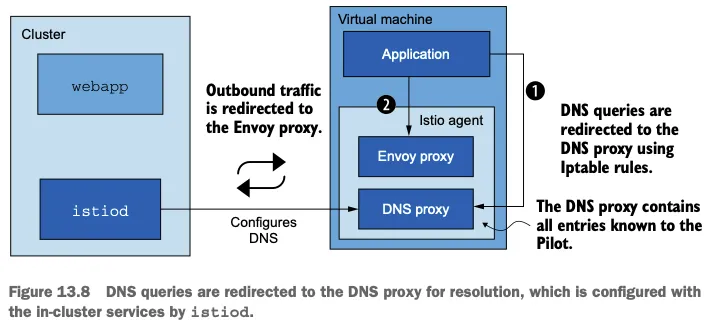
- Istio 후속 버전(1.8 이상)은 istio-agent 사이드카에 로컬 DNS 프록시를 도입했는데, istiod가 이 프록시에 메시 내 서비스를 모두 설정해둔다 (아래 그림).
https://istio.io/latest/blog/2020/dns-proxy/
DNS 프록시는 엔보이 프록시와 함께 이스티오 사이드카로 동작하며 애플리케이션의 DNS 쿼리를 처리하는데, 이 DNS 쿼리는 이스티오에서 일반적으로 트래픽을 포착하는 방법인 Iptable 규칙을 사용해 DNS 프록시로 리다이렉트된다.
- DNS 프록시를 지속적으로 업데이트하고자 이스티오는 NDS Name Discovery Serivce 라는 새 API를 도입했다.
- NDS를 사용하면, 메시에 쿠버네티스 서비스나 이스티오 ServiceEntry가 추가될 때마다 컨트롤 플레인이 데이터 플레인에 새 DNS 항목을 동기화한다.
- 그러나 DNS 프록시는 가상머신에 국한되지 않는다. DNS 프록시를 사용하면 링크 처럼 여러 추가 기능을 사용 할 수 있다.

https://www.anyflow.net/sw-engineer/istio-dns-proxying
13.2 Setting up the infrastructure
구성 환경
- cool-store 애플리케이션 호스팅
13.2.1 Setting up the service mesh : istio, app (실습)
- istio 1.17.8 설치
# (옵션) kube-ops-view
helm repo add geek-cookbook https://geek-cookbook.github.io/charts/
helm install kube-ops-view geek-cookbook/kube-ops-view --version 1.2.2 --set service.main.type=NodePort,service.main.ports.http.nodePort=30007 --set env.TZ="Asia/Seoul" --namespace kube-system
kubectl get deploy,pod,svc,ep -n kube-system -l app.kubernetes.io/instance=kube-ops-view
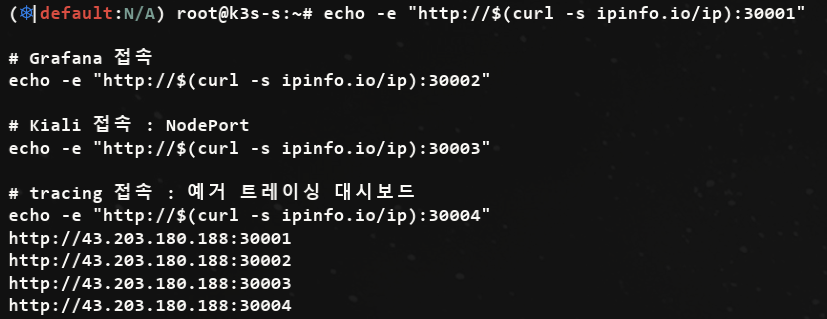
## kube-ops-view 접속 URL 확인
echo -e "http://$(curl -s ipinfo.io/ip):30007/#scale=1.5"
echo -e "http://$(curl -s ipinfo.io/ip):30007/#scale=1.3"
# 소스코드 clone
git clone https://github.com/AcornPublishing/istio-in-action
tree istio-in-action/book-source-code-master -L 1
# istioctl 설치
export ISTIOV=1.17.8
echo 'export ISTIOV=1.17.8' >> /root/.bashrc
curl -s -L https://istio.io/downloadIstio | ISTIO_VERSION=$ISTIOV sh -
cp istio-$ISTIOV/bin/istioctl /usr/local/bin/istioctl
istioctl version --remote=false
# 클러스터와 가상머신이 다른 네트워크에 있으므로, 이스티오를 설치한 네임스페이스에 네트워크 정보 레이블을 지정해야 한다.
kubectl create namespace istio-system
kubectl label namespace istio-system topology.istio.io/network=west-network
... 중략-
접속 테스트
-
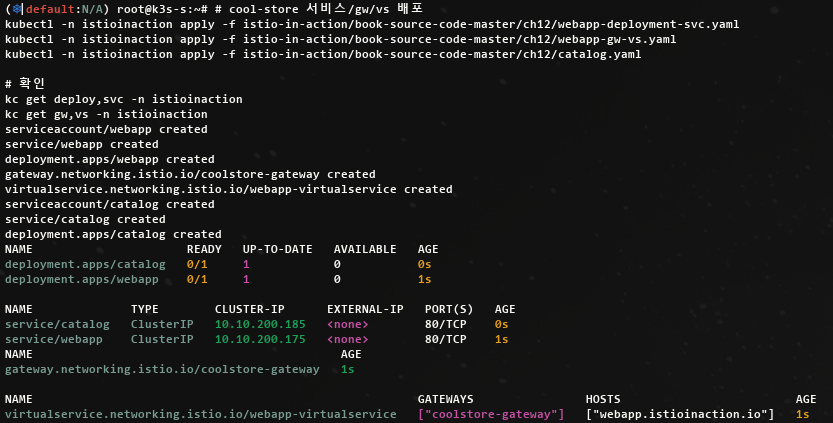
cool-store 서비스/gw/vs 배포 및 http 요청 확인
# cool-store 서비스/gw/vs 배포
kubectl -n istioinaction apply -f istio-in-action/book-source-code-master/ch12/webapp-deployment-svc.yaml
kubectl -n istioinaction apply -f istio-in-action/book-source-code-master/ch12/webapp-gw-vs.yaml
kubectl -n istioinaction apply -f istio-in-action/book-source-code-master/ch12/catalog.yaml

# 확인
kc get deploy,svc -n istioinaction
kc get gw,vs -n istioinaction
13.3 Mesh expansion to VMs
13.3.1 Exposing istiod and cluster services to the VM
- 가상머신이 메시의 일부분이 되려면 istiod에 통신을 하고 클러스터 서비스들과 커넥션을 시작할 수 있어야 한다.
- 별개의 네트워크에 있으므로 트래픽을 Istio의 컨트롤 플레인이나 워크로드로 프록시해줄 east-west 게이트웨이가 필요하다.
- east-west 게이트웨이 설치
#
cat istio-in-action/book-source-code-master/ch13/gateways/cluster-east-west-gw.yaml
apiVersion: install.istio.io/v1alpha1
kind: IstioOperator
metadata:
  name: istio-eastwestgateway
  namespace: istio-system
spec:
  profile: empty
  components:
    ingressGateways:
    - name: istio-eastwestgateway
      label:
        istio: eastwestgateway
        app: istio-eastwestgateway
        topology.istio.io/network: west-network
      enabled: true
      k8s:
        env:
        - name: ISTIO_META_ROUTER_MODE
          value: "sni-dnat"
        # The network to which traffic is routed
        - name: ISTIO_META_REQUESTED_NETWORK_VIEW
          value: west-network
        service:
          ports:
          - name: status-port
            port: 15021
            targetPort: 15021
          - name: mtls
            port: 15443
            targetPort: 15443
          - name: tcp-istiod
            port: 15012
            targetPort: 15012
          - name: tcp-webhook
            port: 15017
            targetPort: 15017
  values:
    global:
      meshID: usmesh
      multiCluster:
        clusterName: west-cluster
      network: west-network

#
istioctl install -f istio-in-action/book-source-code-master/ch13/gateways/cluster-east-west-gw.yaml -y-
게이트웨이를 설치하면 가상머신이 클러스터 서비스와 istiod에 접근하는 데 필요한 포트를 노출할 수 있다.
-
아래 그림은 가상머신이 istiod와 클러스터 서비스들에 연결할 수 있도록 노출된 포트를 보여준다.
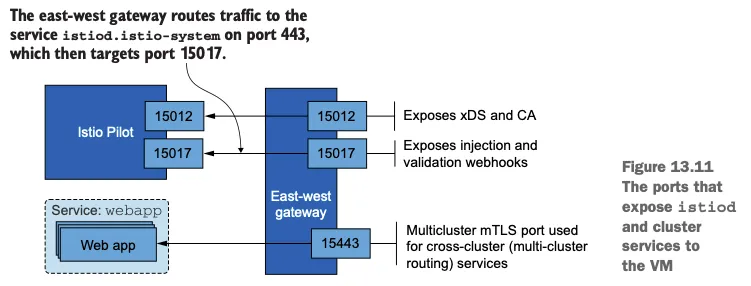
-
가상머신에서 메시 내 서비스로 향하는 요청을 리버스 프록시해주는 다중 클러스터 상호 TLS 포트(15443)을 노출하자
#
cat istio-in-action/book-source-code-master/ch13/expose-services.yaml
apiVersion: networking.istio.io/v1alpha3
kind: Gateway
metadata:
  name: cross-network-gateway
  namespace: istio-system
spec:
  selector:
    istio: eastwestgateway
  servers:
    - port:
        number: 15443
        name: tls
        protocol: TLS
      tls:
        mode: AUTO_PASSTHROUGH
      hosts:
        - "*.local"

kubectl apply -f istio-in-action/book-source-code-master/ch13/expose-services.yaml
kubectl get gw,vs -A
NAMESPACE       NAME                                                AGE
istio-system    gateway.networking.istio.io/cross-network-gateway   2m23s
istioinaction   gateway.networking.istio.io/coolstore-gateway       82m

NAMESPACE       NAME                                                       GATEWAYS                HOSTS                         AGE
istioinaction virtualservice.networking.istio.io/webapp-virtualservice ["coolstore-gateway"] ["webapp.istioinaction.io"]- 트래픽을 허용하고 istiod로 라우팅하도록 Gateway 리소스와 VirtualService 리소스를 적용해 istiod 포트를 노출
#
cat istio-in-action/book-source-code-master/ch13/expose-istiod.yaml
apiVersion: networking.istio.io/v1alpha3
kind: Gateway
metadata:
  name: istiod-gateway
spec:
  selector:
    istio: eastwestgateway
  servers:
    - port:
        name: tls-istiod
        number: 15012
        protocol: tls
      tls:
        mode: PASSTHROUGH
      hosts:
        - "*"
    - port:
        name: tls-istiodwebhook
        number: 15017
        protocol: tls
      tls:
        mode: PASSTHROUGH
      hosts:
        - "*"
---
apiVersion: networking.istio.io/v1alpha3
kind: VirtualService
metadata:
  name: istiod-vs
spec:
  hosts:
  - "*"
  gateways:
  - istiod-gateway
  tls:
  - match:
    - port: 15012
      sniHosts:
      - "*"
    route:
    - destination:
        host: istiod.istio-system.svc.cluster.local
        port:
          number: 15012
  - match:
    - port: 15017
      sniHosts:
      - "*"
    route:
    - destination:
        host: istiod.istio-system.svc.cluster.local
        port:
          number: 443

#
kubectl apply -f istio-in-action/book-source-code-master/ch13/expose-istiod.yaml -n istio-system
13.3.2 Representing a group of workloads with a WorkloadGroup
WorkloadGroup은 구성원인 가상머신들의 공통 속성을 정의
- 노출할 포트, 애플리케이션이 트래픽을 받을 준비
forum 워크로드의 공통 속성은 다음 WorkloadGroup에서 정의
cat istio-in-action/book-source-code-master/ch13/workloadgroup.yaml
apiVersion: networking.istio.io/v1alpha3
kind: WorkloadGroup
metadata:
  name: forum
  namespace: forum-services
spec:
  metadata:
    annotations: {}
    labels:
      app: forum # 서비스는 레이블을 사용해 이 그룹의 워크로드를 대상으로 삼을 수 있다
  template:
    serviceAccount: forum-sa # 워크로드가 이 워크로드 그룹에 등록하려면 forum-sa 인증 토큰을 보유하고 있어야 한다
    network: vm-network # 이스티오가 동일한 네트워크에 있는 워크로드 사이의 직접 접근을 설정할 수 있도록 한다
  probe: # 이 워크로드 그룹의 인스턴스에서 실행되는 istio-agent는 HTTP GET 요청을 8080 포트의 /api/healthz 경로로 보내 앱의 준비 상태를 확인한다
    periodSeconds: 5
    initialDelaySeconds: 1
    httpGet:
      port: 8080
      path: /api/healthz
가상머신을 서비스 메시에 통합하기 위한 관련 속성 일부\
lables
- 쿠버네티스 서비스들이 이 워크로드 그룹으로 등록된 워크로드 엔트리를 선택할 수 있게 해준다.
network
- 컨트롤 플레인이 이 속성을 사용해 트래픽을 가상머신으로 라우팅하도록 서비스 프록시를 설정한다.
- 같은 네트워크에 있으면 IP 주소를 사용한다. 다른 네트워크라면 그 네트워크에 배포된 east-west 게이트웨이를 사용한다.
serviceAccount
- 워크로드의 ID를 나타낸다. 워크로드가 이 그룹의 멤버로 등록하려면, 이 서비스 어카운트 ID용 클레임을 제시해야 한다.
네임스페이스와 서비스 어카운트를 만들고 WorkloadGroup 설정을 클러스터에 적용
#
cat istio-in-action/book-source-code-master/ch13/workloadgroup.yaml
kubectl create namespace forum-services
kubectl create serviceaccount forum-sa -n forum-services
kubectl apply -f istio-in-action/book-source-code-master/ch13/workloadgroup.yaml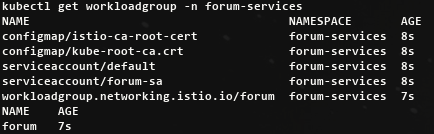
가상머신의 사이드카용 설정 생성하기
WorkloadGroup 은 워크로드 자동 등록을 가능하게 하는 것 외에, 이 그룹에 있는 가상머신을 위한 공통 설정을 생성하는 데도 사용할 수 있다.
- istioctl 은 WorkloadGroup 안의 정보를 사용하고, WorkloadGroup 인스턴스용 설정을 생성하는 데 필요한 추가 정보는 쿠버네티스 클러스터에 쿼리한다.
아래 명령어는 forum 워크로드 호스팅 머신용 설정을 생성
istioctl x workload entry configure -f istio-in-action/book-source-code-master/ch13/workloadgroup.yaml -o /tmp/my-workload-files/ --clusterID "west-cluster" --autoregister
cat /tmp/my-workload-files/hosts
192.168.10.10 istiod.istio-system.svc

chown ubuntu:ubuntu -R /tmp/my-workload-files/
tree /tmp/my-workload-files/
├── cluster.env
├── hosts
├── istio-token
├── mesh.yaml
└── root-cert.pem
고수준에서 알아야 할 중요한 사실은 파일에 다음이 포함돼 있다는 점
- east-west 게이트웨이 IP 주소. 여기를 통해 istiod가 노출된다.
- 루트 인증서. istiod가 제시한 인증서의 진위를 검증하는 데 사용한다.
- 인증서 검증은 서비스 프록시와 istiod 사이의 보안 커넥션을 시작하기 전에 수행해야 하는 선행 작업이다.
- 서비스 어카운트 토큰. istiod에게 forum WorkloadGroup의 구성원임을 인증하는 데 사용한다.
- 서비스 메시. 네트워크, 공통 속성에 대한 설정. WorkloadGroup에 정의된 대로다.
이 설정이 있으면 서비스 프록시는 컨트롤 플레인에 보안 커넥션을 시작하고, 자신의 SVID를 가져오고, xDS로 엔보이 설정을 수신해 메시의 구성원이 될 수 있다.
생성된 파일을 가상머신을 전송하기
설정 파일에는 민감 정보(구체적으로는 서비스 어카운트 토큰)가 포함돼 있으므로 가상머신으로 안전하게 전송해야 한다.
mkdir my-workload-files
scp -i ~/.ssh/kp-gasida.pem ubuntu@$APP_IP:/tmp/my-workload-files/\* ./my-workload-files # macOS
scp -i ~/.ssh/kp-gasida.pem ubuntu@$APP_IP:/tmp/my-workload-files/*  ./my-workload-files # linux

ls -al
openssl x509 -in ./my-workload-files/root-cert.pem -noout -text # istio CA 인증서
jwt decode $(cat ./my-workload-files/istio-token) # 토큰- forum에서 파일 확인

13.3.3 Installing and configuring the istio-agent in the VM
- forum-vm 가상머신에 istio-agent 를 다운로드하고 설치
#
cat /etc/resolv.conf
nameserver 127.0.0.53
...

ss -tnlp
State      Recv-Q     Send-Q         Local Address:Port         Peer Address:Port    Process
LISTEN     0          4096           127.0.0.53%lo:53                0.0.0.0:*        users:(("systemd-resolve",pid=357,fd=14))

ss -unlp
State     Recv-Q    Send-Q           Local Address:Port         Peer Address:Port    Process
UNCONN    0         0                127.0.0.53%lo:53                0.0.0.0:*        users:(("systemd-resolve",pid=357,fd=13))

resolvectl status
...
resolv.conf mode: stub # stub 모드로 설정, 127.0.0.53(local stub resolver)을 가리키며, systemd-resolved가 이 요청을 처리함

Link 2 (ens5)
    Current Scopes: DNS
         Protocols: +DefaultRoute +LLMNR -mDNS -DNSOverTLS DNSSEC=no/unsupported
Current DNS Server: 192.168.0.2
...

#
iptables -t nat -L -n -v
iptables -t filter -L -n -v
iptables -t mangle -L -n -v
iptables -t raw -L -n -v


# 데비안 패키지 형식으로 다운로드 후 설치
curl -LO https://storage.googleapis.com/istio-release/releases/1.17.8/deb/istio-sidecar.deb
file istio-sidecar.deb
dpkg -i istio-sidecar.deb
which pilot-agent
pilot-agent version
which envoy
envoy --version

tree /etc/istio
/etc/istio
├── config
│   └── mesh
├── envoy
│   ├── cluster.env
│   ├── envoy_bootstrap_tmpl.json
│   └── sidecar.env
├── extensions
│   ├── metadata-exchange-filter.compiled.wasm
│   ├── metadata-exchange-filter.wasm
│   ├── stats-filter.compiled.wasm
│   └── stats-filter.wasm
└── proxy

tree /var/lib/istio/
/var/lib/istio/
├── config
│   └── mesh
├── envoy
│   ├── envoy_bootstrap_tmpl.json
│   └── sidecar.env
├── extensions
│   ├── metadata-exchange-filter.compiled.wasm
│   ├── metadata-exchange-filter.wasm
│   ├── stats-filter.compiled.wasm
│   └── stats-filter.wasm
└── proxy

# istio-agent 는 특정 위치에서 설정 파일을 읽으므로, 복사해둔 파일을 옮겨보자
mkdir -p /etc/certs
mkdir -p /var/run/secrets/tokens

cp /tmp/root-cert.pem /etc/certs/root-cert.pem
cp /tmp/istio-token /var/run/secrets/tokens/istio-token
cp /tmp/cluster.env /var/lib/istio/envoy/cluster.env
cp /tmp/mesh.yaml /etc/istio/config/mesh


# istiod.istio-system.svc 요청을 istiod 인스턴스로 프록시하는 east-weat 게이트웨이 IP 주소로 정적으로 해석하도록 한다.
cat /etc/hosts
echo "192.168.10.10 istiod.istio-system.svc" | sudo sh -c 'cat >> /etc/hosts'
cat /etc/hosts- 마지막 단계는 에이전트가 읽고 쓸 디렉터리에 소유자 권한을 부여
#
cat /etc/passwd | tail -n 3
ubuntu:x:1000:1000:Ubuntu:/home/ubuntu:/bin/bash
lxd:x:999:100::/var/snap/lxd/common/lxd:/bin/false
istio-proxy:x:998:999::/var/lib/istio:/bin/sh

tree /etc/istio
chown -R istio-proxy /var/lib/istio /etc/certs /etc/istio/proxy /etc/istio/config /var/run/secrets /etc/certs/root-cert.pem

#
systemctl status istio
systemctl start istio
systemctl enable istio
systemctl status istio
...
     CGroup: /system.slice/istio.service
             ├─32047 sudo -E -u istio-proxy -s /bin/bash -c "ulimit -n 1024; INSTANCE_IP=15.165.15.104 POD_NAME=testpc POD_NAMESPACE=forum-services >
             ├─32140 /usr/local/bin/pilot-agent proxy
             └─32148 /usr/local/bin/envoy -c etc/istio/proxy/envoy-rev.json --drain-time-s 45 --drain-strategy immediate --local-address-ip-version >

May 24 20:10:05 testpc istio-start.sh[32128]: -A ISTIO_OUTPUT -o lo -p tcp -m tcp ! --dport 53 -m owner ! --gid-owner 998 -j RETURN
May 24 20:10:05 testpc istio-start.sh[32128]: -A ISTIO_OUTPUT -m owner --gid-owner 998 -j RETURN
May 24 20:10:05 testpc istio-start.sh[32128]: -A ISTIO_OUTPUT -d 127.0.0.53/3cat 2 -p tcp -m tcp --dport 53 -j REDIRECT --to-ports 15053
May 24 20:10:05 testpc istio-start.sh[32128]: -A ISTIO_OUTPUT -d 127.0.0.1/32 -j RETURN
May 24 20:10:05 testpc istio-start.sh[32128]: -A ISTIO_OUTPUT -j ISTIO_REDIRECT
May 24 20:10:05 testpc istio-start.sh[32128]: -A ISTIO_REDIRECT -p tcp -j REDIRECT --to-ports 15001
May 24 20:10:05 testpc istio-start.sh[32128]: COMMIT
May 24 20:10:05 testpc istio-start.sh[32128]: # Completed on Sat May 24 20:10:05 2025
May 24 20:10:05 testpc sudo[32047]:     root : PWD=/ ; USER=istio-proxy ; COMMAND=/bin/bash -c '\\/bin\\/bash -c ulimit\\ -n\\ 1024\\;\\ INSTANCE_IP>
May 24 20:10:05 testpc sudo[32047]: pam_unix(sudo:session): session opened for user istio-proxy(uid=998) by (uid=0)
...
## 혹은
journalctl -u istio -f
...

which istio-start.sh
cat /usr/local/bin/istio-start.sh


#
tree /etc/certs/
├── cert-chain.pem
├── key.pem
└── root-cert.pem

#
ps aux |grep istio

#
iptables -t nat -L -n -v
iptables -t filter -L -n -v
iptables -t mangle -L -n -v
iptables -t raw -L -n -v
에이전트 로그 확인하기
Istio의 에이전트 로그는 다음 두 위치에 기록된다.
- standard output 표준 출력 채널은 /var/log/istio/istio.log 파일
- standard error 표준 오류 채널은 /var/log/istio/istio.err 파일
표준 출력 로그를 확인하면 이스티오 컨트롤 플레인으로의 연결이 성공했는지 알 수 있습니다.
cat /var/log/istio/istio.log | grep xdsproxy
2025-05-25T01:09:42.094214Z info xdsproxy Initializing with upstream address "istiod.istio-system.svc:15012" and cluster "west-cluster"
2025-05-25T01:09:42.227661Z info xdsproxy connected to upstream XDS server: istiod.istio-system.svc:15012
# 만약 로그 파일이 생성되지 않았다면? 서비스 시작이 실패한 경우에 그럴 수 있다. 아래 처럼 systemd 로그를 확인하자
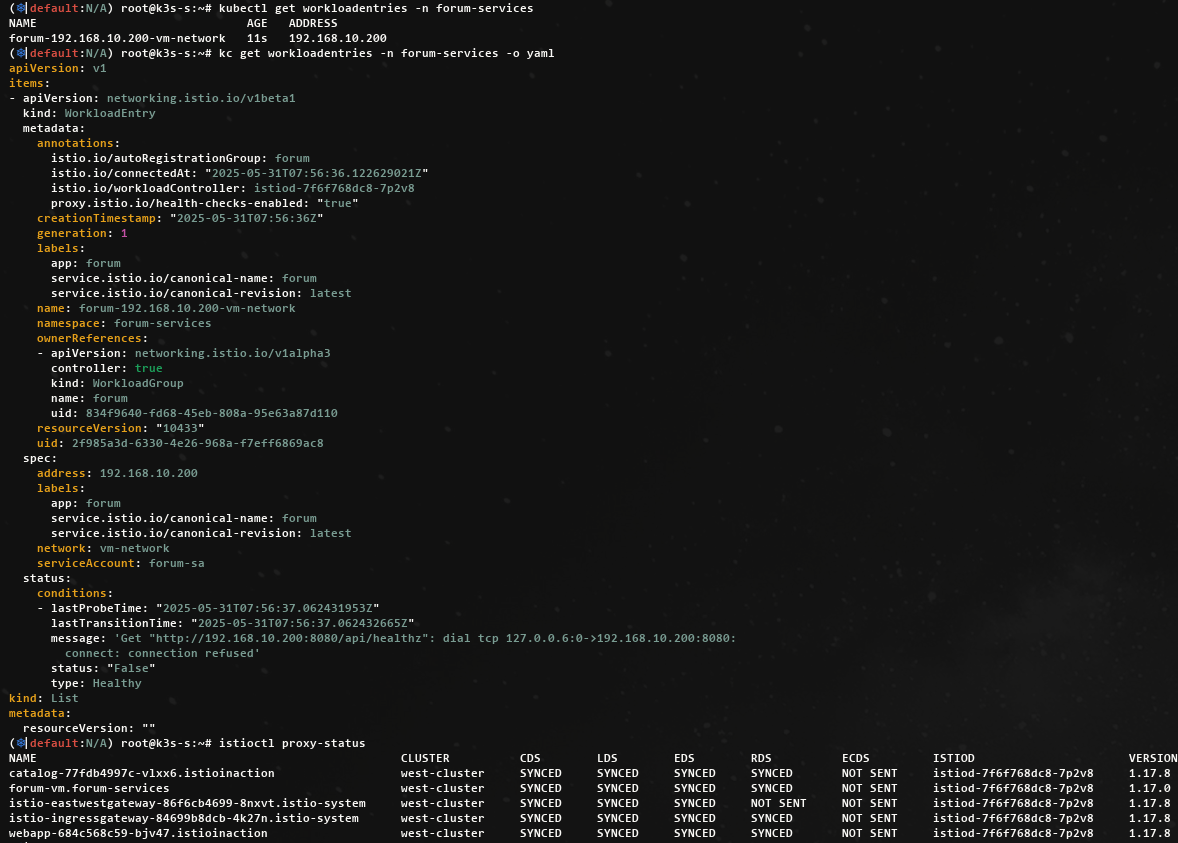
journalctl -u istio -f워크로드가 메시에 등록됐는지 확인하기
워크로드 자동 등록이 활성화돼 있으면, 머신의 istio-agent 가 istiod 에 연결되자마자 WorkloadEntry 가 생성됩니다.
13.3.4 Routing traffic to cluster services
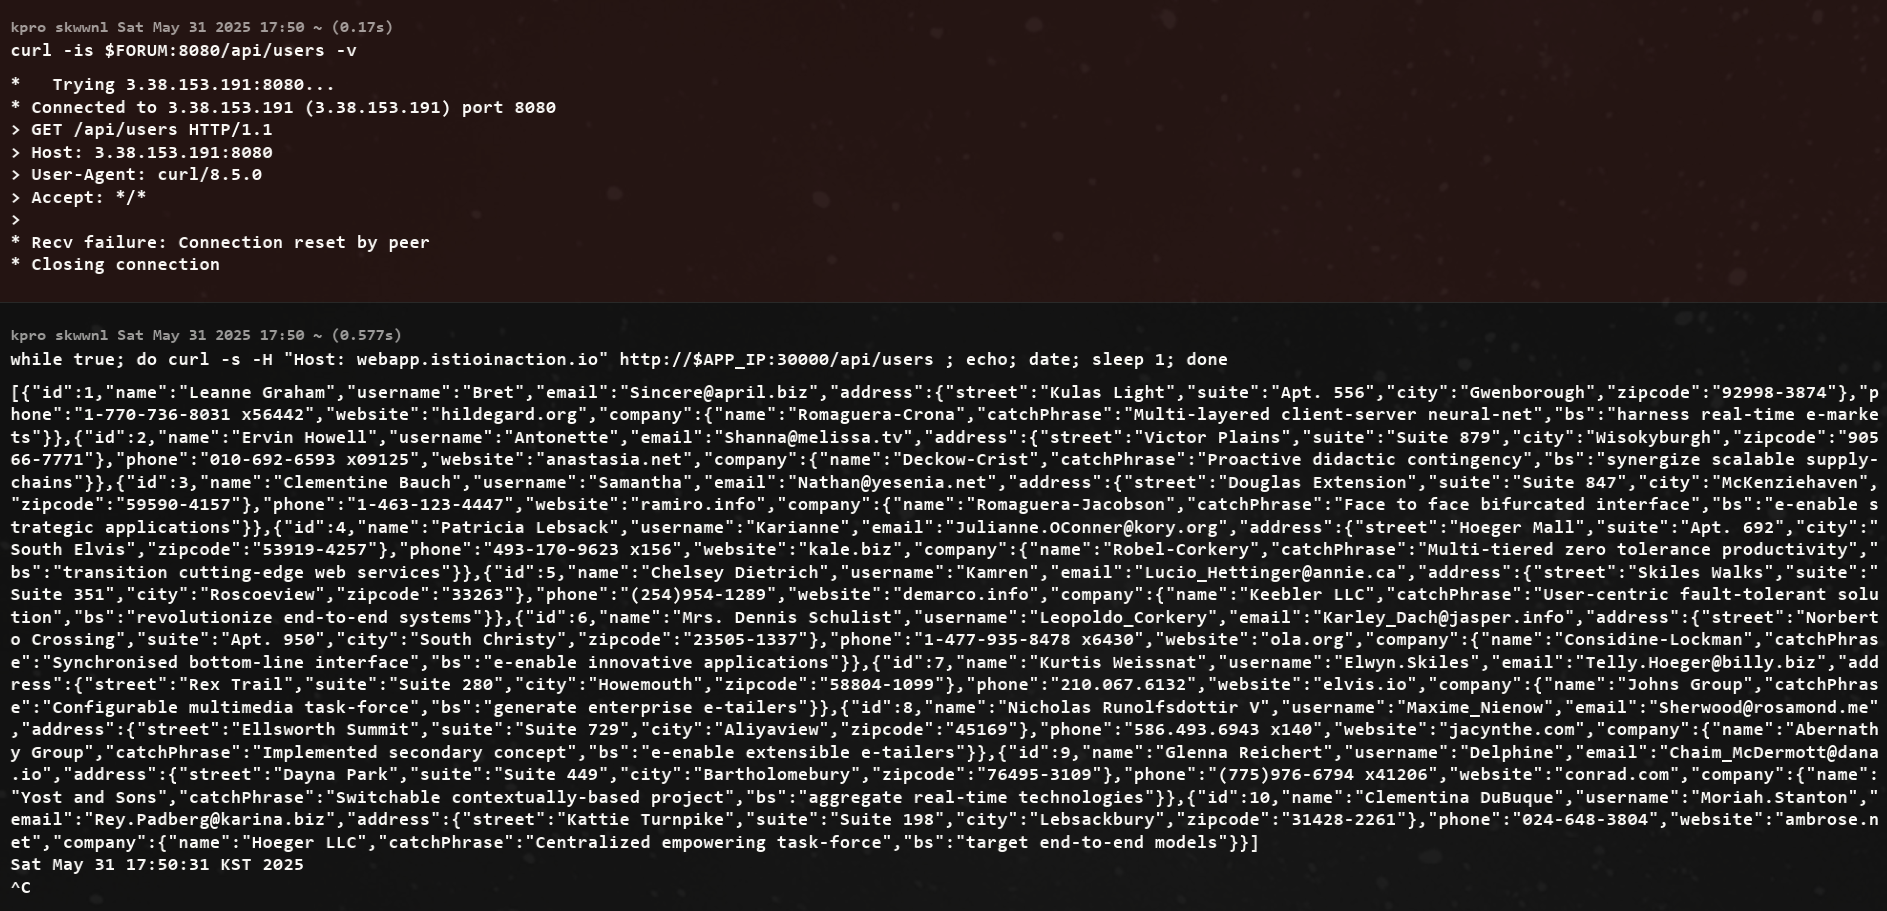
트래픽이 클러스터 서비스로 라우팅되는지 확인하기 위해 가상머신에서 webapp 워크로드로 curl 요청
# [forum-vm] 신규 터미널 : 패킷 모니터링 https://github.com/gcla/termshark/blob/master/docs/UserGuide.md
tcpdump -i any -w - udp port 53 | termshark
## CTRL+C 로 취소 후 수집된 패킷이 termshark 에서 확인 가능

# [forum-vm] : 도메인 해석은 잘 됨
dig +short webapp.istioinaction
10.10.200.48

curl -s webapp.istioinaction/api/catalog/items/1 | jq
watch curl -s webapp.istioinaction/api/catalog/items/1

# 신규 터미널 : 15443 연결하는 envoy 프로세스(데이터 플래인) 확인!
watch -d ss -tnp
watch -d 'ss -tnp | grep envoy'
State     Recv-Q  Send-Q   Local Address:Port     Peer Address:Port  Process
ESTAB 0      0      192.168.10.200:41238 192.168.10.10:15443 users:(("envoy",pid=3203,fd=40))
ESTAB 0      0      192.168.10.200:41242 192.168.10.10:15443 users:(("envoy",pid=3203,fd=41))
...

# 신규 터미널 :
watch -d iptables -t nat -L -n -v
watch -d iptables -t raw -L -n -v
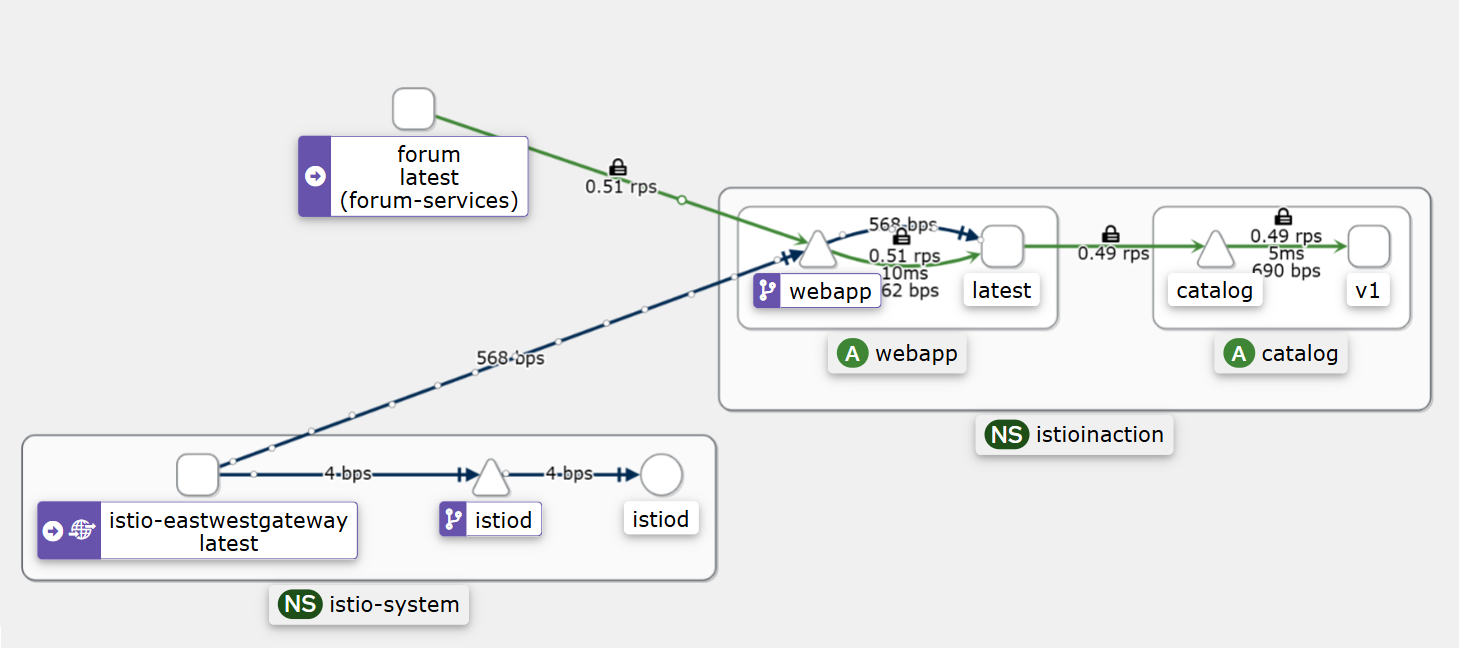
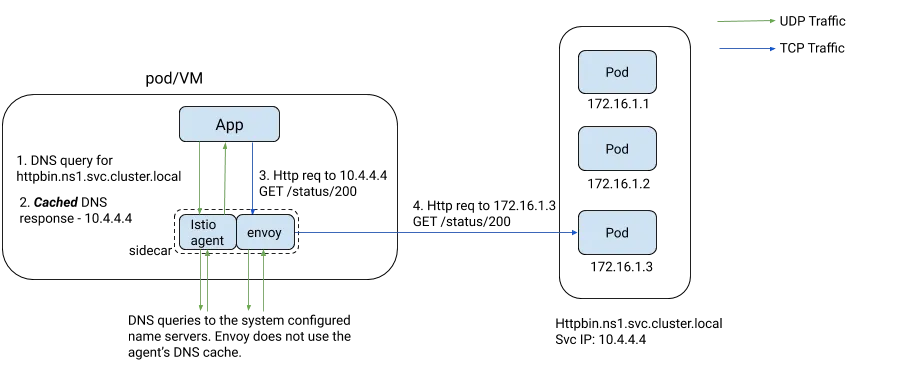
가상머신에서 요청한 트래픽이 클러스터 서비스에 도달하는 과정
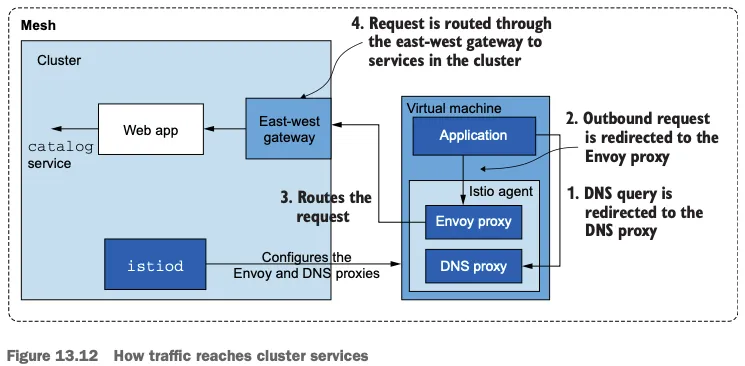
- 트래픽이 애플리케이션을 떠나려면 먼저 그 호스트네임을 해석해야 한다. 즉, DNS 쿼리가 DNS 프록시로 리다이렉트돼야 한다.
- 이름이 IP 주소로 해석되면 애플리케이션은 아웃바운드 요청을 시작할 수 있다. 이 요청은 Iptables 규칙이 엔보이 프록시로 리다이렉트한다.
- 엔보이 프록시는 트래픽을 east-west 게이트웨이로 라우팅한다.
- east-west 게이트웨이는 요청을 webapp 으로 프록시하고, webapp은 catalog 서비스에 아이템을 쿼리한다.
이 과정을 고수준에서 살펴보면 ‘DNS 프록시는 어떻게 설정되는가?’와 ‘애플리케이션은 DNS 프록시와 어떻게 상호작용하는가?’ 같은 질문에 답할 수 있으며, 트래픽을 가상머신 워크로드에서 클러스터 서비스로 라우팅하는 전체 과정과 어떻게 연관되는지 이해할 수 있다.
13.3.5 Routing traffic to the WorkloadEntry
클러스터 안에서 가상머신 워크로드로 라우팅 확인하기
- 쿠버네티스 서비스는 인스턴스를 레이블로 고르며, 이스티오가 모든 서비스를 올바른 IP 주소로 동적으로 설정할 수 있다.
- 예를 들어 forum WorkloadEntry를 고르려면 다음과 같은 쿠버네티스 서비스를 사용한다.
#
cat istio-in-action/book-source-code-master/services/forum/kubernetes/forum-svc.yaml
apiVersion: v1
kind: Service
metadata:
  labels:
    app: forum
  name: forum
spec:
  ports:
  - name: http
    port: 80
    protocol: TCP
    targetPort: 8080
  selector:
    app: forum

kubectl apply -f istio-in-action/book-source-code-master/services/forum/kubernetes/forum-svc.yaml -n forum-services

kubectl get svc,ep -n forum-services
NAME            TYPE        CLUSTER-IP     EXTERNAL-IP   PORT(S)   AGE
service/forum   ClusterIP   10.10.200.72   <none>        80/TCP    20s

NAME              ENDPOINTS   AGE
endpoints/forum   <none>      20s

#
istioctl proxy-config route deploy/webapp.istioinaction
istioctl proxy-config route deploy/webapp.istioinaction --name 80 -o json
...
      "name": "forum.forum-services.svc.cluster.local:80",
      "domains": [
          "forum.forum-services.svc.cluster.local",
          "forum.forum-services",
          "forum.forum-services.svc",
          "10.10.200.72"
      ],
      "routes": [
          {
              "name": "default",
              "match": {
                  "prefix": "/"
              },
              "route": {
                  "cluster": "outbound|80||forum.forum-services.svc.cluster.local",
...

#
istioctl proxy-config cluster deploy/webapp.istioinaction
istioctl proxy-config cluster deploy/webapp.istioinaction --fqdn forum.forum-services.svc.cluster.local -o json
istioctl proxy-config cluster deploy/webapp.istioinaction --fqdn forum.forum-services.svc.cluster.local
SERVICE FQDN                               PORT     SUBSET     DIRECTION     TYPE     DESTINATION RULE
forum.forum-services.svc.cluster.local     80       -          outbound      EDS

# 아직 없다!
istioctl proxy-config endpoint deploy/webapp.istioinaction
istioctl proxy-config endpoint deploy/webapp.istioinaction | grep forum

#
istioctl proxy-config listener deploy/istio-eastwestgateway.istio-system
istioctl proxy-config route deploy/istio-eastwestgateway.istio-system
istioctl proxy-config cluster deploy/istio-eastwestgateway.istio-system
istioctl proxy-config endpoint deploy/istio-eastwestgateway.istio-system
istioctl proxy-config endpoint deploy/istio-eastwestgateway.istio-system | grep forum- forum-vm 의 envoy config 확인
# [forum-vm] istioctl 설치
export ISTIOV=1.17.8
echo 'export ISTIOV=1.17.8' >> /root/.bashrc

curl -s -L https://istio.io/downloadIstio | ISTIO_VERSION=$ISTIOV sh -
cp istio-$ISTIOV/bin/istioctl /usr/local/bin/istioctl

#
curl -s localhost:15000/config_dump | istioctl proxy-config listener --file -
curl -s localhost:15000/config_dump | istioctl proxy-config route --file -
curl -s localhost:15000/config_dump | istioctl proxy-config clusters --file -
curl -s localhost:15000/config_dump | istioctl proxy-config endpoint --file -
curl -s localhost:15000/config_dump | istioctl proxy-config secret --file -
RESOURCE NAME     TYPE           STATUS     VALID CERT     SERIAL NUMBER                               NOT AFTER                NOT BEFORE
default           Cert Chain     ACTIVE     true           310309461583688467984066399721764000962     2025-05-26T01:09:42Z     2025-05-25T01:07:42Z
ROOTCA            CA             ACTIVE     true           46141372426695670978289547947687101983      2035-05-23T01:04:09Z     2025-05-25T01:04:09Z
서비스가 만들어지면 WorkloadEntry 엔드포인트가 선택되고, 이를 사용해 istiod가 데이터 플레인을 설정한다.
- forum 서비스 요청 시도
#
istioctl proxy-config cluster deploy/webapp.istioinaction --fqdn forum.forum-services.svc.cluster.local
istioctl proxy-config endpoint deploy/webapp.istioinaction | grep forum

# 로그 모니터링
kubectl logs -n istioinaction deploy/webapp -c istio-proxy -f
[2025-05-25T04:53:18.841Z] "GET /api/users HTTP/1.1" 503 UH no_healthy_upstream - "-" 0 19 0 - "" "beegoServer" "63377970-9d0f-4591-a4d4-039b4321863d" "forum.forum-services:80" "-" outbound|80||forum.forum-services.svc.cluster.local - 10.10.200.72:80 :0 - default
[2025-05-25T04:53:18.839Z] "GET /api/users HTTP/1.1" 500 - via_upstream - "-" 0 27 2 2 "" "curl/8.7.1" "63377970-9d0f-4591-a4d4-039b4321863d" "webapp.istioinaction.io" "172.16.0.8:8080" inbound|8080|| 127.0.0.6:36439 172.16.0.8:8080 :0 outbound_.80_._.webapp.istioinaction.svc.cluster.local default

# 자신의 PC
curl -s -H "Host: webapp.istioinaction.io" http://$APP_IP:30000/api/catalog/
while true; do curl -s -H "Host: webapp.istioinaction.io" http://$APP_IP:30000/api/catalog/ ; echo; date; sleep 1; done

curl -s -H "Host: webapp.istioinaction.io" http://$APP_IP:30000/api/users
curl -s -H "Host: webapp.istioinaction.io" http://$APP_IP:30000/api/users -I
HTTP/1.1 500 Internal Server Error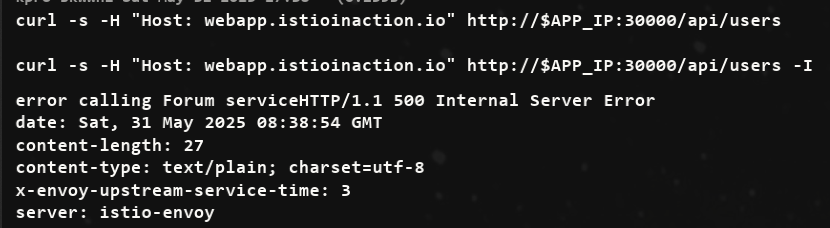
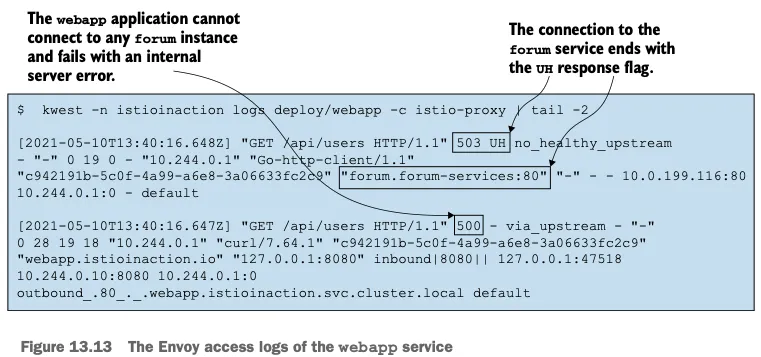
- UH 응답 플래그는 ‘정상 업스트림 없음’으로, 클러스터에 트래픽을 라우팅할 수 있는 정상 엔드포인트가 없을 경우에만 나타난다.
- webapp 에는 forum 서비스의 엔드포인프가 없다는 뜻이다.
forum 워크로드 상태 확인하기
WorkloadEntry 의 상태, 좀 더 정확히는 트래픽을 수신할 준비 상태 readiness 를 확인
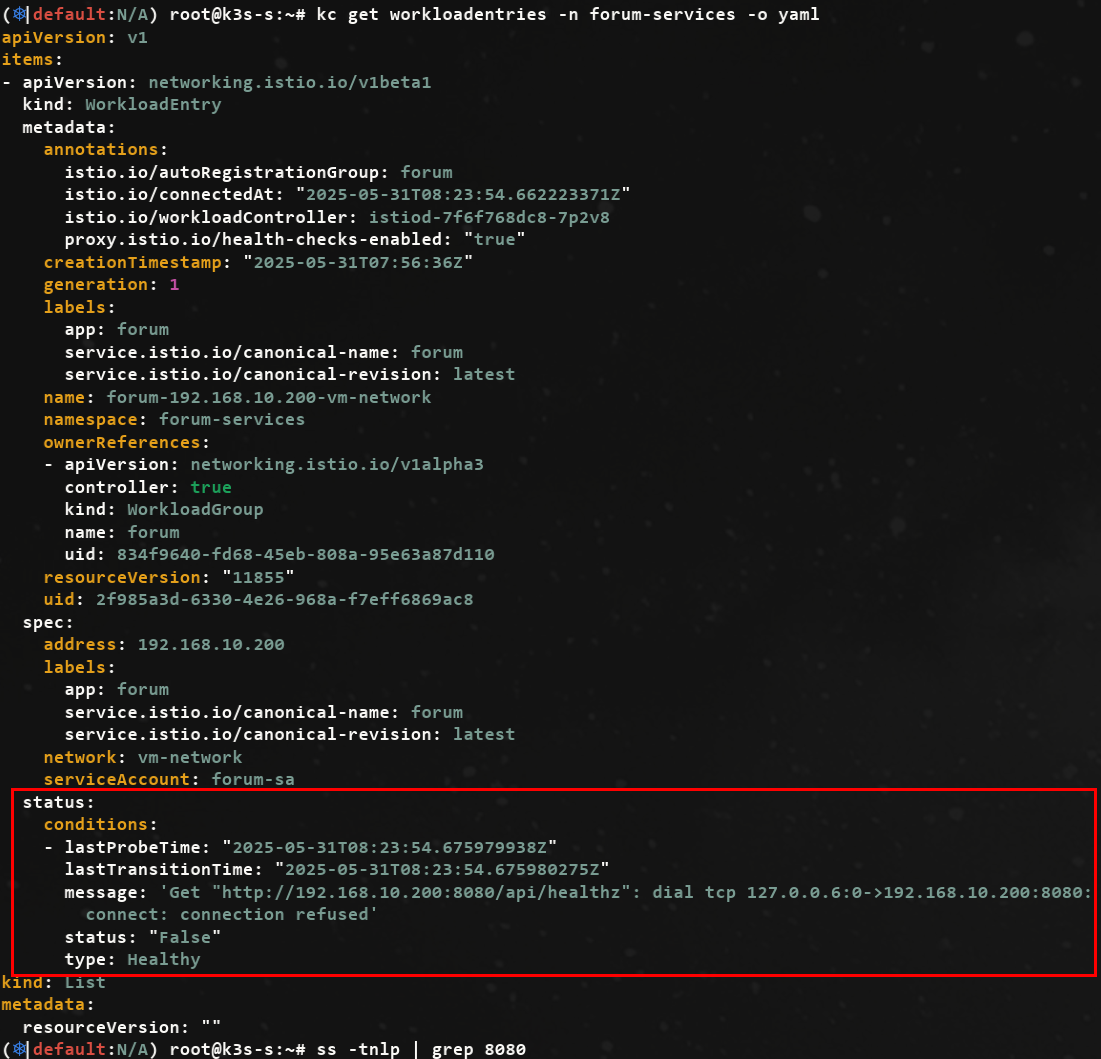
가상머신에서 forum 애플리케이션 시작하기
forum 바이너리를 다운로드하고, 권한을 주고, 8080 포트에서 트래픽을 수신하도록 실행
# forum-vm
wget -O forum https://git.io/J3QrT
file forum
chmod +x forum
./forum

# forum-vm
curl http://localhost:8080/api/healthz -v

ss -tnlp | grep 8080
LISTEN 0      4096               *:8080             *:*    users:(("forum",pid=15081,fd=3))

# k8s-s
istioctl proxy-config cluster deploy/webapp.istioinaction --fqdn forum.forum-services.svc.cluster.local
istioctl proxy-config endpoint deploy/webapp.istioinaction --cluster 'outbound|80||forum.forum-services.svc.cluster.local' -o json
istioctl proxy-config endpoint deploy/webapp.istioinaction --cluster 'outbound|80||forum.forum-services.svc.cluster.local'
ENDPOINT                STATUS      OUTLIER CHECK     CLUSTER
192.168.10.200:8080     HEALTHY     OK                outbound|80||forum.forum-services.svc.cluster.local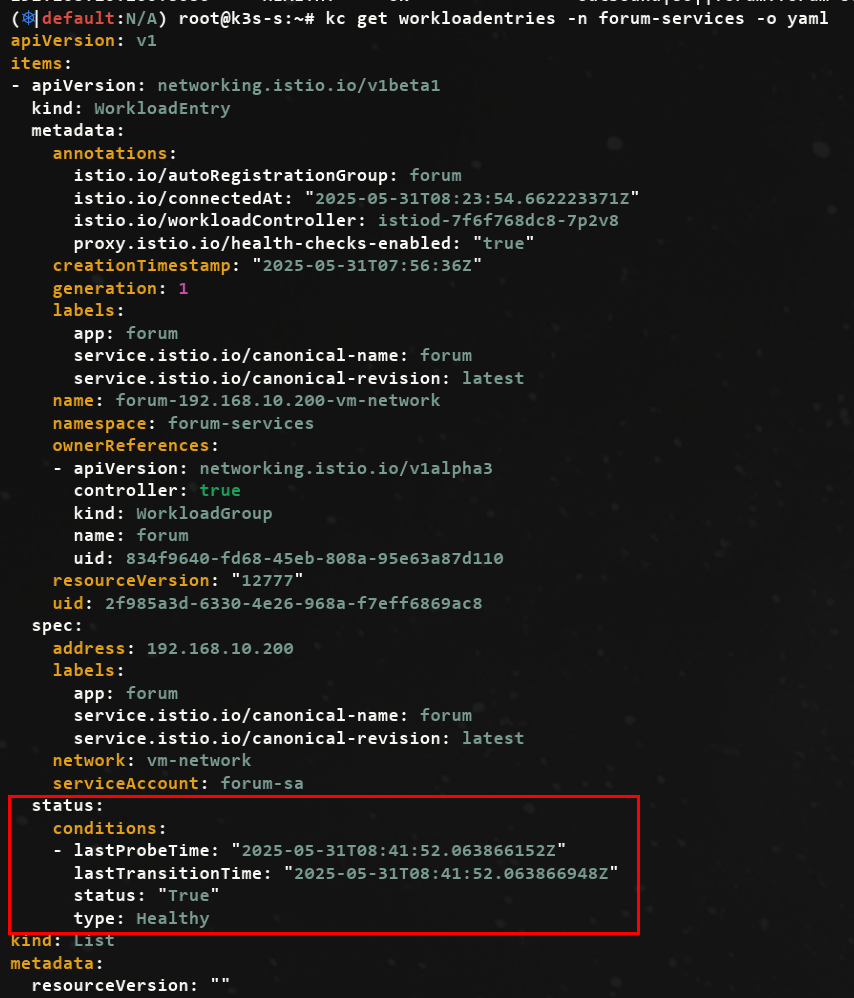
- 재요청

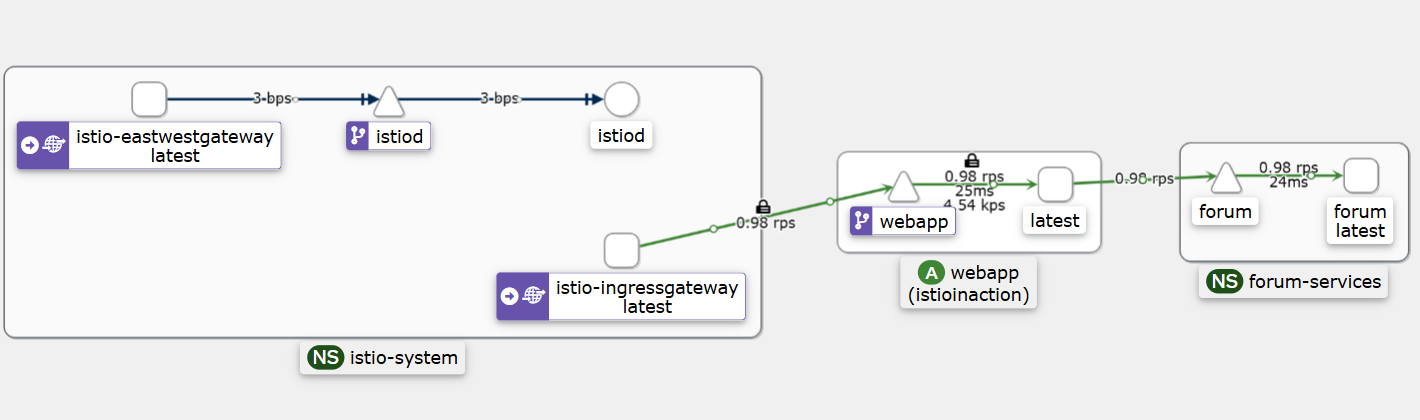
클러스터 서비스에서 WorkloadEntry 로의 트래픽 흐름을 검증했다.
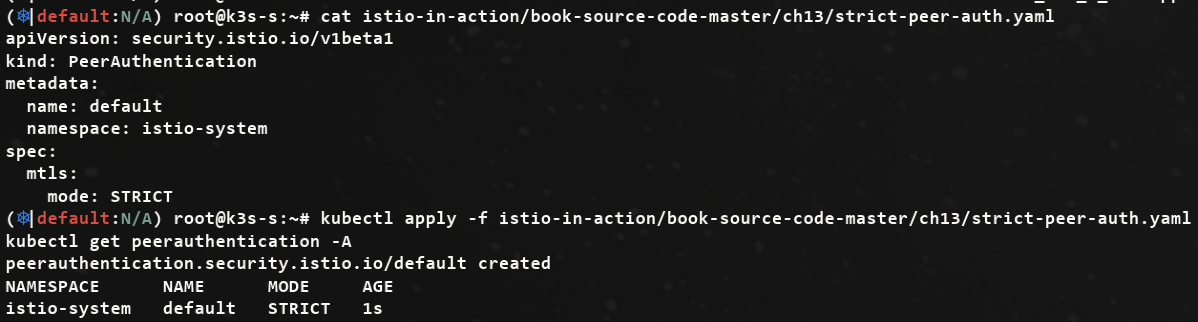
13.3.6 VMs are configured by the control plane: Enforcing mutual authentication
- 가상머신이 메시에 통합돼 사이드카 프록시가 네트워크 트래픽을 관리하므로, 이스티오의 풍부한 기능을 가상머신에 적용할 수 있다.
- 이를 시연하기 위해, 트래픽 상호 인증을 강제하는 PeerAuthentication 을 만들어 보안을 강화하자.
출력을 보면 webapp의 요청이 처리됐는데, 이는 가상머신이 컨트롤 플레인이 적용한 설정을 준수함을 보여준다.
13.4 Demystifying the DNS proxy
DNS 프록시는 이스티오 사이드카의 새 구성 요소로, 이 절의 목표는 DNS 프록시가 클러스터 내 서비스의 호스트네임을 해석하는 방법을 이해시키는 것이다.
13.4.1 How the DNS proxy resolves cluster hostnames (실습)
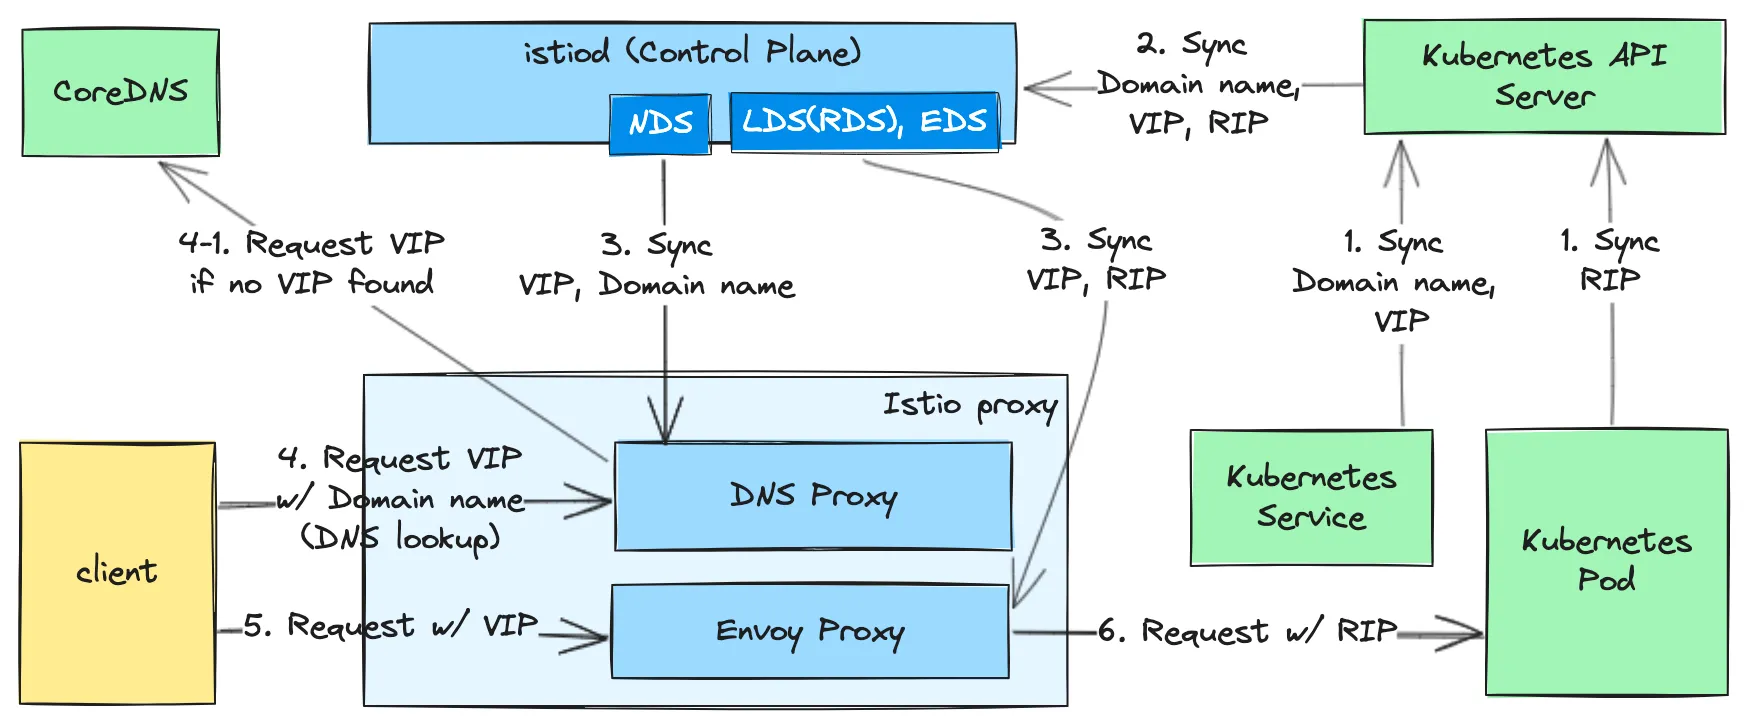
클러스터 내 호스트네임을 해석하는 데 관련된 단계를 모두 이해하기 위해 webapp.istioinaction 호스트네임이 해석되는 구체적인 과정이다. (단계는 아래 그림 참조)
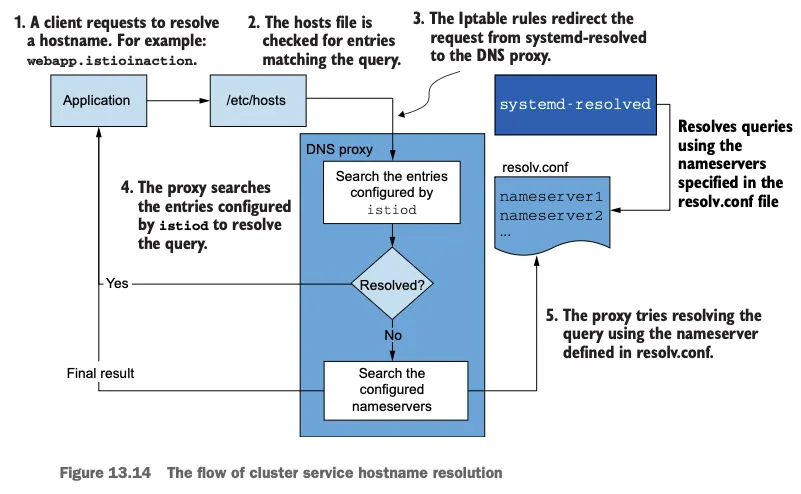
- 클라이언트는
webapp.istioinaction을 해석하기 위해 DNS 쿼리를 만든다 - 운영체제가 DNS 해석을 처리한다. 운영체제는 먼저 hosts 파일에 정의된 항목 중에 호스트네임과 일치하는 것이 있는지 확인한다.
- 일치하는 항목이 없으면 요청을 기본 DNS 해석기 resolver 로 전달한다.
- 우분투의 기본 DNS 해석기는
systemd-resolverd(로컬 애플리케이션에 호스트네임 해석을 제공하는 시스템 서비스)이며, 루프백 주소 127.0.0.53에서 53 포트를 리스닝한다.- 그러나 요청은 절대로 거기에 도달하지 않는데, 요청을 DNS 프록시로 리다이렉트하도록 istio-agent 가 Iptables 규칙을 설정하기 때문이다.
- DNS 프록시에는 서비스 메시 내에서 알려진 서비스를 해석하기 위한 항목들이 포함돼 있다.
- 호스트네임이 일치하면 해석되며, webapp.istioinaction이 그런 경우다.
- 컨트롤 플레인이 NDS로 설정하기 때문이다.
- 그렇지 않고 클러스터 서비스가 아니면 DNS 프록시가 물러나 resolv.conf 파일에 명시된 네임서버로 넘기며, 호스트네임은 여기서 해석되거나 해석하는 데 실패한다.
각 단계 검증하기
- systemd-resolverd(127.0.0.53 에서 수신 중인)로 향하는 DNS 퀴리를 Iptables 규칙이 로컬호스트의 포트 15053에서 UDP 및 TCP 패킷을 수신 중인 DNS 프록시로 리다이렉트하는 것부터 확인

- 포트 정보 확인
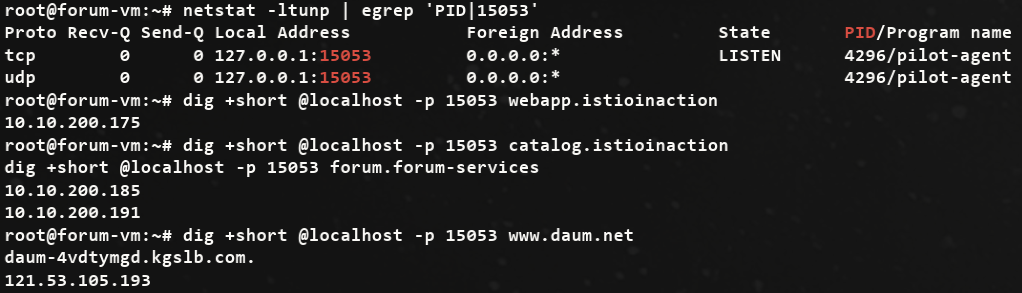
애플리케이션이 호스트네임을 해석할 때는 Iptable 규칙에 따라 요청이 자동으로 이 포트로 리다이렉트된다.
13.4.2 Which hostnames is the DNS proxy aware of?
- DNS 프록시가 인식하는 항목을 모두 찾으려면 istiod의 디버그 엔드포인트를 사용해야 한다.
- 디버그 엔드포인트를 사용하면 모든 워크로드의 사이드카에 대한 NDS 설정을 쿼리할 수 있다.
#
istioctl proxy-status | awk '{print $1}'
catalog-77fdb4997c-f8qj4.istioinaction
istio-eastwestgateway-86f6cb4699-4xfsn.istio-system
istio-ingressgateway-7b7ccd6454-pv8zp.istio-system
forum-vm.forum-services
webapp-684c568c59-vrj97.istioinaction

# NDS 설정을 가져올 때 proxyID 파라미터에 이름을 사용한다.
kubectl -n istio-system exec deploy/istiod -- curl -Ls "localhost:8080/debug/ndsz?proxyID=forum-vm.forum-services" | jq
{
  "resource": {
    "@type": "type.googleapis.com/istio.networking.nds.v1.NameTable",
    "table": {
      "catalog.istioinaction.svc.cluster.local": {
        "ips": [
          "10.10.200.138"
        ],
        "registry": "Kubernetes",
        "shortname": "catalog",
        "namespace": "istioinaction"
      },
      "forum.forum-services.svc.cluster.local": {
        "ips": [
          "10.10.200.72"
        ],
        "registry": "Kubernetes",
        "shortname": "forum",
        "namespace": "forum-services"
      },
      "webapp.istioinaction.svc.cluster.local": {
        "ips": [
          "10.10.200.48"
        ],
        "registry": "Kubernetes",
        "shortname": "webapp",
        "namespace": "istioinaction"
      },
...- 요약된 출력은 webapp 서비스를 보여주는데,
webapp.istioinaction.svc.cluster.local****라는 이름에 매핑된 IP 주소 목록을 포함하고 있다. - 출력을 살펴보면
webapp.istioinaction같은 짧은 변형 variation 이 없다는 것을 확인할 수 있다. - istio-agent 가 NDS 설정을 받을 때, 다음과 같이 쿠버네티스 클러스터에서 설정될 모든 변형을 만들어낸다.
- webapp.istioinaction
- webapp.istioinaction.svc
- webapp.istioinaction.svc.cluster
- 그리고 모두 동일한 IP 목록 주소, 즉, 앞 선 목록에서 봤던 10.10.200.175로 해석된다.
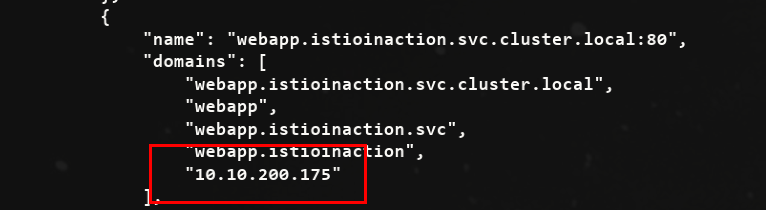
- 핵심
- DNS 프록시는 istiod가 알고 있는 서비스들로 설정된다.
- istio-agent는 호스트네임의 더 짧은 변형들을 생성한다 (쿠버네티스 내의 경험과 일치시키기 위함이다)
- 이런 DNS 프록시 내의 레코드는 클러스터 내 서비스 호스트네임을 해석하는 데 사용된다.
- 클러스터가 아닌 호스트네임(퍼블릭 도메인 같은)쿼리는 머신에서 처음 설정한 네임서버**로 넘어간다.
13.5 Customizing the agent’s behavior
에이전트는 로그 내용, 로그 형식, 에이전트가 인증서를 발급받기 위해 요청할 인증서 수명 설정 같은 동작 등 다양한 설정 선택지가 있다.
- 예로 두 가지 수정이 있다.
- DNS 프록시의 로깅 수준을 debug로 올린다.
- 인증서 수명을 12시간으로 줄인다.
사이드카용 설정 파일인 /var/lib/istio/envoy/sidecar.env 를 업데이트한다.
#
cat /var/lib/istio/envoy/sidecar.env
grep "^[^#]" /var/lib/istio/envoy/sidecar.env # 주석 처리

#
echo 'ISTIO_AGENT_FLAGS="--log_output_level=dns:debug"' >> /var/lib/istio/envoy/sidecar.env
echo 'SECRET_TTL="12h0m0s"' >> /var/lib/istio/envoy/sidecar.env
grep "^[^#]" /var/lib/istio/envoy/sidecar.env # 주석 처리
ISTIO_AGENT_FLAGS="--log_output_level=dns:debug"
SECRET_TTL="12h0m0s"

# 변경 사항 적용
systemctl restart istio

# www.daum.net 도메인은 질의 처리를 하지 못해서, 로컬에 resolver DNS 서버를 통해 질의 로그 확인.
tail -f /var/log/istio/istio.log
2025-05-25T07:23:03.660035Z	debug	dns	response for hostname "www.daum.net." not found in dns proxy, querying upstream
2025-05-25T07:23:03.662845Z	debug	dns	upstream response for hostname "www.daum.net." : ;; opcode: QUERY, status: NOERROR, id: 30399
;; flags: qr rd ra; QUERY: 1, ANSWER: 2, AUTHORITY: 0, ADDITIONAL: 1

;; OPT PSEUDOSECTION:
; EDNS: version 0; flags: ; udp: 65494

;; QUESTION SECTION:
;www.daum.net.	IN	 A

;; ANSWER SECTION:
www.daum.net.	77	IN	CNAME	daum-4vdtymgd.kgslb.com.
daum-4vdtymgd.kgslb.com.	5	IN	A	121.53.105.193

#
dig +short @localhost -p 15053 www.daum.net
13.6 Removing a WorkloadEntry from the mesh & 13장 내용 정리
가상머신이 메시에 자동 등록되던 것처럼, 삭제되면 정리된다
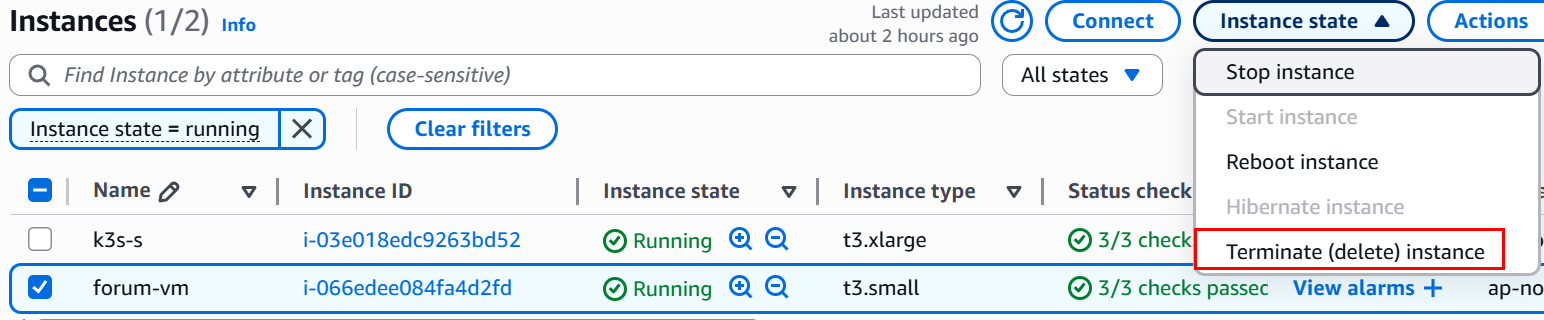
AWS 가상머신용 EC2 를 삭제하자 → 시간이 조금 지난 후, WorkloadEntry 가 정리됐는지 확인
watch kubectl get workloadentries -A
kubectl get workloadentries -A
No resources found
클라우드 네이티브 워크로드의 일시성을 지원하려면 워크로드 항목을 자동으로 정리(삭제)하는 것이 자동 등록만큼 중요하다.
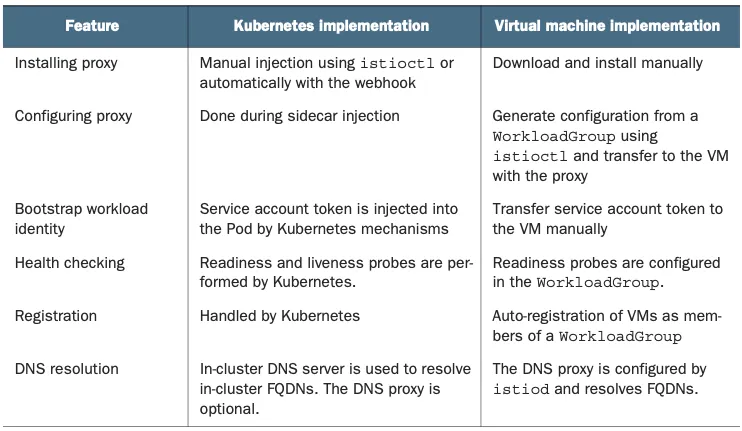
- 쿠버네티스 파드와 가상머신을 메시에 통합하는 방법 간의 차이를 나열.
| 기능 | 쿠버네티스 구현 | 가상머신 구현 |
|---|---|---|
| 프록시 설치 | istioctl로 직접 주입하거나 웹훅으로 자동 주입 | 직접 다운로드해 설치 |
| 프록시 설정 | 사이드카 주입 중 완료 | istioctl을 사용해 WorkloadGroup에서 설정을 생성하고 프록시가 있는 가상머신으로 전송 |
| 워크로드 ID 부트스트랩 | 서비스 어카운트 토큰이 쿠버네티스 메커니즘에 의해 주입 | 서비스 어카운트 토큰을 가상머신으로 수작업으로 전송 |
| 헬스 체크 | 쿠버네티스가 Readiness / Liveness 프로브 수행 | WorkloadGroup에 Rediness 프로브 설정 |
| 등록 | 쿠버네티스가 처리 | WorkloadGroup의 구성원으로 가상머신 자동 등록 |
| DNS 해석 | 클러스터 내 FQDN을 해석하는 데 DNS 서버 사용, DNS 프록시를 사용할지는 선택 가능 | istiod가 DNS 프록시를 설정해 FQDN을 해석 |
유의 사항!
- 우리는 프록시를 수작업으로 설치하고 구성했으며, 이 방식은 워크로드를 메시에 통합하는 방법을 구석구석 모두 보여주는 데 도움이 됐다.
- 그러나 실제 프로젝트에서는 이 과정을 자동화해야 한다. 가상머신을 메시에 수작업으로 추가하면 메시가 아주 취약해진다.
- 서비스를 복구하기 위해 새벽 3시에 가상머신을 수작업으로 재구성하고 메시에 등록할 것을 요구받는 불상사가 일어날 수 있다.
- 오늘날의 프로젝트들은 좋은 관행들을 따라 가상머신을 구축 및 배포하는 자동화를 갖추고 있어 보통 패커 packer.io , 앤서블 ansible.com , 테라폼 terraform.io 같은 도구를 사용한다.
-> 자동화로 애플리케이션에 Istio의 사이드카를 설치하고 설정과 토큰을 제공하도록 스크립트를 업데이트하기만 하면 된다.
Summary
- 가상머신은 이스티오 v1.9에서 베타로 승격됐다. 앞으로는 더 많은 개선이 기대되며, 향후 몇 달 동안 흥미로운 개발 영역이 될 것이다.
- WorkloadGroup 및 WorkloadEntry 를 사용하면 가상머신을 메시에 자동 등록할 수 있다.
- 자동 등록은 가상머신에서 워크로드의 고가용성을 달성하는 데 중요한다.
- istioctl은 가상머신을 istiod에 연결하는 데 필요한 가상머신 설정을 생성할 수 있다.
- east-west 게이트웨이는 가상머신이 연결할 수 있도록 istiod를 노출한다.
- DNS 프록시는 클러스터 내부의 호스트네임을 해석하면 istiod가 NDS API로 설정한다.
- 가상머신 사이드카는 다른 워크로드와 마찬가지로 이스티오 설정을 준수한다
Istio Traffic Flow
- 아래 트래픽 흐름 공통
요청에 대한 트래픽 흐름만 표기됨, 요청에 대한 응답(리턴) 트래픽 흐름은 설명되어 있지 않다.
Type 1: Remote Pod(or 외부) ⇒ Local Pod(Application Container) , 외부에서 Application 컨테이너로 요청 인입 시
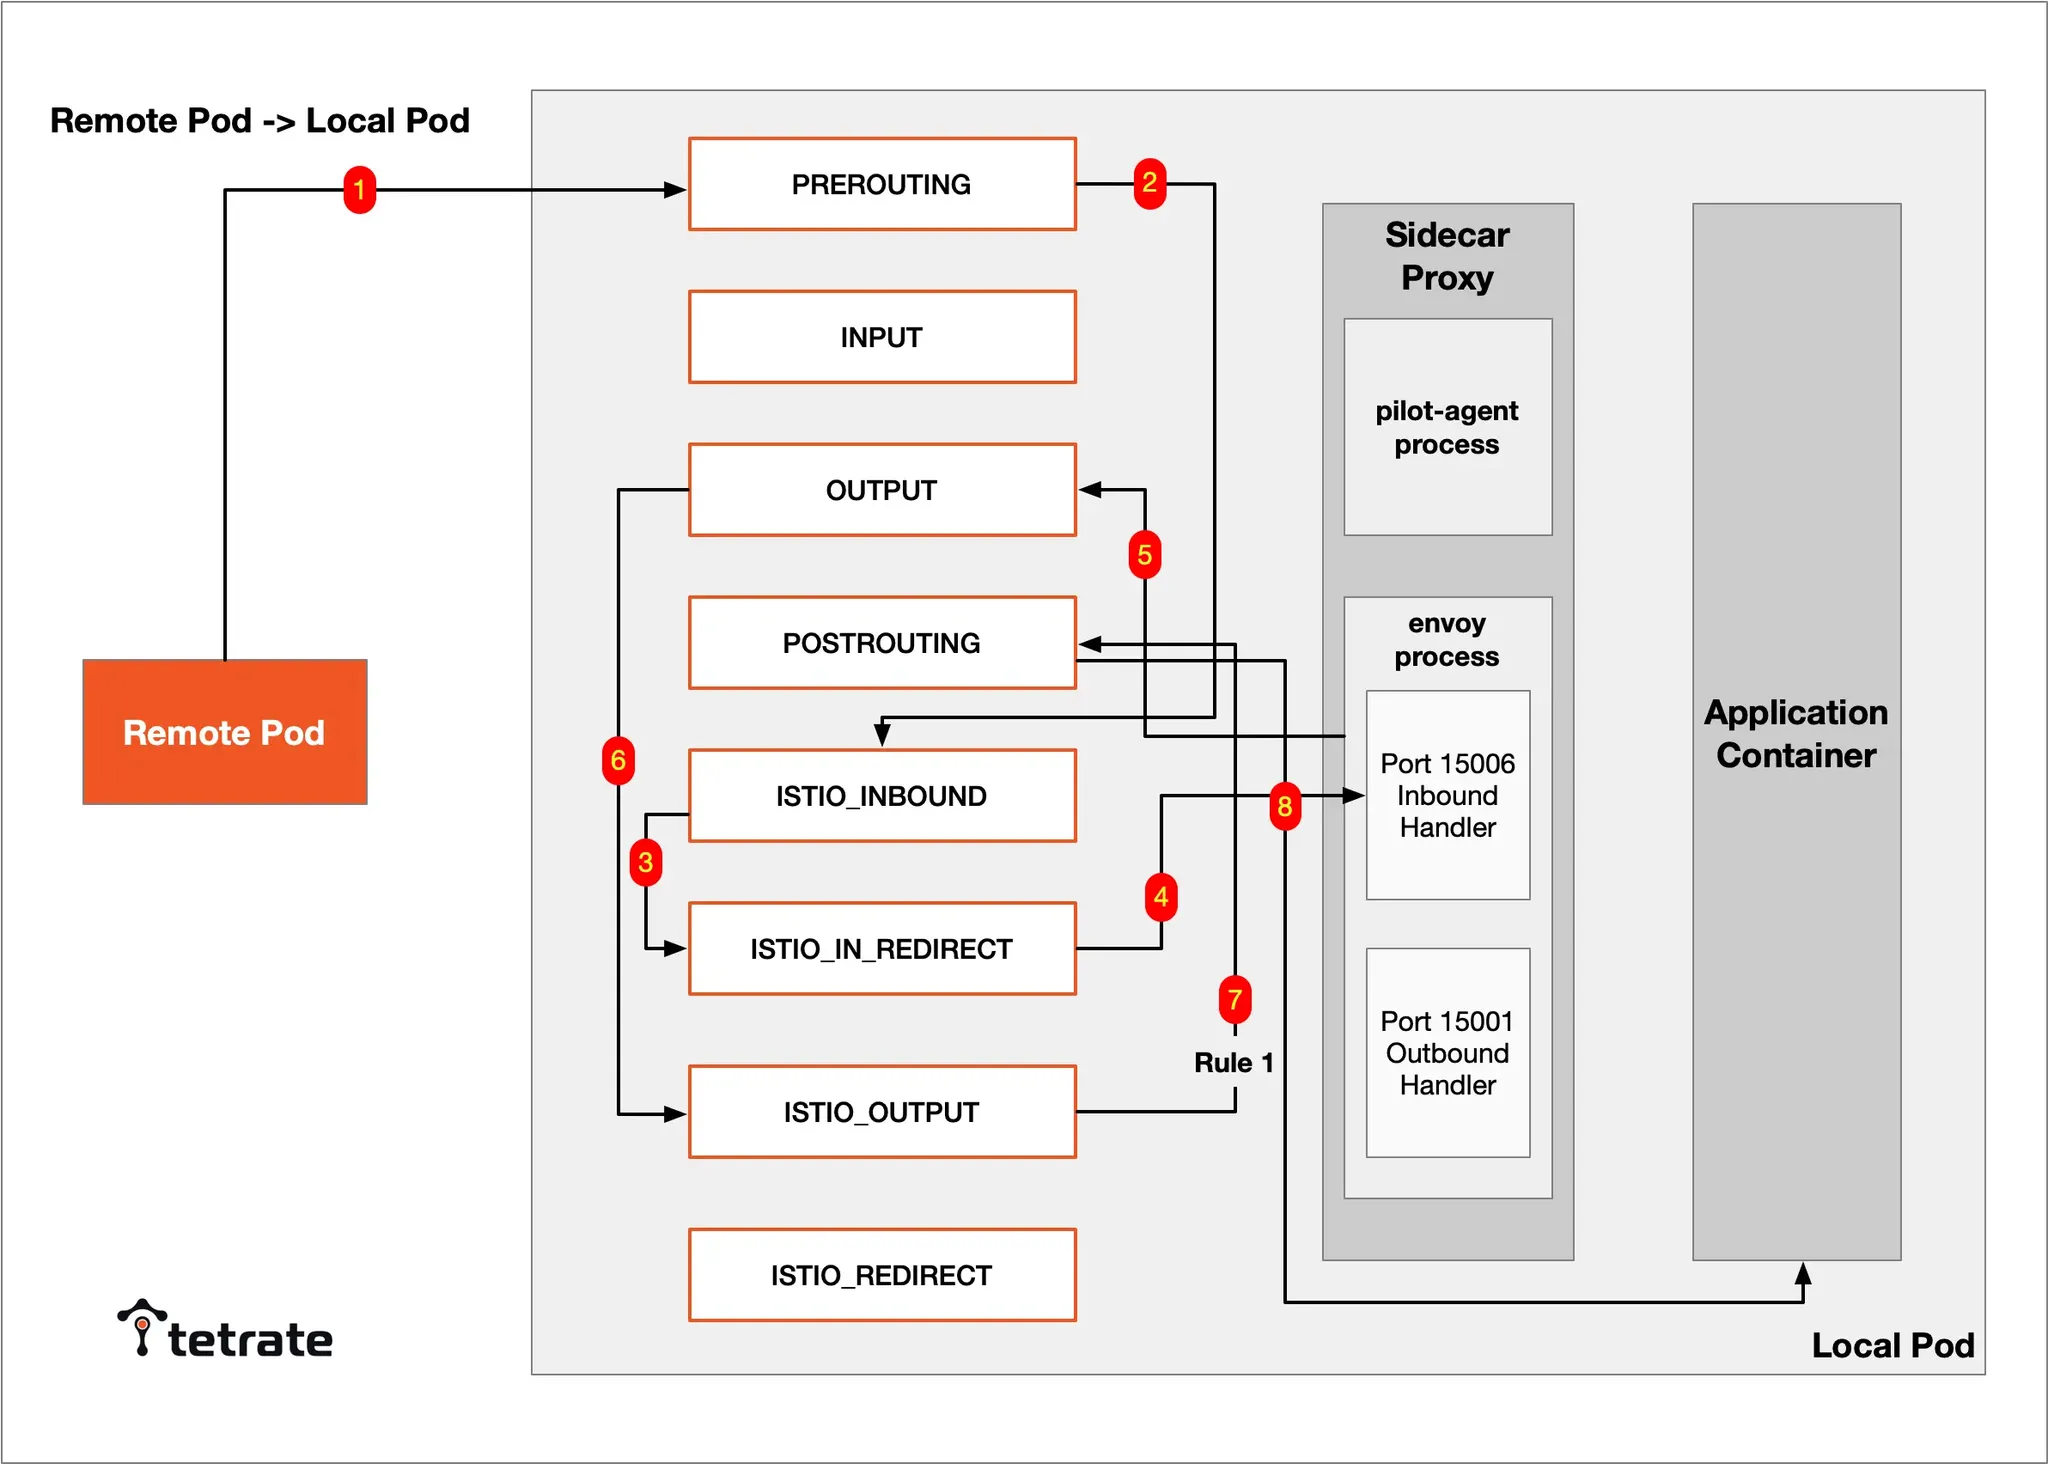
Remote Pod(or 외부) → RREROUTING → ISTIO_INBOUND → ISTIO_IN_REDIRECT → Envoy 컨테이너 15006 (Inbound) → OUTPUT → ISTIO_OUTPUT RULE 1 → POSTROUTING → Local Pod (Application 컨테이너)
Type 2: Local Pod(Application Container) → Remote Pod(or 외부) , Application 컨테이너에서 외부(다른 파드)로 요청 시작 시
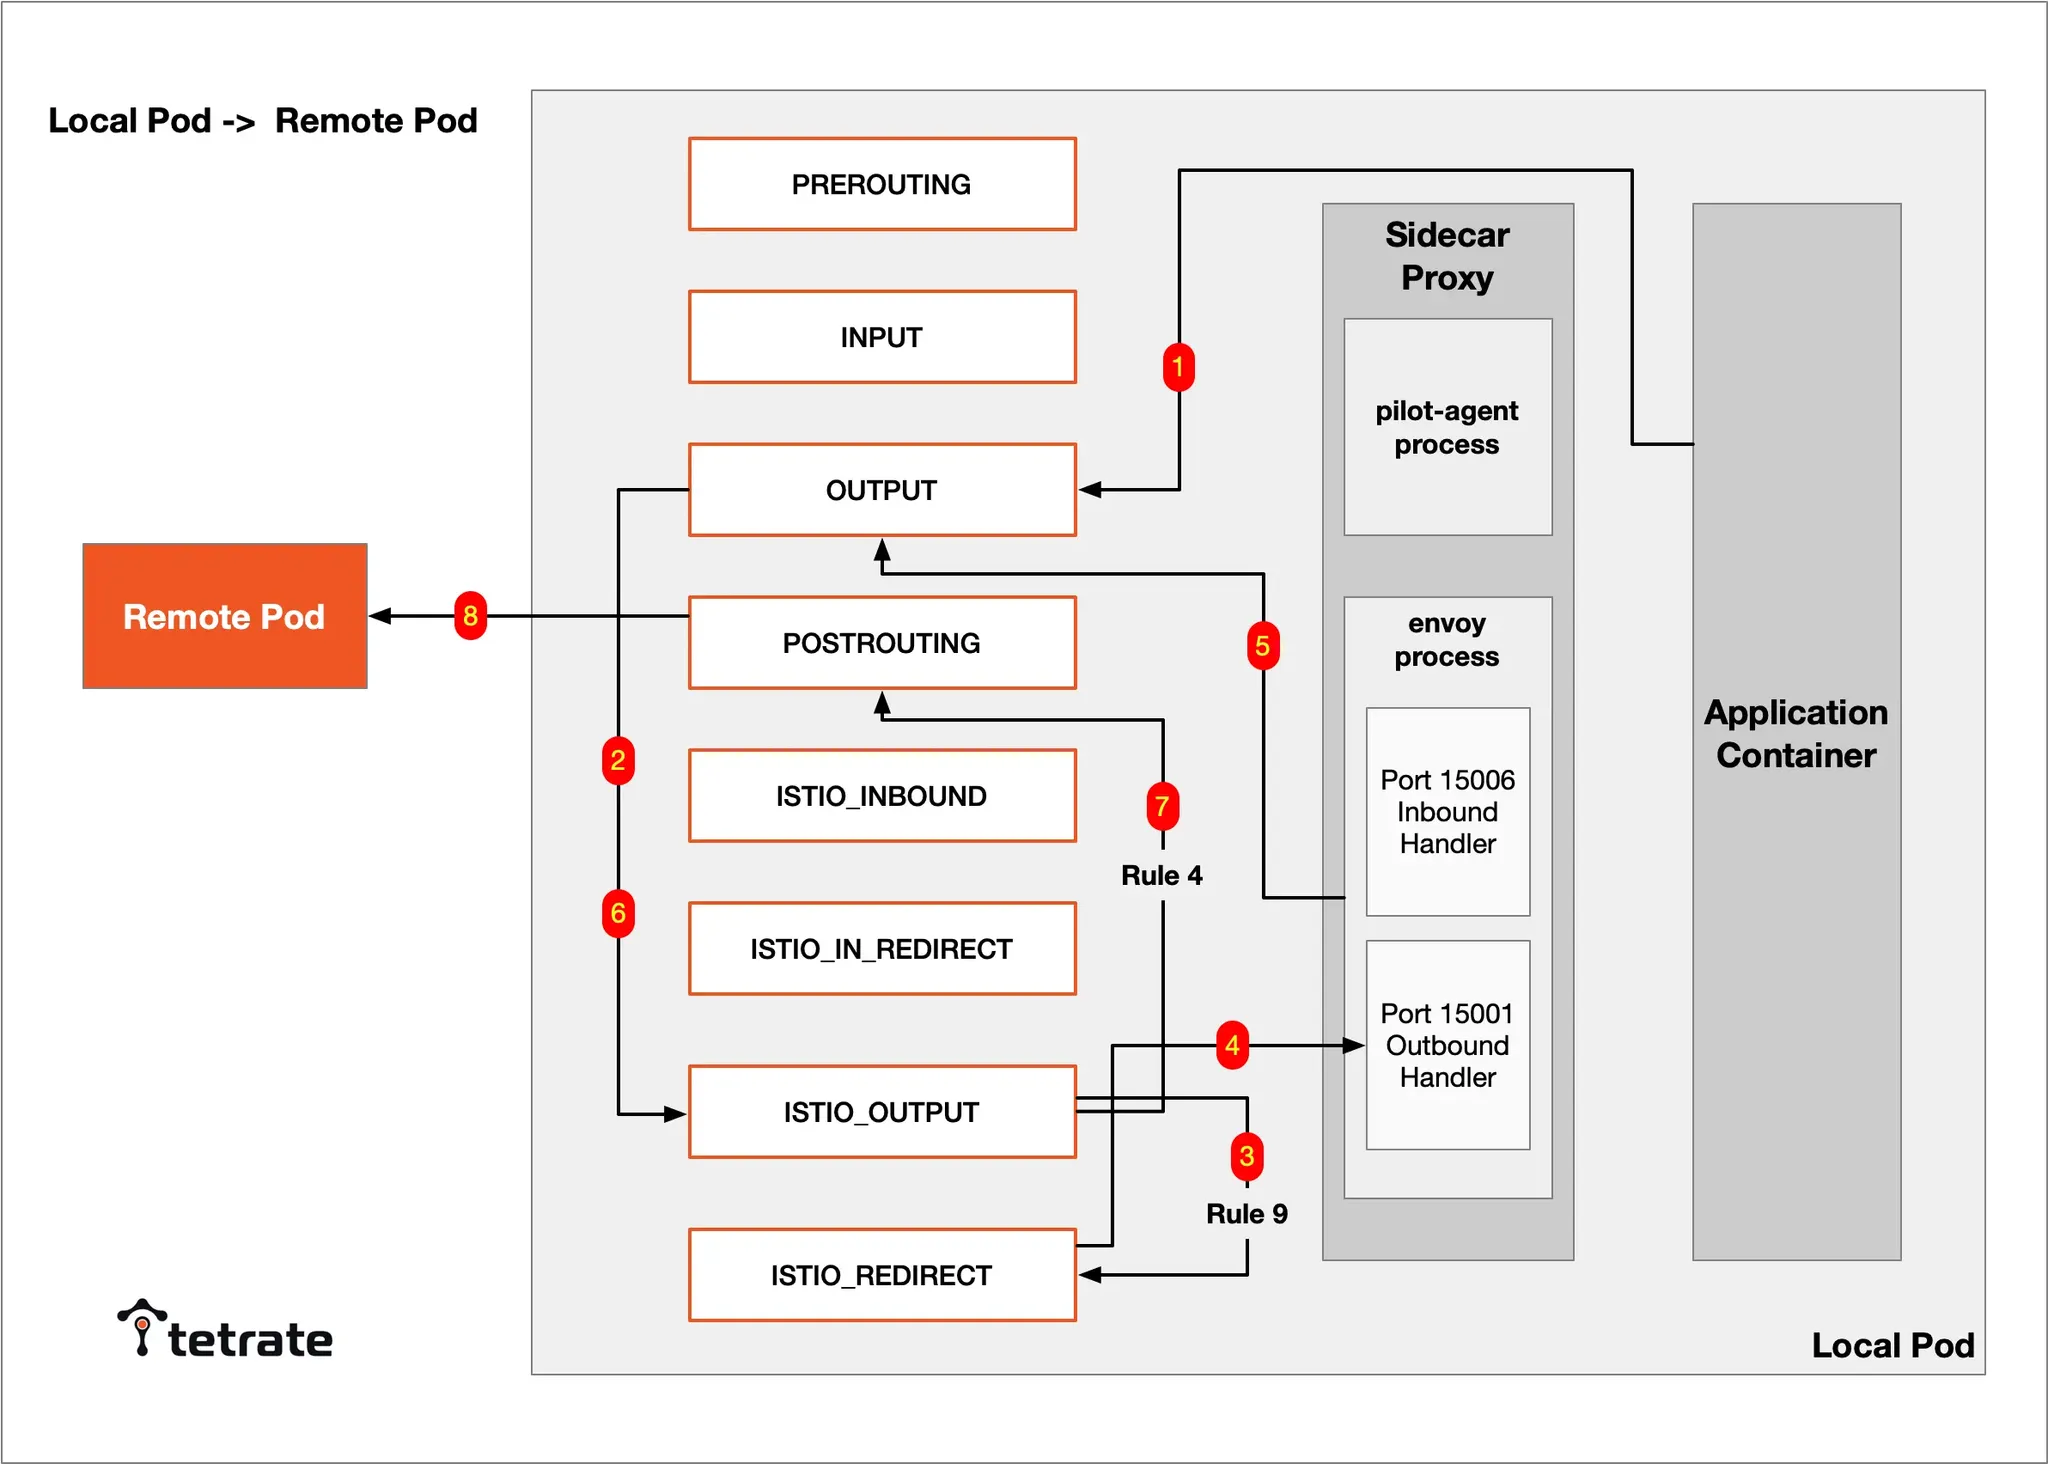
Local Pod (Application 컨테이너) → OUTPUT → ISTIO_OUTPUT RULE 9 → ISTIO_REDIRECT → Envoy 15001 (Outbound) → OUTPUT → ISTIO_OUTPUT RULE 4 → POSTROUTING → Remote Pod(or 외부)
Type 3: Prometheus(서버) → Local Pod(Application Container) , Prometheus(서버)가 Application에 메트릭 수집 시
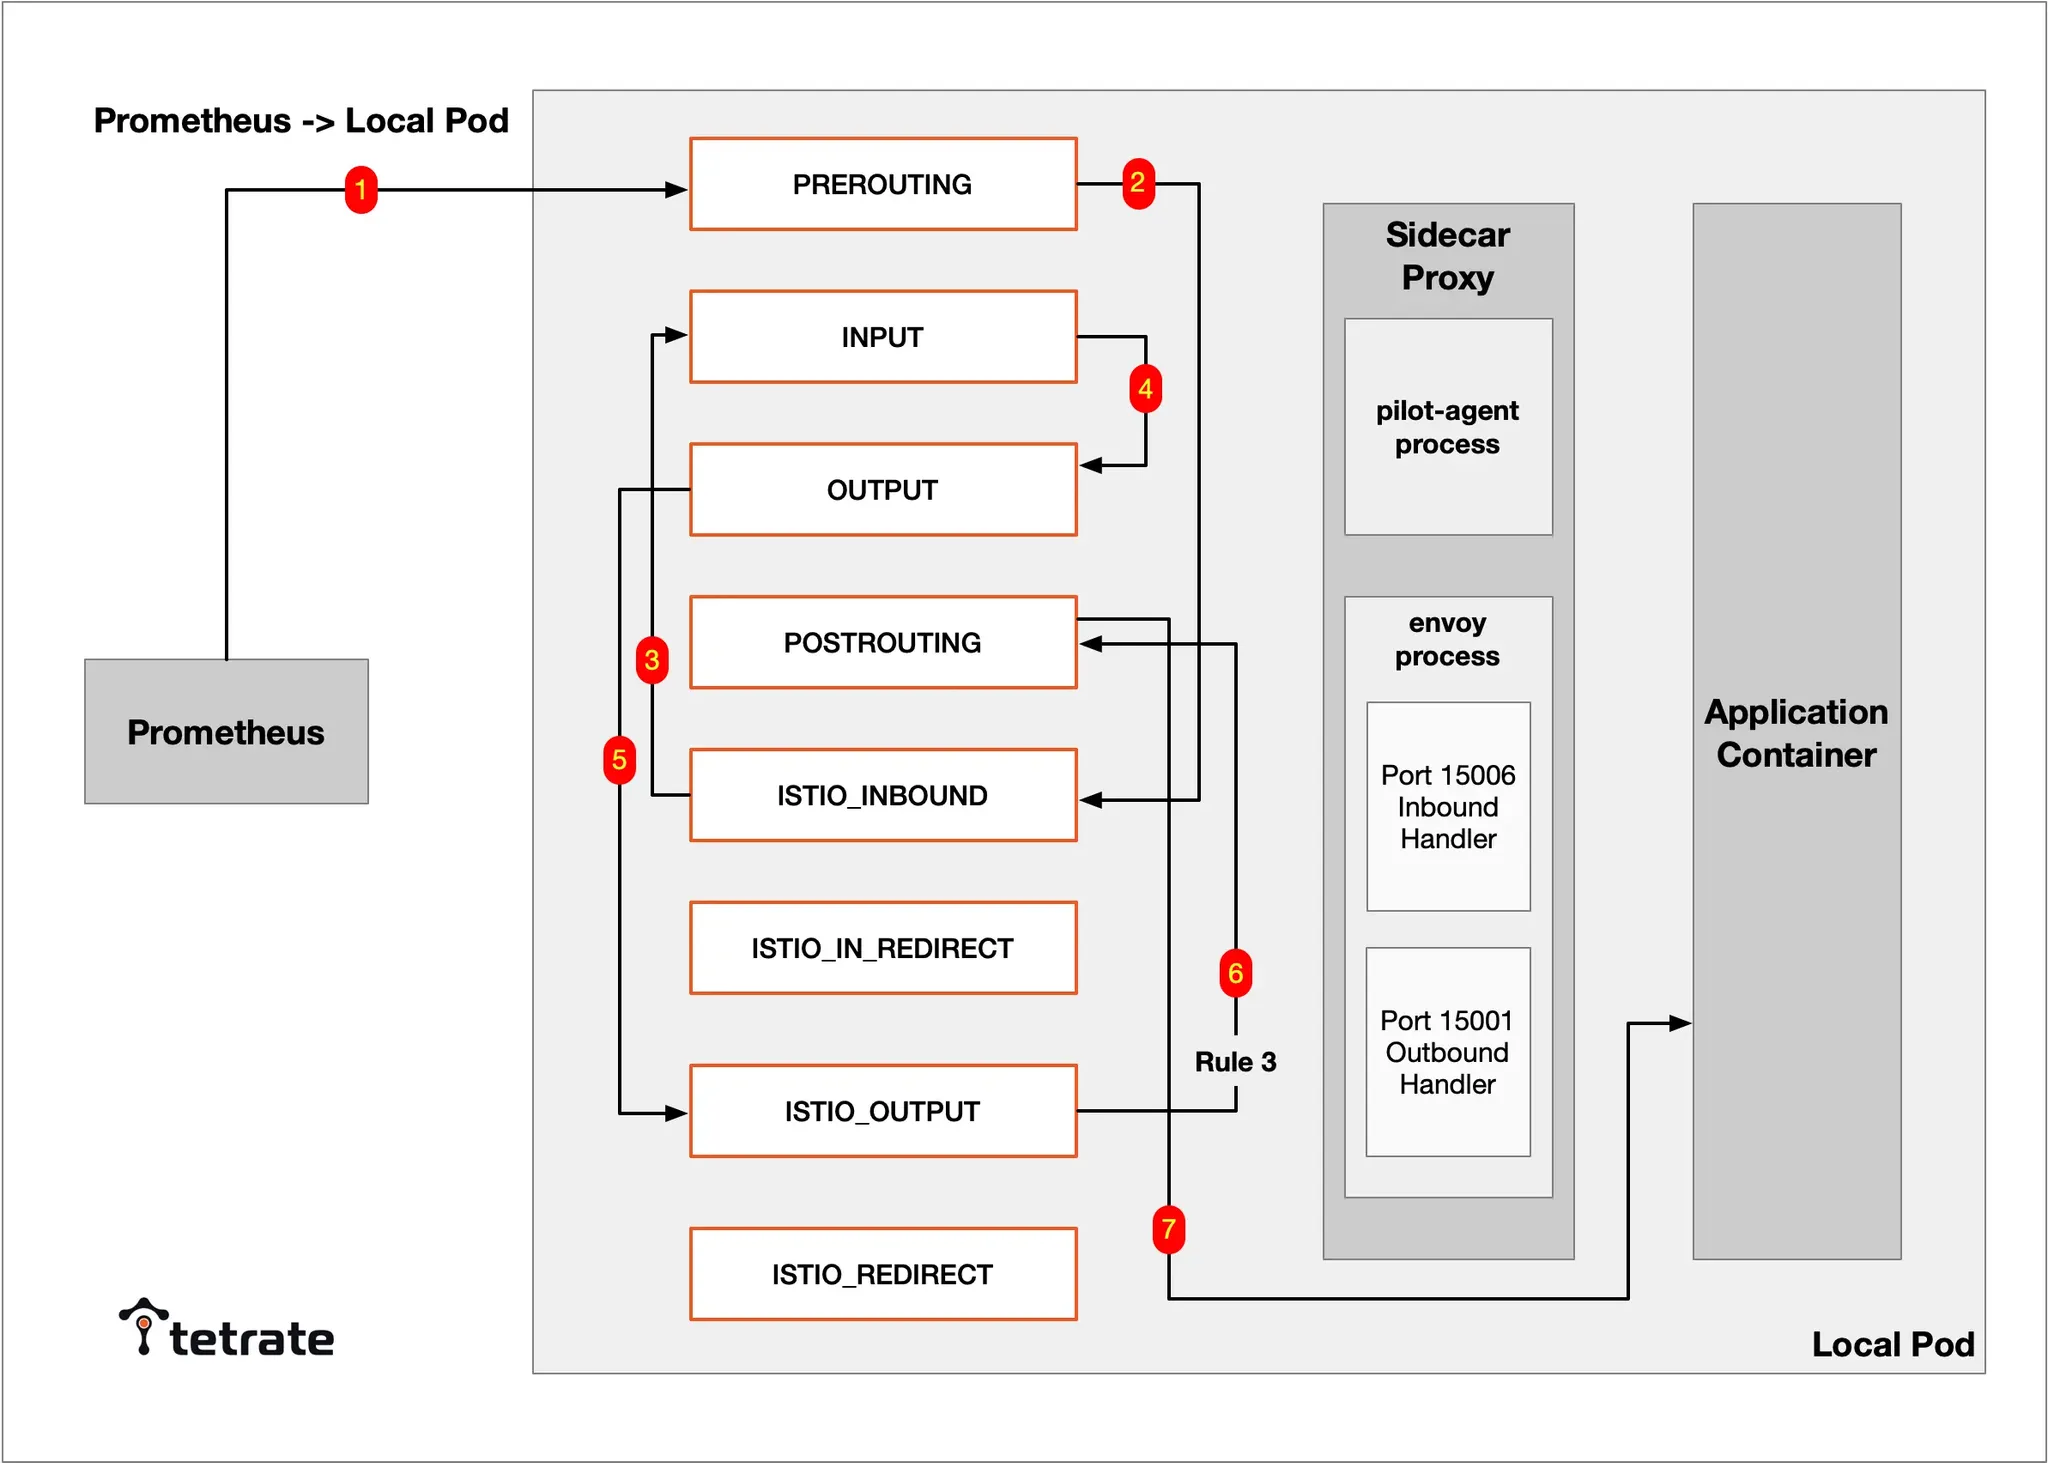
- Prometheus(서버) → RREROUTING → ISTIO_INBOUND (traffic destined for ports 15002, 15090 will go to INPUT) → INPUT → OUTPUT → ISTIO_OUTPUT RULE 3 → POSTROUTING → Local Pod(Application Container)
해당 트래픽 흐름에서는 Sidecar Proxy(Envoy)를 경유하지 않는다!
Type 4: Local Pod → Local Pod , 예시) Application 컨테이너에 2개 이상의 서비스가 존재하고 하나의 서비스가 다른 서비스로 요청 시
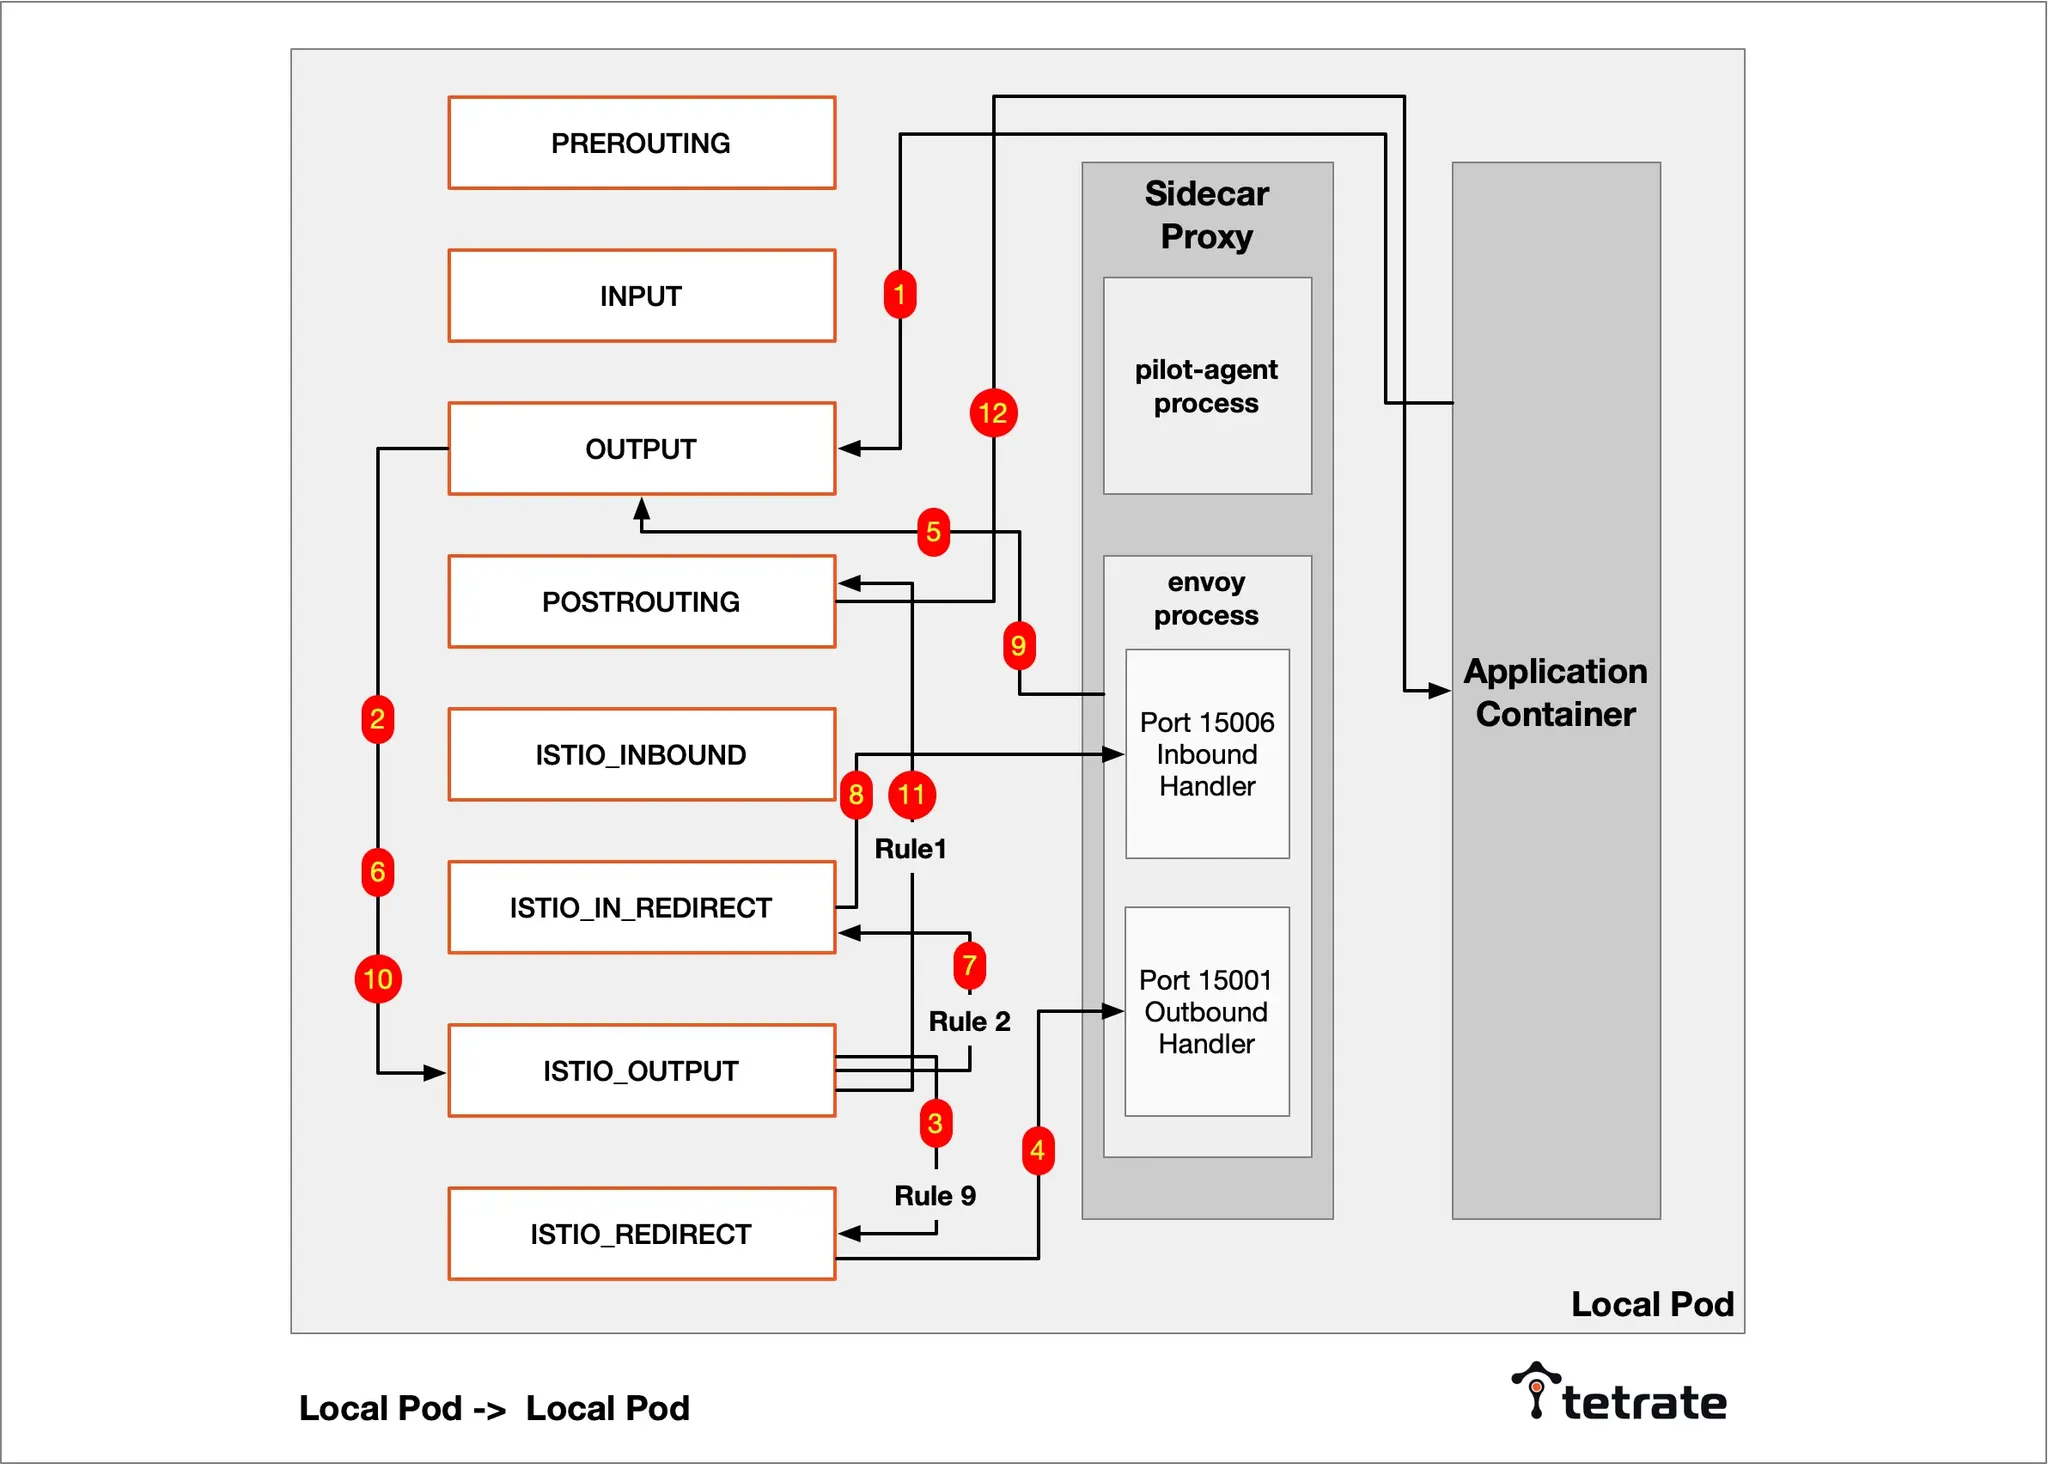
Local Pod → OUTPUT → ISTIO_OUTPUT RULE 9 → ISTIO_REDIRECT → Envoy 15001(Outbound)→ OUTPUT → ISTIO_OUTPUT RULE 2 → ISTIO_IN_REDIRECT → Envoy 15006(Inbound)→ OUTPUT → ISTIO_OUTPUT RULE 1 → POSTROUTING → Local Pod
Type 5: Inter-process TCP traffic within Envoy, Envoy 내부 프로세스(UID/GID 1337)가 lo NICs 나 localhost 도메인 통신 시
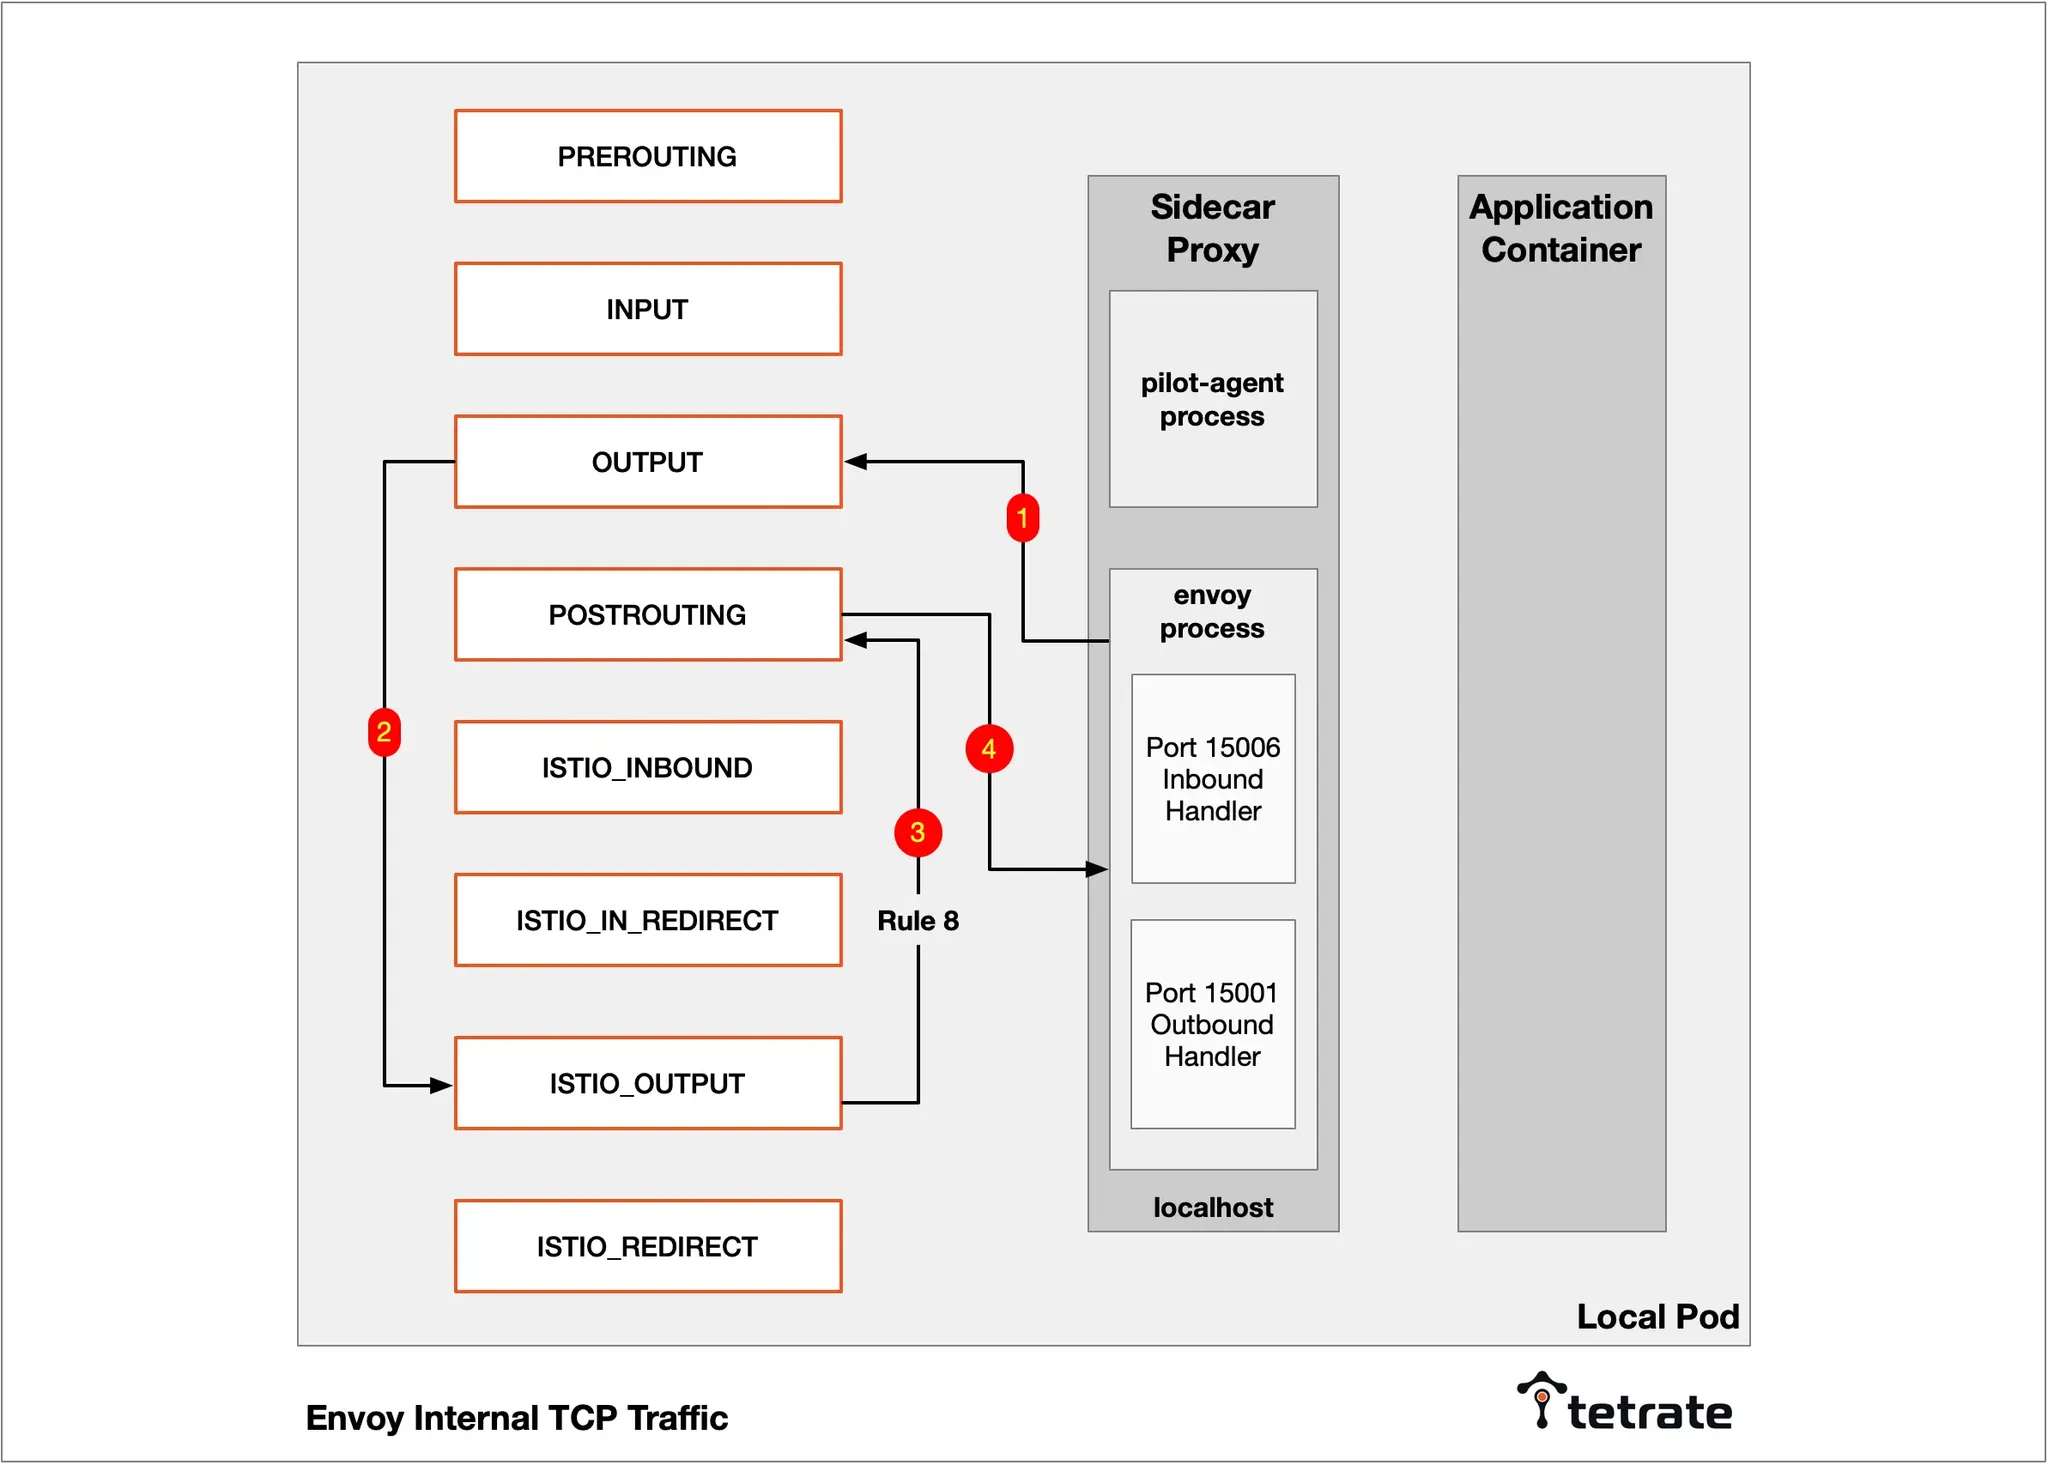
Envoy process (Localhost) → OUTPUT → ISTIO_OUTPUT RULE 8 → POSTROUTING → Envoy process (Localhost)
Type 6: Sidecar to Istiod traffic , pilot-agent 프로세스가 설정 동기화를 위해 istiod(컨트롤 플레인)에 요청 트래픽을 전달 시
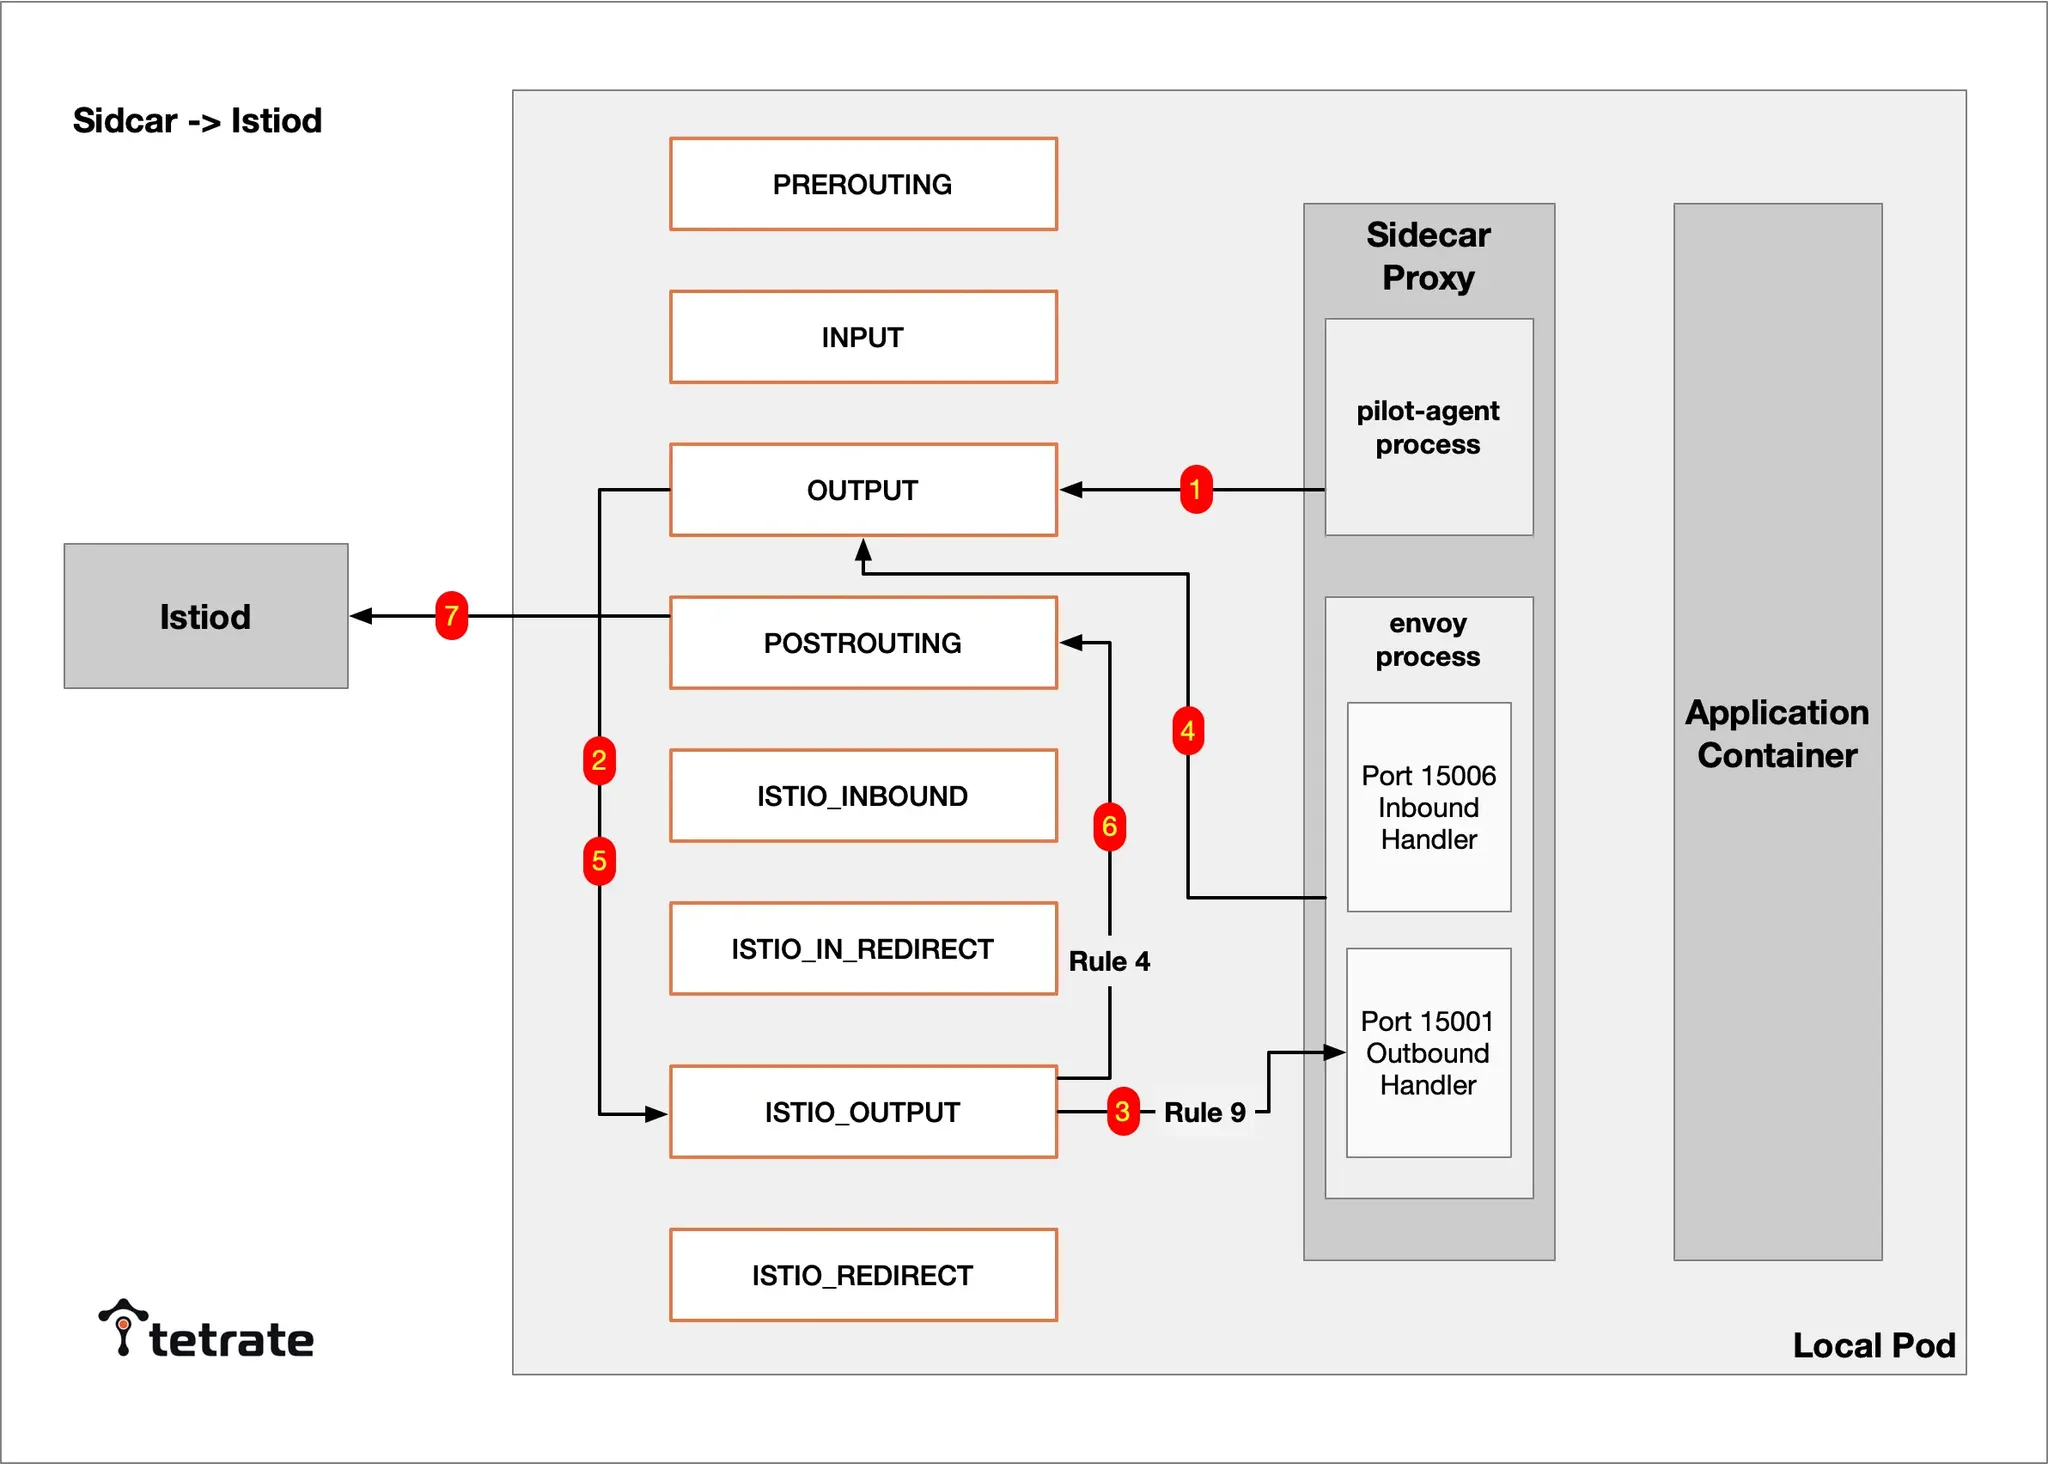
pilot-agent process → OUTPUT -> Istio_OUTPUT RULE 9 → Envoy 15001 (Outbound Handler) → OUTPUT → ISTIO_OUTPUT RULE 4 → POSTROUTING → Istiod(컨트롤 플레인)
