CloudNet@에서 진행하는 Istio Study 1주차 2장 내용입니다.
책에서 진행한 버전과 현재 버전 차이가 상당하여, 실습 진행이 가능한 버전으로 진행합니다.
실습 환경
- WSL2 (Ubuntu)
- Docker
- Kind
Windows의 WSL2 환경에 Docker, Kind를 구성합니다.
설치 과정
Kind 구성
Docker 설치
# WSL2 에 Docker 설치 : 아래 스크립트 실행 후 20초 대기하면 스크립트 실행 됨
curl -fsSL https://get.docker.com -o get-docker.sh
sudo sh ./get-docker.sh
...

# 설치 확인
docker info
docker ps
sudo systemctl status docker
cat /etc/group | grep docker
Kind, 관리 Tool 설치
# 기본 사용자 디렉터리 이동
cd $PWD
pwd

#
sudo systemctl stop apparmor && sudo systemctl disable apparmor

#
sudo apt update && sudo apt-get install bridge-utils net-tools jq tree unzip kubectx kubecolor -y

# Install Kind
curl -Lo ./kind https://kind.sigs.k8s.io/dl/v0.27.0/kind-linux-amd64
chmod +x ./kind
sudo mv ./kind /usr/local/bin/kind
kind --version

# Install kubectl
curl -LO "https://dl.k8s.io/release/$(curl -L -s https://dl.k8s.io/release/stable.txt)/bin/linux/amd64/kubectl"
chmod +x kubectl
sudo mv ./kubectl /usr/bin
sudo kubectl version --client=true

# Install Helm
curl -s https://raw.githubusercontent.com/helm/helm/master/scripts/get-helm-3 | bash
helm version

# Source the completion
source <(kubectl completion bash)
echo 'source <(kubectl completion bash)' >> ~/.bashrc

# Alias kubectl to k
echo 'alias k=kubectl' >> ~/.bashrc
echo 'complete -o default -F __start_kubectl k' >> ~/.bashrc

# Install Kubeps & Setting PS1
git clone https://github.com/jonmosco/kube-ps1.git
echo -e "source $PWD/kube-ps1/kube-ps1.sh" >> ~/.bashrc
cat <<"EOT" >> ~/.bashrc
KUBE_PS1_SYMBOL_ENABLE=true
function get_cluster_short() {
  echo "$1" | cut -d . -f1
}
KUBE_PS1_CLUSTER_FUNCTION=get_cluster_short
KUBE_PS1_SUFFIX=') '
PS1='$(kube_ps1)'$PS1
EOT

# .bashrc 적용을 위해서 logout 후 터미널 다시 접속 하자
exit
Kind 기본 사용/확인
# Create a cluster with kind
kind create cluster

# 클러스터 배포 확인
kind get clusters
kind get nodes
kubectl cluster-info

# 노드 정보 확인
kubectl get node -o wide

# 파드 정보 확인
kubectl get pod -A
kubectl get componentstatuses

# 컨트롤플레인 (컨테이너) 노드 1대가 실행
docker ps
docker images

# kube config 파일 확인
cat ~/.kube/config
혹은
cat $KUBECONFIG # KUBECONFIG 변수 지정 사용 시

# nginx 파드 배포 및 확인 : 컨트롤플레인 노드인데 파드가 배포 될까요?
kubectl run nginx --image=nginx:alpine
kubectl get pod -owide

# 클러스터 삭제
kind delete cluster

# kube config 삭제 확인
cat ~/.kube/config
kind로 K8s 배포
# 클러스터 배포 전 확인
docker ps
mkdir ~/aews-labs
cd ~/aews-labs

# Create a cluster with kind : 1.29.14 , 1.30.10 , 1.31.6 , 1.32.2
kind create cluster --name myk8s --image kindest/node:v1.32.2 --config - <<EOF
kind: Cluster
apiVersion: kind.x-k8s.io/v1alpha4
nodes:
- role: control-plane
  extraPortMappings:
  - containerPort: 30000
    hostPort: 30000
  - containerPort: 30001
    hostPort: 30001
  - containerPort: 30002
    hostPort: 30002
  - containerPort: 30003
    hostPort: 30003
  kubeadmConfigPatches:
  - |
    kind: ClusterConfiguration
    controllerManager:
      extraArgs:
        bind-address: "0.0.0.0"
    etcd:
      local:
        extraArgs:
          listen-metrics-urls: "http://0.0.0.0:2381"
    scheduler:
      extraArgs:
        bind-address: "0.0.0.0"
  - |
    kind: KubeProxyConfiguration
    metricsBindAddress: "0.0.0.0"
EOF

# 확인
kind get nodes --name myk8s
kubens default

# kind 는 별도 도커 네트워크 생성 후 사용 : 기본값 172.18.0.0/16
docker network ls
NETWORK ID     NAME      DRIVER    SCOPE
173f95f978f3   bridge    bridge    local
d8cd85488d6a   host      host      local
8dd40816ceba   kind      bridge    local
0718a86c2c7d   none      null      local

docker inspect kind | jq
[
  {
    "Name": "kind",
    "Id": "8dd40816ceba4f6e96e58eed822b9d7cdb3d454b5ba9026e15ad8eef7649115d",
    "Created": "2025-04-12T17:47:19.472763792+09:00",
    "Scope": "local",
    "Driver": "bridge",
    "EnableIPv4": true,
    "EnableIPv6": true,
    "IPAM": {
      "Driver": "default",
      "Options": {},
      "Config": [
        {
          "Subnet": "fc00:f853:ccd:e793::/64"
        },
        {
          "Subnet": "172.18.0.0/16",
          "Gateway": "172.18.0.1"
        }
      ]
    },
    "Internal": false,
    "Attachable": false,
    "Ingress": false,
    "ConfigFrom": {
      "Network": ""
    },
    "ConfigOnly": false,
    "Containers": {
      "bc19d0436af36fc8d974d2afab510e2b80ac8655165e66136cf7d1fc92f4ebcc": {
        "Name": "myk8s-control-plane",
        "EndpointID": "354f89547faa8658befe39f092a1373f317ecf3dd09ab7dff11e243454d7a77c",
        "MacAddress": "e6:1e:6a:14:e5:e6",
        "IPv4Address": "172.18.0.2/16",
        "IPv6Address": "fc00:f853:ccd:e793::2/64"
      }
    },
    "Options": {
      "com.docker.network.bridge.enable_ip_masquerade": "true",
      "com.docker.network.driver.mtu": "1500"
    },
    "Labels": {}
  }
]

# k8s api 주소 확인 : 어떻게 로컬에서 접속이 되는 걸까?
kubectl cluster-info

# 노드 정보 확인 : CRI 는 containerd 사용
kubectl get node -o wide
myk8s-control-plane   Ready    control-plane   8m56s   v1.32.2   172.18.0.2    <none>        Debian GNU/Linux 12 (bookworm)   5.15.167.4-microsoft-standard-WSL2   containerd://2.0.3

# 파드 정보 확인 : CNI 는 kindnet 사용
kubectl get pod -A -o wide
NAMESPACE            NAME                                          READY   STATUS    RESTARTS   AGE     IP           NODE                  NOMINATED NODE   READINESS GATES
kube-system          coredns-668d6bf9bc-r6947                      1/1     Running   0          9m5s    10.244.0.2   myk8s-control-plane   <none>           <none>
kube-system          coredns-668d6bf9bc-rprqf                      1/1     Running   0          9m5s    10.244.0.3   myk8s-control-plane   <none>           <none>
kube-system          etcd-myk8s-control-plane                      1/1     Running   0          9m11s   172.18.0.2   myk8s-control-plane   <none>           <none>
kube-system          kindnet-cxb9k                                 1/1     Running   0          9m5s    172.18.0.2   myk8s-control-plane   <none>           <none>
kube-system          kube-apiserver-myk8s-control-plane            1/1     Running   0          9m9s    172.18.0.2   myk8s-control-plane   <none>           <none>
kube-system          kube-controller-manager-myk8s-control-plane   1/1     Running   0          9m11s   172.18.0.2   myk8s-control-plane   <none>           <none>
kube-system          kube-proxy-gh54f                              1/1     Running   0          9m5s    172.18.0.2   myk8s-control-plane   <none>           <none>
kube-system          kube-scheduler-myk8s-control-plane            1/1     Running   0          9m9s    172.18.0.2   myk8s-control-plane   <none>           <none>
local-path-storage   local-path-provisioner-7dc846544d-6nqcn       1/1     Running   0          9m5s    10.244.0.4   myk8s-control-plane   <none>           <none>

# 네임스페이스 확인 >> 도커 컨테이너에서 배운 네임스페이스와 다릅니다!
kubectl get namespaces

# 컨트롤플레인노드(컨테이너) 확인 : 도커 컨테이너 이름은 myk8s-control-plane
docker ps
docker images
docker exec -it myk8s-control-plane ss -tnlp

# 디버그용 내용 출력에 ~/.kube/config 권한 인증 로드
kubectl get pod -v6

# kube config 파일 확인 : "server: https://127.0.0.1:YYYYY" 127.0.0.1:Port로 접속 가능을 확인!
cat ~/.kube/config
ls -l ~/.kube/config
kube-ops-view 구성
# kube-ops-view
# helm show values geek-cookbook/kube-ops-view
helm repo add geek-cookbook https://geek-cookbook.github.io/charts/
helm install kube-ops-view geek-cookbook/kube-ops-view --version 1.2.2 --set service.main.type=NodePort,service.main.ports.http.nodePort=30000 --set env.TZ="Asia/Seoul" --namespace kube-system
"geek-cookbook" has been added to your repositories
NAME: kube-ops-view
LAST DEPLOYED: Sat Apr 12 18:09:14 2025
NAMESPACE: kube-system
STATUS: deployed
REVISION: 1
TEST SUITE: None
NOTES:
1. Get the application URL by running these commands:
  export NODE_PORT=$(kubectl get --namespace kube-system -o jsonpath="{.spec.ports[0].nodePort}" services kube-ops-view)
  export NODE_IP=$(kubectl get nodes --namespace kube-system -o jsonpath="{.items[0].status.addresses[0].address}")
  echo http://$NODE_IP:$NODE_PORT
NAME                            READY   UP-TO-DATE   AVAILABLE   AGE
deployment.apps/kube-ops-view   0/1     1            0           0s

NAME                                 READY   STATUS              RESTARTS   AGE
pod/kube-ops-view-6658c477d4-v2v2k   0/1     ContainerCreating   0          0s

NAME                    TYPE       CLUSTER-IP     EXTERNAL-IP   PORT(S)          AGE
service/kube-ops-view   NodePort   10.96.10.169   <none>        8080:30000/TCP   0s

# 설치 확인
kubectl get deploy,pod,svc,ep -n kube-system -l app.kubernetes.io/instance=kube-ops-view

# kube-ops-view 접속 URL 확인 (1.5 , 2 배율) : 아래 접속 주소를 자신의 웹 브라우저에서 접속할 것!
echo "http://127.0.0.1:30000/#scale=1.5"
echo "http://127.0.0.1:30000/#scale=2"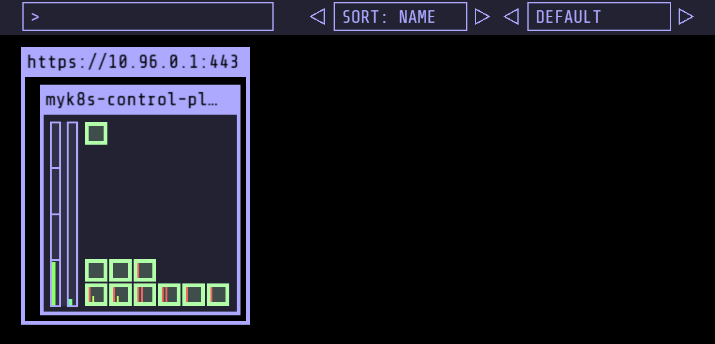
# 클러스터 삭제
kind delete cluster --name myk8s
docker ps
cat ~/.kube/config
지금까지 기본적인 kind 구성과 K8s를 간단하게 테스트해보았으며, 다음에는 특정 버전을 지정하여 실습 과정을 진행하겠습니다.
실습 구성
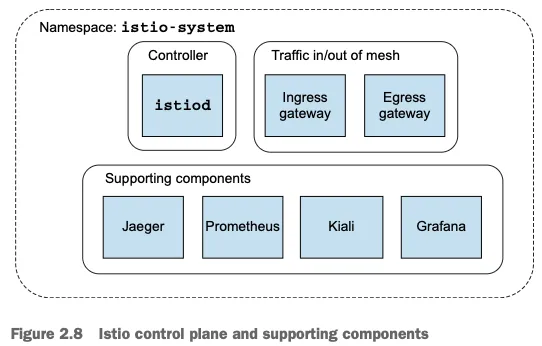
Istio Control Plane 제공 기능
- 운영자가 원하는 라우팅/회복력 routing/resilience 동작을 지정할 수 있는 API
- 데이터 플레인 설정을 위한 API
- 데이터 플레인에 대한 서비스 검색 추상화 service discovery abstraction
- 사용자 정책 specifying usage policies 지정 API
- 인증서 발급 및 순환 Certificate issuance and rotation
- 워크로드 ID 할당 Workload identity assignment
- 통합 원격 측정 컬렉션 Unified telemetry collection
- 서비스 프록시 사이드카 주입 Service-proxy sidecar injection
- 네트워크 경계 지정 및 접근 방법 Specification of network boundaries and how to access them
kind : k8s(1.23.17) 배포
#
git clone https://github.com/AcornPublishing/istio-in-action
cd istio-in-action/book-source-code-master
pwd # 각자 자신의 pwd 경로
code .

#
kind create cluster --name myk8s --image kindest/node:v1.23.17 --config - <<EOF
kind: Cluster
apiVersion: kind.x-k8s.io/v1alpha4
nodes:
- role: control-plane
  extraPortMappings:
  - containerPort: 30000 # Sample Application (istio-ingrssgateway)
    hostPort: 30000
  - containerPort: 30001 # Prometheus
    hostPort: 30001
  - containerPort: 30002 # Grafana
    hostPort: 30002
  - containerPort: 30003 # Kiali
    hostPort: 30003
  - containerPort: 30004 # Tracing
    hostPort: 30004
  - containerPort: 30005 # kube-ops-view
    hostPort: 30005
  extraMounts:
  - hostPath: /home/users/istio-in-action/book-source-code-master # 각자 자신의 pwd 경로로 설정
    containerPath: /istiobook
networking:
  podSubnet: 10.10.0.0/16
  serviceSubnet: 10.200.1.0/24
EOF

# 설치 확인
docker ps
CONTAINER ID   IMAGE                   COMMAND                  CREATED          STATUS          PORTS                                                             NAMES
9fbe928807dc   kindest/node:v1.23.17   "/usr/local/bin/entr…"   51 seconds ago   Up 49 seconds   0.0.0.0:30000-30005->30000-30005/tcp, 127.0.0.1:44687->6443/tcp   myk8s-control-plane

# 노드에 기본 툴 설치
docker exec -it myk8s-control-plane sh -c 'apt update && apt install tree psmisc lsof wget bridge-utils net-tools dnsutils tcpdump ngrep iputils-ping git vim -y'


# (옵션) kube-ops-view
helm repo add geek-cookbook https://geek-cookbook.github.io/charts/
helm install kube-ops-view geek-cookbook/kube-ops-view --version 1.2.2 --set service.main.type=NodePort,service.main.ports.http.nodePort=30005 --set env.TZ="Asia/Seoul" --namespace kube-system
kubectl get deploy,pod,svc,ep -n kube-system -l app.kubernetes.io/instance=kube-ops-view

## kube-ops-view 접속 URL 확인
open "http://localhost:30005/#scale=1.5"
open "http://localhost:30005/#scale=1.3"

# (옵션) metrics-server
helm repo add metrics-server https://kubernetes-sigs.github.io/metrics-server/
helm install metrics-server metrics-server/metrics-server --set 'args[0]=--kubelet-insecure-tls' -n kube-system
kubectl get all -n kube-system -l app.kubernetes.io/instance=metrics-server
Istio 1.17.8 설치
# myk8s-control-plane 진입 후 설치 진행
docker exec -it myk8s-control-plane bash
내부 myk8s-control-plane로 접근하여 istioctl binary 파일을 설치합니다.
# 코드 파일들 마운트 확인
tree /istiobook/ -L 1
/istiobook/
|-- README.md
|-- appendices
|-- bin
|-- ch10
|-- ch11
|-- ch12
|-- ch13
|-- ch14
|-- ch2
|-- ch3
|-- ch4
|-- ch5
|-- ch6
|-- ch7
|-- ch8
|-- ch9
`-- services

# istioctl 설치
export ISTIOV=1.17.8
echo 'export ISTIOV=1.17.8' >> /root/.bashrc

curl -s -L https://istio.io/downloadIstio | ISTIO_VERSION=$ISTIOV sh -
tree istio-$ISTIOV -L 2 # sample yaml 포함
cp istio-$ISTIOV/bin/istioctl /usr/local/bin/istioctl
istioctl version --remote=false

# 설치 결과
istio-1.17.8
|-- LICENSE
|-- README.md
|-- bin
|   `-- istioctl
|-- manifest.yaml
|-- manifests
|   |-- charts
|   |-- examples
|   `-- profiles
|-- samples
|   |-- README.md
|   |-- addons
|   |-- bookinfo
|   |-- certs
|   |-- cicd
|   |-- custom-bootstrap
|   |-- extauthz
|   |-- external
|   |-- grpc-echo
|   |-- health-check
|   |-- helloworld
|   |-- httpbin
|   |-- jwt-server
|   |-- kind-lb
|   |-- multicluster
|   |-- open-telemetry
|   |-- operator
|   |-- ratelimit
|   |-- security
|   |-- sleep
|   |-- tcp-echo
|   |-- wasm_modules
|   `-- websockets
`-- tools
    |-- _istioctl
    |-- certs
    `-- istioctl.bash

# default 프로파일 컨트롤 플레인 배포
istioctl x precheck # 설치 전 k8s 조건 충족 검사
istioctl profile list
istioctl install --set profile=default -y
✔ No issues found when checking the cluster. Istio is safe to install or upgrade!
  To get started, check out https://istio.io/latest/docs/setup/getting-started/
Istio configuration profiles:
    ambient
    default
    demo
    empty
    external
    minimal
    openshift
    preview
    remote
✔ Istio core installed
✔ Istiod installed
✔ Ingress gateways installed
✔ Installation complete


# 설치 확인 : istiod, istio-ingressgateway, crd 등
kubectl get istiooperators -n istio-system

kubectl get istiooperators -n istio-system -o yaml
apiVersion: v1
items:
- apiVersion: install.istio.io/v1alpha1
  kind: IstioOperator
  metadata:
  ...


kubectl get all,svc,ep,sa,cm,secret,pdb -n istio-system

kubectl get crd | grep istio.io | sort
istioctl verify-install # 설치 확인

# 보조 도구 설치
kubectl apply -f istio-$ISTIOV/samples/addons
kubectl get pod -n istio-system
NAME                                   READY   STATUS    RESTARTS   AGE
grafana-b854c6c8-q5x2f                 1/1     Running   0          101s
istio-ingressgateway-996bc6bb6-v25mh   1/1     Running   0          8m7s
istiod-7df6ffc78d-6kl97                1/1     Running   0          8m11s
jaeger-5556cd8fcf-lnsbf                1/1     Running   0          101s
kiali-648847c8c4-pndx8                 1/1     Running   0          101s
prometheus-7b8b9dd44c-r6lcw            2/2     Running   0          101s

# 빠져나오기
exit
---

kubectl get cm -n istio-system istio -o yaml
apiVersion: v1
data:
  mesh: |-
    defaultConfig:
      discoveryAddress: istiod.istio-system.svc:15012
      proxyMetadata: {}
      tracing:
        zipkin:
          address: zipkin.istio-system:9411
    enablePrometheusMerge: true
    rootNamespace: istio-system
    trustDomain: cluster.local
  meshNetworks: 'networks: {}'
kind: ConfigMap
metadata:
  annotations:
    kubectl.kubernetes.io/last-applied-configuration: |
      {"apiVersion":"v1","data":{"mesh":"defaultConfig:\n  discoveryAddress: istiod.istio-system.svc:15012\n  proxyMetadata: {}\n  tracing:\n    zipkin:\n      address: zipkin.istio-system:9411\nenablePrometheusMerge: true\nrootNamespace: istio-system\ntrustDomain: cluster.local","meshNetworks":"networks: {}"},"kind":"ConfigMap","metadata":{"annotations":{},"labels":{"install.operator.istio.io/owning-resource":"unknown","install.operator.istio.io/owning-resource-namespace":"istio-system","istio.io/rev":"default","operator.istio.io/component":"Pilot","operator.istio.io/managed":"Reconcile","operator.istio.io/version":"1.17.8","release":"istio"},"name":"istio","namespace":"istio-system"}}
  creationTimestamp: "2025-04-12T09:49:29Z"
  labels:
    install.operator.istio.io/owning-resource: unknown
    install.operator.istio.io/owning-resource-namespace: istio-system
    istio.io/rev: default
    operator.istio.io/component: Pilot
    operator.istio.io/managed: Reconcile
    operator.istio.io/version: 1.17.8
    release: istio
  name: istio
  namespace: istio-system
  resourceVersion: "1246"
  uid: 2a406a67-8971-4ffa-b504-3eb8ae445fc6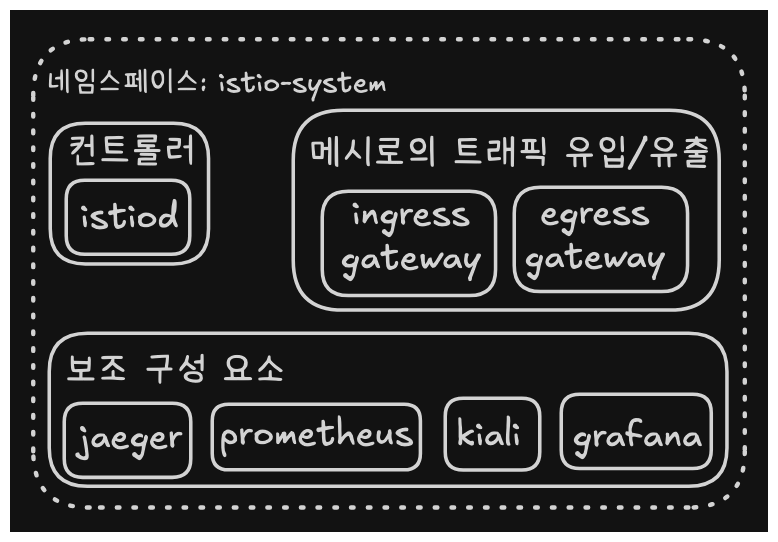
서비스 메시에 첫 애플리케이션 배포
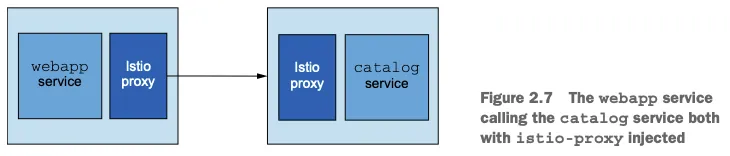
아래 구성처럼 프론트와 백 서비스로 간단한 테스트를 진행합니다.
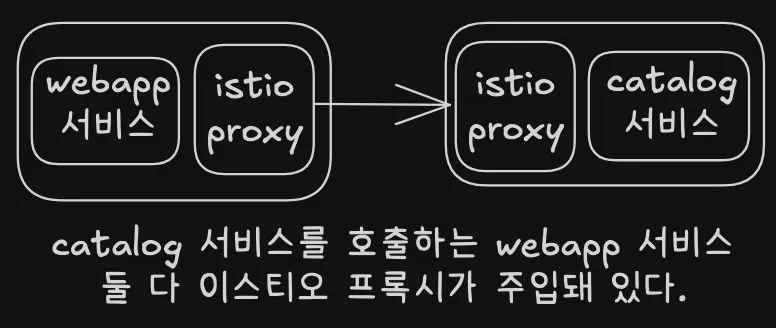
Sidecar 설정을 추가하는 방법은 2가지가 있는데, 첫 번째는 yaml에 직접 명시하는 것이고, 두 번째는 namespace 또는 Pod에 label을 설정하는 것이다. 두 번째 방식이 편리하게 사용됩니다.
kubectl create ns istioinaction

# 방법1 : yaml에 sidecar 설정을 추가
cat services/catalog/kubernetes/catalog.yaml
docker exec -it myk8s-control-plane istioctl kube-inject -f /istiobook/services/catalog/kubernetes/catalog.yaml
...
  - args:
        - proxy
        - sidecar
        - --domain
        - $(POD_NAMESPACE).svc.cluster.local
        - --proxyLogLevel=warning
        - --proxyComponentLogLevel=misc:error
        - --log_output_level=default:info
        - --concurrency
        - "2"
        env:
        - name: JWT_POLICY
          value: third-party-jwt
        - name: PILOT_CERT_PROVIDER
          value: istiod
        - name: CA_ADDR
          value: istiod.istio-system.svc:15012
        - name: POD_NAME
          valueFrom:
            fieldRef:
              fieldPath: metadata.name
  ...
        image: docker.io/istio/proxyv2:1.13.0
        name: istio-proxy


# 방법2 : namespace에 레이블을 추가하면 istiod (오퍼레이터)가 해당 namepsace의 pod spec에 자동으로 sidecar 설정을 주입
kubectl label namespace istioinaction istio-injection=enabled
kubectl get ns --show-labels
namespace/istioinaction labeled
NAME                 STATUS   AGE     LABELS
default              Active   38m     kubernetes.io/metadata.name=default
istio-system         Active   31m     kubernetes.io/metadata.name=istio-system
istioinaction        Active   7m15s   istio-injection=enabled,kubernetes.io/metadata.name=istioinaction
kube-node-lease      Active   38m     kubernetes.io/metadata.name=kube-node-lease
kube-public          Active   38m     kubernetes.io/metadata.name=kube-public
kube-system          Active   38m     kubernetes.io/metadata.name=kube-system
local-path-storage   Active   38m     kubernetes.io/metadata.name=local-path-storage

#
kubectl get mutatingwebhookconfiguration
NAME                         WEBHOOKS   AGE
istio-revision-tag-default   4          9m24s # 특정 revision의 사이드카 주입 설정 관리
istio-sidecar-injector       4          9m45s # Istio는 각 애플리케이션 Pod에 Envoy 사이드카 프록시를 자동으로 주입
                                              ## 네임스페이스나 Pod에 istio-injection=enabled 라벨이 있어야 작동

kubectl get mutatingwebhookconfiguration istio-sidecar-injector -o yaml

kubectl get cm -n istio-system istio-sidecar-injector -o yaml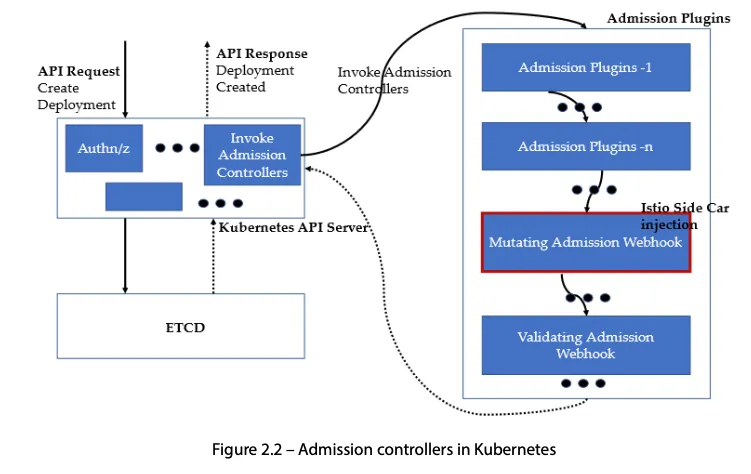
#
cat services/catalog/kubernetes/catalog.yaml
kubectl apply -f services/catalog/kubernetes/catalog.yaml -n istioinaction

cat services/webapp/kubernetes/webapp.yaml
kubectl apply -f services/webapp/kubernetes/webapp.yaml -n istioinaction

#
kubectl get pod -n istioinaction
NAME                     READY   STATUS    RESTARTS   AGE
catalog-6cf4b97d-vkpwj   2/2     Running   0          14s
webapp-7685bcb84-px62g   2/2     Running   0          21s

# catalog 디플로이먼트에서 파드 관련 spec
kubectl get deploy -n istioinaction catalog -o jsonpath="{.spec.template.spec}" | jq

# catalog 파드 관련 spec : 위 디플로이먼트와 파드 spec 을 비교해보자
kubectl get pod -n istioinaction -l app=catalog -o jsonpath="{.items[0].spec}" | jq


# 접속 테스트용 netshoot 파드 생성
cat <<EOF | kubectl apply -f -
apiVersion: v1
kind: Pod
metadata:
  name: netshoot
spec:
  containers:
  - name: netshoot
    image: nicolaka/netshoot
    command: ["tail"]
    args: ["-f", "/dev/null"]
  terminationGracePeriodSeconds: 0
EOF

# catalog 접속 확인
kubectl exec -it netshoot -- curl -s http://catalog.istioinaction/items/1 | jq
{
  "id": 1,
  "color": "amber",
  "department": "Eyewear",
  "name": "Elinor Glasses",
  "price": "282.00"
}

# webapp 접속 확인 : webapp 서비스는 다른 서비스에서 데이터를 집계해 브라우저에 시각적으로 표시한다.
## 즉 webapp은 다른 백엔드 서비스의 파사드 facade 역할을 한다.
kubectl exec -it netshoot -- curl -s http://webapp.istioinaction/api/catalog/items/1 | jq
{
  "id": 1,
  "color": "amber",
  "department": "Eyewear",
  "name": "Elinor Glasses",
  "price": "282.00"
}
로컬 Host에서 직접 접근하기
# 아래 방법 대신 임시 사용
kubectl port-forward -n istioinaction deploy/webapp 8080:8080
확인 후 CTRL+C 로 종료

open http://localhost:8080
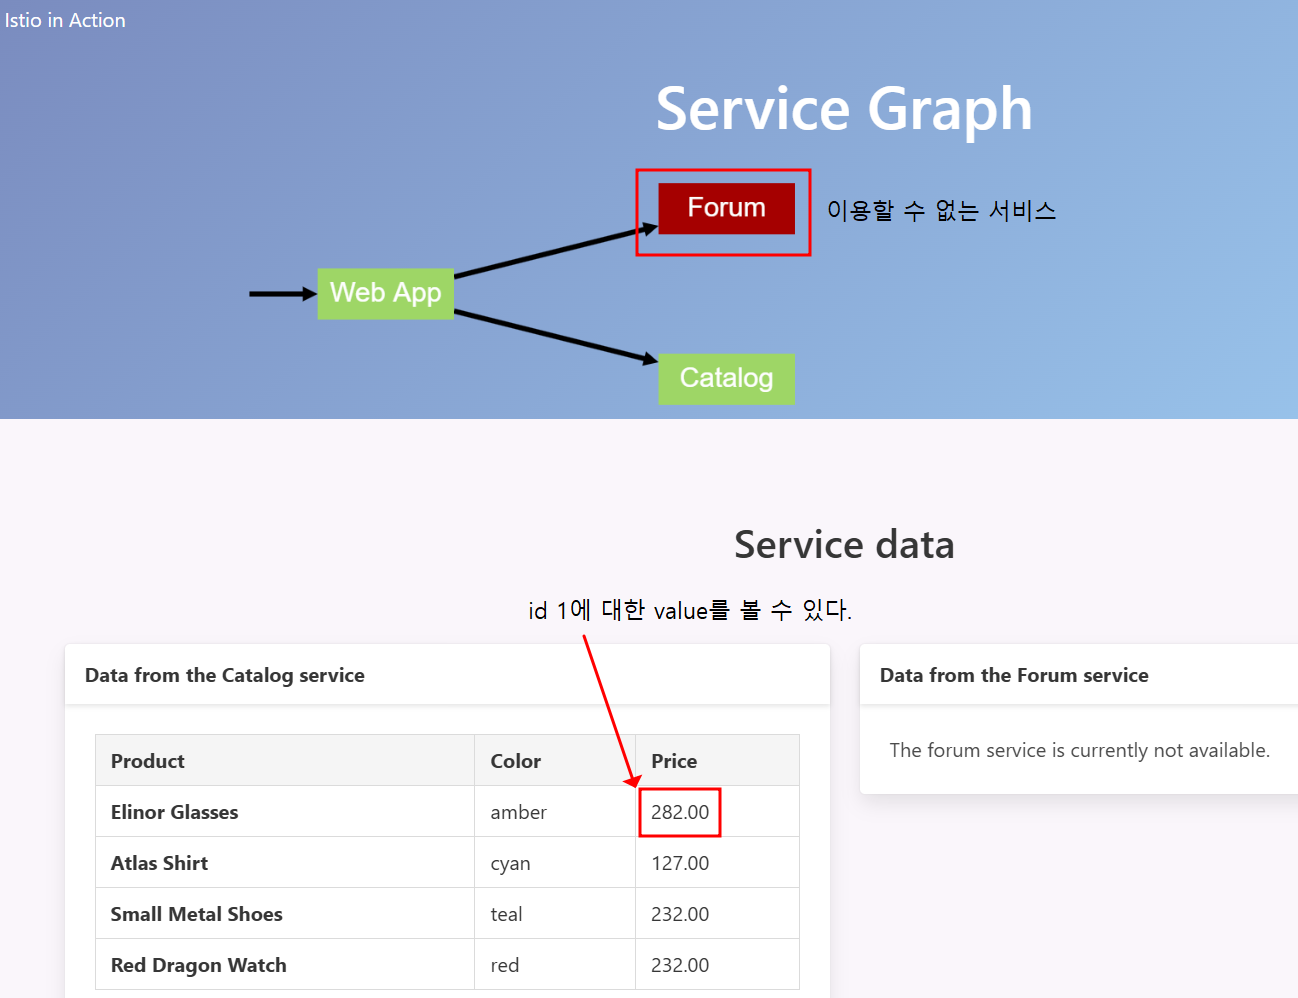
아래 첨부 화면을 보면 홈페이지에 직접 접근하여, 운영되지 않는 Forum은 빨간색으로 표기되고, curl로 조회했던 id=1의 value를 확인할 수 있다.
복원력, 관찰가능성, 트래픽 제어
# istioctl proxy-status : 단축어 ps
docker exec -it myk8s-control-plane istioctl proxy-status
NAME                                                  CLUSTER        CDS        LDS        EDS        RDS          ECDS         ISTIOD                      VERSION
catalog-6cf4b97d-vkpwj.istioinaction                  Kubernetes     SYNCED     SYNCED     SYNCED     SYNCED       NOT SENT     istiod-7df6ffc78d-6kl97     1.17.8
istio-ingressgateway-996bc6bb6-v25mh.istio-system     Kubernetes     SYNCED     SYNCED     SYNCED     NOT SENT     NOT SENT     istiod-7df6ffc78d-6kl97     1.17.8
webapp-7685bcb84-px62g.istioinaction                  Kubernetes     SYNCED     SYNCED     SYNCED     SYNCED       NOT SENT     istiod-7df6ffc78d-6kl97     1.17.8

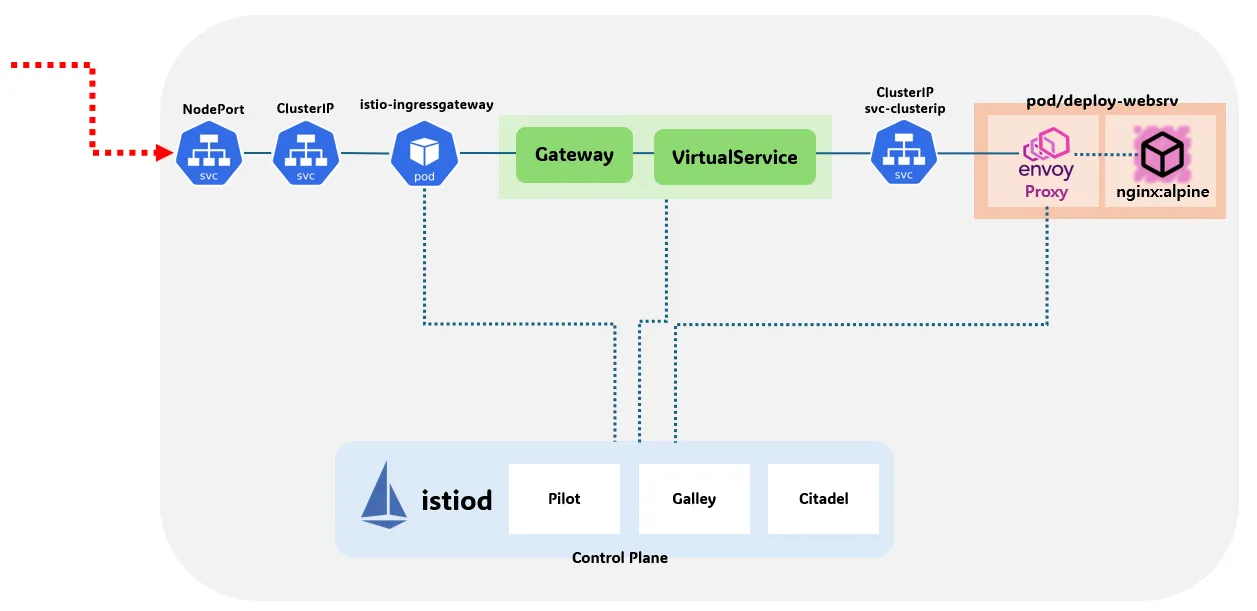
cat ch2/ingress-gateway.yaml
cat <<EOF | kubectl -n istioinaction apply -f -
apiVersion: networking.istio.io/v1alpha3
kind: Gateway
metadata:
  name: outfitters-gateway
  namespace: istioinaction
spec:
  selector:
    istio: ingressgateway # use istio default controller
  servers:
  - port:
      number: 80
      name: http
      protocol: HTTP
    hosts:
    - "*"
---
apiVersion: networking.istio.io/v1alpha3
kind: VirtualService
metadata:
  name: webapp-virtualservice
  namespace: istioinaction
spec:
  hosts:
  - "*"
  gateways:
  - outfitters-gateway
  http:
  - route:
    - destination:
        host: webapp
        port:
          number: 80
EOF

#
kubectl get gw,vs -n istioinaction
NAME                                             AGE
gateway.networking.istio.io/outfitters-gateway   109s

NAME                                                       GATEWAYS                 HOSTS   AGE
virtualservice.networking.istio.io/webapp-virtualservice   ["outfitters-gateway"]   ["*"]   109s

docker exec -it myk8s-control-plane istioctl proxy-status
NAME                                                  CLUSTER        CDS        LDS        EDS        RDS        ECDS         ISTIOD                      VERSION
catalog-6cf4b97d-vkpwj.istioinaction                  Kubernetes     SYNCED     SYNCED     SYNCED     SYNCED     NOT SENT     istiod-7df6ffc78d-6kl97     1.17.8
istio-ingressgateway-996bc6bb6-v25mh.istio-system     Kubernetes     SYNCED     SYNCED     SYNCED     SYNCED     NOT SENT     istiod-7df6ffc78d-6kl97     1.17.8
webapp-7685bcb84-px62g.istioinaction                  Kubernetes     SYNCED     SYNCED     SYNCED     SYNCED     NOT SENT     istiod-7df6ffc78d-6kl97     1.17.8

ISTIOIGW=istio-ingressgateway-996bc6bb6-v25mh.istio-system
WEBAPP=webapp-7685bcb84-px62g.istioinaction

# istioctl proxy-config : 단축어 pc
docker exec -it myk8s-control-plane istioctl proxy-config all $ISTIOIGW
docker exec -it myk8s-control-plane istioctl proxy-config all $WEBAPP

docker exec -it myk8s-control-plane istioctl proxy-config listener $ISTIOIGW
docker exec -it myk8s-control-plane istioctl proxy-config route $ISTIOIGW
docker exec -it myk8s-control-plane istioctl proxy-config cluster $ISTIOIGW
docker exec -it myk8s-control-plane istioctl proxy-config endpoint $ISTIOIGW
docker exec -it myk8s-control-plane istioctl proxy-config log $ISTIOIGW

docker exec -it myk8s-control-plane istioctl proxy-config listener $WEBAPP
docker exec -it myk8s-control-plane istioctl proxy-config route $WEBAPP
docker exec -it myk8s-control-plane istioctl proxy-config cluster $WEBAPP
docker exec -it myk8s-control-plane istioctl proxy-config endpoint $WEBAPP
docker exec -it myk8s-control-plane istioctl proxy-config log $WEBAPP

# envoy 가 사용하고 있는 인증서 정보 확인
docker exec -it myk8s-control-plane istioctl proxy-config secret $ISTIOIGW
docker exec -it myk8s-control-plane istioctl proxy-config secret $WEBAPP

docker exec -it myk8s-control-plane istioctl proxy-config routes deploy/istio-ingressgateway.istio-system
NAME          DOMAINS     MATCH                  VIRTUAL SERVICE
http.8080     *           /*                     webapp-virtualservice.istioinaction
              *           /stats/prometheus*
              *           /healthz/ready*


# istio-ingressgateway 서비스 NodePort 변경 및 nodeport 30000로 지정 변경
kubectl get svc,ep -n istio-system istio-ingressgateway
kubectl patch svc -n istio-system istio-ingressgateway -p '{"spec": {"type": "NodePort", "ports": [{"port": 80, "targetPort": 8080, "nodePort": 30000}]}}'
kubectl get svc -n istio-system istio-ingressgateway

# istio-ingressgateway 서비스 externalTrafficPolicy 설정 : ClientIP 수집 확인
kubectl patch svc -n istio-system istio-ingressgateway -p '{"spec":{"externalTrafficPolicy": "Local"}}'
kubectl describe svc -n istio-system istio-ingressgateway

#
kubectl stern -l app=webapp -n istioinaction
kubectl stern -l app=catalog -n istioinaction

#
curl -s http://127.0.0.1:30000/api/catalog | jq
[
  {
    "id": 1,
    "color": "amber",
    "department": "Eyewear",
    "name": "Elinor Glasses",
    "price": "282.00"
  },
  {
    "id": 2,
    "color": "cyan",
    "department": "Clothing",
    "name": "Atlas Shirt",
    "price": "127.00"
  },
  {
    "id": 3,
    "color": "teal",
    "department": "Clothing",
    "name": "Small Metal Shoes",
    "price": "232.00"
  },
  {
    "id": 4,
    "color": "red",
    "department": "Watches",
    "name": "Red Dragon Watch",
    "price": "232.00"
  }
]

curl -s http://127.0.0.1:30000/api/catalog/items/1 | jq
curl -s http://127.0.0.1:30000/api/catalog -I | head -n 1

# webapp 반복 호출
while true; do curl -s http://127.0.0.1:30000/api/catalog/items/1 ; sleep 1; echo; done
while true; do curl -s http://127.0.0.1:30000/api/catalog -I | head -n 1 ; date "+%Y-%m-%d %H:%M:%S" ; sleep 1; echo; done
while true; do curl -s http://127.0.0.1:30000/api/catalog -I | head -n 1 ; date "+%Y-%m-%d %H:%M:%S" ; sleep 0.5; echo; done
Istio 관찰가능성
# NodePort 변경 및 nodeport 30001~30003으로 변경 : prometheus(30001), grafana(30002), kiali(30003), tracing(30004)
kubectl patch svc -n istio-system prometheus -p '{"spec": {"type": "NodePort", "ports": [{"port": 9090, "targetPort": 9090, "nodePort": 30001}]}}'
kubectl patch svc -n istio-system grafana -p '{"spec": {"type": "NodePort", "ports": [{"port": 3000, "targetPort": 3000, "nodePort": 30002}]}}'
kubectl patch svc -n istio-system kiali -p '{"spec": {"type": "NodePort", "ports": [{"port": 20001, "targetPort": 20001, "nodePort": 30003}]}}'
kubectl patch svc -n istio-system tracing -p '{"spec": {"type": "NodePort", "ports": [{"port": 80, "targetPort": 16686, "nodePort": 30004}]}}'

# Prometheus 접속 : envoy, istio 메트릭 확인
open http://127.0.0.1:30001

# Grafana 접속
open http://127.0.0.1:30002

# Kiali 접속 1 : NodePort
open http://127.0.0.1:30003

# (옵션) Kiali 접속 2 : Port forward
kubectl port-forward deployment/kiali -n istio-system 20001:20001 &
open http://127.0.0.1:20001

# tracing 접속 : 예거 트레이싱 대시보드
open http://127.0.0.1:30004-
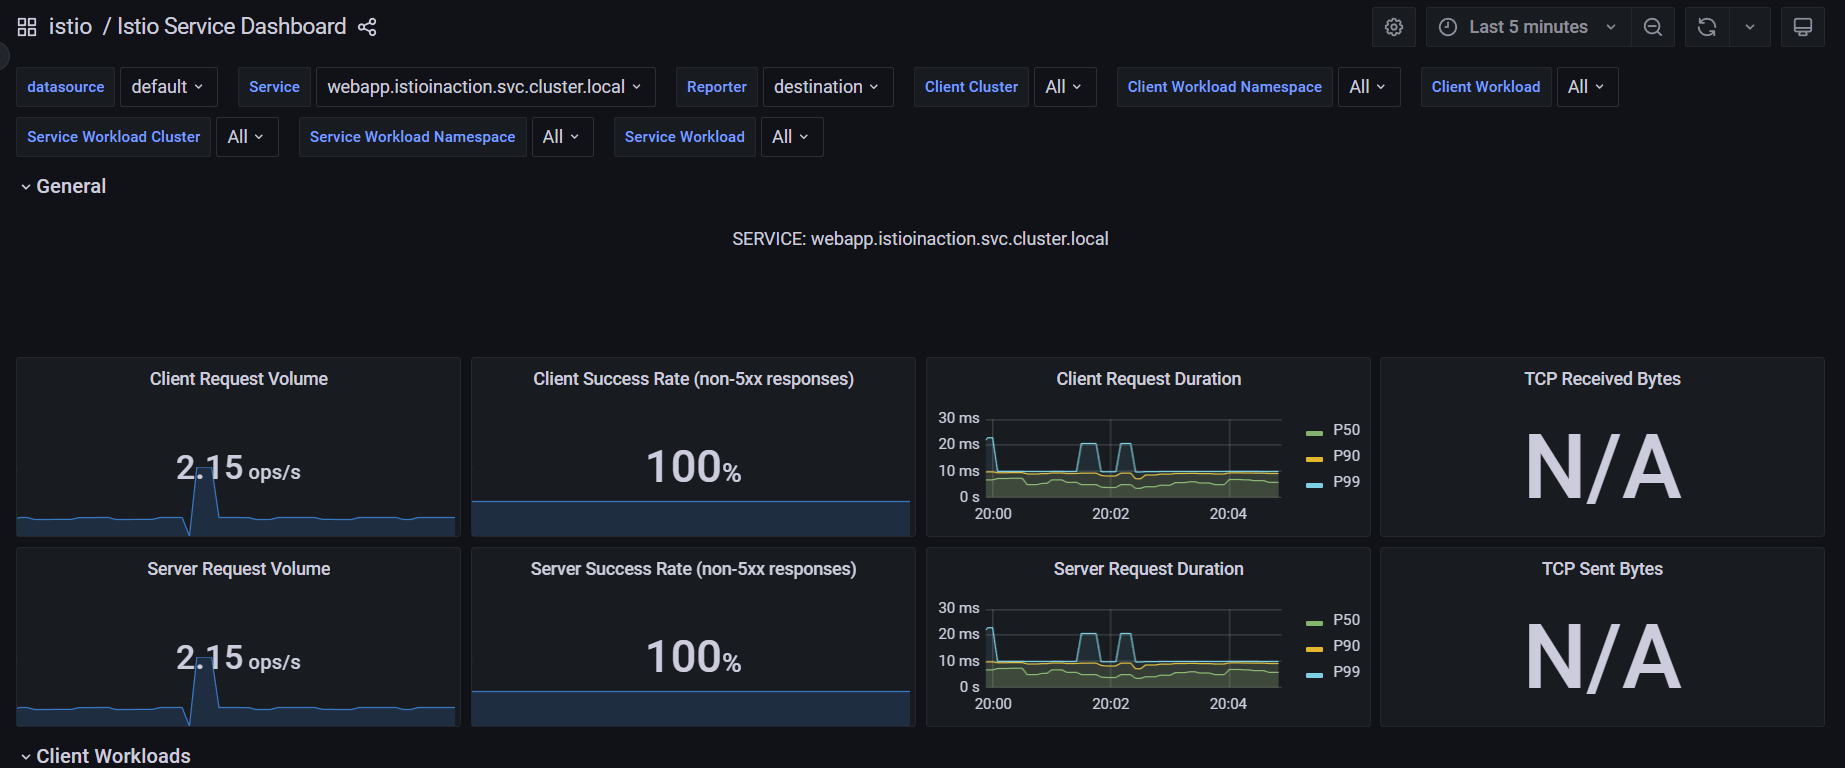
Grafana Dashboard 확인
대시보드 - Istio Service Dashboard ⇒ 상단 Service (webapp.. 선택) ← 트래픽 반복 접속 해둔 상태
-
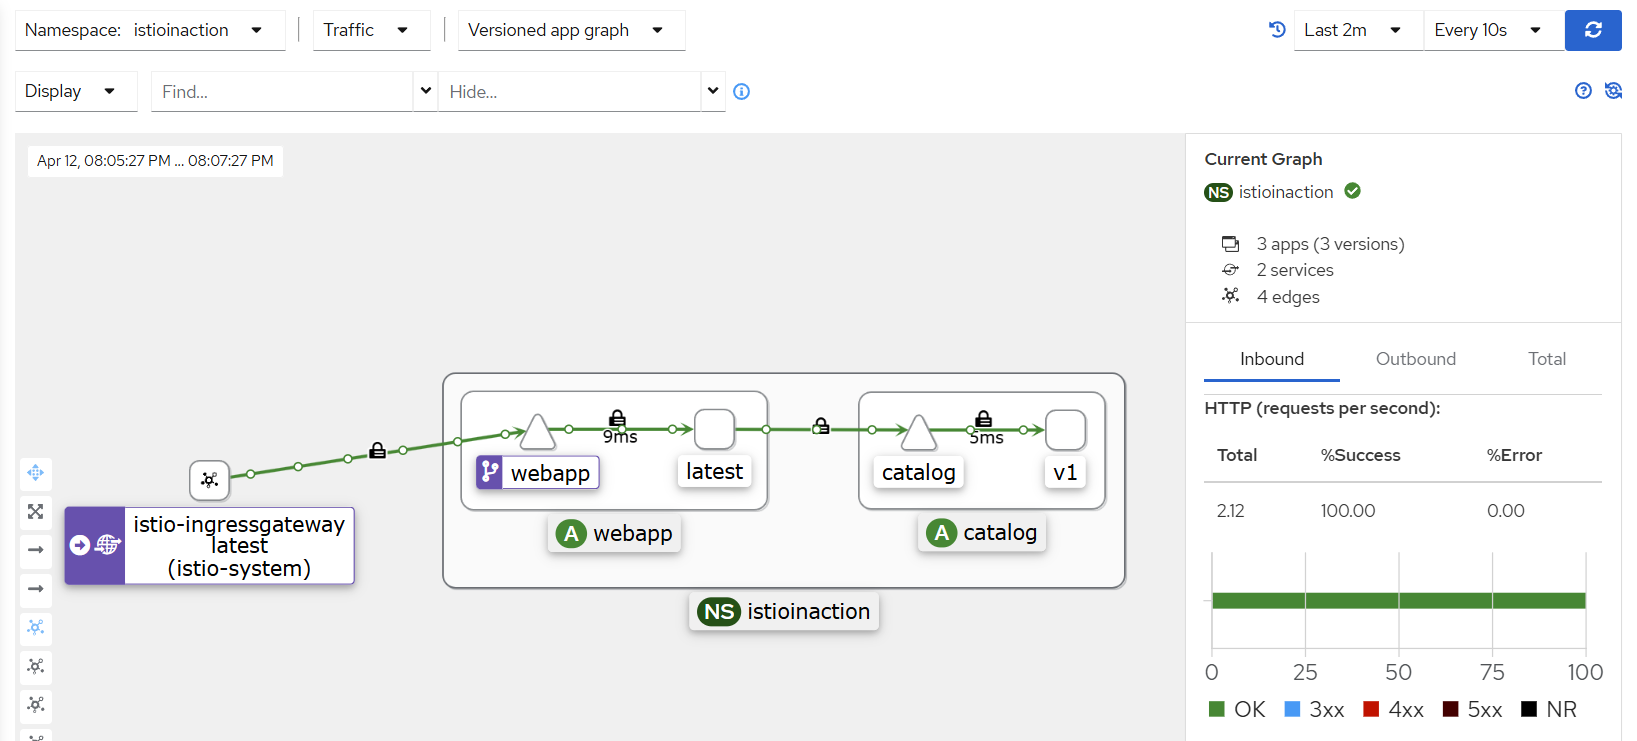
Kiali Console 확인
메트릭(프로메테우스)과 트레이싱(zipkin, jaeger, tempo)을 수집하여 해당 정보를 기반으로 시각화 합니다.
Namespace, Response Time, Service Nodes, Traffic Distribution/Animation, Security 등의 옵션을 선택해서 그래프를 확인합니다.
아래에서는 100% 성공만 보이고, 여기서 자물쇠는 mTLS Enabled이 되어 서로 암호화 통신을 의미합니다.
-
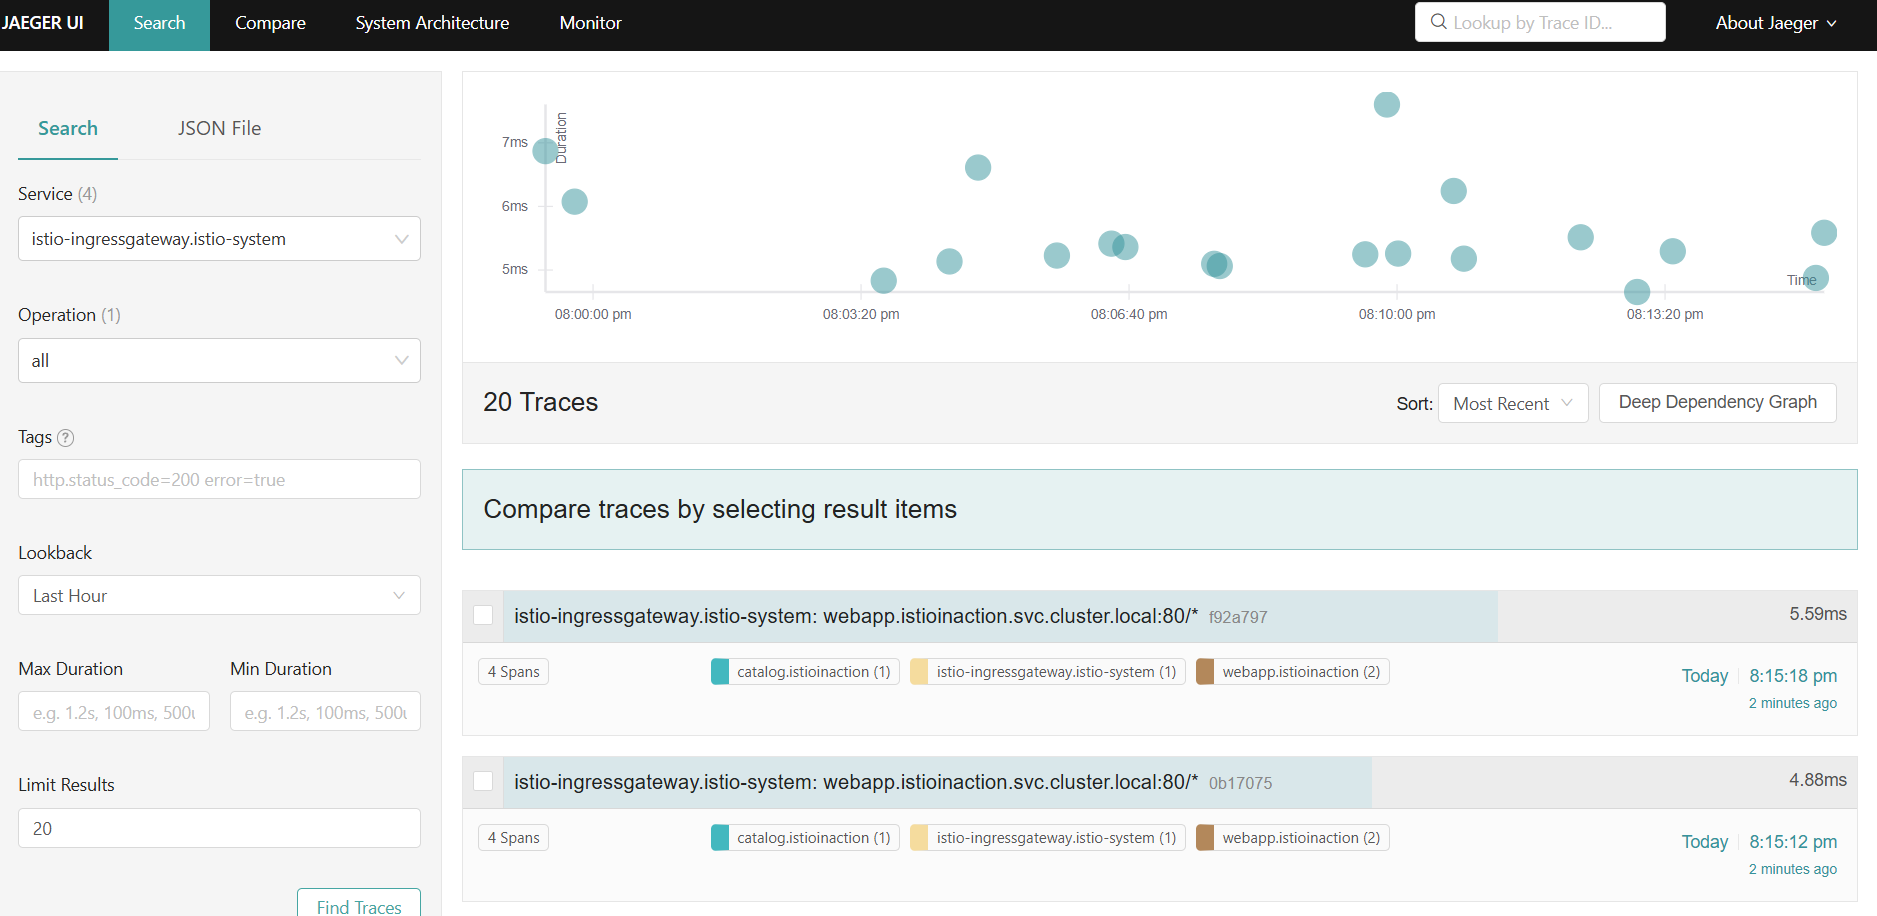
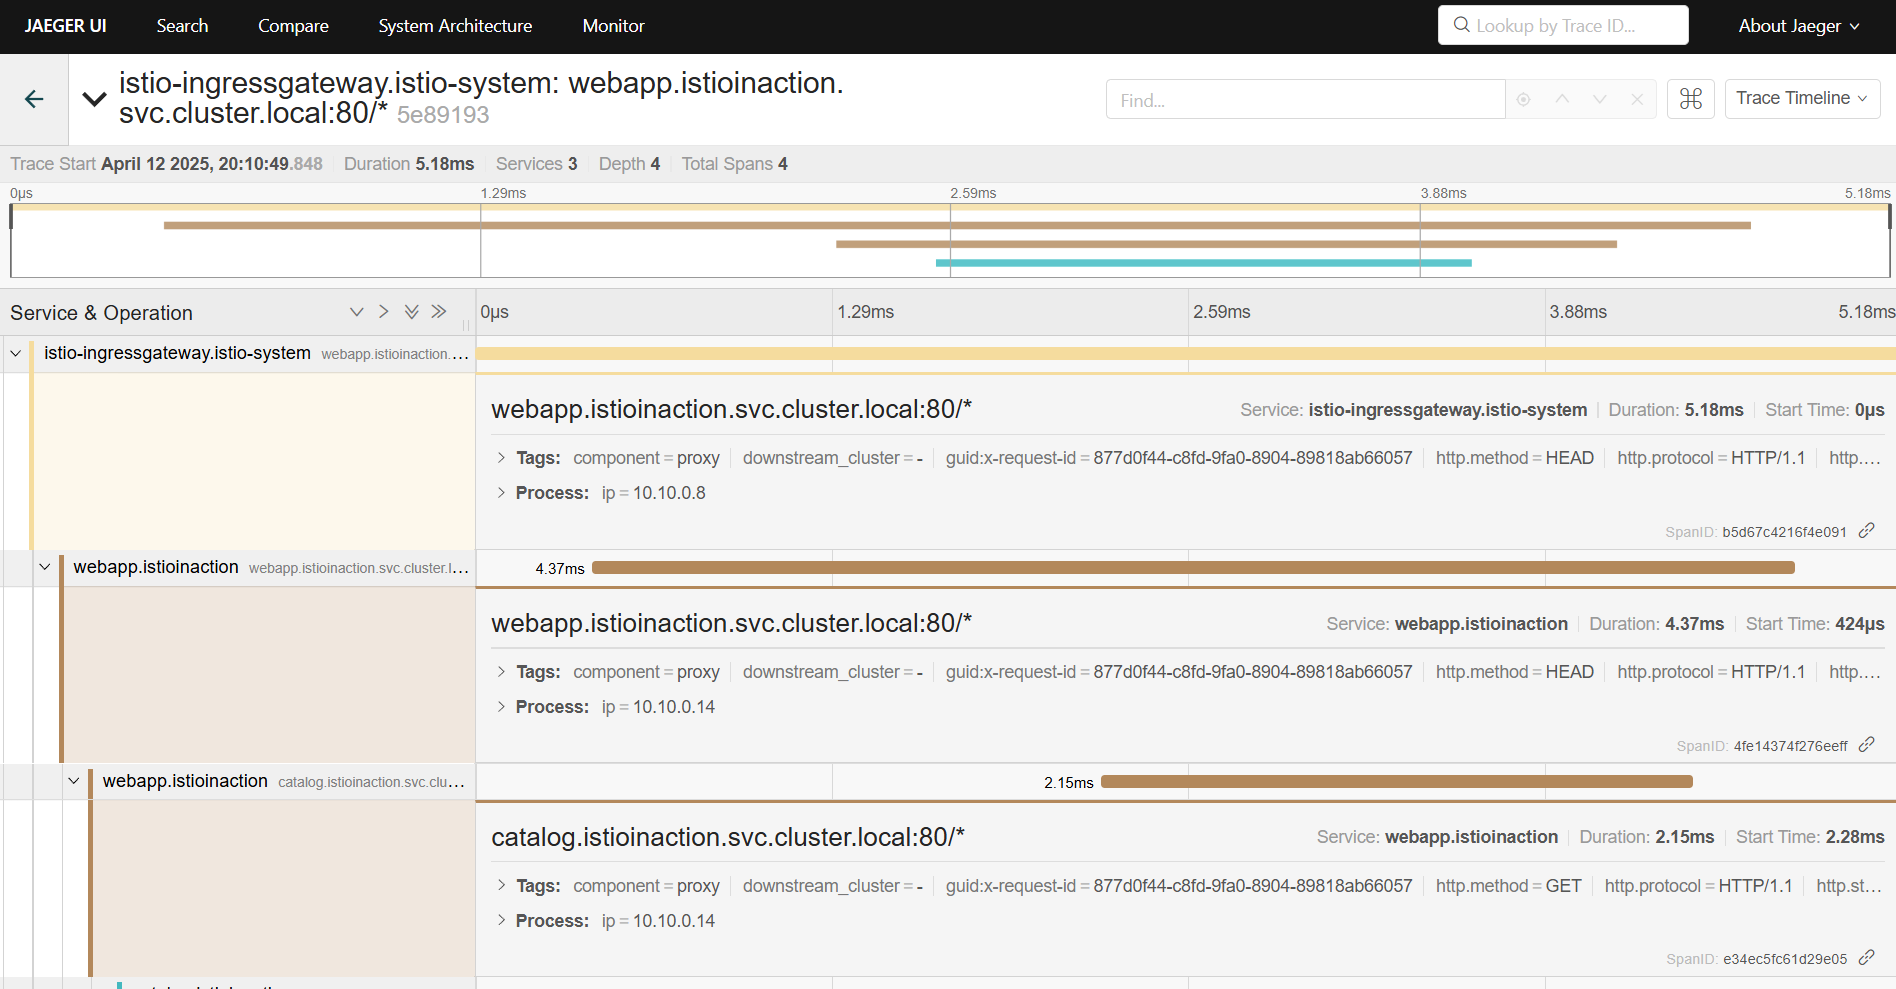
Jaeger 확인
트레이싱 대시보드 확인 - 가장 최근의 호출 목록과 그 호출의 분산 트레이싱 스팬 확인 가능
100개 중 1개로 샘플링되어 나오며, 보통 10~20%로 지정합니다.
의도적인 500 Error 재현하고 retry로 복원력 높이기
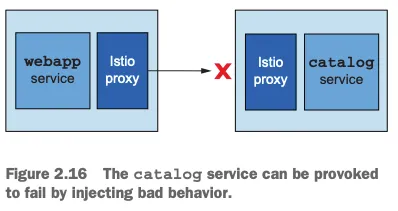
아래는 chaos.sh라는 500 Error를 재현하는 Shell Script입니다.
#!/usr/bin/env bash

if [ $1 == "500" ]; then

    POD=$(kubectl get pod | grep catalog | awk '{ print $1 }')
    echo $POD

    for p in $POD; do
        if [ ${2:-"false"} == "delete" ]; then
            echo "Deleting 500 rule from $p"
            kubectl exec -c catalog -it $p -- curl  -X POST -H "Content-Type: application/json" -d '{"active":
        false,  "type": "500"}' localhost:3000/blowup
        else
            PERCENTAGE=${2:-100}
            kubectl exec -c catalog -it $p -- curl  -X POST -H "Content-Type: application/json" -d '{"active":
            true,  "type": "500",  "percentage": '"${PERCENTAGE}"'}' localhost:3000/blowup
            echo ""
        fi
    done

fi
docker exec -it myk8s-control-plane bash
----------------------------------------
# istioinaction 로 네임스페이스 변경
cat /etc/kubernetes/admin.conf
kubectl config set-context $(kubectl config current-context) --namespace=istioinaction
cat /etc/kubernetes/admin.conf
cd /istiobook/bin/
./chaos.sh 500 100 # 모니터링 : kiali, grafana, tracing
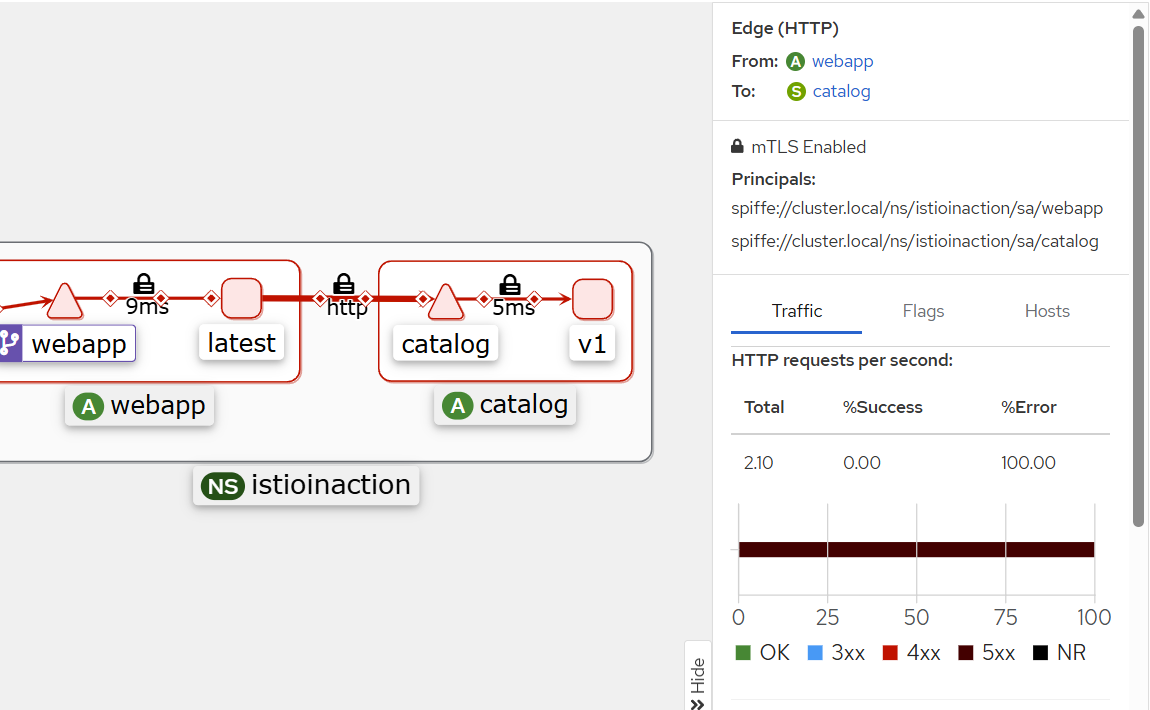
./chaos.sh 500 50 # 모니터링 : kiali, grafana, tracing100% 500 Error 발생 기준
-
100% Grafana 500 확인

-
100% Kiali 500 확인
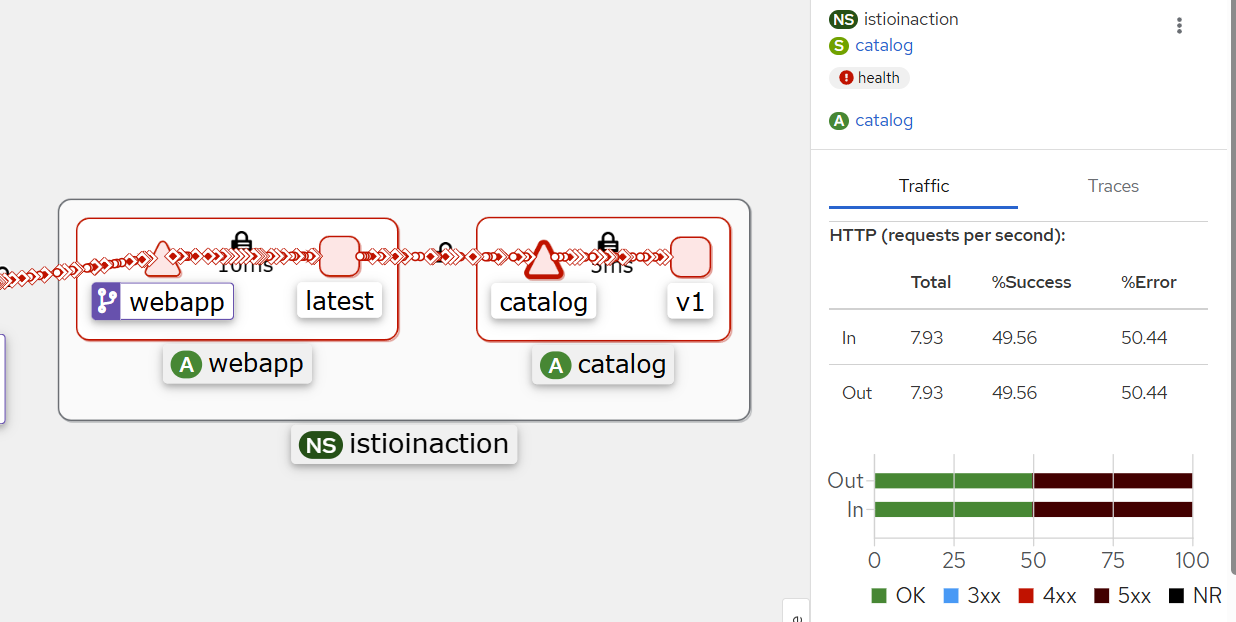
50% 500 Error 발생 기준
- 50% Kiali 500 확인
200과 500이 반반 나뉘어져 있는 것을 볼 수 있다.
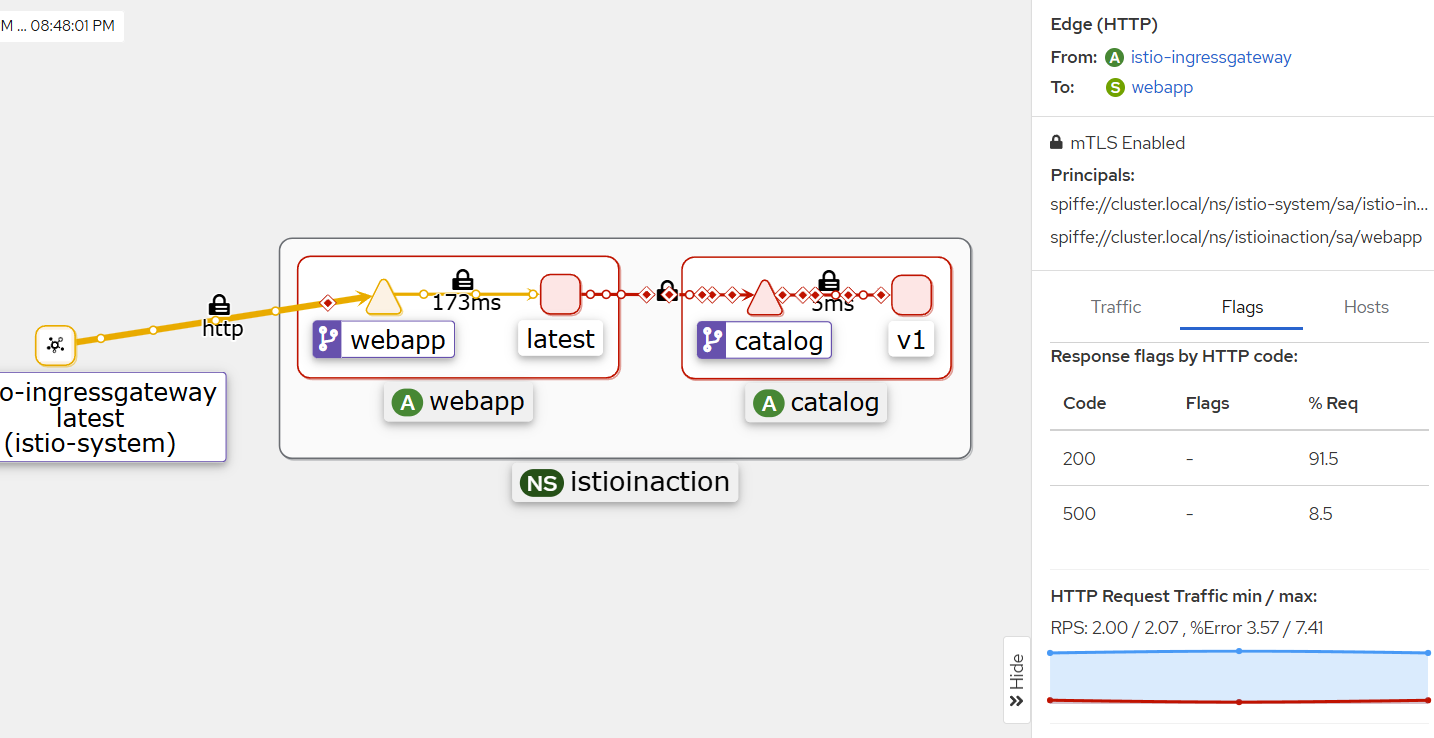
에러 발생 시 reslience 하게 retry 하도록 애플리케이션 코드 수정 없이 해보기!
Resiliency 하게 해보자 ⇒ proxy(envoy)에 endpoint(catalog) 5xx 에러 시 retry 적용
# catalog 3번까지 요청 재시도 할 수 있고, 각 시도에는 2초의 제한 시간이 있음.
cat <<EOF | kubectl -n istioinaction apply -f -
apiVersion: networking.istio.io/v1alpha3
kind: VirtualService
metadata:
  name: catalog
spec:
  hosts:
  - catalog
  http:
  - route:
    - destination:
        host: catalog
    retries:
      attempts: 3
      retryOn: 5xx
      perTryTimeout: 2s
EOF

kubectl get vs -n istioinaction
NAME                    GATEWAYS                 HOSTS         AGE
catalog                                          ["catalog"]   2s
webapp-virtualservice   ["outfitters-gateway"]   ["*"]         56m
아래 결과를 보면, Webapp에 요청에 대해 500이 줄어들고 200은 91%까지 상승한 것을 볼 수 있다.
Grafana의 Istio Mesh에서도 성공 비율과 5xx가 변한 것이 확인됩니다.
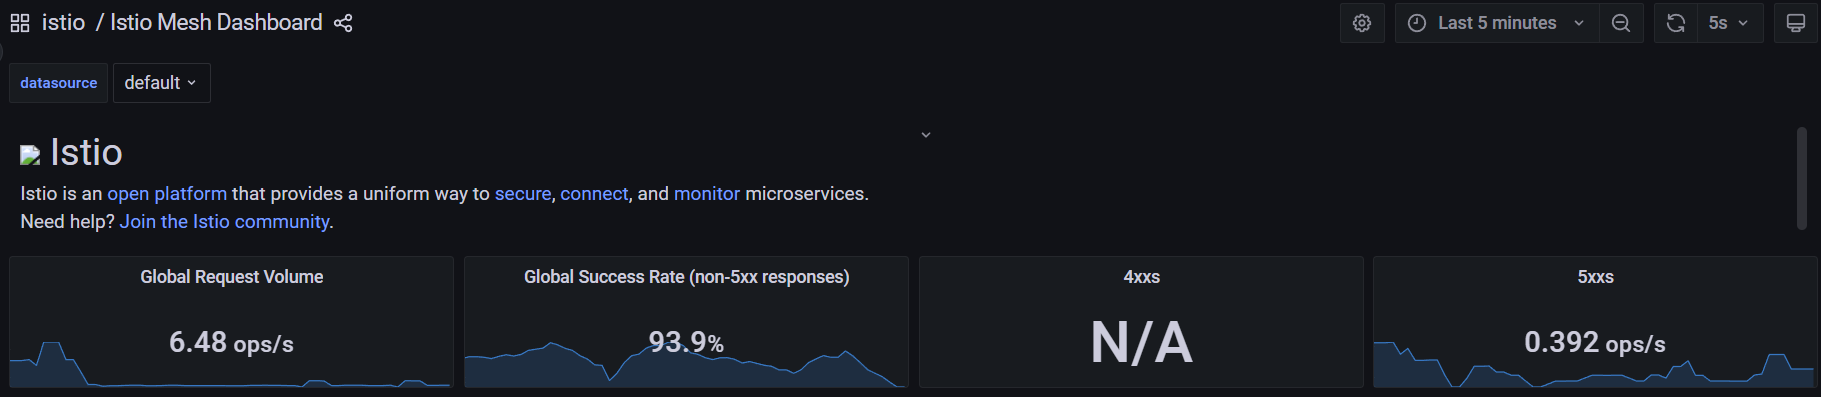
결과적으로 client의 응답 성공율이 상승했다.
새 기능 추가 시나리오 대응
특정 사용자 집단만 새 배포로 라우팅하도록, 릴리즈에 단계적 접근 : catalog v2 에 imageUrl 새 속성 추가
# catalog v2 배포
cat <<EOF | kubectl -n istioinaction apply -f -
apiVersion: apps/v1
kind: Deployment
metadata:
  labels:
    app: catalog
    version: v2
  name: catalog-v2
spec:
  replicas: 1
  selector:
    matchLabels:
      app: catalog
      version: v2
  template:
    metadata:
      labels:
        app: catalog
        version: v2
    spec:
      containers:
      - env:
        - name: KUBERNETES_NAMESPACE
          valueFrom:
            fieldRef:
              fieldPath: metadata.namespace
        - name: SHOW_IMAGE
          value: "true"
        image: istioinaction/catalog:latest
        imagePullPolicy: IfNotPresent
        name: catalog
        ports:
        - containerPort: 3000
          name: http
          protocol: TCP
        securityContext:
          privileged: false
EOF

# (옵션) 500 에러 발생 꺼두기
docker exec -it myk8s-control-plane bash
----------------------------------------
cd /istiobook/bin/
./chaos.sh 500 delete
exit
----------------------------------------
Catalog 버전 2가 생성된 Kiali, Grafana
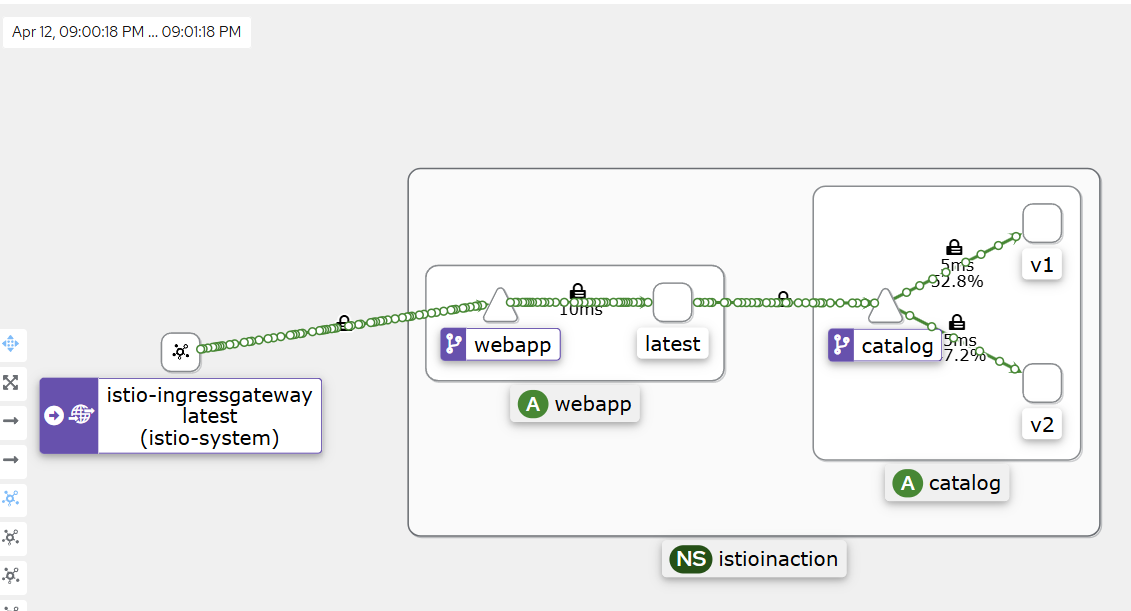
두 개 버전이 확인됩니다.
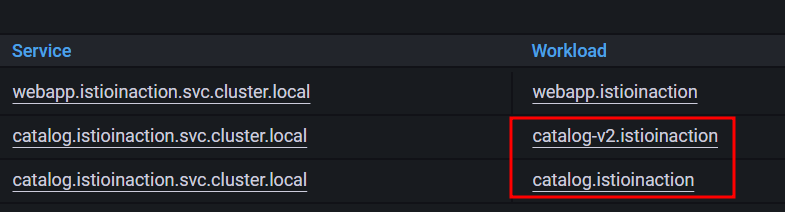
v1만 접속 설정하는 설정
DestinationRule에서 subsets에 버전1/2가 기입돼 있다.
cat <<EOF | kubectl -n istioinaction apply -f -
apiVersion: networking.istio.io/v1alpha3
kind: DestinationRule
metadata:
  name: catalog
spec:
  host: catalog
  subsets:
  - name: version-v1
    labels:
      version: v1
  - name: version-v2
    labels:
      version: v2
EOF

#
kubectl get gw,vs,dr -n istioinaction

# 반복 접속 : v1,v2 분산 접속 확인
while true; do curl -s http://127.0.0.1:30000/api/catalog | jq; date "+%Y-%m-%d %H:%M:%S" ; sleep 1; echo; done

# v1 라우팅 VS 수정(업데이트)
cat <<EOF | kubectl -n istioinaction apply -f -
apiVersion: networking.istio.io/v1alpha3
kind: VirtualService
metadata:
  name: catalog
spec:
  hosts:
  - catalog
  http:
  - route:
    - destination:
        host: catalog
        subset: version-v1
EOF

# 반복 접속 : v1 접속 확인
while true; do curl -s http://127.0.0.1:30000/api/catalog | jq; date "+%Y-%m-%d %H:%M:%S" ; sleep 1; echo; done
특정 헤더는 v2, 그외에는 v1 접속 설정
# 라우팅 VS 수정(업데이트)
cat <<EOF | kubectl -n istioinaction apply -f -
apiVersion: networking.istio.io/v1alpha3
kind: VirtualService
metadata:
  name: catalog
spec:
  hosts:
  - catalog
  http:
  - match:
    - headers:
        x-dark-launch:
          exact: "v2"
    route:
    - destination:
        host: catalog
        subset: version-v2
  - route:
    - destination:
        host: catalog
        subset: version-v1
EOF

#
kubectl get gw,vs,dr -n istioinaction

# 반복 접속 : v1 접속 확인
while true; do curl -s http://127.0.0.1:30000/api/catalog | jq; date "+%Y-%m-%d %H:%M:%S" ; sleep 1; echo; done

# 반복 접속 : v2 접속 확인
while true; do curl -s http://127.0.0.1:30000/api/catalog -H "x-dark-launch: v2" | jq; date "+%Y-%m-%d %H:%M:%S" ; sleep 1; echo; done
실습 완료 후 삭제
kubectl delete deploy,svc,gw,vs,dr --all -n istioinaction && kind delete cluster --name myk8s최신 버전 실습
실습 환경 : docker (kind - k8s 1.32.2) , istio 1.25.1
kind : k8s(1.23.17) 배포
#
kind create cluster --name myk8s --image kindest/node:v1.32.2 --config - <<EOF
kind: Cluster
apiVersion: kind.x-k8s.io/v1alpha4
nodes:
- role: control-plane
  extraPortMappings:
  - containerPort: 30000 # Sample Application
    hostPort: 30000
  - containerPort: 30001 # Prometheus
    hostPort: 30001
  - containerPort: 30002 # Grafana
    hostPort: 30002
  - containerPort: 30003 # Kiali
    hostPort: 30003
  - containerPort: 30004 # Tracing
    hostPort: 30004
  - containerPort: 30005 # kube-ops-view
    hostPort: 30005
networking:
  podSubnet: 10.10.0.0/16
  serviceSubnet: 10.200.1.0/24
EOF

# 설치 확인
docker ps
CONTAINER ID   IMAGE                  COMMAND                  CREATED          STATUS          PORTS                                                             NAMES
e0f3053409ec   kindest/node:v1.32.2   "/usr/local/bin/entr…"   59 seconds ago   Up 56 seconds   0.0.0.0:30000-30005->30000-30005/tcp, 127.0.0.1:43015->6443/tcp   myk8s-control-plane

# 노드에 기본 툴 설치
docker exec -it myk8s-control-plane sh -c 'apt update && apt install tree psmisc lsof wget bridge-utils net-tools dnsutils tcpdump ngrep iputils-ping git vim -y'
istio 1.25.1 설치
이전 버전들과 차이점은 Operator 설치 방식은 없어졌으며, profile 파라미터도 더 이상 지원하지 않는다.
# istioctl 설치
export ISTIOV=1.25.1
echo 'export ISTIOV=1.25.1' >> /root/.bashrc

curl -s -L https://istio.io/downloadIstio | ISTIO_VERSION=$ISTIOV sh -
tree istio-$ISTIOV -L 2 # sample yaml 포함
cp istio-$ISTIOV/bin/istioctl /usr/local/bin/istioctl
istioctl version --remote=false


# default 프로파일 배포
cd istio-$ISTIOV
cat <<EOF | istioctl install -y -f -
# IOP configuration used to install the demo profile without gateways.
apiVersion: install.istio.io/v1alpha1
kind: IstioOperator
spec:
  profile: demo
  components:
    ingressGateways:
    - name: istio-ingressgateway
      enabled: true
    egressGateways:
    - name: istio-egressgateway
      enabled: false
EOF
addon 등 설치
# 설치 확인 : istiod(데몬, 컨트롤플레인), istio-ingressgateway, crd 등
kubectl get all,svc,ep,sa,cm,secret,pdb -n istio-system
kubectl get crd | grep istio.io | sort

# istio-ingressgateway 서비스 NodePort 변경 및 nodeport 30000로 지정 변경
kubectl patch svc -n istio-system istio-ingressgateway -p '{"spec": {"type": "NodePort", "ports": [{"port": 80, "targetPort": 8080, "nodePort": 30000}]}}'
kubectl get svc -n istio-system istio-ingressgateway

# istio-ingressgateway 서비스 externalTrafficPolicy 설정 : ClientIP 수집 확인 용도
kubectl patch svc -n istio-system istio-ingressgateway -p '{"spec":{"externalTrafficPolicy": "Local"}}'
kubectl describe svc -n istio-system istio-ingressgateway


# default 네임스페이스에 istio-proxy sidecar 주입 설정 - Docs
kubectl label namespace default istio-injection=enabled
kubectl get ns --show-labels


# addon 설치
kubectl apply -f samples/addons
kubectl rollout status deployment/kiali -n istio-system

#
kubectl get pod,svc -n istio-system

# NodePort 변경 및 nodeport 30001~30003으로 변경 : prometheus(30001), grafana(30002), kiali(30003), tracing(30004)
kubectl patch svc -n istio-system prometheus -p '{"spec": {"type": "NodePort", "ports": [{"port": 9090, "targetPort": 9090, "nodePort": 30001}]}}'
kubectl patch svc -n istio-system grafana -p '{"spec": {"type": "NodePort", "ports": [{"port": 3000, "targetPort": 3000, "nodePort": 30002}]}}'
kubectl patch svc -n istio-system kiali -p '{"spec": {"type": "NodePort", "ports": [{"port": 20001, "targetPort": 20001, "nodePort": 30003}]}}'
kubectl patch svc -n istio-system tracing -p '{"spec": {"type": "NodePort", "ports": [{"port": 80, "targetPort": 16686, "nodePort": 30004}]}}'

# Prometheus 접속 : envoy, istio 메트릭 확인
open http://127.0.0.1:30001

# Grafana 접속
open http://127.0.0.1:30002

# Kiali 접속 1 : NodePort
open http://127.0.0.1:30003

# (옵션) Kiali 접속 2 : Port forward
kubectl port-forward deployment/kiali -n istio-system 20001:20001 &
open http://127.0.0.1:20001

# tracing 접속 : 예거 트레이싱 대시보드
open http://127.0.0.1:30004
Bookinfo sample application 배포
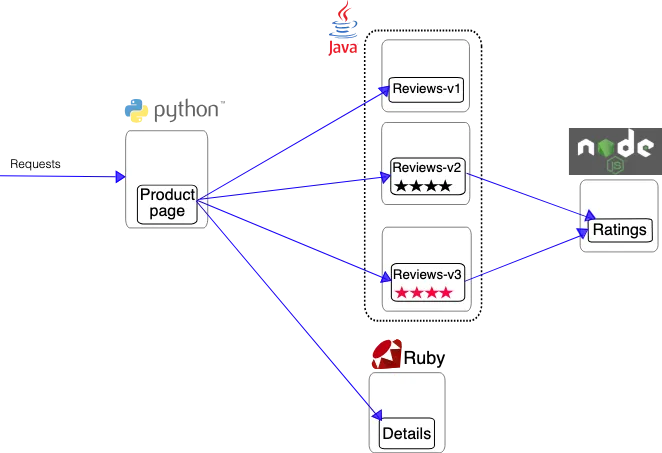
#
kubectl apply -f samples/bookinfo/platform/kube/bookinfo.yaml

# 확인 : 서비스 어카운트(sa)는 spiffe 에 svid 에 사용됨
kubectl get all,sa

# product 웹 접속 확인
kubectl exec "$(kubectl get pod -l app=ratings -o jsonpath='{.items[0].metadata.name}')" -c ratings -- curl -sS productpage:9080/productpage | grep -o "<title>.*</title>"

# productpage 파드 로그
kubectl logs -l app=productpage -c istio-proxy --tail=-1
kubectl logs -l app=productpage -c productpage -f
Open the application to outside traffic
# Istio Gateway/VirtualService 설정
cat samples/bookinfo/networking/bookinfo-gateway.yaml
apiVersion: networking.istio.io/v1
kind: Gateway
metadata:
  name: bookinfo-gateway
spec:
  # The selector matches the ingress gateway pod labels.
  # If you installed Istio using Helm following the standard documentation, this would be "istio=ingress"
  selector:
    istio: ingressgateway # use istio default controller
  servers:
  - port:
      number: 8080
      name: http
      protocol: HTTP
    hosts:
    - "*"
---
apiVersion: networking.istio.io/v1
kind: VirtualService
metadata:
  name: bookinfo
spec:
  hosts:
  - "*"
  gateways:
  - bookinfo-gateway
  http:
  - match:
    - uri:
        exact: /productpage
    - uri:
        prefix: /static
    - uri:
        exact: /login
    - uri:
        exact: /logout
    - uri:
        prefix: /api/v1/products
    route:
    - destination:
        host: productpage
        port:
          number: 9080

kubectl apply -f samples/bookinfo/networking/bookinfo-gateway.yaml

# Istio Gateway/VirtualService 설정 확인
kubectl get gw,vs
istioctl proxy-status

# productpage 파드의 istio-proxy 로그 확인 Access log 가 출력 - Default access log format : 링크
kubectl logs -l app=productpage -c istio-proxy -f
kubectl stern -l app=productpage

# productpage 웹 접속 : 새로고침
open http://127.0.0.1:30000/productpage
curl -v -s http://127.0.0.1:30000/productpage | grep -o "<title>.*</title>"

# 반복 접속
for i in {1..10};  do curl -s http://127.0.0.1:30000/productpage | grep -o "<title>.*</title>" ; done
for i in {1..100}; do curl -s http://127.0.0.1:30000/productpage | grep -o "<title>.*</title>" ; done

while true; do curl -s http://127.0.0.1:30000/productpage | grep -o "<title>.*</title>" ; echo "--------------" ; sleep 1; done
while true; do curl -s http://127.0.0.1:30000/productpage | grep -o "<title>.*</title>" ; echo "--------------" ; sleep 0.5; done
while true; do curl -s http://127.0.0.1:30000/productpage | grep -o "<title>.*</title>" ; echo "--------------" ; sleep 0.1; done
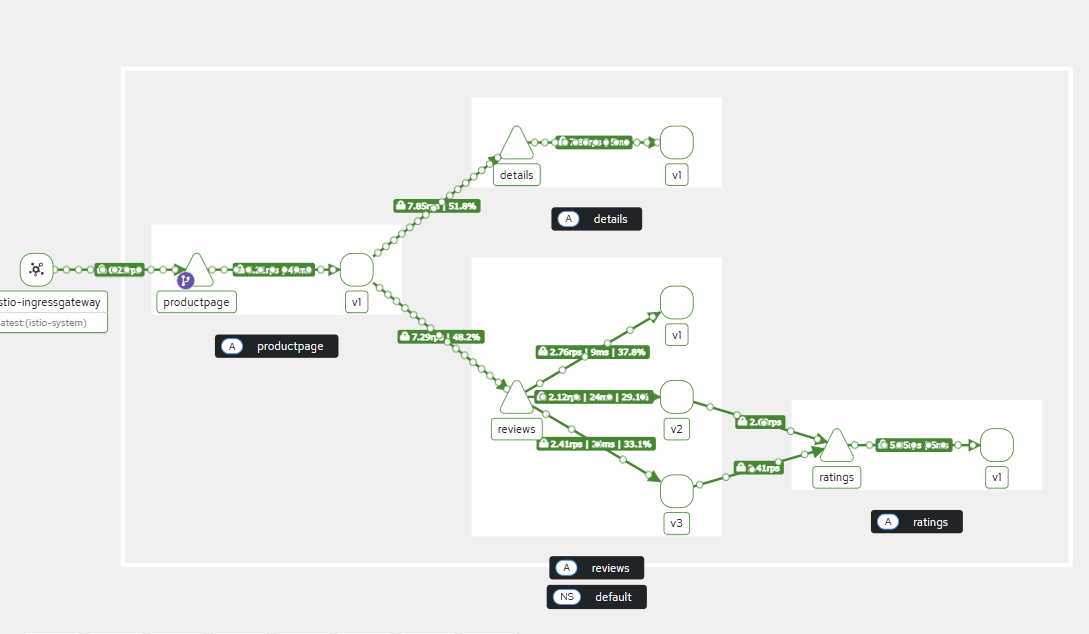
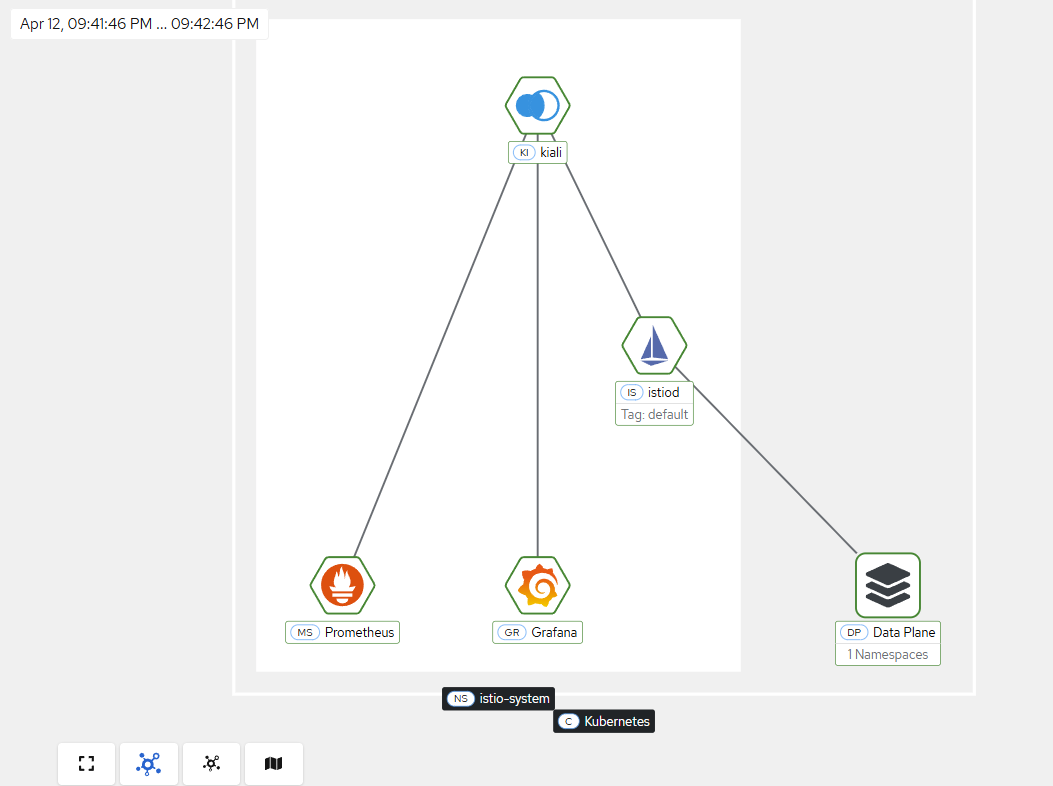
일부 UI가 변경되었고, Mesh라는 항목이 추가되었다.
- 실습 완료 후 삭제
kind delete cluster --name myk8s 1주차 Study 후기
Kind라는 Kubernetes 환경을 편리하게 생성하는 tool을 직접 실습해보았고, 클라우드 비용을 절약하기 위해 앞으로 간단한 실습에는 적극적으로 사용할 예정이다.
이전에 가볍게 Istio를 구축만 해보았지, 이렇게 자세하게 공부하게 되어서 매우 감사드립니다.
