
리액트 라우터 중에서 서브라우트 (중첩 라우트)와 History API , Switch를 사용해봤습니다.
리액트 라우터 이전 내용은 여기를 참고하세요.
서브 라우트 (중첩 라우트)
라우트 내부에 라우트를 만드는것을 의미합니다. 새로운 컴포넌트를 만들어서 컴포넌트 안에 라우트 컴포넌트를 렌더링 하면 됩니다.
src > subprofile.js
import React from 'react';
import { Link , Route } from 'react-router-dom';
import profiledata from './profiledata';


const subprofile = () => {
    return (
        <div>
            <h3>유저목록</h3>
            <ul>
                <li>
                    <Link to='/subprofile/plush'>plush</Link>
                </li>
                <li>
                    <Link to='/subprofile/gildong'>gildong</Link>
                </li>
            </ul>

            <Route path='/subprofile' exact render={() => <div>유저를 선택해주세요.</div>} />
            <Route path='/subprofile/:username' component={profiledata} />
        </div>
    );
};

export default subprofile;
해당 링크를 누르면 profiledata 컴포넌트에서 가져온 데이터를 보여주는 컴포넌트입니다.
exact={true} -> exact : exact가 true일경우 exact로 축약해서 작성할 수 있습니다.
render VS component : 특정 컴포넌트에 데이터를 전달 (props) 하고싶을 때, component 대신, render를 사용하는게 더 효율적입니다. component , render 둘 중 아무거나 사용해도 실행결과는 똑같지만, component는 렌더링 할때마다 컴포넌트가 새롭게 생성되기 때문에 비효율적입니다.
profiledata.js
import React from 'react';

//사용할 데이터.
const mydata = {
    plush: {
        name: 'Plush',
        description:'리액트 라우터를 공부중입니다.'
    },
    gildong: {
        name: '홍길동',
        description: '전래동화의 주인공'
    }
};

const profiledata = ({ match }) => {
    const { username } = match.params;
    //match안에 들어있는 params 값 참조
    const profiledata = mydata[username];
    if (!profiledata){
        return <div>존재하지 않는 유저입니다.</div>
        //mydata에 있는 외의 값을 입력하면 존재하지 않는 유저입니다 출력.
    }
    return (
        <div>
            <h3>
                {username} ({profiledata.name})
            </h3>
            <p>{profiledata.description}</p>
        </div>
    );
};

export default profiledata;
App.js
import React from 'react';
import { Route , Link } from 'react-router-dom';
import first from './first';
import about from './about';
import './App.css';
import subprofile from './subprofile';
import history1 from './history1';

const App = () => {
  return (
    <div>
      <ul>
        <li>
          <Link to="/">FIRST</Link>
        </li>
        <li>
          <Link to="/about">SECOND</Link>
        </li>
        <li>
          <Link to="/subprofile">profile List</Link>
        </li>
      </ul>
      <hr/>
        <Route path="/" exact component={first} />
        <Route path="/about" component={about} />
        <Route path='/subprofile' component={subprofile}/>
    </div>
  );
};

export default App;
App.js에도 컴포넌트를 추가시켜줍니다.
결과

const mydata = {
    plush: {
        name: 'Plush',
        description:'리액트 라우터를 공부중입니다.'
    },
    gildong: {
        name: '홍길동',
        description: '전래동화의 주인공'
    }
};
profile List 링크를 누르면 유저 목록이 보여지고, 유저를 누르면 profiledata 컴포넌트에 저장된 mydata가 보여집니다.
라우터 history API
history API는 현재까지 이동한 url 경로들이 스택 형태로 담겨있어 주소를 임의로 변경하거나 되돌아갈 수 있게 할 수 있습니다.
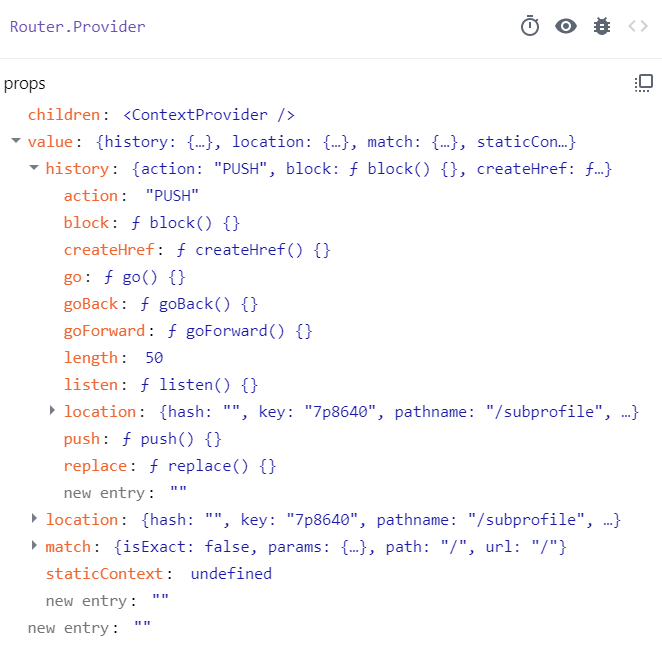
history API를 사용하여 페이지 뒤로가기 , 첫페이지로 가기 , 페이지 이탈방지 메시지 등 여러가지 작업을 할 수 있습니다.
history1.js
import React from 'react';
import {useEffect} from 'react';

function history1 ({history}) {
    const goBack = () => {
        history.goBack();
        // 이전페이지로 이동.
    };

    const goHome = () => {
        history.push('/');
        //해당경로 ('/') (첫페이지)으로 이동.
        //push : 특정 경로로 이동.
    };

    useEffect(() => {
        console.log(history);
        const msg= history.block('정말 떠나실건가요?');
      // 사용자가 다른 페이지로 갈때마다 '정말 떠나실건가요?' 메시지 출력.
        return () => {
            msg();
        }
    }, [history]);


    return (
        <div>
            <button onClick={goBack}>뒤로</button>
            <button onClick={goHome}>홈으로</button>
        </div>
    );
};

export default history1;
goback : 이전페이지로 이동.
goHome : 첫 페이지로 이동.
goForward : 앞 페이지로 이동.
push : 특정 경로로 이동.
length : 전체 history 스택의 길이
block : history 스택의 PUSH/POP 동작을 제어 (자바스크립트의 confirm()과 비슷한 형태로, 다른 페이지로 이동할 경우에 뜨도록 함. 즉, 컴포넌트가 언마운트될 때 뜬다고 보면됨.)
useHistory Hook
import React from 'react';
import {useEffect} from 'react';
import { useHistory } from "react-router-dom";

function history1(){
    let history = useHistory();
    function handleBack(){
        history.goBack();
    }
    function handleHome(){
        history.push('/');
    }
    useEffect(() => {
        console.log(history);
        const msg= history.block('정말 떠나실건가요?');
        return () => {
            msg();
        }
    }, [history]);
    return(
        <div>
            <button type="button" onClick={handleBack}>뒤로</button>
            <button type="button" onClick={handleHome}>홈으로</button>
        </div>
    )
};

export default history1;
useHistory & Switch
App.js
import React from 'react';
import { Route , Link, Switch } from 'react-router-dom';
import first from './first';
import about from './about';
import './App.css';
import subprofile from './subprofile';
import history1 from './history1';
import { useHistory } from 'react-router-dom'; // useHistory hook 선언

const App = () => {
  let history = useHistory();
    function handleBack(){ //페이지 이동 조작을 위한 함수.
        history.goBack();
    }
    function handleForward(){
      history.go(1); //goForward = go(1) 똑같이 페이지를 앞으로 이동.
                     /*go() : 괄호안에 숫자가 커질수록 이동하는 페이지도 많아짐.
                      ex) go(2) : 앞으로 2페이지 이동 , go(3) : 앞으로 3페이지 이동*/
    }
    function handleHome(){
      history.push('/');
    }
  return (
    <div>
      <div className="btnArea"> //함수 연결시켜주기.
        <button type="button" onClick={handleBack}>뒤로</button>
        <button type="button" onClick={handleForward}>앞으로</button>
        <button type="button" onClick={handleHome}>첫 페이지로</button>
      </div>
      <ul>
        <li>
          <Link to="/">FIRST</Link>
        </li>
        <li>
          <Link to="/about">SECOND</Link>
        </li>
        <li>
          <Link to="/subprofile">profile List</Link>
        </li>
        <li>
          <Link to="/history1">history sample</Link>
        </li>
      </ul>
      <hr/>
      <Switch>
        <Route path="/" exact component={first} />
        <Route path="/about" component={about} />
        <Route path='/subprofile' component={subprofile}/>
        <Route path='/history1' component={history1}/>
        <Route
          render={({ location }) => (
            <div>
              <h2>이 페이지는 존재하지 않습니다.</h2>
              <p>{location.pathname}</p>
            </div>
          )}
          />
      </Switch>
    </div>
  );
};

export default App;
Switch : 첫번째로 매칭되는 path값을 가진 컴포넌트를 렌더링 시킵니다. (path값을 비교하여 일치하면 일치한 컴포넌트만 보여줍니다.) Switch Case문이라고 생각하시면 될듯합니다.
location : 현재 페이지의 정보를 담고 있는 객체입니다.

(localhost:3000/0506)
-> 링크로 연결된 경로들 말고 다른 경로를 입력하면 '이 페이지는 존재하지 않습니다.' 문구가 뜨게 됩니다.
history API에 대한 자세한 내용은 여기 를 클릭하세요.
결과

뒤로 버튼을 누르거나, 다른 링크를 눌렀을 때 해당 메시지가 출력됩니다.
