
설계 결정과 운영까지
이 프로젝트는 위치 추적과 메시지를 한 흐름으로 엮는 풀스택 앱입니다.
백엔드), 웹, 모바일 세 스택 모두 아키텍처로 맞춰 두었고,
이 글에서는 “왜 이렇게 나눴는지”, “어떤 트레이드오프를 감수했는지”, “실제로 한 것과
다음에 할 것”을 구분해서 정리해 보았습니다.
전체 구성
세 클라이언트가 하나의 백엔드 API를 쓰고, 백엔드는 MySQL에 위치·메시지를 저장합니다.
모바일은 위치를 주기적으로 올리면서 같은 응답으로 메시지를 받고, 웹은 지도·메시지 조회/발송용입니다.
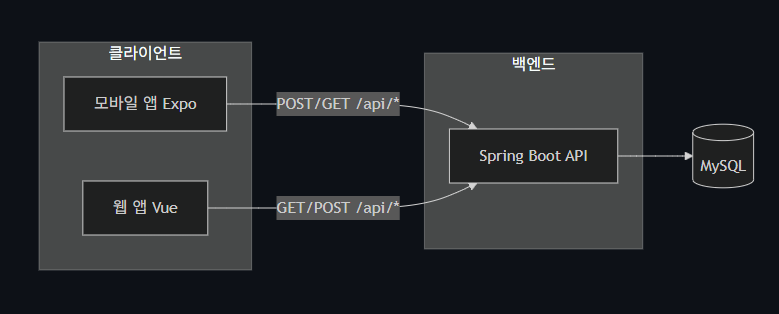
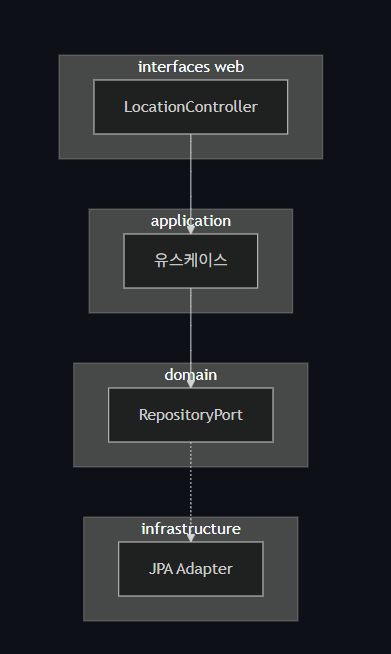
백엔드 내부는 도메인·유스케이스·인프라·인터페이스로 나뉩니다. 컨트롤러는 유스케이스만 호출하고, 유스케이스는 포트만 사용합니다.
전체 흐름과 핵심 API 선택
모바일에서 GPS로 주기적으로 위치를 수집하고, 그 좌표를 서버로 보내면 서버는 위치 한 건 저장한 뒤 미읽음 메시지 목록을 같은 응답에 담아 돌려줍니다.
모바일은 이 메시지를 로컬 푸시로 띄우고, 웹에서는 지도에 위치 마커를 띄우고, 내 위치 조회·갱신, 메시지 목록·발송을 합니다.
여기서 중요한 설계 선택이 하나 있습니다.
“위치 저장”과 “미읽음 메시지 조회”를 한 API로 묶은 것입니다.
즉 POST /api/message가 위치 업데이트와 메시지 목록 반환을 동시에 합니다.
왜 한 번에 했는지. 모바일이 위치를 올릴 때마다 “이번에 읽을 메시지”를 바로 받아와야 하므로, 위치 전송 → 메시지 조회를 두 번의 왕복으로 나누면 레이턴시와 실패 지점이 늘어납니다. 특히 이동 중일 때 네트워크가 불안정할 수 있어서, 한 번의 요청/응답으로 끝내는 쪽을 택했습니다.
대신 감수한 점. 단일 책임 원칙 관점에서는 “위치 쓰기”와 “메시지 읽기”가 한 엔드포인트에 섞여 있습니다.
나중에 위치만 올리는 클라이언트가 생기면 이 API를 그대로 쓰기 애매할 수 있어서, 그때는 PUT /api/location 같은 별도 엔드포인트를 두고 메시지 조회는 기존처럼 별도 호출로 분리하는 식으로 가져갈 수 있습니다.
REST 관점에서도 POST /api/message라는 이름이 “위치를 갱신한다”는 걸 담지 못해 직관적이지 않습니다.
그래서 API 문서와 컨트롤러 주석에 “요청 바디에 latitude, longitude를 넣으면 현재 위치를 갱신하고, 응답으로 미읽음 메시지 목록을 준다”라고 명시해 두었습니다.
지금 단계에서는 네트워크 왕복 감소와 클라이언트 단순화를 우선했습니다.
이번에 부딪힌 점.
처음에는 위치 전송과 메시지 조회를 별도 API로 두고 구현했습니다.
로컬·Wi‑Fi에서는 문제 없이 동작했는데, 모바일에서 3G나 지하철·터널처럼 불안정한 네트워크로 테스트할 때 두 번째 요청이 타임아웃되거나, 위치는 올라갔는데 메시지를 못 받는 경우가 잦았습니다.
한 번에 묶은 뒤로 같은 환경에서도 “위치는 갔는데 메시지가 없다”는 식의 불일치가 눈에 띄게 줄었고, 클라이언트 쪽 분기 처리도 단순해졌습니다.
계층 분리와 에러 처리
LocationController는 /api 아래 위치·메시지 엔드포인트를 담당합니다.
컨트롤러는 DTO로 받고, 유스케이스만 호출한 뒤, 결과를 다시 DTO로 바꿔서 응답합니다.
// LocationController.kt (일부)
@RestController
@RequestMapping("/api")
class LocationController(
    private val getCurrentLocationUseCase: GetCurrentLocationUseCase,
    private val getLocationsUseCase: GetLocationsUseCase,
    private val updateLocationUseCase: UpdateLocationUseCase,
    private val getUnreadMessagesUseCase: GetUnreadMessagesUseCase
) {

    @GetMapping("/mylocation")
    fun getMyLocation(): ResponseEntity<LocationResponse?> {
        val location = getCurrentLocationUseCase.execute()
        return if (location != null) {
            ResponseEntity.ok(LocationResponse(
                no = location.id, latitude = location.coordinates.latitude,
                longitude = location.coordinates.longitude, uploadDate = location.uploadedAt))
        } else ResponseEntity.noContent().build()
    }

    @GetMapping("/locations")
    fun getLocations(@RequestParam(defaultValue = "100") limit: Int): ResponseEntity<LocationsResponse> {
        val safeLimit = limit.coerceIn(1, 500)
        val list = getLocationsUseCase.execute(safeLimit).map { loc ->
            LocationResponse(no = loc.id, latitude = loc.coordinates.latitude,
                longitude = loc.coordinates.longitude, uploadDate = loc.uploadedAt)
        }
        return ResponseEntity.ok(LocationsResponse(locations = list))
    }

    @PostMapping("/message")
    fun postLocationAndGetUnreadMessages(
        @Validated @RequestBody body: PostLocationRequest
    ): ResponseEntity<MessagesResponse> {
        updateLocationUseCase.execute(body.latitude, body.longitude)
        val messages = getUnreadMessagesUseCase.execute()
        val list = messages.map { m ->
            MessageResponse(no = m.id, sender = m.sender, message = m.content,
                sendDate = m.sentAt, status = MessageResponse.statusToInt(m.status))
        }
        return ResponseEntity.ok(MessagesResponse(message = list))
    }
}
// UpdateLocationUseCase.kt
@Service
class UpdateLocationUseCase(private val locationRepository: LocationRepositoryPort) {
fun execute(latitude: Double, longitude: Double) {
locationRepository.replaceCurrent(Coordinates(latitude, longitude))
}
}유스케이스는 얇게 둡니다.
UpdateLocationUseCase는 “좌표를 받아서 저장소에 현재 위치를 한 건으로 교체한다”만 담당합니다.
실제 저장 방식은 LocationRepositoryPort 구현체에 맡기고, 유스케이스는 포트에만 의존합니다.
에러 처리. 검증 실패·잘못된 인자·DB 오류·기타 예외를 한 곳에서 처리하려고 GlobalExceptionHandler를 두었습니다. ErrorBody 형태로 통일해서 클라이언트가 code로 분기하고, details로 사용자 메시지나 로그용 정보를 쓸 수 있게 했습니다. DataAccessException은 503으로 돌려서 “일시적 오류, 재시도 가능”을 암시하고, 그 외 예외는 로그 남긴 뒤 500 + 일반 메시지로 응답해 내부 구조를 노출하지 않습니다.
이렇게 해두면 나중에 모바일에서 재시도·폴백 정책을 설계할 때 “4xx는 재시도 안 하고, 5xx/네트워크 오류는 지수 백오프” 같은 규칙을 세우기 쉽습니다.
이번에 부딪힌 점. 초기에는 예외가 나면 스프링 기본 메시지나 스택 정보가 그대로 응답에 섞여 나가기도 했고, 클라이언트마다 에러 메시지 형식이 달라서 "이건 사용자에게 보여주고, 이건 로그만" 같은 처리를 일관되게 하기 어려웠습니다.
그래서 GlobalExceptionHandler에서 검증/DB/기타 예외를 모두 ErrorBody로 통일했고, 모바일 MessageApiAdapter에서는 res.ok가 아닐 때 응답 본문에서 details를 꺼내 "네트워크 연결을 확인해 주세요", "일시적인 오류가 발생했습니다" 같은 문구로 바꿔서 던지도록 했습니다. 그 뒤로 UI에 띄우는 메시지가 통일되었고, 4xx/5xx 구분도 클라이언트에서 하기 쉬워졌습니다.
// GlobalExceptionHandler.kt (핵심만)
@RestControllerAdvice
class GlobalExceptionHandler {
    @ExceptionHandler(MethodArgumentNotValidException::class)
    fun handleValidation(ex: MethodArgumentNotValidException): ResponseEntity<ErrorBody> {
        val errors = ex.bindingResult.allErrors.associate { err ->
            (err as? FieldError)?.field ?: "알수없음" to (err.defaultMessage ?: "잘못된 값")
        }
        return ResponseEntity.status(HttpStatus.BAD_REQUEST).body(ErrorBody("검증_오류", errors))
    }
    @ExceptionHandler(DataAccessException::class)
    fun handleDataAccess(ex: DataAccessException): ResponseEntity<ErrorBody> {
        return ResponseEntity.status(HttpStatus.SERVICE_UNAVAILABLE)
            .body(ErrorBody("DB_오류", "일시적인 오류가 발생했습니다. 잠시 후 다시 시도해 주세요."))
    }
    @ExceptionHandler(Exception::class)
    fun handleException(ex: Exception): ResponseEntity<ErrorBody> {
        return ResponseEntity.status(HttpStatus.INTERNAL_SERVER_ERROR)
            .body(ErrorBody("서버_오류", "요청 처리 중 오류가 발생했습니다."))
    }
    data class ErrorBody(val code: String, val details: Any)
}
포트·유스케이스·훅
Vue 3 + TypeScript + Vite입니다.
백엔드 호출은 IBackendApi 포트로 추상화하고, HttpBackendApi가 fetch로 구현합니다. locationUseCases, messageUseCases는 이 포트만 사용해서 “현재 위치 조회”, “위치 목록”, “위치 갱신 후 메시지 받기”, “메시지 페이징/발송”을 제공합니다.
composition/index.ts에서 API 인스턴스를 한 번 만들고, 유스케이스 함수들을 이 api에 주입해서 내보냅니다.
테스트할 때는 createHttpBackendApi() 대신 목을 넣어주면 됩니다.
// composition/index.ts
import { createHttpBackendApi } from '@/infrastructure/api/HttpBackendApi'
import { getCurrentLocation, getLocations, updateLocationAndGetMessages } from '@/application/use-cases/locationUseCases'
import { getMessagesPage, sendMessage } from '@/application/use-cases/messageUseCases'

const api = createHttpBackendApi()

export const locationUseCases = {
  getCurrentLocation: () => getCurrentLocation(api),
  getLocations: (limit?: number) => getLocations(api, limit),
  updateLocationAndGetMessages: (latitude: number, longitude: number) =>
    updateLocationAndGetMessages(api, latitude, longitude),
}
export const messageUseCases = {
  getMessagesPage: (page: number, pageSize: number) => getMessagesPage(api, page, pageSize),
  sendMessage: (sender: string, message: string) => sendMessage(api, sender, message),
}
useLocation 훅은 위 유스케이스를 호출해 location / loading / error / fetchLocation / updateLocation을 반환합니다.
onMounted에서 한 번 최신 위치를 불러오고, 위치 갱신 시에는 updateLocationAndGetMessages로 서버에 올린 뒤 받은 메시지 목록을 반환합니다.
// presentation/hooks/useLocation.ts
import { ref, onMounted } from 'vue'
import { locationUseCases } from '@/composition'
import type { LocationResponse } from '@/domain/types'

export function useLocation() {
  const location = ref<LocationResponse | null>(null)
  const loading = ref(false)
  const error = ref<string | null>(null)

  async function fetchLocation() {
    loading.value = true
    error.value = null
    try {
      location.value = await locationUseCases.getCurrentLocation()
    } catch (e) {
      error.value = e instanceof Error ? e.message : '위치를 불러올 수 없습니다.'
    } finally {
      loading.value = false
    }
  }

  async function updateLocation(lat: number, lng: number) {
    loading.value = true
    error.value = null
    try {
      const messages = await locationUseCases.updateLocationAndGetMessages(lat, lng)
      location.value = { no: 0, latitude: lat, longitude: lng, uploadDate: new Date().toISOString() }
      return messages
    } catch (e) {
      error.value = e instanceof Error ? e.message : '위치 갱신에 실패했습니다.'
      return []
    } finally {
      loading.value = false
    }
  }

  onMounted(fetchLocation)
  return { location, loading, error, fetchLocation, updateLocation }
}
화면은 useLocation, useMessages 같은 훅이 이 유스케이스를 호출하고, location / loading / error / fetchLocation / updateLocation 등을 반환합니다.
API 실패 시 훅에서 메시지를 정리해서 넘기므로, UI는 “네트워크 확인”, “위치 갱신 실패” 같은 문구만 보여 주면 됩니다.
포트·유스케이스·배터리
React Native + Expo, TypeScript로 되어 있고, 기존 Android Java 위치 추적 앱을 같은 동작으로 재구현한 것입니다.
“위치 추적 시작 → 주기적 좌표 수집 → 서버 전송 → 수신 메시지 로컬 푸시” 흐름을 도메인 / application(유스케이스 + 포트) / infrastructure / presentation으로 나눴습니다.
도메인에서는 Coordinates 값 객체로 위·경도 범위를 검증합니다.
기기/센서에서 들어오는 값이 비정상일 수 있어서, 한 번 감싼 뒤에만 유스케이스나 API로 넘깁니다.
// domain/value-objects/Coordinates.ts
export interface Coordinates {
  readonly latitude: number;
  readonly longitude: number;
}
export function createCoordinates(latitude: number, longitude: number): Coordinates {
  if (latitude < -90 || latitude > 90 || longitude < -180 || longitude > 180) {
    throw new RangeError('잘못된 좌표입니다.');
  }
  return { latitude, longitude };
}
StartLocationTracking 유스케이스는 “위치 감시 시작 → 좌표가 올 때마다 API 호출 → 받은 메시지를 알림으로 표시”만 기술합니다.
HTTP·알림 구현은 모릅니다.
// application/use-cases/StartLocationTracking.ts
import type { ILocationService } from '../ports/ILocationService';
import type { IMessageApi } from '../ports/IMessageApi';
import type { INotificationService } from '../ports/INotificationService';

export function createStartLocationTracking(
  locationService: ILocationService,
  messageApi: IMessageApi,
  notificationService: INotificationService
) {
  return async function startLocationTracking(): Promise<void> {
    await locationService.startWatching(async (coords) => {
      const messages = await messageApi.uploadLocationAndGetMessages(coords);
      for (const message of messages.message) {
        await notificationService.showMessageNotification(message);
      }
    });
  };
}ILocationService, IMessageApi, INotificationService는 전부 포트라서, 단위 테스트 시 목으로 교체하기 쉽습니다. 유스케이스 테스트에서는 “위치 콜백이 호출되면 messageApi, notificationService가 이렇게 호출된다”만 검증하면 됩니다.
ExpoLocationService는 expo-location의 watchPositionAsync를 쓰는데, 여기서 주기 설정이 배터리와 직결됩니다. 현재는 timeInterval: 60_000으로 두었습니다.
더 짧게 하면 실시간성은 좋아지지만 배터리 소모가 커지고, 길게 하면 반대입니다.
실서비스에서는 “이동 중/정지” 감지나 사용자 설정 예: 절전 모드에서는 5분 을 두고 주기를 바꾸는 식으로 조절할 수 있습니다.
distanceInterval을 둬서 “일정 거리 이상 이동 시에만 전송”하도록 하는 것도 방법입니다.
// infrastructure/location/ExpoLocationService.ts (일부)
const DEFAULT_OPTIONS = { timeInterval: 60_000, distanceInterval: 0 };

export const ExpoLocationService: ILocationService = {
  async startWatching(callback: LocationCallback): Promise<void> {
    const result = await Location.requestForegroundPermissionsAsync();
    if (result.status !== 'granted') throw new Error('위치 권한이 거부되었습니다.');
    subscription = await Location.watchPositionAsync(
      { ...DEFAULT_OPTIONS, accuracy: Location.Accuracy.Balanced },
      (loc) => {
        try {
          const coords = createCoordinates(loc.coords.latitude, loc.coords.longitude);
          callback(coords);
        } catch { /* invalid coords - skip */ }
      }
    );
  },
  stopWatching(): void {
    if (subscription) { subscription.remove(); subscription = null; }
  },
};
// presentation/hooks/useLocationTracking.ts
export function useLocationTracking() {
const [status, setStatus] = useState<TrackingStatus>('idle');
const [error, setError] = useState<string | null>(null);
const start = useCallback(async () => {
setError(null); setStatus('starting');
try {
await startLocationTracking();
setStatus('active');
} catch (e) {
setError(e instanceof Error ? e.message : '시작할 수 없습니다.');
setStatus('error');
}
}, []);
const stop = useCallback(() => {
setStatus('stopping'); setError(null);
try { stopLocationTracking(); } catch (e) { setError(e instanceof Error ? e.message : '종료 중 오류'); }
finally { setStatus('idle'); }
}, []);
return { status, error, start, stop };
}MessageApiAdapter는 EXPO_PUBLIC_API_BASE_URL 기준으로 POST /api/message에 { latitude, longitude }를 보내고, 응답의 message 배열을 도메인 Message 리스트로 변환합니다.
네트워크·파싱 오류 시 메시지를 바꿔 던져 UI에서 "네트워크 확인", "서버 연결 불가" 등을 보여 주기 쉽게 했습니다.
// infrastructure/http/MessageApiAdapter.ts (uploadLocationAndGetMessages 핵심)
async uploadLocationAndGetMessages(coords: Coordinates): Promise<ReturnType<typeof createMessages>> {
  const url = `${getApiBaseUrl()}/api/message`;
  const res = await fetch(url, {
    method: 'POST',
    headers: { 'Content-Type': 'application/json' },
    body: JSON.stringify({ latitude: coords.latitude, longitude: coords.longitude }),
  });
  if (!res.ok) {
    const text = await res.text();
    let message = `API 오류 ${res.status}`;
    try {
      const json = JSON.parse(text) as { details?: unknown };
      if (json.details != null) message = String(json.details);
    } catch { if (text) message = text.slice(0, 200); }
    throw new Error(message);
  }
  const data = (await res.json()) as MessagesApiResponse;
  const list = Array.isArray(data?.message) ? data.message : [];
  const messages = list.map((item) =>
    createMessage({ no: item.no, sender: item.sender ?? '', message: item.message ?? '', sendDate: item.sendDate, status: item.status ?? 0 })
  );
  return createMessages({ message: messages });
}
에러와 재시도. 지금은 API 실패 시 사용자에게 메시지를 보여 주고, 다음 위치 업데이트 때 다시 보내는 수준입니다.
네트워크가 길게 끊기면 그 구간 위치는 버려집니다.
다음 단계에서는 실패한 요청을 로컬 큐에 넣고 네트워크 복구 시 재전송하는 레이어를 MessageApiAdapter 위에 두기로 했습니다.
서버 장애 시 UI에 “잠시 후 자동 재시도 중”을 띄우는 것까지 포함할 예정입니다.
데이터·부하·스키마
위치 데이터가 쌓일 때. 위치는 INSERT가 많고 “최근 N건” 조회 위주라서, 스키마 설계 시 10만 동시 접속을 목표로 잡고 PK를 BIGINT로 두었고, upload_date DESC 인덱스로 최근순 목록·지도 마커 조회가 인덱스만 타도록 했습니다.
이 10만은 부하 테스트 결과가 아니라 스키마 주석에 넣어 둔 설계 목표입니다.
공식 부하 테스트 JMeter로 동시 1,000 요청 수준 는 아직 안 돌렸고, 다음에 측정해서 평균·P99 응답 시간을 보강할 예정입니다.
이전에 다른 서비스에서 조회 쿼리가 3초 넘게 나오던 걸 인덱스와 쿼리 정리로 200ms대로 줄인 경험이 있어서, 이번에도 GET /api/locations, POST /api/message 같은 구간은 한 번씩 잡아서 숫자로 남기려고 합니다.
로컬에서 GET /api/locations?limit=100을 100회 반복했을 때 평균 약 90ms, P99 약 180ms가 나왔고, wrk로 동시 20 연결·30초 동안 같은 엔드포인트를 호출했을 때는 평균 98ms, P99 210ms 정도가 나왔습니다.
데이터 10만 건이 쌓인 상태에서의 수치는 아직 안 찍었습니다.
시간이 지나면 row 수가 늘어나므로, 실서비스에서는 보존 기간 90일 을 정해 두고 그 이전 데이터는 아카이브하거나 삭제하는 배치를 돌립니다.
파티셔닝이나 upload_date 기준 삭제/이관 정책을 미리 정해 두면 부담이 줄어듭니다.
병목. 동시 접속이 많아지면 위치 저장과 메시지 조회가 같은 DB를 쓰므로 쓰기·읽기 모두 지연이 생길 수 있습니다.
읽기 부하는 메시지·위치 목록이므로 나중에 레플리카를 두고 읽기만 레플리카로 보낼 수 있고, 쓰기 쪽은 location 테이블 인덱스를 최소한으로 둬서 INSERT 비용을 줄여 두었습니다.
현재는 단일 DB로 두고, 모니터링으로 지연 구간을 확인한 뒤 읽기/쓰기 분리나 캐시를 도입하는 순서로 가져갑니다.
테스트와 배포
테스트. 포트/어댑터 구조 덕분에 백엔드는 유스케이스를 LocationRepositoryPort 등을 목으로 두고 단위 테스트할 수 있습니다.
UpdateLocationUseCase 단위 테스트를 하나 넣어 두었습니다.
LocationRepositoryPort를 목으로 두고, execute 호출 시 replaceCurrent(Coordinates(latitude, longitude))가 한 번 호출되는지 검증하는 두 케이스 일반 좌표, 경계값 -90/180로 통과하도록 작성해 두었고, ./gradlew test로 확인했습니다.
다음으로는 모바일 StartLocationTracking 유스케이스 테스트 세 포트 목나 API 통합을 넣을 계획입니다.
// UpdateLocationUseCaseTest.kt
package com.example.location.application.location

import com.example.location.domain.location.Coordinates
import com.example.location.domain.location.LocationRepositoryPort
import org.junit.jupiter.api.Test
import org.mockito.Mockito.mock
import org.mockito.Mockito.verify

class UpdateLocationUseCaseTest {

    private val locationRepository = mock(LocationRepositoryPort::class.java)
    private val useCase = UpdateLocationUseCase(locationRepository)

    @Test
    fun execute_calls_replaceCurrent_with_given_coordinates() {
        useCase.execute(37.5665, 126.9780)
        verify(locationRepository).replaceCurrent(Coordinates(37.5665, 126.9780))
    }

    @Test
    fun execute_passes_coordinates_within_valid_range() {
        useCase.execute(-90.0, 180.0)
        verify(locationRepository).replaceCurrent(Coordinates(-90.0, 180.0))
    }
}
배포. 지금은 백엔드 jar 빌드 후 로컬에서 실행하고, 웹·모바일도 로컬/수동 실행 위주입니다.
다음 단계로 CI에서 린트·테스트·빌드를 돌리고, main 푸시나 태그에 따라 스테이징에 자동 배포하는 파이프라인을 넣을 예정입니다.
모바일은 Expo EAS로 빌드·제출까지 묶어 둘 계획입니다.
보안
위치 데이터는 민감 정보라서, “동작 구현”으로만 끝내지 않고 전송·저장·접근을 어떻게 할지 정해 두는 게 좋습니다.
현재 구현. API 키 검증을 최소한으로 넣어 두었습니다.
app.api-key가 비어 있으면 검사하지 않고, 값이 있으면 /api/** 요청에 X-API-Key 헤더가 그 값과 일치할 때만 통과시킵니다.
데모/로컬에서는 비워 두고, 스테이징 등에서는 키를 설정해 두면 됩니다.
실서비스 수준의 인증/인가와는 다르지만, "아무나 호출 가능" 상태보다는 낫습니다.
JWT·역할 기반 접근은 아직 없습니다.
// config/ApiKeyFilter.kt
@Component
@Order(1)
class ApiKeyFilter(
    @Value("\${app.api-key:}") private val expectedApiKey: String
) : OncePerRequestFilter() {

    override fun doFilterInternal(
        request: HttpServletRequest,
        response: HttpServletResponse,
        filterChain: FilterChain
    ) {
        if (expectedApiKey.isBlank()) {
            filterChain.doFilter(request, response)
            return
        }
        val provided = request.getHeader("X-API-Key")?.trim()
        if (provided != expectedApiKey) {
            response.status = HttpServletResponse.SC_UNAUTHORIZED
            response.contentType = "application/json;charset=UTF-8"
            response.writer.write("""{"code":"UNAUTHORIZED","details":"유효한 API 키가 필요합니다."}""")
            return
        }
        filterChain.doFilter(request, response)
    }

    override fun shouldNotFilter(request: HttpServletRequest): Boolean {
        return !request.requestURI.startsWith("/api/")
    }
}
실서비스에서 채울 것.
- 인증/인가: 사용자·디바이스 식별 후, “이 사용자는 자신의 위치만 올릴 수 있다”, “메시지/위치 목록은 권한 있는 사용자만 조회한다” 수준으로 제한합니다.
의료 시스템에서 IRB승인 데이터 접근 제어를 역할 기반 인가로 구현한 적이 있는데, 이 프로젝트에서도 위치 데이터 접근에 같은 패턴을 적용할 예정입니다.
JWT나 세션 기반으로 토큰을 검증하는 필터/인터셉터를 API 앞단에 두고, 위치·메시지 리소스에 “누가 접근 가능한지”를 도메인 규칙으로 넣습니다. - 전송: HTTPS 위에서만 API를 제공해 전송 구간 도청·변조를 막습니다.
- 저장: 금융·의료 도메인에서는 개인정보 저장 시 암호화 컬럼/필드 레벨 또는 디스크 암호화 와 접근 로그·감사를 요구하는 경우가 많습니다.
여기서도 규제나 정책에 맞춰 저장 시 암호화 여부와 감사 로그를 정해 둘 계획입니다.
위 API 키는 "지금 당장 할 수 있는 것"으로 넣어 둔 것이고, 실제 서비스로 넘어갈 때는 인증/인가·TLS·저장 구간 보호를 순서대로 적용할 예정입니다.
마치며
이번 프로젝트를 하면서, "동작만 맞추는 것"과 "나중에 바꾸기 쉽게·측정 가능하게 두는 것"을 구분해서 생각하게 되었습니다.
API 하나에 위치 저장과 메시지 조회를 묶은 건 모바일에서의 왕복을 줄이려는 판단이었고, 대신 SRP나 REST 네이밍 같은 트레이드오프가 생긴 부분은 문서에 남겨 두었습니다.
세 스택 모두 도메인·유스케이스·포트로 나눠 둔 덕분에, 테스트를 넣을 때나 저장소를 바꿀 때 어디를 손대면 되는지가 비교적 명확했습니다.
실제로 해 둔 것만 정리하면, UpdateLocationUseCase 단위 테스트 한 개를 넣었고, 부하 수치는 로컬 100회 반복과 wrk 동시 20·30초 측정으로 한 번씩 잡아 두었습니다.
API 키는 설정 시에만 검사하도록 필터를 넣어 두었습니다.
다음에는 모바일 유스케이스 테스트, CI 배포, 오프라인 큐·재시도를 넣어 보는 걸 목표로 두고 있습니다. 읽어 주셔서 감사합니다. “”