Spring Boot + Kotlin으로 구현하는 RAG 강화 스트리밍 채팅 시스템
앞서..
이전 글에서 Spring Boot와 Kotlin을 사용하여 LLM을 통합하고, 부드러운 스트리밍 대화 경험을 구현했습니다. 하지만 곧 핵심 문제를 발견하게 됩니다: 범용 대형 언어 모델은 지식이 풍부하지만, 우리의 사적 영역 지식(회사 내부 제품 문서, 기술 매뉴얼, 개인 노트 등)에 대해서는 전혀 모릅니다. "우리 최신 XX 제품의 특징은 무엇인가요?"와 같은 구체적인 질문에 답변할 수 없습니다.
이 문제를 해결하기 위해 오늘의 주인공이 등장합니다 - RAG(Retrieval-Augmented Generation, 검색 증강 생성).
간단히 말해서, RAG 기술은 대형 모델에 "지식 USB"를 외장 연결하는 것과 같습니다. 대화할 때 먼저 우리 자신의 지식베이스(벡터 데이터베이스)에서 질문과 가장 관련성 높은 정보를 검색하고, 이 정보를 원본 질문과 함께 대형 모델에 "먹여서" 이 "참고 자료"를 기반으로 정확한 답변을 생성하도록 합니다.
본문에서는 전체 과정을 단계별로 안내합니다: 벡터 데이터베이스 구축부터 개인 문서를 AI에 "먹이기", 최종적으로 "범용 모드"와 "지식베이스 모드" 간에 자유롭게 전환할 수 있는 지능형 챗봇을 구현하는 것까지.
환경 준비
RAG를 구현하려면 먼저 "지식"을 저장할 수 있는 곳이 필요합니다. 이곳이 바로 벡터 데이터베이스입니다. 텍스트를 벡터(숫자 집합)로 변환하여 저장하고, 유사도 검색을 효율적으로 수행할 수 있도록 설계되었습니다.
시장에는 Chroma, Milvus 등 다양한 선택지가 있습니다. 이번에는 Redis Stack을 선택했습니다. 익숙한 Redis일 뿐만 아니라, 통합된 RediSearch 모듈이 강력한 벡터 저장 및 검색 기능을 제공하여 Java 개발자에게 매우 친숙하기 때문입니다.
Docker를 사용하여 빠르게 시작하겠습니다. 전체 과정은 두 단계로 나뉩니다:
1. 최신 이미지 가져오기
docker pull redis/redis-stack:latest2. 컨테이너 실행
docker run -d --name redis-stack -p 9379:6379 -e REDIS_ARGS="--requirepass 123456" redis/redis-stack:latest설명: -p 9379:6379를 통해 컨테이너의 6379 포트를 호스트의 9379로 매핑하여 로컬의 다른 Redis 인스턴스와 충돌을 방지합니다. 동시에 -e를 통해 접근 비밀번호를 123456으로 설정했습니다.
실행이 성공하면 벡터 데이터베이스가 준비 완료됩니다!
프로젝트 통합
1. Maven 의존성 추가
다음으로, Spring Boot 프로젝트에 관련 의존성을 도입하고 설정해야 합니다.
<!-- Spring AI Redis 벡터 저장소 Starter -->
<dependency>
    <groupId>org.springframework.ai</groupId>
    <artifactId>spring-ai-redis-store-spring-boot-starter</artifactId>
</dependency>

<!-- Spring AI 문서 읽기 도구, 다양한 형식의 문서를 파싱하기 위함 -->
<dependency>
    <groupId>org.springframework.ai</groupId>
    <artifactId>spring-ai-tika-document-reader</artifactId>
</dependency>
의존성 설명:
- spring-ai-redis-store-spring-boot-starter: 핵심 의존성으로, Redis 벡터 데이터베이스와 상호작용하는 모든 기능을 제공합니다.
- spring-ai-tika-document-reader: 강력한 문서 파싱 도구로, 애플리케이션이 .txt, .pdf, .docx 등 다양한 형식의 파일을 직접 읽을 수 있게 합니다.
2. application.yml 설정 추가
application.yml에서 Redis 벡터 데이터베이스와 관련된 설정을 추가합니다:
spring:
  data:
    redis:
      host: 127.0.0.1
      port: 9379
      password: 123456
  ai:
    vectorstore:
      redis:
        initialize-schema: true # 필요한 스키마를 초기화할지 여부
        index-name: lee-vectorstore # 벡터를 저장하는 데 사용되는 인덱스 이름
        prefix: 'lee:' # redis 키의 접두사
설정이 완료되면, Spring AI는 애플리케이션 시작 시 자동으로 Redis에 연결하고, 벡터 저장을 위한 인덱스를 생성합니다.
지식베이스 업로드 및 처리 흐름 구축
모든 준비가 완료되었습니다. 이제 문서의 업로드, 파싱, 분할, 벡터화 저장을 구현하는 코드를 작성해보겠습니다.
1. 프론트엔드 개선: 업로드 진입점과 모드 스위치 제공
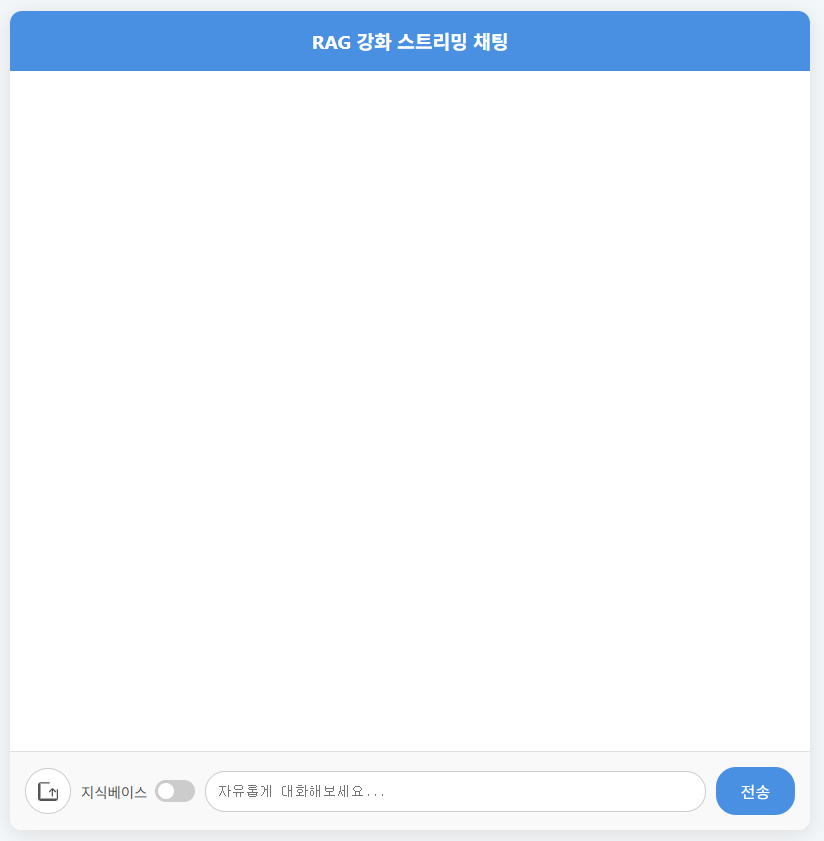
먼저 프론트엔드 페이지를 개선하여 두 가지 핵심 기능을 추가해야 합니다: 지식베이스 문서를 제출하는 파일 업로드 버튼과, 일반 대화와 RAG 대화 간에 자유롭게 전환할 수 있는 "지식베이스" 스위치입니다.
<!DOCTYPE html>
<html lang="ko">
<head>
    <meta charset="UTF-8">
    <meta name="viewport" content="width=device-width, initial-scale=1.0">
    <title>RAG 강화 스트리밍 채팅</title>
    <style>
        body {
            font-family: -apple-system, BlinkMacSystemFont, "Segoe UI", Roboto, "Helvetica Neue", Arial, "Noto Sans KR", sans-serif;
            background-color: #f4f7f9;
            margin: 0;
            display: flex;
            justify-content: center;
            align-items: center;
            height: 100vh;
        }
        .chat-container {
            width: 90%;
            max-width: 800px;
            height: 90vh;
            background-color: #fff;
            border-radius: 12px;
            box-shadow: 0 4px 20px rgba(0, 0, 0, 0.1);
            display: flex;
            flex-direction: column;
            overflow: hidden;
            position: relative;
        }
        .chat-header {
            background-color: #4a90e2;
            color: white;
            padding: 16px;
            font-size: 1.2em;
            text-align: center;
            font-weight: bold;
        }
        .chat-messages {
            flex-grow: 1;
            padding: 20px;
            overflow-y: auto;
            display: flex;
            flex-direction: column;
            gap: 15px;
        }
        .message {
            padding: 12px 18px;
            border-radius: 18px;
            max-width: 75%;
            line-height: 1.5;
            word-wrap: break-word;
        }
        .user-message {
            background-color: #dcf8c6;
            align-self: flex-end;
            border-bottom-right-radius: 4px;
        }
        .bot-message {
            background-color: #e9e9eb;
            align-self: flex-start;
            border-bottom-left-radius: 4px;
        }
        .chat-input-area {
            display: flex;
            padding: 15px;
            border-top: 1px solid #e0e0e0;
            background-color: #f9f9f9;
            align-items: center;
        }
        #message-input {
            flex-grow: 1;
            padding: 12px;
            border: 1px solid #ccc;
            border-radius: 20px;
            resize: none;
            font-size: 1em;
            margin-right: 10px;
        }
        #send-button {
            padding: 12px 25px;
            border: none;
            background-color: #4a90e2;
            color: white;
            border-radius: 20px;
            cursor: pointer;
            font-size: 1em;
            transition: background-color 0.3s;
            flex-shrink: 0;
        }
        #send-button:disabled {
            background-color: #a0c7ff;
            cursor: not-allowed;
        }
        #upload-button {
            width: 44px;
            height: 44px;
            border: 1px solid #ccc;
            border-radius: 50%;
            display: flex;
            justify-content: center;
            align-items: center;
            cursor: pointer;
            margin-right: 10px;
            background-color: #fff;
            transition: background-color 0.3s;
            flex-shrink: 0;
        }
        #upload-button:hover {
            background-color: #f0f0f0;
        }
        #upload-button svg {
            width: 20px;
            height: 20px;
            fill: #555;
        }
        #upload-button.loading {
            cursor: not-allowed;
            animation: spin 1s linear infinite;
        }
        @keyframes spin {
            0% { transform: rotate(0deg); }
            100% { transform: rotate(360deg); }
        }
        #file-input {
            display: none;
        }
        #toast-notification {
            position: absolute;
            top: 80px;
            left: 50%;
            transform: translateX(-50%);
            padding: 12px 25px;
            border-radius: 8px;
            color: white;
            font-weight: bold;
            opacity: 0;
            visibility: hidden;
            transition: opacity 0.5s, visibility 0.5s;
            z-index: 1000;
        }
        #toast-notification.show {
            opacity: 1;
            visibility: visible;
        }
        #toast-notification.success {
            background-color: #28a745;
        }
        #toast-notification.error {
            background-color: #dc3545;
        }

        /* --- 신규: 지식베이스 스위치 스타일 --- */
        .knowledge-switch-container {
            display: flex;
            align-items: center;
            margin-right: 10px;
            cursor: pointer;
        }
        .knowledge-switch-container .switch-label {
            margin-right: 8px;
            font-size: 0.9em;
            color: #555;
            user-select: none; /* 텍스트 선택 방지 */
        }
        .switch {
            position: relative;
            display: inline-block;
            width: 40px;
            height: 22px;
        }
        .switch input {
            opacity: 0;
            width: 0;
            height: 0;
        }
        .slider {
            position: absolute;
            cursor: pointer;
            top: 0;
            left: 0;
            right: 0;
            bottom: 0;
            background-color: #ccc;
            transition: .4s;
            border-radius: 22px;
        }
        .slider:before {
            position: absolute;
            content: "";
            height: 16px;
            width: 16px;
            left: 3px;
            bottom: 3px;
            background-color: white;
            transition: .4s;
            border-radius: 50%;
        }
        input:checked + .slider {
            background-color: #4a90e2;
        }
        input:checked + .slider:before {
            transform: translateX(18px);
        }
    </style>
</head>
<body>

<div class="chat-container">
    <div class="chat-header">RAG 강화 스트리밍 채팅</div>
    <div class="chat-messages" id="chat-messages">
        <!-- 채팅 메시지가 여기에 동적으로 추가됩니다 -->
    </div>

    <div id="toast-notification"></div>

    <div class="chat-input-area">
        <label for="file-input" id="upload-button" title="지식 문서 업로드">
            <svg viewBox="0 0 1024 1024" xmlns="http://www.w3.org/2000/svg"><path d="M761.6 364.8c-12.8-12.8-32-12.8-44.8 0l-160 160c-12.8 12.8-12.8 32 0 44.8 12.8 12.8 32 12.8 44.8 0l102.4-102.4v300.8c0 19.2 12.8 32 32 32s32-12.8 32-32V467.2l102.4 102.4c12.8 12.8 32 12.8 44.8 0 12.8-12.8 12.8-32 0-44.8L761.6 364.8zM896 896H128V128h448c19.2 0 32-12.8 32-32s-12.8-32-32-32H128C64 64 0 128 0 192v704c0 64 64 128 128 128h768c64 0 128-64 128-128V448c0-19.2-12.8-32-32-32s-32 12.8-32 32v448z"></path></svg>
        </label>
        <input type="file" id="file-input" accept=".txt,.pdf,.md,.docx">

        <!-- 신규: 지식베이스 스위치 -->
        <div class="knowledge-switch-container" title="활성화하면 업로드된 문서를 기반으로 답변합니다">
            <span class="switch-label">지식베이스</span>
            <label class="switch">
                <input type="checkbox" id="knowledge-toggle">
                <span class="slider"></span>
            </label>
        </div>

        <textarea id="message-input" placeholder="질문을 입력하세요..." rows="1"></textarea>
        <button id="send-button">전송</button>
    </div>
</div>

<script>
    // --- DOM 요소 가져오기 ---
    const chatMessages = document.getElementById('chat-messages');
    const messageInput = document.getElementById('message-input');
    const sendButton = document.getElementById('send-button');
    const fileInput = document.getElementById('file-input');
    const uploadButton = document.getElementById('upload-button');
    const toast = document.getElementById('toast-notification');
    // 신규: 지식베이스 스위치 요소
    const knowledgeToggle = document.getElementById('knowledge-toggle');

    // --- 핵심 변수 ---
    const userId = 'user-' + Date.now() + '-' + Math.random().toString(36).substr(2, 9);
    let eventSource = null;
    let currentBotMessageElement = null;

    // --- 파일 업로드 로직 (변경 없음) ---
    async function handleFileUpload(event) {
        const file = event.target.files[0];
        if (!file) return;

        uploadButton.classList.add('loading');
        uploadButton.style.pointerEvents = 'none';

        const formData = new FormData();
        formData.append('file', file);

        try {
            // RagController에 업로드 인터페이스가 있다고 가정하고, 경로는 /rag/upload
            const response = await fetch('/rag/upload', { // 백엔드와 일치하는지 확인하세요
                method: 'POST',
                body: formData,
            });

            // 백엔드가 성공 시 { status: 200, msg: "성공" } 형식으로 반환한다고 가정
            const result = await response.json();

            if (response.ok && result.status === 200) {
                showToast(`문서 "${file.name}" 업로드 성공!`, 'success');
            } else {
                showToast(`업로드 실패: ${result.msg || '알 수 없는 오류'}`, 'error');
            }
        } catch (error) {
            console.error('Upload failed:', error);
            showToast('업로드에 실패했습니다. 네트워크를 확인하거나 관리자에게 문의하세요.', 'error');
        } finally {
            uploadButton.classList.remove('loading');
            uploadButton.style.pointerEvents = 'auto';
            fileInput.value = '';
        }
    }

    // --- Toast 알림 (변경 없음) ---
    function showToast(message, type = 'success') {
        toast.textContent = message;
        toast.className = 'show';
        toast.classList.add(type);
        setTimeout(() => {
            toast.className = toast.className.replace('show', '');
        }, 3000);
    }

    // --- SSE 연결 (변경 없음) ---
    function connectSSE() {
        if (eventSource) {
            eventSource.close();
        }
        eventSource = new EventSource(`/sse/connect?userId=${userId}`);

        eventSource.addEventListener('add', (event) => {
            if (!currentBotMessageElement) {
                currentBotMessageElement = createMessageElement('bot-message');
                chatMessages.appendChild(currentBotMessageElement);
            }
            if (event.data && event.data.toLowerCase() !== 'null') {
                // innerHTML을 사용하여 향후 Markdown -> HTML 렌더링 지원
                currentBotMessageElement.innerHTML += event.data.replace(/\n/g, '<br>');
            }
            scrollToBottom();
        });

        eventSource.addEventListener('finish', (event) => {
            console.log('스트림 완료:', event.data);
            currentBotMessageElement = null;
            sendButton.disabled = false;
            messageInput.disabled = false;
            eventSource.close();
        });

        eventSource.onerror = (error) => {
            console.error('SSE 오류:', error);
            if (currentBotMessageElement) {
                currentBotMessageElement.innerHTML += '<br><strong style="color: red;">연결이 중단되었습니다. 다시 시도해 주세요.</strong>';
            }
            sendButton.disabled = false;
            messageInput.disabled = false;
            eventSource.close();
        };
    }

    // --- 메시지 전송 (핵심 수정) ---
    async function sendMessage() {
        const message = messageInput.value.trim();
        if (!message) return;

        displayUserMessage(message);
        messageInput.value = '';
        messageInput.focus();

        sendButton.disabled = true;
        messageInput.disabled = true;

        // SSE 연결이 메시지를 받을 준비가 되었는지 확인
        connectSSE();

        // 지식베이스 스위치의 상태 판단
        const useKnowledgeBase = knowledgeToggle.checked;

        // 입력 상자의 placeholder 힌트 업데이트
        updatePlaceholder();

        try {
            // 통일된 백엔드 API 호출
            await fetch('/chat/send', {
                method: 'POST',
                headers: {
                    'Content-Type': 'application/json',
                },
                body: JSON.stringify({
                    currentUserName: userId,
                    message: message,
                    useKnowledgeBase: useKnowledgeBase // 스위치 상태 전송
                }),
            });
        } catch (error) {
            console.error('Failed to send message:', error);
            displayBotMessage('죄송합니다. 메시지 전송에 실패했습니다.');
            sendButton.disabled = false;
            messageInput.disabled = false;
        }
    }

    // --- UI 보조 함수 ---
    function createMessageElement(className, htmlContent = '') {
        const div = document.createElement('div');
        div.className = `message ${className}`;
        div.innerHTML = htmlContent;
        return div;
    }

    function displayUserMessage(message) {
        const userMessageElement = createMessageElement('user-message', message);
        chatMessages.appendChild(userMessageElement);
        scrollToBottom();
    }

    function displayBotMessage(message) {
        const botMessageElement = createMessageElement('bot-message', message);
        chatMessages.appendChild(botMessageElement);
        scrollToBottom();
    }

    function scrollToBottom() {
        chatMessages.scrollTop = chatMessages.scrollHeight;
    }

    // 신규: 스위치 상태에 따라 입력 상자 힌트 업데이트
    function updatePlaceholder() {
        if (knowledgeToggle.checked) {
            messageInput.placeholder = '업로드된 지식베이스를 기반으로 질문하세요...';
        } else {
            messageInput.placeholder = '자유롭게 대화해보세요...';
        }
    }

    // --- 이벤트 바인딩 ---
    sendButton.addEventListener('click', sendMessage);
    messageInput.addEventListener('keydown', (event) => {
        if (event.key === 'Enter' && !event.shiftKey) {
            event.preventDefault();
            sendMessage();
        }
    });
    fileInput.addEventListener('change', handleFileUpload);
    // 신규: 스위치에 change 이벤트를 바인딩하여 placeholder 업데이트
    knowledgeToggle.addEventListener('change', updatePlaceholder);

    // placeholder 초기화
    updatePlaceholder();

</script>
</body>
</html>
최종 효과는 다음과 같습니다:
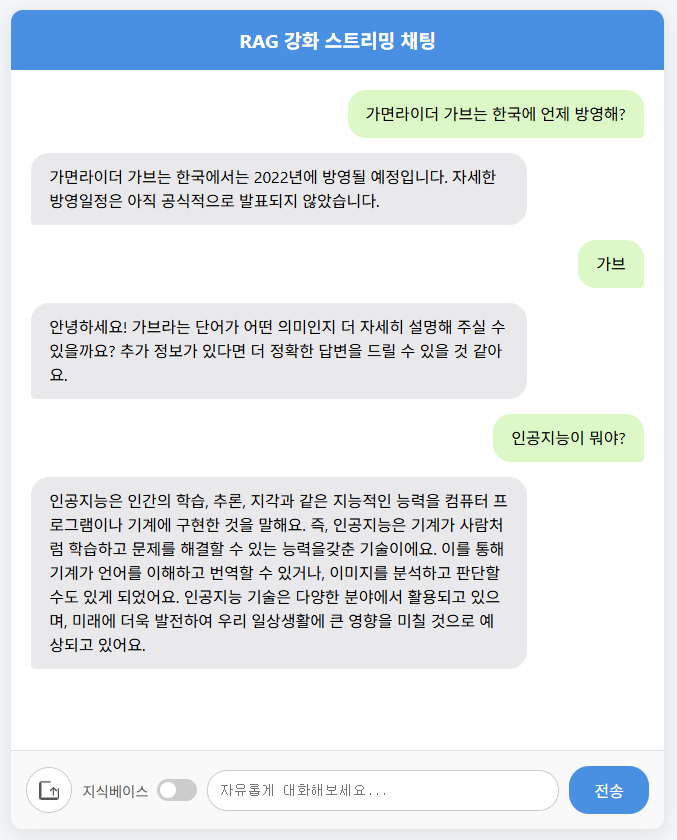
(*) 입력할경우
2. 백엔드 구현: 문서의 수신과 저장
프론트엔드의 파일 업로드 요청을 처리하기 위해 RagController를 생성합니다.
import com.sleekydz86.rag.application.service.DocumentService
import com.sleekydz86.rag.presentation.dto.LeeResult
import org.springframework.web.bind.annotation.PostMapping
import org.springframework.web.bind.annotation.RequestMapping
import org.springframework.web.bind.annotation.RequestParam
import org.springframework.web.bind.annotation.RestController
import org.springframework.web.multipart.MultipartFile

@RestController
@RequestMapping("/rag")
class RagController(
    private val documentService: DocumentService
) {

    @PostMapping("/upload")
    fun upload(@RequestParam("file") file: MultipartFile): LeeResult<Nothing> =
        file.resource?.let { resource ->
            documentService.loadText(resource, file.originalFilename ?: "unknown")
                .fold(
                    onSuccess = { LeeResult.ok(msg = "파일이 성공적으로 업로드되었습니다.") },
                    onFailure = { error -> LeeResult.error("업로드 실패: ${error.message}") }
                )
        } ?: LeeResult.error("유효하지 않은 파일입니다.")
}DocumentServiceImpl은 전체 처리 흐름의 핵심으로, 업로드된 문서를 읽기 -> 분할 -> 벡터화 -> 저장하는 역할을 담당합니다.
import org.springframework.ai.document.Document
import org.springframework.ai.reader.tika.TikaDocumentReader
import org.springframework.ai.transformer.splitter.TokenTextSplitter
import org.springframework.ai.vectorstore.SearchRequest
import org.springframework.ai.vectorstore.VectorStore
import org.springframework.core.io.Resource
import org.springframework.stereotype.Service
import org.slf4j.LoggerFactory

@Service
class DocumentServiceImpl(
    private val vectorStore: VectorStore
) : DocumentService {

    private val logger = LoggerFactory.getLogger(javaClass)
    private val textSplitter = TokenTextSplitter()

    override fun loadText(resource: Resource, fileName: String): Result<Unit> {
        return try {
            logger.info("문서 로딩 시작: $fileName")

            val documentReader = TikaDocumentReader(resource)
            val documents = documentReader.get()

            logger.info("원본 문서 내용 길이: ${documents.firstOrNull()?.content?.length ?: 0}")

            val documentsWithMetadata = documents.map { document ->
                Document(
                    document.content,
                    document.metadata + mapOf(
                        "fileName" to fileName,
                        "source" to resource.toString(),
                        "timestamp" to System.currentTimeMillis().toString(),
                        "contentLength" to document.content.length.toString()
                    )
                )
            }

            val splitDocuments = textSplitter.apply(documentsWithMetadata)

            logger.info("문서 분할 완료: 원본 ${documents.size}개 -> 분할 ${splitDocuments.size}개")

            // 각 청크 내용 로깅
            splitDocuments.forEachIndexed { index, doc ->
                logger.debug("청크 ${index + 1}: ${doc.content.take(100)}...")
            }

            // VectorStore에 저장
            vectorStore.add(splitDocuments)

            logger.info("문서 로딩 완료: $fileName, 분할된 청크 수: ${splitDocuments.size}")

            Result.success(Unit)

        } catch (e: Exception) {
            logger.error("문서 로딩 실패: $fileName", e)
            Result.failure(e)
        }
    }

    override fun doSearch(query: String): List<Document> {
        return try {
            logger.info("벡터 검색 실행: '$query'")

            // 검색 파라미터 조정
            val searchRequest = SearchRequest.query(query)
                .withTopK(20)  // 더 많은 결과 반환
                .withSimilarityThreshold(0.01)  // 임계값을 매우 낮게 설정

            val results = vectorStore.similaritySearch(searchRequest)

            logger.info("검색 결과 수: ${results.size}")
            results.forEachIndexed { index, doc ->
                val fileName = doc.metadata["fileName"] ?: "알 수 없는 문서"
                val content = doc.content.take(150)
                logger.info("결과 ${index + 1}: [$fileName] - $content...")
            }

            results
        } catch (e: Exception) {
            logger.error("벡터 검색 실패: '$query'", e)
            emptyList()
        }
    }
}
문서를 분할해야 하는 이유는 무엇일까요?
대형 모델이 처리할 수 있는 컨텍스트 길이는 제한적이므로, 수만 자의 긴 문서를 통째로 던져줄 수 없습니다. 올바른 방법은 긴 문서를 논리적으로 완전하고 의미 있는 작은 단락(Chunk)으로 분할하는 것입니다. 이렇게 하면 검색 시 질문과 가장 관련성 높은 몇 개의 단락만 찾으면 됩니다.
Spring AI는 기본 분할 전략을 제공하지만, 구조화된 지식베이스(QA 쌍, API 문서 등)의 경우, 사용자 정의 분할 규칙이 검색 정확도를 크게 향상시킬 수 있습니다. 여기서는 CustomTextSplitter를 생성하여 연속된 빈 줄을 기준으로 문서를 분할합니다. 이는 나중에 제공할 제품 매뉴얼에 매우 효과적입니다.
import org.springframework.ai.transformer.splitter.TextSplitter
import org.springframework.stereotype.Component

@Component
class CustomTextSplitter : TextSplitter(), TextSplitStrategy {

    override fun splitText(text: String): List<String> = split(text)

    override fun split(text: String): List<String> =
        text.split("\\s*\\R\\s*\\R\\S*".toRegex())
            .filter { it.isNotBlank() }
            .map { it.trim() }
}
주목할 점은, TextSplitter를 상속하고 splitText 메서드만 재정의하면, Spring AI의 apply 메서드가 내부적으로 우리 구현을 호출하므로 매우 편리합니다.
3. 지식베이스 문서 준비
여기서는 대형 모델을 사용하여 제품 매뉴얼을 생성하여 지식베이스 파일로 활용합니다. 제품 소개, 설치, 기능 및 FAQ 등을 포함한 내용입니다.
인공지능(AI)은 인간의 학습능력과 추론능력, 지각능력, 자연언어의 이해능력 등을 컴퓨터 프로그램으로 실현한 기술입니다.

머신러닝은 AI의 한 분야로, 데이터로부터 학습하여 패턴을 찾고 예측을 수행하는 기술입니다.

딥러닝은 머신러닝의 하위 분야로, 인공신경망을 기반으로 복잡한 패턴을 학습하는 기술입니다.

자연어처리(NLP)는 인간의 언어를 컴퓨터가 이해하고 처리할 수 있도록 하는 AI 기술입니다.

RAG(Retrieval-Augmented Generation)는 외부 지식베이스를 검색하여 AI 모델의 응답 품질을 향상시키는 기술입니다.

스프링 부트(Spring Boot)는 자바 기반의 웹 애플리케이션을 쉽게 개발할 수 있도록 도와주는 프레임워크입니다.

코틀린(Kotlin)은 JVM에서 실행되는 현대적인 프로그래밍 언어로, 자바와 100% 호환됩니다.
4. 네트워크 문제 해결 팁
spring-ai-redis-store-spring-boot-starter 의존성이 Hugging Face Hub에서 모델 파일을 다운로드해야 하므로, 국내 사용자는 네트워크 문제를 겪을 수 있습니다.
다운로드에 실패하면 전역 JVM 프록시를 구성하여 해결할 수 있습니다. ProxyConfig 구성 클래스를 생성하면 됩니다:
import jakarta.annotation.PostConstruct
import org.springframework.context.annotation.Configuration

@Configuration
class ProxyConfig {

    companion object {
        private const val PROXY_HOST = "127.0.0.1"
        private const val PROXY_PORT = 10080
    }

    @PostConstruct
    fun setSystemProxy() {
        listOf("http", "https").forEach { protocol ->
            System.setProperty("${protocol}.proxyHost", PROXY_HOST)
            System.setProperty("${protocol}.proxyPort", PROXY_PORT.toString())
        }

        println("시스템 프록시 설정됨: http://$PROXY_HOST:$PROXY_PORT")
    }
}설명: 여기서 포트 번호를 자신의 프록시로 바꾸면 됩니다.
5. 저장 결과 검증
준비된 《AI 기술 개요》를 업로드한 후, Redis 클라이언트에서 문서가 성공적으로 분할되고 벡터 데이터가 포함된 항목으로 저장되었음을 확인할 수 있습니다.
이제 지식베이스가 AI의 두뇌에 성공적으로 "먹여졌습니다"!
RAG 강화 대화 구현
지식이 저장된 후, 가장 중요한 단계는 대화에서 어떻게 "사용"하는가입니다.
1. 통일된 채팅 인터페이스
코드의 우아함을 위해, 두 가지 대화 모드를 처리하기 위해 두 개의 독립적인 인터페이스를 사용하지 않고, 요청 본문에 useKnowledgeBase 불린 값을 추가하여 동적으로 전환할 수 있는 통일된 채팅 인터페이스를 설계합니다.
data class ChatEntity(
    val currentUserName: String,
    val message: String,
    val botMsgId: String? = null,
    val useKnowledgeBase: Boolean = false
) {
    companion object {
        fun createDefault(userName: String, message: String) =
            ChatEntity(userName, message, useKnowledgeBase = false)

        fun createWithKnowledge(userName: String, message: String) =
            ChatEntity(userName, message, useKnowledgeBase = true)
    }
}
통일된 ChatController.java
import com.sleekydz86.rag.application.service.ChatService
import com.sleekydz86.rag.domain.model.ChatEntity
import org.springframework.web.bind.annotation.PostMapping
import org.springframework.web.bind.annotation.RequestBody
import org.springframework.web.bind.annotation.RequestMapping
import org.springframework.web.bind.annotation.RestController

@RestController
@RequestMapping("/chat")
class ChatController(
    private val chatService: ChatService
) {

    /**
     * 통일된 채팅 인터페이스
     * @param chatEntity 메시지와 지식베이스 사용 여부를 포함하는 엔티티
     */
    @PostMapping("/send")
    fun chat(@RequestBody chatEntity: ChatEntity) {
        // 모든 정보를 포함한 엔티티를 서비스 계층에 직접 전달
        chatService.streamChat(chatEntity)
    }
}
2. 핵심 채팅 서비스 개선
ChatServiceImpl의 메서드는 useKnowledgeBase 값에 따라 AI를 직접 호출할지, 아니면 먼저 벡터 데이터베이스에서 검색한 후 AI를 호출할지를 결정합니다.
import com.sleekydz86.rag.domain.model.ChatEntity
import com.sleekydz86.rag.infrastructure.external.SSEServer
import com.sleekydz86.rag.infrastructure.external.sse.SSEMsgType
import org.slf4j.LoggerFactory
import org.springframework.ai.chat.ChatClient
import org.springframework.ai.chat.prompt.Prompt
import org.springframework.ai.document.Document
import org.springframework.stereotype.Service

@Service
class ChatServiceImpl(
    private val chatClient: ChatClient,
    private val documentService: DocumentService
) : ChatService {

    private val logger = LoggerFactory.getLogger(javaClass)

    companion object {
        private const val RAG_PROMPT_TEMPLATE = """
        다음 제공된 지식 정보를 바탕으로 사용자의 질문에 답변해 주세요.

        규칙:
        1. 지식 정보에 질문에 대한 답변이 있다면, 그 정보를 활용하여 정확하고 상세하게 답변하세요.
        2. 지식 정보에 질문에 대한 답변이 없다면, 일반적인 AI 지식으로 답변하거나 관련된 정보를 제공하세요.
        3. 답변은 자연스럽게 흘러가도록 하되, "지식에 따르면" 등의 표현은 사용하지 마세요.
        4. 답변은 친근하고 도움이 되는 톤으로 작성하세요.
        5. 지식 정보가 여러 개 있다면, 모든 관련 정보를 종합하여 답변하세요.
        6. 절대 "현재 가지고 있는 지식으로는 이 질문에 답변할 수 없습니다"라는 메시지를 출력하지 마세요.
        7. 항상 유용하고 도움이 되는 답변을 제공하세요.

        【지식 정보】
        {context}

        【사용자 질문】
        {question}

        위 지식 정보를 바탕으로 답변해 주세요.
    """
    }

    override fun streamChat(chatEntity: ChatEntity) {
        val (userId, question, _, useKnowledgeBase) = chatEntity

        val prompt = if (useKnowledgeBase) {
            logger.info("【사용자: $userId】지식베이스 모드로 질문 중입니다.")
            createRAGPrompt(question)
        } else {
            logger.info("【사용자: $userId】일반 모드로 질문 중입니다.")
            Prompt(question)
        }

        try {
            val response = chatClient.call(prompt)
            val content = response.result?.output?.content ?: ""

            if (content.isNotEmpty()) {
                val chunks = content.chunked(100)
                chunks.forEach { chunk ->
                    SSEServer.sendMsg(userId, chunk, SSEMsgType.ADD)
                    Thread.sleep(50)
                }
            }

            logger.info("【사용자: $userId】응답이 성공적으로 완료되었습니다.")
            SSEServer.sendMsg(userId, "done", SSEMsgType.FINISH)
            SSEServer.close(userId)

        } catch (error: Exception) {
            logger.error("【사용자: $userId】AI 처리 중 오류 발생: ${error.message}", error)
            SSEServer.sendMsg(userId, "죄송합니다. 서비스에 문제가 발생했습니다. 잠시 후 다시 시도해 주세요.", SSEMsgType.FINISH)
            SSEServer.close(userId)
        }
    }

    private fun createRAGPrompt(question: String): Prompt {
        val searchResults = documentService.doSearch(question)

        logger.info("검색된 문서 수: ${searchResults.size}")

        val context = if (searchResults.isNotEmpty()) {
            searchResults.joinToString("\n---\n") { document: Document ->
                val fileName = document.metadata["fileName"] ?: "알 수 없는 문서"
                "[$fileName]\n${document.content}"
            }
        } else {
            "관련된 지식 정보를 찾을 수 없습니다."
        }

        logger.info("RAG 컨텍스트 생성: ${context.length}자")
        logger.debug("RAG 컨텍스트 내용: $context")

        val promptContent = RAG_PROMPT_TEMPLATE
            .replace("{context}", context)
            .replace("{question}", question)

        return Prompt(promptContent)
    }
}주의: RAG_PROMPT_TEMPLATE의 규칙을 관찰해보면, 모델에게 컨텍스트를 어떻게 사용하고, 답을 찾을 수 없을 때 어떻게 응답해야 하는지 명확하게 지시해야 합니다. 이러한 세밀한 지시는 RAG 효과를 보장하는 핵심입니다.
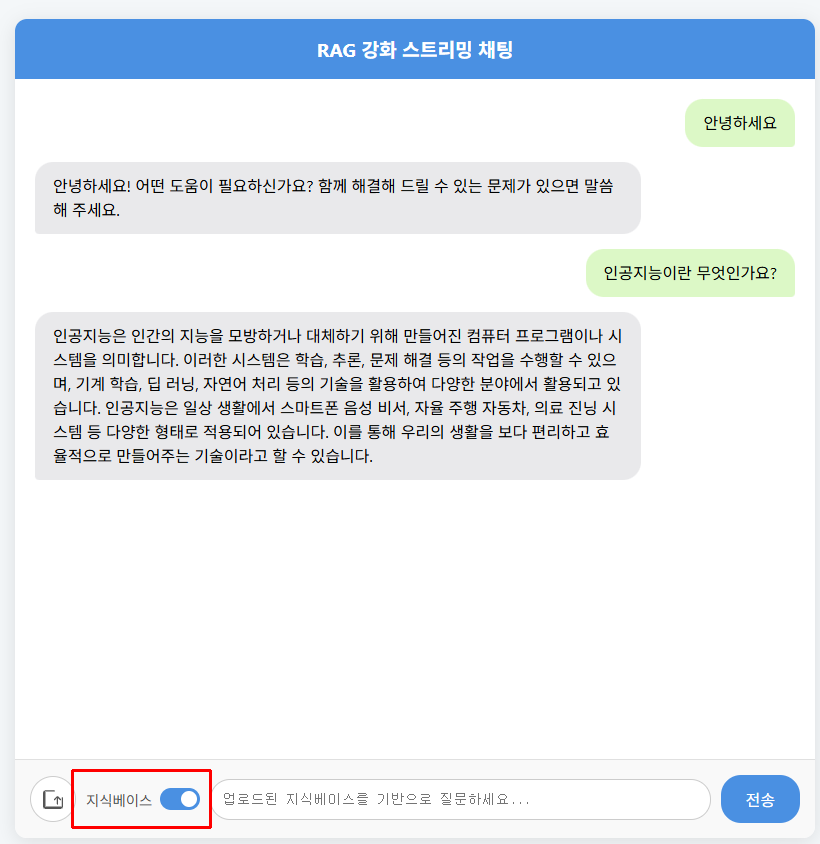
테스트
코딩이 완료된 후, AI가 "지식베이스"를 켜기 전후에 어떤 차이가 있는지 테스트해보겠습니다.
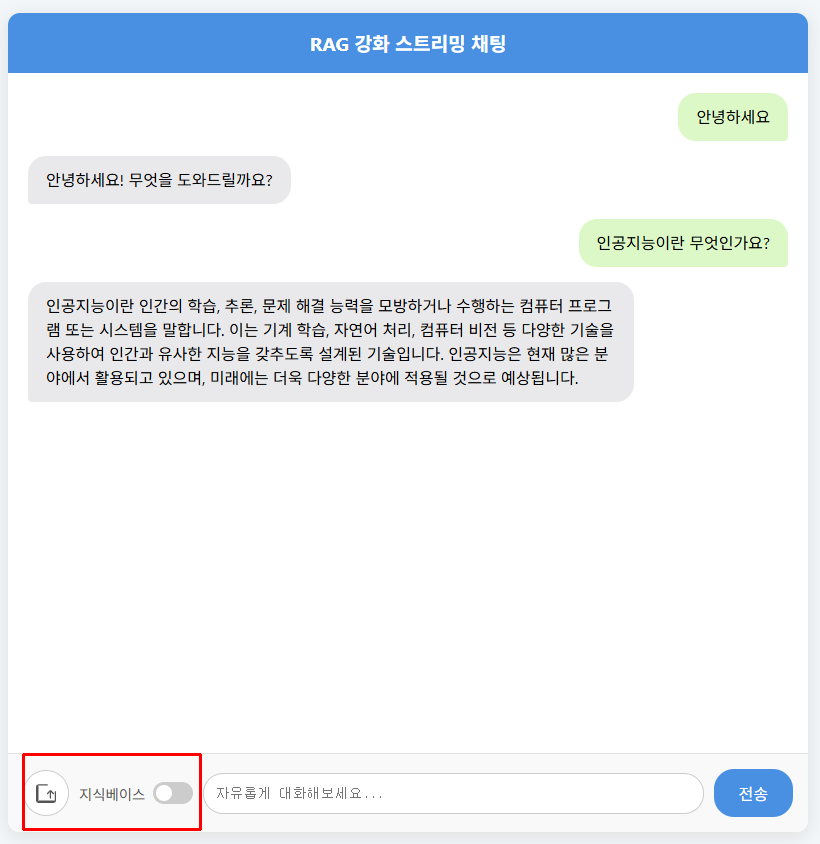
테스트 1: 지식베이스 스위치 끄기
제품에 대한 질문을 해보겠습니다: "인공지능이란 무엇인가요?"
대형 모델이 이 가상의 AI 기술에 대해 전혀 모르는 것을 확인할 수 있습니다.
테스트 2: 지식베이스 스위치 켜기
이제 "지식베이스" 스위치를 열고 같은 질문을 다시 해보겠습니다.
성공입니다! AI가 우리가 업로드한 문서에서 정확하게 답을 찾아 자연스러운 언어로 제시했습니다.
요약
본문에서 우리는 흥미진진한 고급 여정을 완성했습니다. Redis 벡터 데이터베이스와 Spring AI를 통합하여 AI 애플리케이션을 위한 외부 지식베이스를 성공적으로 구축하고, 완전한 RAG 흐름을 구현했습니다. 이는 단순한 기술 데모가 아니라, 기업급 지능형 고객 서비스, 지능형 문서 Q&A, 개인 지식 어시스턴트 등 무한한 가능성의 문을 열어주는 것입니다.
그러나 지식베이스의 내용은 결국 인적 유지보수에 의존하므로 실시간 업데이트를 보장하기 어렵습니다. 사용자가 최신 업계 보고서나 실시간 뉴스를 물어볼 때, AI는 여전히 무력합니다. 그렇다면 AI가 실시간으로 네트워크를 검색하여 최신 정보를 얻을 수 있는 방법이 있을까요? 답은 긍정적이며, 이는 우리가 다음 글에서 탐구할 내용입니다 - SearXNG를 통합하여 네트워크 검색 기능을 구현하는 것입니다.
본문에 대한 질문이나 제안사항이 있으시면 댓글로 교류해주세요. 다음 글에서 만나요!