1. 문제 상황
우리 팀은 부동산 시각화 플랫폼을 개발하면서 심각한 성능 문제에 직면했습니다.
3D 건물 모델 1000개 이상을 동시에 렌더링해야 하는 상황에서 다음과 같은 문제가 발생했습니다.
- 초기 로딩 시간: 평균 8-10초
- 프레임 속도: 15-20 FPS (목표: 60 FPS)
- 메모리 사용량: 평균 2GB 이상
- 모바일 기기에서 심각한 성능 저하
2. 원인 분석
2.1 성능 프로파일링 결과
Chrome DevTools Performance 패널을 사용한 분석 결과
// 초기 코드의 문제점
const buildings = [];
const textureLoader = new THREE.TextureLoader();

buildingData.forEach(data => {
    const geometry = new THREE.BoxGeometry(
        data.width,
        data.height,
        data.depth
    );

    // 🚫 문제 1: 각 건물마다 새로운 텍스처 로딩
    const texture = textureLoader.load(data.textureUrl);

    // 🚫 문제 2: 불필요한 머티리얼 복제
    const material = new THREE.MeshStandardMaterial({
        map: texture,
        roughness: 0.7,
        metalness: 0.3
    });

    const building = new THREE.Mesh(geometry, material);
    buildings.push(building);
    scene.add(building);
});
2.2 주요 병목 지점
1. 텍스처 중복 로딩
2. 지오메트리 중복 생성
3. 불필요한 높은 폴리곤 수
4. 부적절한 LOD (Level of Detail) 관리
3. 해결 방안
3.1 텍스처 및 지오메트리 최적화
class BuildingManager {
    constructor() {
        this.textureCache = new Map();
        this.geometryCache = new Map();
        this.textureLoader = new THREE.TextureLoader();
    }

    getTexture(url) {
        if (!this.textureCache.has(url)) {
            const texture = this.textureLoader.load(url);
            texture.encoding = THREE.sRGBEncoding;
            texture.anisotropy = 16;
            this.textureCache.set(url, texture);
        }
        return this.textureCache.get(url);
    }

    getGeometry(width, height, depth) {
        const key = `${width}-${height}-${depth}`;
        if (!this.geometryCache.has(key)) {
            const geometry = new THREE.BoxGeometry(width, height, depth);
            geometry.computeBoundingSphere();
            this.geometryCache.set(key, geometry);
        }
        return this.geometryCache.get(key);
    }

    createBuilding(data) {
        const geometry = this.getGeometry(
            data.width,
            data.height,
            data.depth
        );
        const texture = this.getTexture(data.textureUrl);

        const material = new THREE.MeshStandardMaterial({
            map: texture,
            roughness: 0.7,
            metalness: 0.3
        });

        return new THREE.Mesh(geometry, material);
    }
}
3.2 LOD (Level of Detail) 구현
class LODBuilder {
    constructor(buildingManager) {
        this.buildingManager = buildingManager;
    }

    createLODBuilding(data) {
        const lod = new THREE.LOD();

        // 고품질 버전 (가까운 거리)
        const highDetail = this.buildingManager.createBuilding(data);
        lod.addLevel(highDetail, 0);

        // 중간 품질 버전
        const mediumDetail = this.createMediumDetail(data);
        lod.addLevel(mediumDetail, 100);

        // 저품질 버전 (먼 거리)
        const lowDetail = this.createLowDetail(data);
        lod.addLevel(lowDetail, 500);

        return lod;
    }

    createMediumDetail(data) {
        // 폴리곤 수를 50% 감소시킨 버전
        const geometry = new THREE.BoxGeometry(
            data.width,
            data.height,
            data.depth,
            Math.max(1, Math.floor(data.segments / 2)),
            Math.max(1, Math.floor(data.segments / 2)),
            Math.max(1, Math.floor(data.segments / 2))
        );

        return new THREE.Mesh(
            geometry,
            new THREE.MeshStandardMaterial({
                map: this.buildingManager.getTexture(data.textureUrl),
                roughness: 0.7,
                metalness: 0.3
            })
        );
    }

    createLowDetail(data) {
        // 매우 단순화된 버전
        const geometry = new THREE.BoxGeometry(
            data.width,
            data.height,
            data.depth,
            1, 1, 1
        );

        return new THREE.Mesh(
            geometry,
            new THREE.MeshBasicMaterial({
                color: 0xcccccc
            })
        );
    }
}
3.3 Frustum Culling 최적화
class SceneManager {
    constructor(camera, scene) {
        this.camera = camera;
        this.scene = scene;
        this.frustum = new THREE.Frustum();
        this.cameraViewProjectionMatrix = new THREE.Matrix4();
    }

    updateFrustum() {
        this.camera.updateMatrixWorld();
        this.camera.matrixWorldInverse.copy(this.camera.matrixWorld).invert();

        this.cameraViewProjectionMatrix.multiplyMatrices(
            this.camera.projectionMatrix,
            this.camera.matrixWorldInverse
        );

        this.frustum.setFromProjectionMatrix(this.cameraViewProjectionMatrix);
    }

    isVisible(building) {
        const boundingSphere = building.geometry.boundingSphere.clone();
        boundingSphere.applyMatrix4(building.matrixWorld);
        return this.frustum.intersectsSphere(boundingSphere);
    }

    update() {
        this.updateFrustum();

        this.scene.traverse(object => {
            if (object instanceof THREE.Mesh) {
                const visible = this.isVisible(object);
                if (object.visible !== visible) {
                    object.visible = visible;
                }
            }
        });
    }
}
4. 성능 개선 결과
4.1 측정 데이터
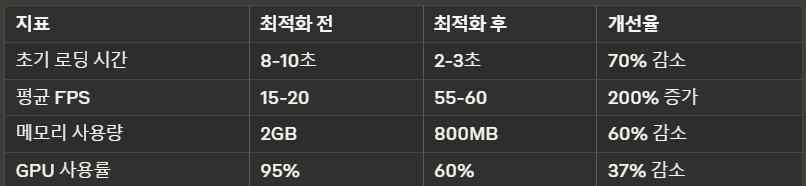
4.2 구현 결과
// 최종 사용 예시
const buildingManager = new BuildingManager();
const lodBuilder = new LODBuilder(buildingManager);
const sceneManager = new SceneManager(camera, scene);

// 건물 데이터 로딩 및 생성
buildingData.forEach(data => {
    const building = lodBuilder.createLODBuilding(data);
    scene.add(building);
});

// 렌더링 루프
function animate() {
    requestAnimationFrame(animate);

    sceneManager.update();
    renderer.render(scene, camera);
}

animate();
5. 추가 최적화 팁
5.1 Worker Thread 활용
// 지오메트리 계산을 워커 스레드로 분리
const worker = new Worker('geometry-worker.js');

worker.postMessage({
    type: 'computeGeometry',
    buildingData: data
});

worker.onmessage = (e) => {
    const { vertices, indices } = e.data;
    const geometry = new THREE.BufferGeometry();
    geometry.setAttribute('position', new THREE.Float32BufferAttribute(vertices, 3));
    geometry.setIndex(indices);
};
5.2 인스턴스 메시 활용
const instancedMesh = new THREE.InstancedMesh(
    baseGeometry,
    material,
    1000 // 인스턴스 수
);

// 매트릭스 업데이트
const matrix = new THREE.Matrix4();
buildingData.forEach((data, i) => {
    matrix.setPosition(data.x, data.y, data.z);
    instancedMesh.setMatrixAt(i, matrix);
});
5.3 셰이더 최적화
// 커스텀 셰이더 예시
const customMaterial = new THREE.ShaderMaterial({
    uniforms: {
        time: { value: 0 },
        colorMap: { value: null }
    },
    vertexShader: `
        varying vec2 vUv;
        void main() {
            vUv = uv;
            gl_Position = projectionMatrix * modelViewMatrix * vec4(position, 1.0);
        }
    `,
    fragmentShader: `
        uniform sampler2D colorMap;
        varying vec2 vUv;
        void main() {
            vec4 color = texture2D(colorMap, vUv);
            gl_FragColor = color;
        }
    `
});
6. 결론
이번 최적화 프로젝트를 통해 Three.js를 사용한 대규모 3D 시각화 애플리케이션의 성능을 크게 개선할 수 있었습니다.
특히 다음과 같은 핵심 전략이 효과적이었습니다
1. 리소스 캐싱 및 재사용
2. LOD 시스템 구현
3. Frustum Culling 최적화
4. 워커 스레드 활용
5. 인스턴스 메시 도입
이러한 최적화를 통해 사용자 경험이 크게 개선되었으며, 모바일 기기에서도 안정적인 성능을 제공할 수 있게 되었습니다.
출처: Animation Loop

레거시를 이해하면서도 새로운 기술을 현실적으로 적용할 수 있는 백엔드 개발자가 되는 것이 목표입니다.