STOMP와 WebSocket을 활용한 실시간 메시징 시스템 구현
이번 글에서는 STOMP(Simple Text Oriented Messaging Protocol)를 활용한 실시간 메시징 시스템 구현 방법을 공유합니다. Spring Boot와 WebSocket을 활용해, 간단한 Publish-Subscribe 메시지 브로커를 구현하는 방법을 단계별로 설명합니다.
STOMP란?
STOMP는 간단한 텍스트 기반의 메시지 프로토콜로, Publish-Subscribe 구조를 제공합니다. 이 구조는 브로커를 통해 메시지를 라우팅하며, 게시자가 특정 주제(Topic)에 메시지를 게시하면, 해당 주제를 구독한 클라이언트가 메시지를 수신할 수 있습니다.
STOMP의 구조
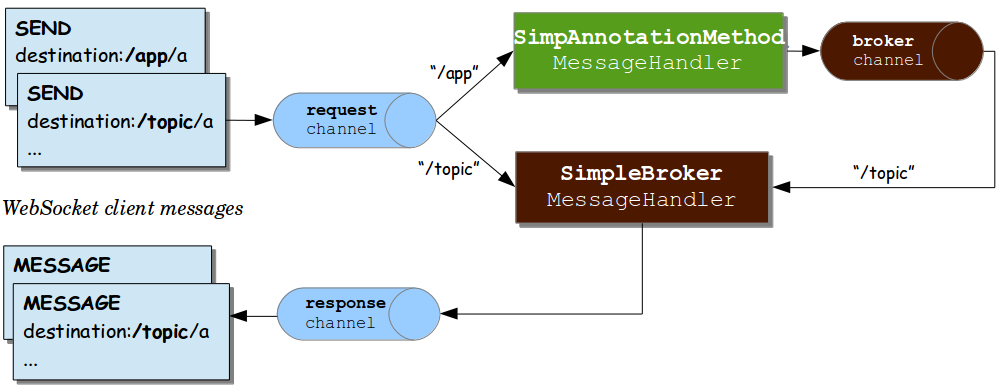
출처: https://velog.io/@qkrqudcks7/STOMP%EB%9E%80
위 구조도는 STOMP 메시징 시스템의 기본 동작 방식을 보여줍니다.
구현 과정
1. 의존성 추가
Spring Boot에서 WebSocket과 STOMP를 사용하려면 아래 의존성을 추가합니다:
dependencies {
	implementation 'org.springframework.boot:spring-boot-starter-websocket'
	testImplementation 'org.springframework.boot:spring-boot-starter-test'
}
2. WebSocketConfig 클래스 설정
WebSocketConfig는 STOMP 프로토콜과 WebSocket 연결을 설정하는 핵심 클래스입니다.
@Configuration
@EnableWebSocketMessageBroker
public class WebSocketConfig implements WebSocketMessageBrokerConfigurer {

  @Override
  public void configureMessageBroker(MessageBrokerRegistry config) {
    config.enableSimpleBroker("/topic");
    config.setApplicationDestinationPrefixes("/app");
  }

  @Override
  public void registerStompEndpoints(StompEndpointRegistry registry) {
    registry.addEndpoint("/gs-guide-websocket");
  }
}
/topic: 메시지 브로커가 구독자에게 메시지를 브로드캐스트하는 경로입니다.
(서버가 처리 결과를 클라이언트(구독자)들에게 발송할 때 사용)
/app: 클라이언트가 메시지를 서버로 보낼 때 사용하는 경로입니다.
(클라이언트가 서버로 메시지를 전송할 때 사용)
/gs-guide-websocket: 클라이언트가 서버와 연결할 때 사용하는 WebSocket 엔드포인트입니다.
3. 메시지 처리 로직 작성
GreetingController는 서버 측 메시지 처리를 담당합니다.
@Controller
public class GreetingController {

  @MessageMapping("/hello")
  @SendTo("/topic/greetings")
  public Greeting greeting(HelloMessage message) throws Exception {
    Thread.sleep(1000); // simulated delay
    return new Greeting("Hello, " + HtmlUtils.htmlEscape(message.getName()) + "!");
  }
}
@MessageMapping("/hello"): 클라이언트가 /app/hello 경로로 보낸 메시지를 처리합니다.
@SendTo("/topic/greetings"): 처리된 메시지를 /topic/greetings로 구독 중인 클라이언트에게 발송합니다.
4. 클라이언트 코드 작성 (JavaScript)
클라이언트 측에서는 STOMP.js를 이용해 서버와 통신합니다:
const stompClient = new StompJs.Client({
    brokerURL: 'ws://localhost:8080/gs-guide-websocket'
});

stompClient.onConnect = (frame) => {
    console.log('Connected: ' + frame);
    stompClient.subscribe('/topic/greetings', (greeting) => {
        showGreeting(JSON.parse(greeting.body).content);
    });
};

function connect() {
    stompClient.activate();
}

function disconnect() {
    stompClient.deactivate();
    console.log("Disconnected");
}

function sendName() {
    stompClient.publish({
        destination: "/app/hello",
        body: JSON.stringify({'name': $("#name").val()})
    });
}
stompClient.subscribe: /topic/greetings 경로로 오는 메시지를 수신합니다.
stompClient.publish: /app/hello 경로로 메시지를 보냅니다.
connect / disconnect: 서버와 연결하거나 연결을 해제합니다.
결론
Spring Boot와 STOMP를 활용하면 실시간 메시지 전송 시스템을 간단히 구현할 수 있습니다.
이 구조를 바탕으로 채팅 애플리케이션, 알림 시스템 등 다양한 기능을 확장할 수 있습니다.
실시간 메시징이 필요한 프로젝트에 유용하게 활용할 수 있는 기술입니다.
