타임리프 태그 속성
타임리프는 HTML 태그에 th: 를 이용해 속성을 지정한다. 이를 이용하면 기존 속성을 대체하고, 기존 속성이 없다면 새롭게 만들어 적용한다.
속성 설정
<input type="text" name="userName" th:name="userA" />위와 같이 기존의 name 속성이 있을 때, th:name을 활용해서 설정해주면 기존의 name은 사라지고 타임리프의 th:name이 적용된다.
속성 추가
- attrappend : 지정한 속성 뒤에 덧붙입니다.
<input type="text" class="text" th:attrappend="class=' large'" />기존의 class인 "text" 뒤에 " large"가 붙어 class="text large"가 된다.
- attrprepend : 지정한 속성 앞에 덧붙입니다.
<input type="text" class="text" th:attrprepend="class='large '" />기존의 class인 "text" 앞에 "large "가 붙어 class="large text"가 된다.
- classappend : 클래스에 덧붙입니다.
<input type="text" class="text" th:classappend="large" />기존의 class인 "text" 뒤에 "large"가 붙어 class="text large"가 된다.
attrappend, attrprepend의 경우에는 공백을 고려해서 넣어주어야 하는 번거로움이 있다. 따라서 classappend의 경우에는 자동으로 한 칸 띄고 붙여주기 때문에 편리하게 이용할 수 있다.
- classprepend 가 있는지 해보았는데, 타임리프가 처리되지 않는 것으로보아 없는 기능인 것 같다.
checked 속성 설정
html 태그에 checked를 넣으면 true, false 어떤 조건을 주어도 체크가 되는 상황이 있다. 이런 경우, 조건문을 넣고 처리해야하는 번거로움이 있는데 이를 타임리프가 간단하게 해결해준다.
<input type="checkbox" name="active" checked />
<input type="checkbox" name="active" checked="true" />
<input type="checkbox" name="active" checked="false" />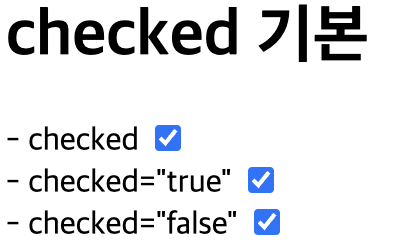
th:checked로 속성을 주면 조건에 따라 처리가 된다. false인 경우 어떻게 체크가 되지 않게 보이는걸까?
타임리프에서는 th:checked="false"를 인지하면 checked 속성을 지워버린다. 따라서 체크가 되지 않도록 한다.
<input type="checkbox" name="active" th:checked="true" />
<input type="checkbox" name="active" th:checked="false" />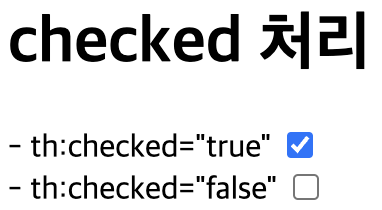
이를 활용하면 Model에서 넘어오는 boolean 값에 따라 처리하게끔 타임리프를 활용하여 태그를 작성할 수도 있다.
<input type="checkbox" name="active" th:checked="${isChecked}" />