
22-23 GDSC Sookmyung Core Member로서 React 스터디를 담당하게 되었는데, 심화 스터디 주제로 Redux를 공부하게 되어 개인적으로 정리해 보았다.
Redux
- 자바스크립트 앱을 위한 예측 가능한 상태 컨테이너
- 🚨 React에 의존적이지 않고, Vue, Angular, Vanilla JS 등 다양한 프레임워크에서 활용 가능
Redux의 3가지 원칙
1. Single source of truth
- 동일한 데이터는 항상 같은 곳에서 가지고 온다.
- 즉, store라는 하나뿐인 데이터 공간이 있다는 의미이다.
2. State is read-only
- 리액트에서는 setState 메소드를 활용해야만 상태 변경이 가능하다.
- 리덕스에서도 action이라는 객체를 통해서만 상태를 변경할 수 있다.
3. Changes are made with pure functions
- 변경은 순수 함수로만 가능하다.
- 리듀서와 연관되는 개념이다.
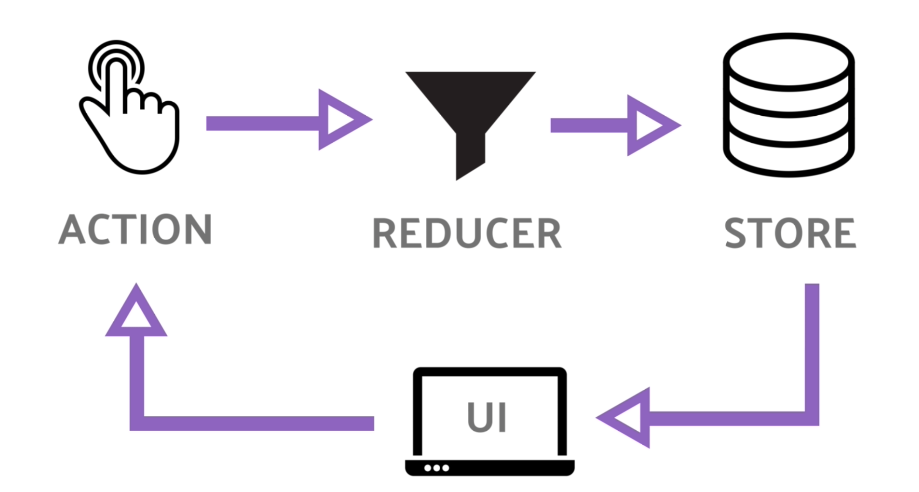
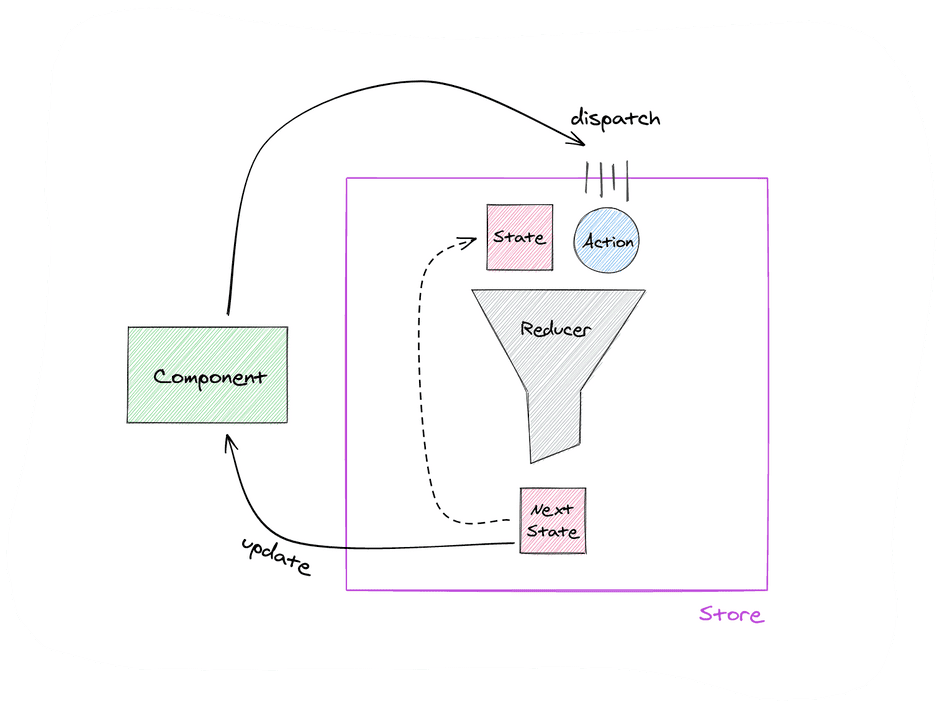
- Store(스토어) – Action(액션) – Reducer(리듀서)
핵심 개념
Store
- 상태가 관리되는 오직 하나의 공간
- 컴포넌트와는 별개로, 스토어 안에 앱에서 필요한 상태를 저장
- 컴포넌트에서 상태 정보가 필요할 때 스토어에 접근
getState(): 현재 state를 가져오는 메소드subscribe(): 변화를 감지하는 메소드
Action
- 앱에서 스토어에 운반할 데이터
- 객체 형식
{
  type: 'ACTION_CHANGE_USER', // 필수
  payload: { // 옵션
    name: 'myname',
    age: 25
  }
}
Reducer
- 데이터를 변경하는 함수
- Action -> Reducer -> Store
- Action을 Reducer에 전달하기 위해서는
dispatch()메소드 사용dispatch(): Reducer에게 보내는 메시지
- Reducer가 주문을 보고 Store의 상태를 업데이트
- Reducer가 return하는 값 = Application의 state
Vanilla-Redux
Counter
import { createStore } from "redux";

const form = document.getElementById("form");
const input = document.getElementById("input");
const ul = document.querySelector("ul");

// Reducer: modify state
const countModifier = (count = 0, action) => { // default state = 0
  console.log(action);
  // Action
  switch (action.type) {
    case ADD:
      return count + 1;
    case MINUS:
      return count - 1;
    default:
      return count;
  }
};

// Store: data area
const countStore = createStore(countModifier);

const onChange = () => {
  number.innerText = countStore.getState();
}

countStore.subscribe(onChange);

// sending message
const handleAdd = () => {
  countStore.dispatch({ type: ADD });
};
const handleMinus = () => {
  countStore.dispatch({ type: MINUS });
};

add.addEventListener("click", handleAdd);
minus.addEventListener("click", handleMinus);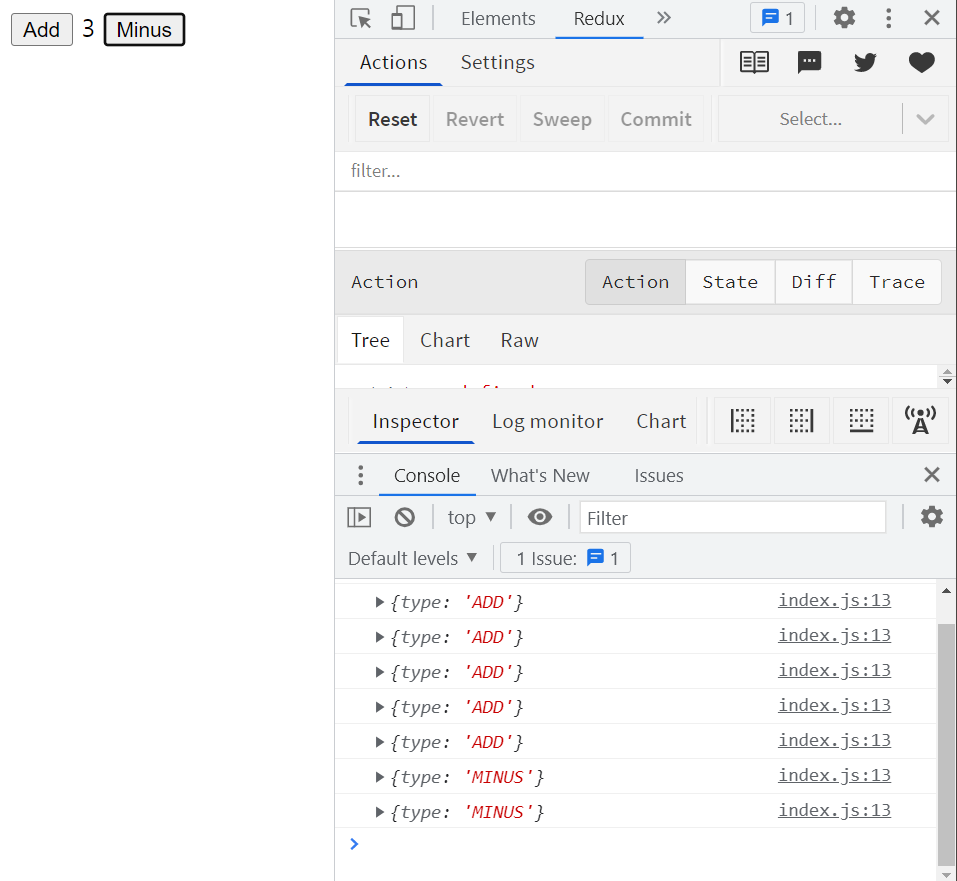
React-Redux
Redux를 위한 공식 React 바인딩
- index.js 에 store 연결
import React from "react";
import ReactDOM from "react-dom/client";
import { Provider } from "react-redux";
import store from "./store";
import App from "./components/App";

const root = ReactDOM.createRoot(document.getElementById("root"));
root.render(
  <Provider store={store}>
    <App />
  </Provider>
);mapStateToProps: hooks에서는useSelector, redux에서는getState- state로부터 컴포넌트에 prop로써 전달
mapDispatchToProps: hooks에서는useDispatch, redux에서는dispatch
Redux-Toolkit
효율적인 Redux 개발을 위한 모든 것을 제공하는 공식 도구
createAction: type & payload로 구성된 객체 반환createReducer: 새로운 state를 리턴하거나 state를 mutate할 수 있다.- ※ 뭔가를 리턴할 때는 새로운 state여야만한다.
- => state를 mutate하기 쉬워짐
- Builder Callback 표기법: createReducer의 콜백 함수 인자로 주어지는 builder 객체는 addCase, addMatcher, addDefaultCase라는 메서드를 제공한다. 그리고 각 함수에서 액션을 리듀서에서 어떻게 처리할지를 정의할 수 있다.
configureStore: redux의 createStore. redux-toolkit 사용 가능createSlice: action + reducers
store.js
import { createSlice, configureStore } from "@reduxjs/toolkit";

// action + reducers
const toDos = createSlice({
  name: "toDosReducer",
  initialState: [],
  reducers: {
    add: (state, action) => {
      state.push({ text: action.payload, id: Date.now() });
    },
    remove: (state, action) => {
      state.filter((toDo) => toDo.id !== action.payload);
    },
  },
});

const store = configureStore({ reducer: toDos.reducer });

export const { add, remove } = toDos.actions;

export default store;
참고 자료

No Stress🎈 Be Happy✨