반복문
반복문을 배우면서 tab 기능을 구현하고 있다.
반복문을 사용하지않는다면
- HTML
    <div class="container mt-5">
        <ul class="list">
            <li class="tab-button">Products</li>
            <li class="tab-button orange">Information</li>
            <li class="tab-button">Shipping</li>
        </ul>
        <div class="tab-content">
            <p>상품설명입니다. Product</p>
        </div>
        <div class="tab-content show">
            <p>스펙설명입니다. Information</p>
        </div>
        <div class="tab-content">
            <p>배송정보입니다. Shipping</p>
        </div>
</div> - CSS
ul.list {
    list-style-type: none;
    margin: 0;
    padding: 0;
    border-bottom: 1px solid #ccc;
    }
ul.list::after {
    content: '';
    display: block;
    clear: both;
}
.tab-button {
    display: block;
    padding: 10px 20px 10px 20px;
    float: left;
    margin-right: -1px;
    margin-bottom: -1px;
    color: grey;
    text-decoration: none;
    cursor: pointer;
}
.orange {
    border-top: 2px solid orange;
    border-right: 1px solid #ccc;
    border-bottom: 1px solid white;
    border-left: 1px solid #ccc;
    color: black;
    margin-top: -2px;
}
.tab-content {
    display: none;
    padding: 10px;
}
.show {
    display: block;
}- JavaScript
var button = document.querySelectorAll('.tab-button');
var content = document.querySelectorAll('.tab-content');

button[0].addEventListener('click',function(){
    button[0].classList.remove('orange');
    button[1].classList.remove('orange');
    button[2].classList.remove('orange');
    button[0].classList.add('orange');
    content[0].classList.remove('show');
    content[1].classList.remove('show');
    content[2].classList.remove('show');
    content[0].classList.add('show');
});

button[1].addEventListener('click',function(){
    button[0].classList.remove('orange');
    button[1].classList.remove('orange');
    button[2].classList.remove('orange');
    button[1].classList.add('orange');
    content[0].classList.remove('show');
    content[1].classList.remove('show');
    content[2].classList.remove('show');
    content[1].classList.add('show');
});

button[2].addEventListener('click',function(){
    button[0].classList.remove('orange');
    button[1].classList.remove('orange');
    button[2].classList.remove('orange');
    button[2].classList.add('orange');
    content[0].classList.remove('show');
    content[1].classList.remove('show');
    content[2].classList.remove('show');
    content[2].classList.add('show');
});
해당 코드로 반복적인 문법을 일일히 작성하여 구현해야한다.
반복문을 이용한 코드를 만든다면
- JavaScript
for (let i = 0; i < 3; i++){ // i 값은 0; i 가 3 미만일때까지 실행; 실행할때마다 i 1씩 증가
    button[i].addEventListener('click',function(){
        button[0].classList.remove('orange');
        button[1].classList.remove('orange');
        button[2].classList.remove('orange');
        button[i].classList.add('orange');
        content[0].classList.remove('show');
        content[1].classList.remove('show');
        content[2].classList.remove('show');
        content[i].classList.add('show');
    });
};
왜 var 가 아닌 let 을 사용해야 적용될까?
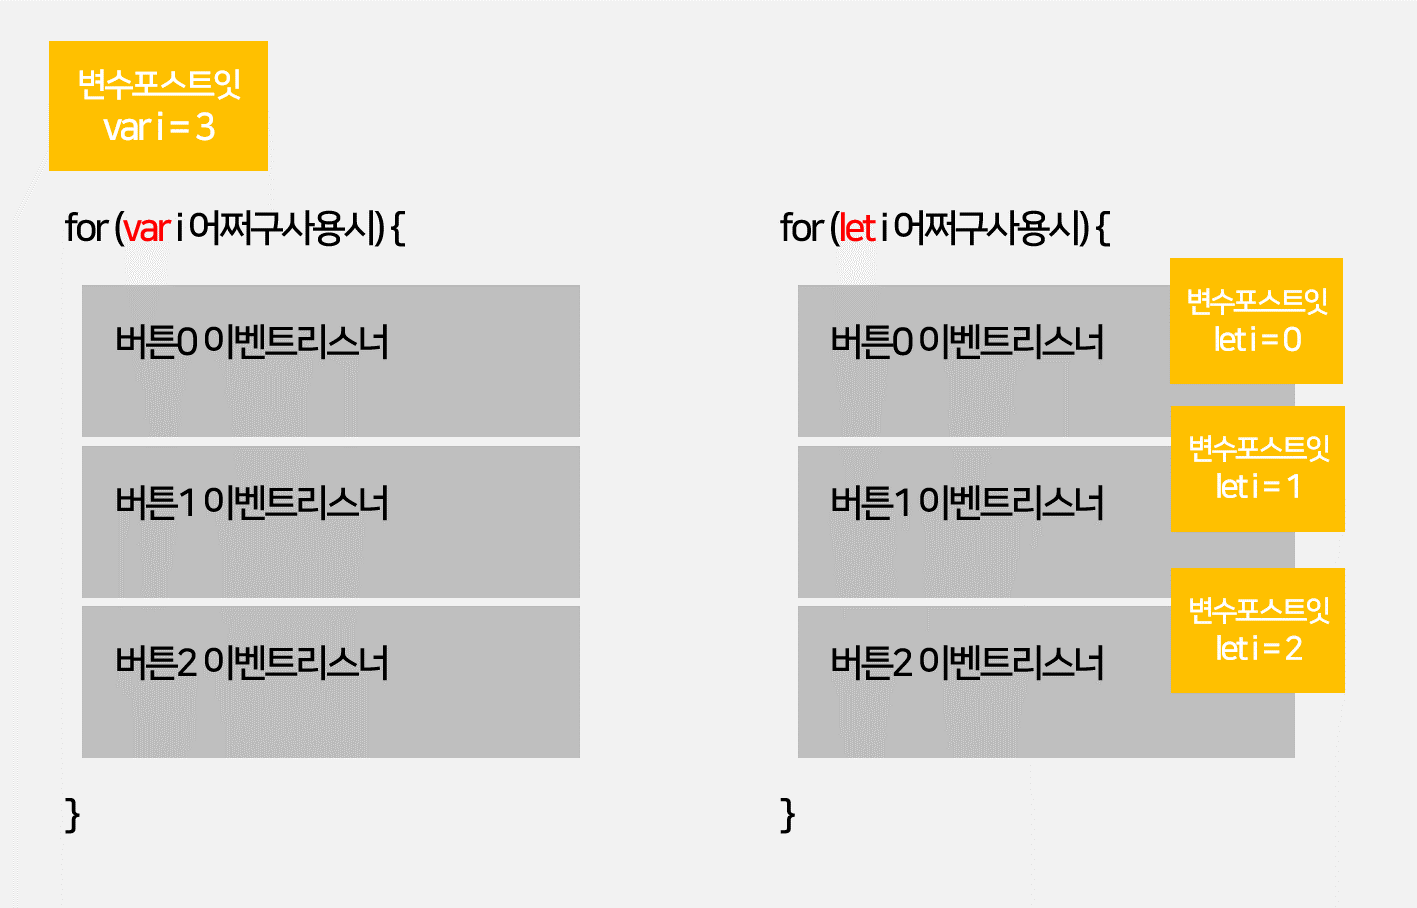
for 안에서 var i = 0 쓰면
-
var 변수는 범위가 function
-
var i 들어있는 포스트잇은 for 바깥에 생성됨
for 안에서 let i = 0 쓰면
-
let 변수는 범위가 { }
-
let i 들어있는 포스트잇은 for 안쪽에 3개 생성됨
이벤트 버블링
- 이벤트가 상위 html로 퍼지는 현상
function(e){} // function 함수 () 에 e 를 추가 시 이벤트함수 사용가능

  e.target; // 유저가 실제로 누른요소
  e.currentTarget; == this; // 이벤트리스너 달린 요소
  e.preventDefault();
  e.stopPropagation(); // 이벤트 버블링이 퍼지는것을 막아줌
dataset
HTML 코드에 UI로 출력되지않는 data 값을 넣을 수 있다.
출력법
- HTML
<li class="tab-button" data-id="0">Products</li>- JavaScript
document.querySelector('.tab-button').dataset.id // 0 값 출력
FrontEnd