적재해놓은 데이터들을 뒤지는 일은 생각보다 시간이 많이 든다.데이터를 손쉽게 검색해서 찾을 수 있는 방법은 없을까?
이러한 질문에 대답 가능한건 Elasticsearch의 기능들이다.
Elasticsearch는 Search Engine이다.
복잡한 데이터 구성, SQL이 익숙하지 않은 조직이라면 도입했을때 효율적이라는 생각이 든다.
오늘은 Elastic Search의 기본적인 CRUD 기능들을 살펴볼 예정이다.
Query API
OpenSearch
AWS에서 제공하는 Elasticsearch로 fork 선언 후 opensearch라는 이름을 사용하는 것 같다.
(AWS Opensearch를 기준으로 작성하였다)
아래 내용에서는 RDB와 비교하면 설명이 불가능한 부분이 발생하므로 Elasticsearch의 명칭을 사용한다.
ElasticSearch, OpenSearch의 서버는 구성이 완료된 상태에서 진행이 된다고 가정한다.
(서버 구축 관련 내용은 검색하면 많이 나온다)
1. 클라이언트 설치
opensearch의 클라이언트 라이브러리를 설치해준다.
pip install opensearch-py2. 클라이언트 연결 확인
ElasticSearch 서버와 잘 연결이 된 상태인지 확인해보자.
from opensearchpy import OpenSearch

user_id = '사용자 ID'
passwd = '사용자 PW'
host = 'host'
port = 'port' # 대부분 443을 사용한다.

hosts = [{'host':host, 'port':port}]
auth = (user,passwd)

es = OpenSearch(
    hosts=hosts,
    http_compress = True,
    http_auth=auth,
    use_ssl = True,
    verify_certs = True,
    ssl_assert_hostname = False,
    ssl_show_warn = False
    )

es.ping()
결과값이 True로 나온다면 정상적으로 연결이 완료된 상태다.
(이제 본격적인 CRUD를 테스트해보자)
INDEX 생성(CREATE)
임의의 index를 생성해보자.
index-test라는 index를 생성하고
내부에 title,description이라는 field에
각각 elastic search, index create test라는 document를 넣어줬다.
es.index(
    index='index-test',
    body={
        'title' : 'Elastic Search',
        'description' : 'index create test'
    })
실행 결과
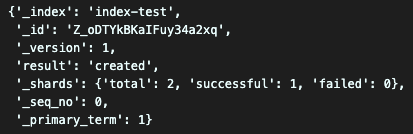
성공적으로 잘 생성된걸 볼 수 있다.
결과 해석
{'_index': '인덱스의 이름',
 '_id': '생성된 document의 id',
 '_version': 'document의 버전',
 'result': '결과 값',
 '_shards': {'total': 2, 'successful': 1, 'failed': 0},
 '_seq_no': 순번,
 '_primary_term': 1}
 # 나머지 값들은 좀 더 공부를 해봐야겠다.
의문
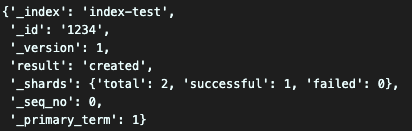
id 값은 무조건 난수로 생성이 되는건가? => 설정해줄수 있다!
es.index(
    index='index-test',
    id=1234, # id 값을 입력해주면 직접 설정할 수 있다!
    body={
        'title' : 'Elastic Search2',
        'description' : 'index create test2'
    })
Document 생성(CREATE)
index 생성과 Document 생성이 다른건 index와 Document를 같이 새롭게 생성하는가?
생성된 index에 Document를 생성하는가에 따른 차이다.
es.create(
    index='index-test',
    id=123,
    body={
        'title' : 'Elastic Search3',
        'description' : 'index create test3'
    })
실행 결과
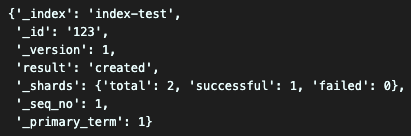
똑같이 잘 실행되는 모습을 볼 수 있다.
index와는 다르게 id값이 필수 파라미터다.
Document 읽어오기(READ)
아까 생성했던 Document를 읽어와보자.
es.get(
    index='index-test',
    id=1234)
실행 결과
잘 읽어오는걸 확인할 수 있다.
Document 검색하기(READ)
OpenSearch의 꽃 검색엔진이다
검색 조건으로 title에 Elastic Search가 들어가 있는 Document만 검색해봤다.
es.search(
    index='index-test',
    body={
        'query':{
            'match': {'title': 'Elastic Search'}
            }
        }
    )
실행 결과
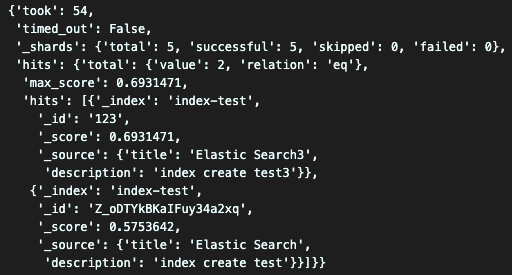
해당되는 값이 source로 출력되고 검색 결과에 대한 score도 출력되는걸 볼 수 있다.
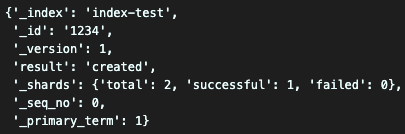
Document 수정(UPDATE)
기존에 생성된 Document를 수정해보자.
es.index(index='index-test',
        id='1234',
        body={
            'title' : 'update title',
            'description' : 'update description'
        })
실행 결과
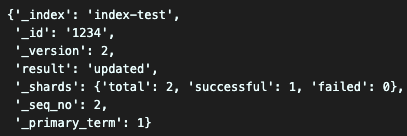
버전과 결과 값을 보면 업데이트가 된 사실을 알 수 있다.
Document 삭제(DELETE)
마지막으로 지금까지 테스트 해본 내용들을 지우면서 DELETE를 실행해보자.
index는 index-test, id는 1234인 document를 삭제한다.
es.delete(
    index='index-test',
    id=1234
    )
실행 결과
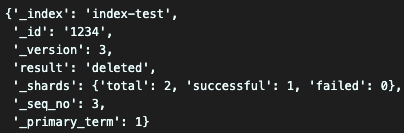
성공적으로 document를 삭제했다.
INDEX 삭제(DELETE)
이제 Document를 지웠으니 남은건 index가 있다.
남은 index 마저 지워보자.
es.indices.delete(
    index='index-test'
    )
실행 결과

성공적으로 삭제했다.
결과 리뷰
python에서 opensearch를 client로 불러올 수 있는게 너무 편리했다.
간단하게 검색하거나 데이터를 적재하는 측면에서 새로운 방법을 찾은 느낌이다.
앞으로 계속 client 호출 방식으로 쭉 사용할 것 같다.