회사에서 일을 하다 만들어진 모듈을 npm package에 올리지 않고 내부에서 사용할 수 있도록 패키지화 해서 사용한 적이 있다.
자주 사용하거나 외부에 이 모듈을 사용하도록 내부 코드는 난독화하는 경우가 있다.
자주 사용하는 기능은 예를 들어 axios post, get 요청 혹은 요소 hide, show등이 있다.
오늘은 이러한 간단한 기능을 패키지화 하는 방법을 정리해보도록 하겠다!
예시 환경은 typescript로 작성하고 간단한 실습으로 요소를 보여주고 숨겨주는 모듈로 해보겠다.
// index.ts
type ElementTypes = (element: HTMLElement) => void;

/**
 * @description element show
 * @param element html element
 */
export const show_element: ElementTypes = (element) => {
  try {
    element.setAttribute("display", "block");
  } catch (e) {
    throw new Error("Failed to Show!");
  }
}

/**
 * @description element hide
 * @param element html element
 */
export const hide_element: ElementTypes = (element) => {
  try {
    element.setAttribute("display", "none");
  } catch (e) {
    throw new Error("Failed to Hide!");
  }
}
위 코드는 element 인자를 받아 display 속성을 변경하는 간단한 예제이다. (대충 짜서 에러날 수 있음ㅋ)
이제 이 모듈을 패키지화 하는 scripts를 작성해보겠다.
일단 필요한 npm devDependencies들을 간단하게 정리하겠다.
- esbuild : javascript 번들러
- mkdirp : mkdir -p (존재하지 않는 중간의 디렉토리를 자동을 생성)
- rimraf : rm -rf (강제 삭제)
- dts-bundle : typescript d.ts 파일에서 번들 생성
- json : json 작업을 명령줄에서 동작
scripts는 크게 6가지 단계로 이루어진다.
- precompile
- compile
- prebuild
- build
- prepack
- pack
이 단계에서 빌드 단계만 거치고 싶다면 npm run build를 패키지까지 추출하고 싶다면 npm run pack을 치면 위 6단계를 거치면서 수행이 완료가 됩니다.
package.json
"scripts": {
"test": "echo \"Error: no test specified\" && exit 1",
"precompile": "rm -rf ./package && rm -rf /.lib",
"compile": "tsc",
"prebuild": "npm run compile && rm -rf ./dist",
"build": "node ./build.js",
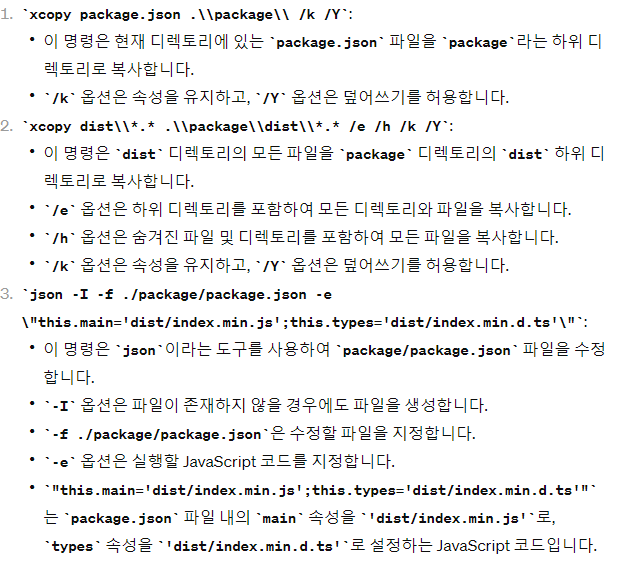
"prepack": "rm -rf ./package && npm run build && mkdir -p ./package ./package/dist && xcopy package.json .\\package\\ /k /Y && xcopy dist\\*.* .\\package\\dist\\*.* /e /h /k /Y && json -I -f ./package/package.json -e \"this.main='dist/index.min.js';this.types='dist/index.min.d.ts'\"",
"pack": "tar -cvzf package_ex.tar.gz package/*"
}- precompile : 현재 package 폴더 및 코드가 존재한다면 이미 존재하는 파일들을 삭제한다.
- compile : tsc 명령어로 ts 파일을 js로 트랜스파일 한다. (lib 폴더가 생기면서 아래 파일에 index.js와 index.d.ts 파일이 생김)
- prebuild : npm run compile을 수행하고 이미 dist 폴더가 존재한다면 삭제해준다.
- build : esbuild build.js 파일 형식으로 작성한것을 토대로 빌드 해준다.
- prepack : 패키지 하기전 package를 만들어준다. (폴더)
- pack : tar 형식으로 압축 파일을 만들어준다.
prepack 단계에서 여러 명령어가 있지만 GPT 선생님에게 요약해달라고 했다.
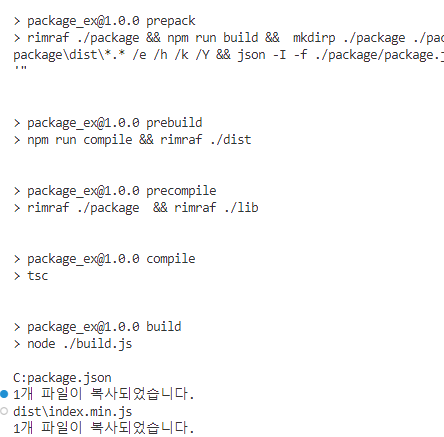
그 외 필요한 파일들이 있다.
빌드 파일, tsconfig
// build.js
const { build } = require('esbuild');
const dts = require('dts-bundle');
const package = require('./package.json');
const path = require('path');

build({
  entryPoints: ['index.js'], // 진입 시작할 파일
  outfile: 'dist/index.min.js', // 빌드 결과 파일
  bundle: true, // 종속성 번들에 포함
  minify: true, // 코드 단축화
  platform: 'node' // 번들 환경
}).then(() => {
  dts.bundle({
    name: package.name,
    out: path.join(__dirname, "../dist/index.min.d.ts"), // ts로 변환된 파일
    main: 'index.d.ts' // 타입 참조 파일
  });
}).catch((error) => {
  console.error(error);
})
// tsconfig.json
{
"compilerOptions": {
"target": "es2016",
"module": "commonjs",
"rootDir": "./",
"declaration": true, // d.ts 파일을 만들겠다.
"strict": true, // strict 모드를 적용하겠다.
"paths": { // ts가 모듈을 어디서 가져올지
"package_ex": ["."]
},
"outDir": "./lib",
"moduleResolution": "node",
},
"typedocOptions": {
"entryPoints" : ["./src"],
"entryPointStrategy" : "expand",
"exclude" : "node_modules/**"
}
}이제 필요한 설정들은 다 했다!
npm run pack을 날리면
쨔자잔 tar.gz 파일 생성 완료
이제 이걸 다른 프로젝트에 적용하는 법을 정리해보겠다.
적용하는법은 매우 간단하다.
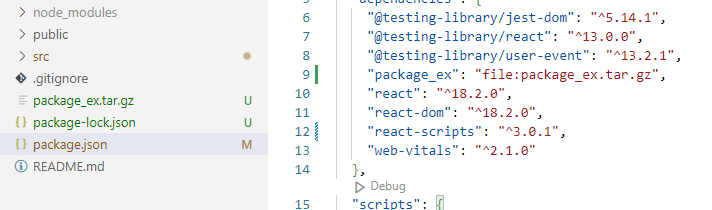
- 사용할 프로젝트의 원하는 경로에 압축 파일 저장
- npm dependencies에 사용할 패키지 경로 작성
- import해서 사용하면 끝
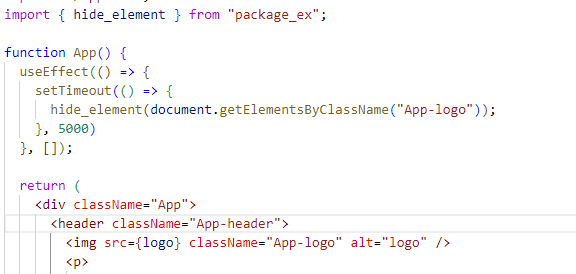
이제 리액트 프로젝트에서 한번 써보겠다.
dependencies 적용
모듈 사용
github link
작성한 코드 깃허브!