
📘패키지 (ppt Chapter 01)
📖주요 패키지
- java.lang
- 자바 language
- import문으로 호출 되지 않아도 기본적으로 로딩 되는 패키지.(기본 클래스와 인터페이스 제공) - java.util
- 자바 유틸리티- 수학, 날짜, 자료 구조 등과 관련된 클래스들을 많이 가지고 있음
- java.io
- 입출력 관련 패키지
- 데이터 저장, 호출 등의 입출력 기능이 모여있음
- 자바에선 stream(스트림)을 이용하는데, 실제 입출력 장치와 프로그램 사이의 연결을 도와주는 연결관 역할을 담당함 - java.awt
- 자바 GUI(그래픽 유저 인터페이스)
📖JAVA Object HashCode(객체 해시코드)
: 객체를 식별하는 하나의 정수값
java.lang.Object@16진수으로 표현됨
Object 클래스에 정의된 hashCode 메소드는 객체의 주소값을 이용하여 해시코드를 만들어 반환하기 때문에 서로 다른 두 객체는 같은 해시코드를 가질 수 없다.
- hashCode메소드도 오버라이딩을 해야함
(이유 : 같은 객체라면 hash 메소드를 호출했을때 결과값인 해시코드도 같아야하기 때문)
(+ 추가)
사용하는 이유 중 하나는 객체를 비교할때 드는 비용(시간등)을 낮추기 위해서.
보통은 equals()을 많이 사용하는데, 비교적 시간이 많이 소요됨.
즉, hashCode를 사용하는것이 비교적 시간절약 됨.
(그림 그려서 하기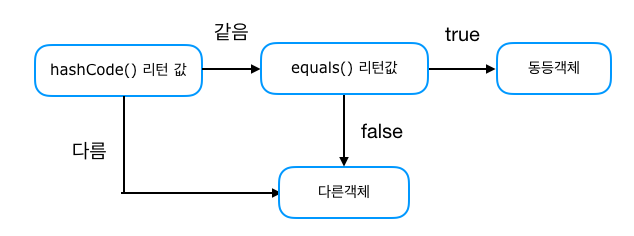
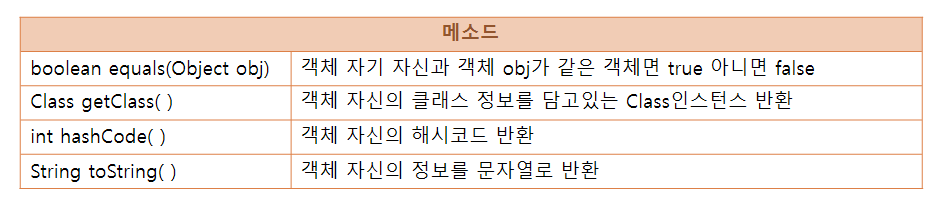
📖java.lang.Object 클래스
- 총 11개의 메소드만으로 구성되어 있음
(강의에서는 4개만 알려줌, 나머지는 알아서 공부해야할듯)
📖객체를 문자열로 변환
-
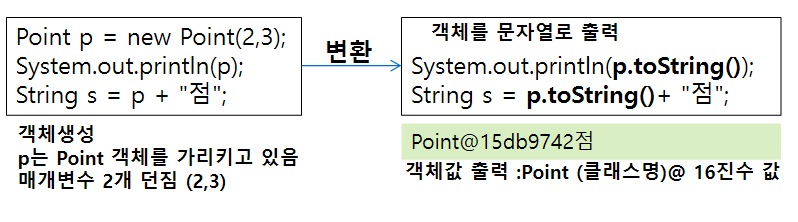
-
오버라이딩된
toString()작성해서 출력 가능
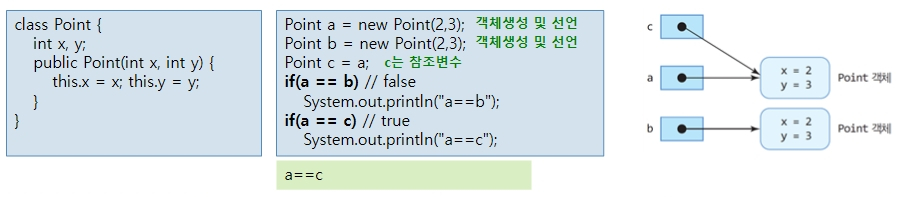
📖객체비교(==)와 equals()
📘패키지 Chapter 01 예제
📖예제 1
package chapter06;

class Point {
	private int x, y;// 접근 지정자와 속성 x,y

	public Point(int x, int y) {
		this.x = x; //매개변수 값을 필드에 세팅
		this.y = y; //매개변수 값을 필드에 세팅
	} // 기본 생성자
}

public class ObjectPorpertyEx {
	public static void print(Object obj) {
		System.out.println(obj.getClass().getName());//메소드 안의 메소드
		System.out.println(obj.hashCode());//객체에 선언받은 16진수 코드(?)
		System.out.println(obj.toString());//객체 값(문자로 변환했을때의 값)을 출력
		//패키지, 클래스 이름 , 그리고 위의 obj.hashCode()의 값을 문자열로 출력
		System.out.println(obj);//obj.toString()으로 이해하고 출력함.
	}//메소드

	public static void main(String[] args) {
		Point p = new Point(2,3);
		print(p);

	}

}

//출력
//chapter06.Point
//705927765
//chapter06.Point@2a139a55
//chapter06.Point@2a139a55
📖예제 2
package chapter06;


class Point2 {
	int x,y;


	public Point2 (int x, int y) {
		this.x =x;
		this.y= y;
	}
	public String toString() {//오버라이딩
		return "Point ("+x+","+y+")";
	}

}
public class ToStringEx {
	public static void main(String[] args) {
		Point2 p= new Point2(2,3);
		System.out.println(p.toString());
		System.out.println(p);
		System.out.println(p+"입니다.");
	}

}

//출력
//Point (2,3)
//Point (2,3)
//Point (2,3)입니다.
📖예제 3
package chapter06;


class Point2 {
	int x,y;


	public Point2 (int x, int y) {
		this.x =x;
		this.y= y;
	}
//	public String toString() {//오버라이딩
//		return "Point ("+x+","+y+")";
//	}

}
public class ToStringEx {
	public static void main(String[] args) {
		Point2 p= new Point2(2,3);
		System.out.println(p.toString());
		System.out.println(p);
	}

}
// 출력
//chapter06.Point2@2a139a55
//chapter06.Point2@2a139a55
📖예제 4
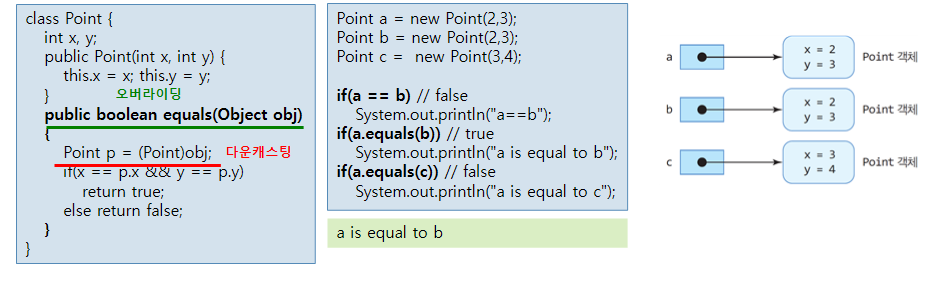
package chapter06;

class Point3 {
	int x, y;

	public Point3(int x, int y) {
		this.x = x;
		this.y = y;
	}

	public boolean equals(Object obj) {
		Point3 p = (Point3) obj;// 다운캐스팅
		if (x == p.x && y == p.y) {
			return true;
		} else {
			return false;
		}
	}// 오버라이딩
}

public class EqualsEx {
	public static void main(String[] args) {
		Point3 a = new Point3(2, 3);
		Point3 b = new Point3(2, 3);
		Point3 c = new Point3(3, 4);

		if (a == b) {
			System.out.println("a==b");
		}
		if (a.equals(b)) {
			System.out.println("a is equal to b");
		}
		if (a.equals(c)) {
			System.out.println("a is equal to b");
		}
	}

}

//출력
//a is equal to b
📖예제 5
package chapter06;

class Rect {
	int width;
	int height;

	public Rect(int width, int height) {
		this.width = width;
		this.height = height;
	}

	public boolean equals(Object obj) {
		Rect p = (Rect) obj;// 다운캐스팅

		if (width * height == p.height * p.width) {
			return true;
		} else {
			return false;
		}
	}// 오버라이딩
}

public class EqualsEx2 {
	public static void main(String[] args) {
		Rect a = new Rect(2, 3);
		Rect b = new Rect(3, 2);
		Rect c = new Rect(3, 4);

		if (a.equals(b)) {
			System.out.println("a is equal to b");
		}
		if (a.equals(c)) {
			System.out.println("a is equal to c");
		}
		if (b.equals(c)) {
			System.out.println("b is equal to c");
		}

	}
}

//출력
//a is equal to b
📖예제 6
//강사님 방법
package chapter06;

import java.util.Random;
import java.util.Scanner;

public class RandomArray2 {
	public static boolean exists(int a[], int from, int ranNum) {
		for (int i = 0; i < from; i++) {
			if (a[i] == ranNum) {
				return true;
			}
		}
		return false;
	}


	public static void main(String[] args) {
		Scanner scanner = new Scanner(System.in);
		System.out.println("정수 몇개?");
		int number = scanner.nextInt();
		Random com = new Random();
		int intarray[]= new int [number];


		for (int i = 0; i < intarray.length; i++) {
				int ranNum = com.nextInt(100)+1;

				if (exists(intarray, i, ranNum)) {
					i--;
					continue;
				}
				intarray[i]=ranNum;
		}


		for (int i = 0; i < intarray.length; i++) {
			if (i==0) {
				System.out.print(intarray[i]+" ");
			}else {
				if (i%10 ==0) {
					System.out.println();
				}
				System.out.print(intarray[i]+" ");
			}
		}
		scanner.close();
	}
}
📘패키지 (ppt Chapter 02)
📖Wrapper 클래스
: 기본형 변수도 어쩔 수없이 객체로 다뤄야 할 경우에 사용함
(ex 매개변수로 객체를 요구할때, 기본형 값이 아닌 객체로 저장해야할 때, 객체간의 비교가 필요할 때 등등)

📖Wrapper 클래스 객체 생성
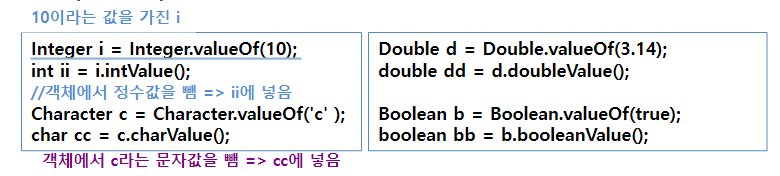
(쉽게 말하면 기본 타입을 클래스화? 한 것)
Integer i = Integer.valueOf(10);
 Character c = Character.valueOf(‘c’);
 Double f = Double.valueOf(3.14);
 Boolean b = Boolean.valueOf(true);


Integer I = Integer.valueOf(“10”);
Double d = Double.valueOf(“3.14”);
Boolean b = Boolean.valueOf(“false”);

Float f = Float.valueOf((double) 3.14);
📖주요 메소드
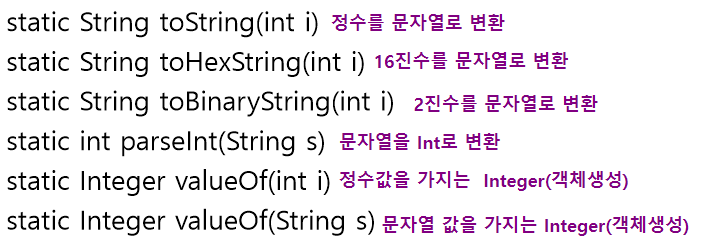
📖예제
package chapter06;

public class WrapperEx {

	public static void main(String[] args) {
		char c1 = '4', c2='F';
		if (Character.isDigit(c1)) {
			// isDigit()함수는 명시된char값이 숫자인지 아닌지 판단 후 t/f 값으로 리턴
			System.out.println(c1+"는 숫자");
		}else {
			System.out.println(c1+"는 숫자 아님 ");
		}

		if (Character.isAlphabetic(c1)) {
			// isDigit()함수는 명시된char값이 문자인지 아닌지 판단 후 t/f 값으로 리턴
			System.out.println(c1+"는 영문자");
		}else {
			System.out.println(c1+"는 영문자 아님 ");
		}
		if (Character.isDigit(c2)) {
			// isDigit()함수는 명시된char값이 숫자인지 아닌지 판단 후 t/f 값으로 리턴
			System.out.println(c2+"는 숫자");
		}else {
			System.out.println(c2+"는 숫자 아님 ");
		}

		if (Character.isAlphabetic(c2)) {
			// isDigit()함수는 명시된char값이 문자인지 아닌지 판단 후 t/f 값으로 리턴
			System.out.println(c2+"는 영문자");
		}else {
			System.out.println(c2+"는 영문자 아님 ");
		}

		System.out.println(Integer.parseInt("-123"));
		System.out.println(Integer.toHexString(28)); //16진수로 변환
		System.out.println(Integer.toBinaryString(28)); //2진수로 변환

		Double d = Double.valueOf(3.14);//객체 생성
		System.out.println(d.toString());
		System.out.println(d);
		//자동 언박싱
		System.out.println(Double.parseDouble("3.14"));

		boolean b = (4>3);
		System.out.println(Boolean.toString(b));
		System.out.println(Boolean.parseBoolean("false"));

	}

}


//출력
//4는 숫자
//4는 영문자 아님
//F는 숫자 아님
//F는 영문자
//-123
//1c
//11100
//3.14
//3.14
//3.14
//true
//false
📖Wrapper 활용
-
기본 타입 값
-
문자열

- 기본타입

📖박싱과 언박싱
- Integer의 ValueOf 클래스 사용시 객체 생성됨.
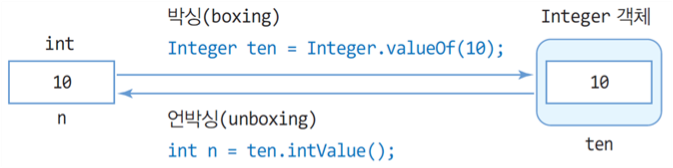
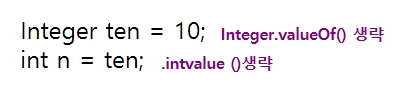
package chapter06;

public class AutoBoxingUnboxingEx {

	public static void main(String[] args) {
		int n =10;
		Integer intObject=Integer.valueOf(n);
//		Integer intObject=n;
		System.out.println("intObjcet = "+intObject);//자동 박싱
//		System.out.println("intObjcet = "+intObject.intValue());//자동 언박싱

		int m = intObject+10;//자동 언박싱....
//		int m = intObject.intValue()+10;//자동 언박싱....
		System.out.println("m = "+m);
	}

}

//
//출력:
//intObjcet = 10
//m = 20
📘패키지 (ppt Chapter 03)
📖멀티태스킹
: 하나의 응용프로그램이 여러개의 작업을 동시에 처리
ex) 미디어 플래이어 (오디오 재생 테스크, 비디오 재생 태스크, 사용자 키/ 마우스 입력처리 태스크..)
###스레드(Thread)
: 바늘이 하나의 실을 가지고 바느질 하는 것과 같음
(이건 프로세스랑 비교해서 따로 작성 할 예정
📖메모리 사용 영역
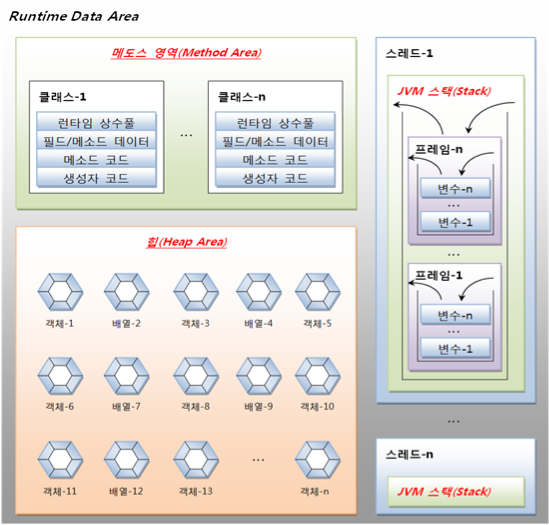
- JVM이 사용하는 메모리 영역
- OS에서 할당 받은 메모리 영역(Runtime Data Area)을 세 영역으로 구분
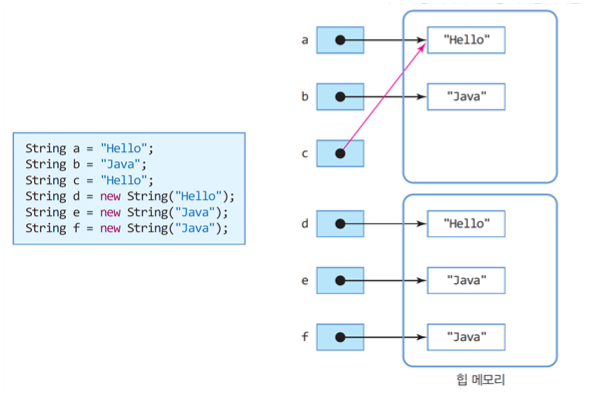
📖자바의 String 객체와 String 리터럴
저장 위치 다름
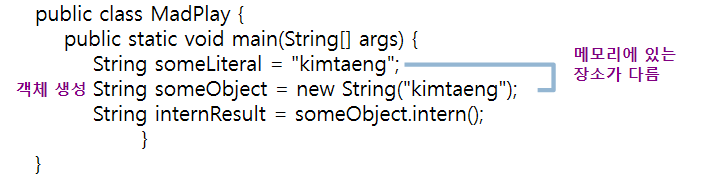
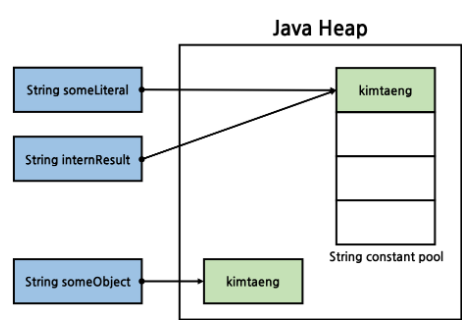
📖String 리터럴과 new String()
String 생성 방법
1. 리터럴로 생성, String s = "Hello";
2. String 객체로 생성, String t = new String("Hello");
📖String 객체의 주요 특징
수정 불가능
📖String 객체의 주요 메소드
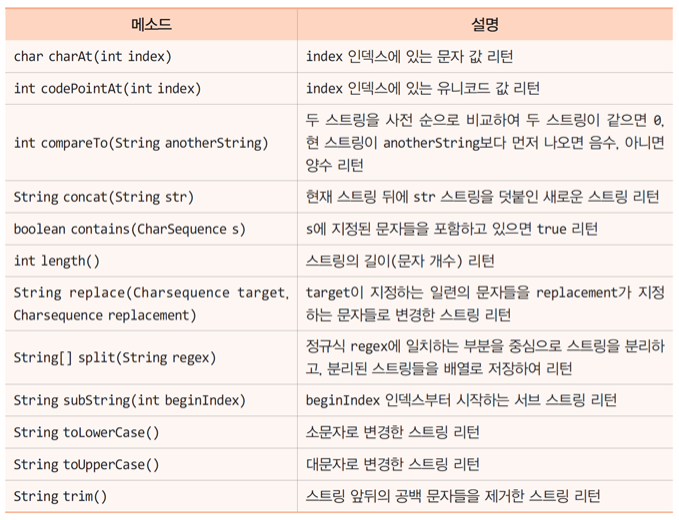
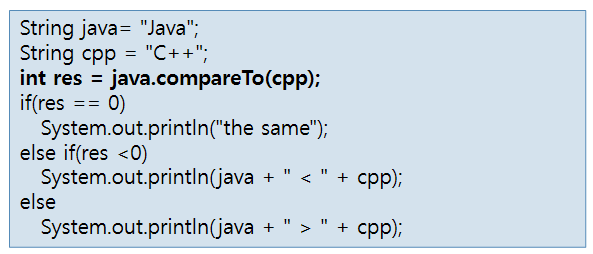
📖문자열 비교
- int compareTo(String anotherString)
📖문자열 연결
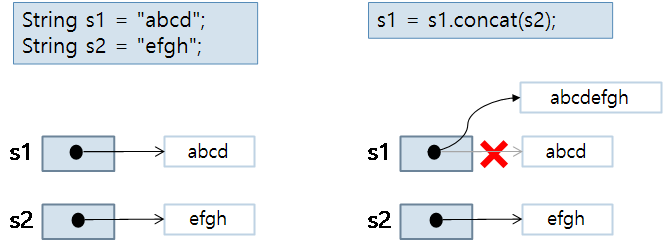
- 연산자로 문자열 연결
- String concat(String str)를 이용한 문자열 연결
"I love ".concat("Java.") 는 "I love Java." 리턴📖concat() : 새로운 문자열 생성
📖문자열 내 공백 제거와 문자 접근
- 공백 제거 : String trim()
- 문자열의 문자 : char charAt(int index)
📘패키지 (ppt Chapter 04)
StringBuffer 클래스
: 가변 크기의 문자열 저장 클래스
Java.lang.StringBuffer
- 생성

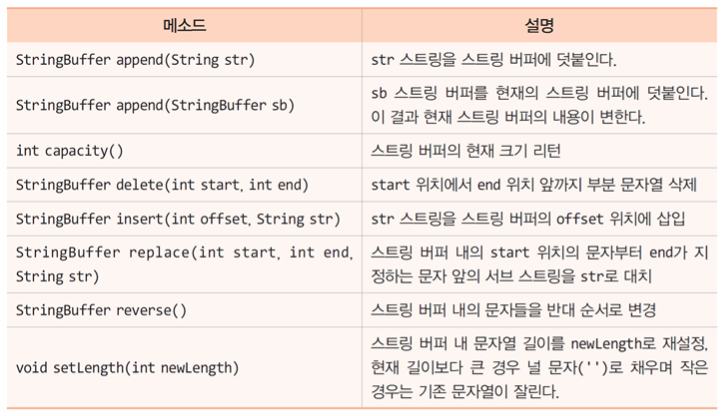
📖StringBuffer 클래스의 주요 메소드
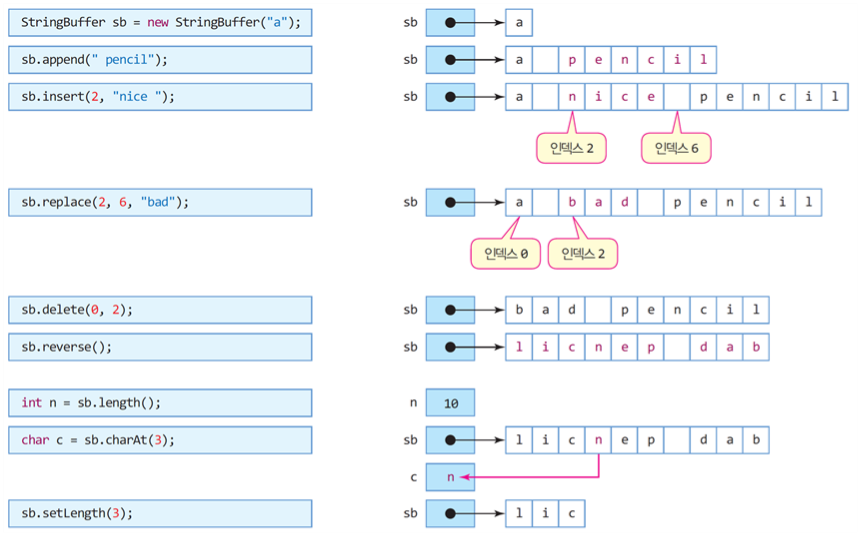
예시
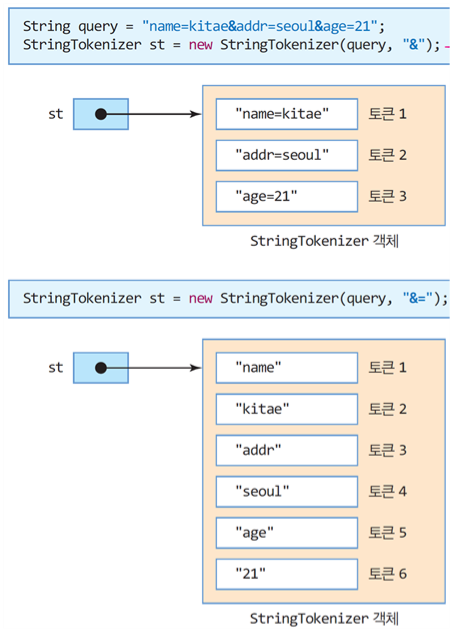
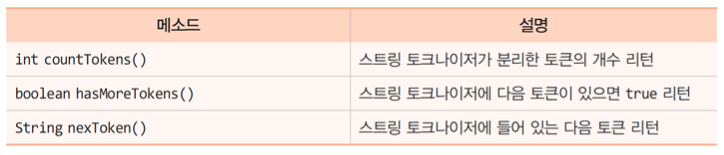
📖StringTokenizer 클래스
java.util.StringTokenizer
: 하나의 문자열을 여러 문자열 분리

📖예제
package chapter06;
import java.util.StringTokenizer;
public class StringTokenizerEx {
public static void main(String[] args) {
String query ="홍길동/장화/홍련/콩쥐/팥쥐";
StringTokenizer st = new StringTokenizer(query, "/");
// System.out.println(st.nextToken());
// System.out.println(st.nextToken());
// System.out.println(st.nextToken());
// System.out.println(st.nextToken());
// System.out.println(st.nextToken());
// //아니 출력되는게... .nextToken()이 필요한지는 몰랐음....(다음토큰을 띄어쓰기 한 상태로 출력하게 함)
while (st.hasMoreTokens()) {
System.out.println(st.nextToken());
}
}
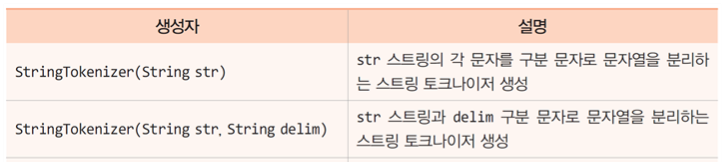
}📖StringTokenizer의 생성자와 메소드
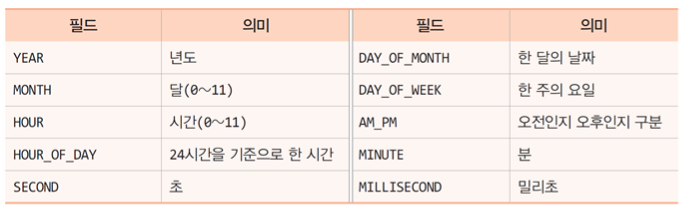
📖Calendar 클래스
- java.util 패키지
- 시간과 날짜 정보 저장 관리
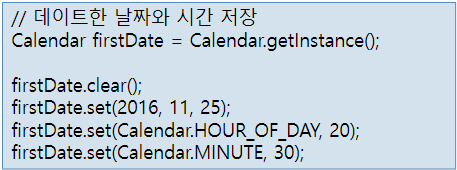
📖Calendar 객체 생성 및 날짜와 시간
-
Calendar 객체 생성
: Calendar now = Calendar.getInstance(); -
날짜와 시간

-
날짜와 시간 설정하기
📖예제
package chapter06;

import java.util.Calendar;

public class CalendarEx {
	public static void printCalendar(String msg, Calendar cal) {
		int year = cal.get(Calendar.YEAR);
		int month = cal.get(Calendar.MONTH)+1;
		int day = cal.get(Calendar.DAY_OF_MONTH);
		int dayOfWeek = cal.get(Calendar.DAY_OF_WEEK);
		int hourOfDay = cal.get(Calendar.HOUR_OF_DAY);
		int ampm = cal.get(Calendar.AM_PM);
		int hour = cal.get(Calendar.HOUR);
		int minute = cal.get(Calendar.MINUTE);
		int second = cal.get(Calendar.SECOND);
		int millisecond = cal.get(Calendar.MILLISECOND);
//		int year = cal.get(Calendar.YEAR);
//		int year = cal.get(Calendar.YEAR);

		System.out.println(msg+year+"/"+month+"/"+day+"/");

		switch (dayOfWeek) {
			case Calendar.SUNDAY:System.out.print("일요일"); break;
			case Calendar.MONDAY:System.out.print("월요일"); break;
			case Calendar.THURSDAY:System.out.print("화요일"); break;
			case Calendar.WEDNESDAY:System.out.print("수요일"); break;
			case Calendar.TUESDAY:System.out.print("목요일"); break;
			case Calendar.FRIDAY:System.out.print("금요일"); break;
			case Calendar.SATURDAY:System.out.print("토요일"); break;
		}
		System.out.println("("+hourOfDay+"시)");


		if (ampm == Calendar.AM) {
			System.out.print("오전");
		}else {
			System.out.print("오후");
		}
		System.out.println(hour+"시"+minute+"분"+second+"초"+millisecond+"밀리초");


	}
	public static void main(String[] args) {
		Calendar now = Calendar.getInstance();
		printCalendar("현재 ", now);
//		printCalendar(msg, cal);

		Calendar firstDate = Calendar.getInstance();
		firstDate.clear();
		firstDate.set(2016, 11, 25);
		firstDate.set(Calendar.HOUR_OF_DAY,20);
		firstDate.set(Calendar.MINUTE,30);
		printCalendar("처음 데이터 한 날은", firstDate);
	}

}
📘복습 문제
📖문제 1.
person객체 만들어 이용
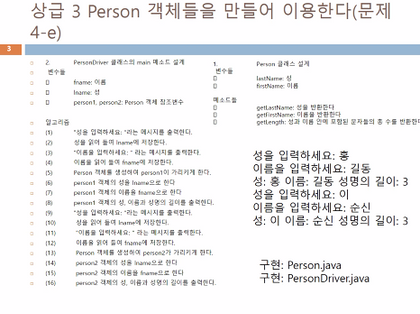
package chapter06;

public class Person {
	public String lastName;
	public String firstName;

	public String getLastName() {
		return lastName;
	}
	public String getFirstName() {
		return firstName;
	}
//	public void getLastName() {
//		System.out.print("성 : " +lastName);
//	}
//	public void getFirstName() {
//		System.out.println("  이름 : "+firstName);
//	}

	public int getLength() {
		return firstName.length()+lastName.length();
	}
//	public void getLength() {
//		System.out.print("성명의 길이: "+(firstName.length()+lastName.length()));
//	}
}
package chapter06;
import java.util.Scanner;
public class PersonDriver extends Person {
public static void main(String[] args) {
String fname;
String lname;
// Person person1;
// Person person2;
Scanner scanner = new Scanner(System.in);
System.out.println("성을 입력하시오 :");
lname = scanner.next();
System.out.println("이름을 입력하세요 :");
fname = scanner.next();
Person person1 = new Person();
person1.lastName = lname;
person1.firstName = fname;
System.out.println("성 : " +person1.getLastName()
+"이름 : "+person1.getFirstName()
+" 성명의 길이 : "+person1.getLength());
// person1.getLastName();
// person1.getFirstName();
//// System.out.println("성명의 길이 :");
// person1.getLength();
System.out.println();
System.out.println("성을 입력하시오 :");
lname = scanner.next();
System.out.println("이름을 입력하세요 :");
fname = scanner.next();
Person person2 = new Person();
person2.lastName = lname;
person2.firstName = fname;
// person2.getLastName();
// person2.getFirstName();
// person2.getLength();
System.out.println("성 : " +person2.getLastName()
+"이름 : "+person2.getFirstName()
+" 성명의 길이 : "+person2.getLength());
}
}// 내가 한건 주석 처리함
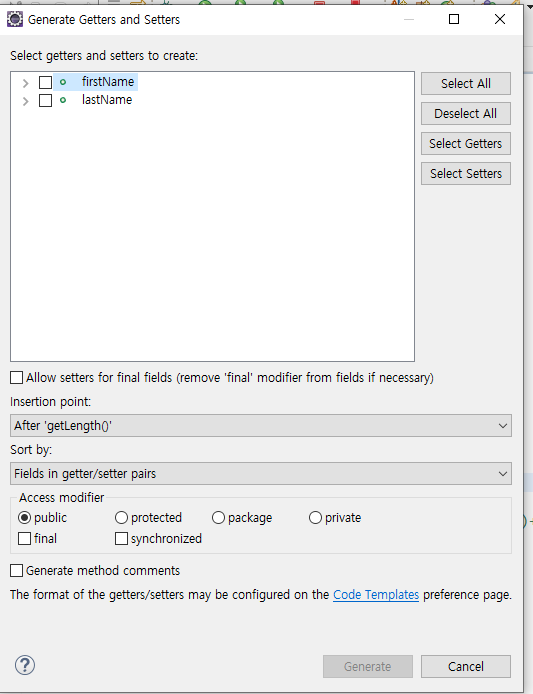
get~~메소드 생성할때 이거 사용하면 편함
(this 자동 생성과 비슷함)
(alt+shift+s)
📖문제 2
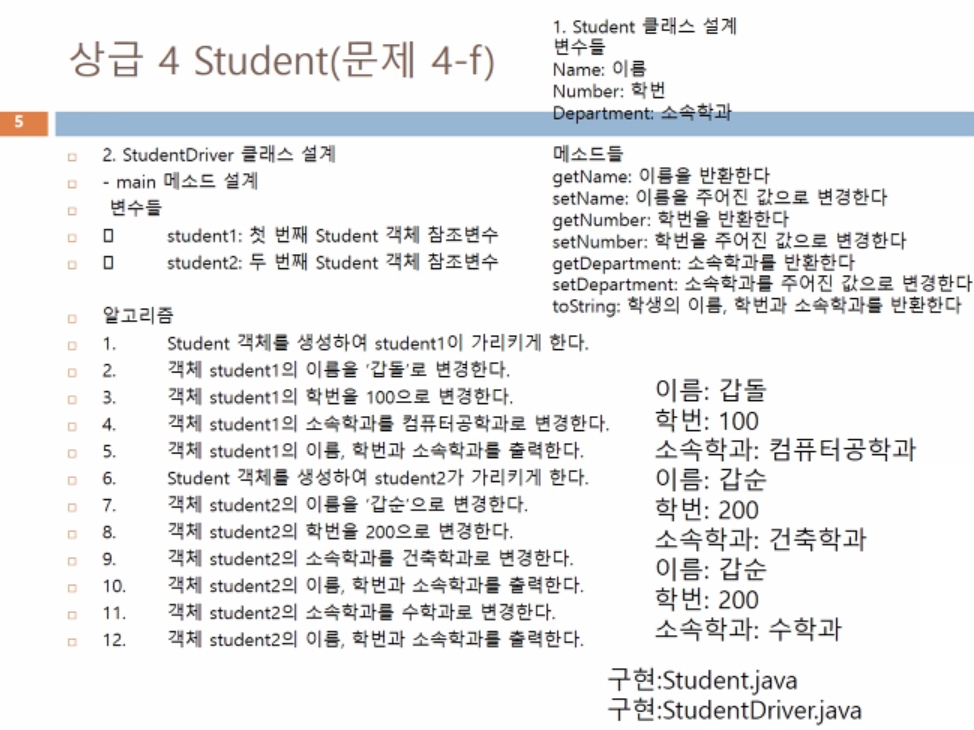
package chapter06;

public class StudentDriver {
	public static void main(String[] args) {

		Student student1, student2;

		student1 = new Student();
		student1.setName("갑돌");
		student1.setNumber(100);
		student1.setDepartment("컴퓨터공학과");
		System.out.println(student1);

		student2 = new Student();
		student2.setName("갑순");
		student2.setNumber(200);
		student2.setDepartment("건축학과");
		System.out.println(student2);


		student2.setDepartment("수학과");
		System.out.println(student2);
	}
}
package chapter06;
public class Student {
public String name;
public int number;
public String department;
public String toString() {
return "이름: "+name+"\n"+"학번: "+number+"\n"+"소속학과: "+department;
}
public String getName() {
return name;
}
public int getNumber() {
return number;
}
public String department() {
return department;
}
public void setName(String name) {
this.name = name;
}
public void setNumber(int number) {
this.number = number;
}
public void setDepartment(String department) {
this.department = department;
}
}