
[11.15] 내일배움캠프[Spring] TIL-12
1. 파이썬 알고리즘 - 비선형 자료구조
- 트리 / 힙
👉 1개 -> 2개 -> 4개 등 가지 치기 형태로 쭉 뻗어 나가는 자료구조
- DFS / BFS
👉 깊이우선 탐색 / 넓이 우선탐색 -> 트리 구조에서 자료 탐색하는 방법
- 트리
👉 뿌리와 가지로 구성되어 거꾸로 세워놓은 나무처럼 보이는 계층형,비선형 자료구조!!( 스택 , 링크드리스트... -> 선형 자료구조 )
👉 선형 구조 : 자료 저장, 자료 꺼내기에 초점 / 비선형 구조 : 표현적인 면에 초점( 어떤 자료 안에 어떤 자료가 있고.... )
👉 계층형구조가 확실하다.
👉 Node : 각각 데이터를 저장하는 기본 요소( 데이터 + 밑에 데이터를 가르키는 가지까지 포함 )
👉 Root Node : 트리에서 맨 위에 있는 노드
👉 Level : 최상위 노드를 Level 0 으로 했을 때 , 하위 Branch로 연결된 노드의 깊이를 나타냄
👉 Parent Node : 어떤 노드의 하위 레벨에 연결된 노드
👉 Child Node : 어떤 노드의 상위 레벨에 연결된 노드
👉 Leaf Node(Termial Node) : Child Node가 하나도 없는 노드
👉 Sibling : 동일한 Parent Node를 가진 노드
👉 Depth : 트리에서 Node가 가질 수 있는 최대 Level
- 트리의 종류
👉 이진트리 : 각 노드가 최대 두개의 자식을 가진다는 것
👉 완전 이진트리 : 노드를 삽입할 때 최하단 왼쪽 노드부터 차례대로 삽입해야 한다는 것
- 완전 이진트리
👉 완전 이진트리일 경우에만 배열로 표현가능
    8      Level 0 -> [None, 8] 첫번째 레벨의 8을 넣고,
  6   3    Level 1 -> [None, 8, 6, 3] 다음 레벨인 6, 3을 넣고
 4 2 5     Level 2 -> [None, 8, 6, 3, 4, 2, 5] 다음 레벨인 4, 2, 5를 넣으면 됩니다!
- index 계산하기
👉 [None,8,6,3,4,2,5]
👉 현재 인덱스 2 = 왼쪽 자식의 인덱스
👉 현재 인덱스 2 +1 = 오른쪽 자식의 인덱스
👉 현재 인덱스 // 2 = 부모의 인덱스
👉 트리의 높이 = Level끼리 빼기
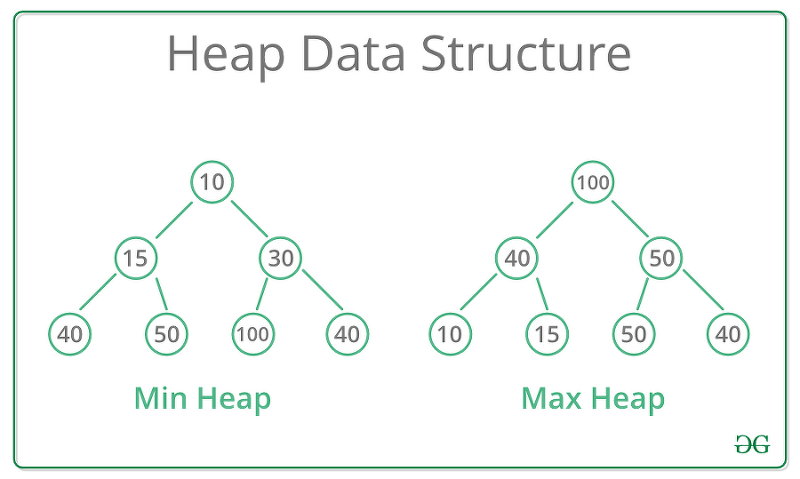
- 힙
👉 데이터에서 최대값과 최소값을 빠르게 찾기 위해 고안된 완전 이진트리
👉 힙은 항상 큰 값이 상위 레벨에 있고, 작은 값이 하위레벨에 있도록 하는 자료구조
👉 부모노드의 값이 항상 자식노드보다 크거나 작게 배치해야함
( max / min heap ) -> 데이터 삽입이 이뤄져도 지켜져야함 ->
삽입 데이터와 부모노드와의 비교를 통해 자리 바꾸기
- 배열로 표현해보는 힙에 데이터 추가하기
class MaxHeap:
    def __init__(self):
        self.items = [None] # 힙은 첫번째를 index 1로 표현함으로 None을 채움.

    def insert(self, value):
        self.items.append(value)
        cur_index = len(self.items)-1

        while cur_index > 1:
            parent_index = cur_index // 2
            if self.items[cur_index] > self.items[parent_index]:

				# 새로 넣은 원소가 부모 원소보다 크다면 바꿔주는 작업
                self.items[cur_index],self.items[parent_index] = self.items[parent_index],self.items[cur_index]
                cur_index = parent_index
            else:
                break


        return self.items


max_heap = MaxHeap()
max_heap.insert(3)
max_heap.insert(4)
max_heap.insert(2)
max_heap.insert(9)
print(max_heap.items)  # [None, 9, 4, 2, 3] 가 출력되어야 합니다!
- 배열로 표현해보는 힙에서 원소 제거
class MaxHeap:
    def __init__(self):
        self.items = [None]

    def insert(self, value):
        self.items.append(value)
        cur_index = len(self.items) - 1

        while cur_index > 1:  # cur_index 가 1이 되면 정상을 찍은거라 다른 것과 비교 안하셔도 됩니다!
            parent_index = cur_index // 2
            if self.items[parent_index] < self.items[cur_index]:
                self.items[parent_index], self.items[cur_index] = self.items[cur_index], self.items[parent_index]
                cur_index = parent_index
            else:
                break

    def delete(self):

        # 루트노드와 맨 끝의 노드를 교체한다.
        self.items[1],self.items[-1] = self.items[-1],self.items[1]

        # 가장 큰 값이 맨뒤로 갔으므로 삭제하면서 변수에 담아주자
        pre_max = self.items.pop()

        # 이제 heap 규칙을 지키기 위해 비교하면서 자리를 바꿔주자

        cur_index = 1
        while cur_index <= len(self.items) - 1:
            left_child_index = cur_index * 2
            right_child_index = cur_index * 2 + 1
            max_index = cur_index

            if left_child_index <= len(self.items) -1 and self.items[left_child_index] > self.items[max_index] :
                max_index = left_child_index

            if right_child_index <= len(self.items) -1 and self.items[right_child_index] > self.items[max_index] :
                max_index = right_child_index


            if max_index == cur_index:
                break

            self.items[cur_index], self.items[max_index] = self.items[max_index],self.items[cur_index]
            cur_index = max_index


max_heap = MaxHeap()
max_heap.insert(8)
max_heap.insert(6)
max_heap.insert(7)
max_heap.insert(2)
max_heap.insert(5)
max_heap.insert(4)
print(max_heap.items)  # [None, 8, 6, 7, 2, 5, 4]
print(max_heap.delete())  # 8 을 반환해야 합니다!
print(max_heap.items)  # [None, 7, 6, 4, 2, 5]
- 그래프
👉 노드와 노드사이에 연결관계에 초점
👉 노드 : 연결관계를 가진 각 데이터
👉 간선 : 노드 간의 관계를 표시한 선
👉 인접 노드 : 간선으로 직접 연결된 노드
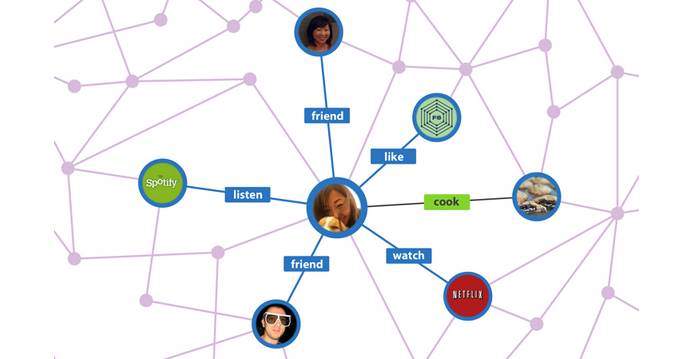
- 유방향 그래프 / 무방향 그래프
👉 유방향 그래프 : 화살표가 한쪽으로 존재하며, 정해진 방향으로만 갈 수 있음
👉 무방향 그래프 : 이어져만 있으면 어디든 갈 수 있음

- DFS ( 깊이, 끝까지 탐색 )
- BFS( 한 노드 기준 인접 노드 먼저 돌고 , 우선 방문... )
👉 트리나 그래프를 탐색하는 방법
👉 DFS는 끝까지 파고드는 것이며 , 그래프의 최대 깊이만큼의 공간 복잡도를 요구한다 -> 공간을 적게 씀 -> 그러나 최단 경로를 찾기가 어려움
👉 BFS는 모든 경우를 다 봐야하므로 공간을 많이쓴다.
- 재귀 함수를 이용한 DFS 탐색
# 위의 그래프를 예시로 삼아서 인접 리스트 방식으로 표현했습니다!
graph = {
    1: [2, 5, 9],
    2: [1, 3],
    3: [2, 4],
    4: [3],
    5: [1, 6, 8],
    6: [5, 7],
    7: [6],
    8: [5],
    9: [1, 10],
    10: [9]
}
visited = []

# 1. 시작 노드 (루트노드)인 1부터 탐색한다.
# 2. 현재 방문한 노드를 visited_array에 추가한다.
# 3. 현재 방문한 노드와 인접한 노드 중 방문하지 않은 노드에 방문한다.


def dfs_recursion(adjacent_graph, cur_node, visited_array):
    # 현재 위치에 있으므로 방문한 배열에 기록
    visited_array.append(cur_node)

    for adjacent_node in adjacent_graph:

        if adjacent_node not in visited_array:

            dfs_recursion(adjacent_graph, adjacent_node,visited_array)

    return


dfs_recursion(graph, 1, visited)  # 1 이 시작노드입니다!
print(visited)  # [1, 2, 3, 4, 5, 6, 7, 8, 9, 10] 이 출력되어야 합니다!
- 스택을 이용한 DFS 탐색
# 위의 그래프를 예시로 삼아서 인접 리스트 방식으로 표현했습니다!
graph = {
    1: [2, 5, 9],
    2: [1, 3],
    3: [2, 4],
    4: [3],
    5: [1, 6, 8],
    6: [5, 7],
    7: [6],
    8: [5],
    9: [1, 10],
    10: [9]
}

# 1. 시작 노드를 스텍에 넣는다.
# 2. 현재 스택의 노드를 빼서 visited에 추가한다.
# 3. 현재 방문한 노드와 인접한 노드 중에서 방문하지 않는 노드를 스택에 추가한다.

def dfs_stack(adjacent_graph, start_node):
    stack = [start_node]
    visited = []

    while stack:
        current_node = stack.pop()
        visited.append(current_node)
        for adjacent_node in adjacent_graph[current_node]:
            if adjacent_node not in visited:
                stack.append(adjacent_node)
    return visited


print(dfs_stack(graph, 1))  # 1 이 시작노드입니다!
# [1, 9, 10, 5, 8, 6, 7, 2, 3, 4] 이 출력되어야 합니다!
- BFS 구현 예제
# 위의 그래프를 예시로 삼아서 인접 리스트 방식으로 표현했습니다!
graph = {
    1: [2, 3, 4],
    2: [1, 5],
    3: [1, 6, 7],
    4: [1, 8],
    5: [2, 9],
    6: [3, 10],
    7: [3],
    8: [4],
    9: [5],
    10: [6]
}


def bfs_queue(adj_graph, start_node):
    queue = [start_node]
    visited = []

    while queue:
        current_nod = queue.pop(0) #pop도 index를 가질 수 있구나!
        visited.append(current_nod)

        for adj_node in adj_graph[current_nod]:
            if adj_node not in visited:
                queue.append(adj_node)

    return visited


print(bfs_queue(graph, 1))  # 1 이 시작노드입니다!
# [1, 2, 3, 4, 5, 6, 7, 8, 9, 10] 이 출력되어야 합니다!
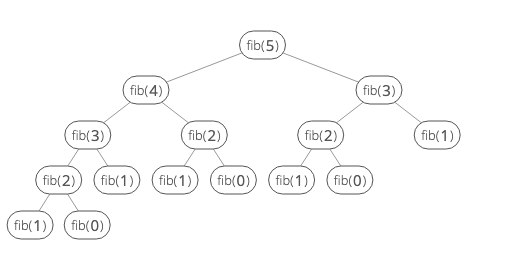
- Dynamic Progarmming ( 동적 계획법 )
👉 ex) 피보나치 수열 : 첫째, 둘째의 합이 셋째항 , 셋째 넷째항의 합은 다섯째항 -> 앞 두항의 합이 현재 값이다.
FIbo(3) = Fibo(2) + Fibo(1) = 재귀함수?!?!
- 피보나치 수열 구현
input = 20


def fibo_recursion(n):
    # 구현해보세요!
    if n == 1 or n == 2:
        return 1

    return fibo_recursion(n-1) + fibo_recursion(n-2)


print(fibo_recursion(input))  # 6765
👉 여기서 input = 100 이라면 시간이 엄~청 오래걸림
👉 똑같은 재귀 연산의 결과를 기억하는 동적 계획법!!!
👉 결과를 기록한다 -> 메모이제이션
👉 문제를 쪼갤 수 있는 구조이다 -> 겹치는 부분 문제
- 동적 계획법을 활용한 피보나치 수열 예제
input = 100

# memo 라는 변수에 Fibo(1)과 Fibo(2) 값을 저장해놨습니다!
memo = {
    1: 1,
    2: 1
}

# 1. 만약 메모에 있으면 그 값 바로 반환
# 2. 없으면 수식대로 진행한다.
# 3. 그리고 그 값을 메모에 기록한다.


def fibo_dynamic_programming(n, fibo_memo):
    if n in fibo_memo:
        return fibo_memo[n]

    nth_fibo = fibo_dynamic_programming(n-1, fibo_memo) + fibo_dynamic_programming(n-2, fibo_memo)
    fibo_memo[n] = nth_fibo

    return nth_fibo


print(fibo_dynamic_programming(input, memo))
2. java
- 추상클레스
👉 추상 메서드를 선언할 수 있는 클래스-> 새로운 객체를 생성하지 못함!
- 추상 클래스 예제
abstract class Bird {

    private int x, y, z;

    void fly(int x, int y, int z) {
        printLocation();
        System.out.println("이동합니다!");
        this.x = x;
        this.y = y;
        if(flyable(z)){
            this.z=z;

        }else{
            System.out.println("그 높이로는 날 수 없습니다!");
        }

        printLocation();

    }

    abstract boolean flyable(int z);

    public void printLocation() {
        System.out.println("현재 위치 { " + x + ", " + y + ", " + z + " }");
    }
}


class Pigeon extends Bird{
    @Override
    boolean flyable(int z) {

        return z < 10000;
    }
}

class Peacock extends Bird{
    @Override
    boolean flyable(int z) {
        return false;
    }
}

public class Main {
    public static void main(String[] args) {

        Bird pigeon = new Pigeon();
        Bird peacock = new Peacock();

        System.out.println("-----비둘기-------");
        pigeon.fly(1,1,3);

        System.out.println("------공작새--------");
        peacock.fly(1,1,3);

        System.out.println("-----비둘기-------");
        pigeon.fly(3,3,30000);
    }
}
- 인터페이스
👉 객체의 특정 행동의 특징을 정의하는 것
👉 내용이 없는 메서드의 집합
👉 인터페이스 구현 클레스는 인터페이스의 내용을 전부 구현해야함
👉 상속과 달리 여러 인터페이스를 구현할 수 있다
( 인터페이스의 모든 내용을 모두 override 한다는 조건하에)
- 구현 예제 풀어보기( 자식, 부모, 조부모 )
🚨 공통적인 속성을 생성자로 초기화하는 Person을 Class로 상속 받고
각 행동( walk, run ,swim )을 인터페이스로 분리 하는게 훨씬 유연한 코드이나 그 생각을 하지 못하고 인터페이스로만 작성한 잘못된 코드.
// 1. 사람은 자식 부모님 조부모님이 있다.
// 2. 모든 사람은 이름 나이 현재 장소정보가 있다.
// 3. 모든 사람은 걸을 수 있다.(x,y좌표이동)
// 4. 자식과 부모님은 뛸 수 있다.
// 5. 조부모님 기본속도 1 , 부모 3 , 자식 5
// 6. 뛸 때는 속도가 기본속도 대비 +2 빠르다.
// 7. 수영할 때는 속도가 기본속도대비 +1 빠르다
// 8. 자식만 수영을 할 수 있다. (x,y좌표이동 )
interface Person {
    void walk(int x,int y,int age);
    void run(int x, int y);
    void swim(int x, int y);
}

class Son implements Person{

    int x, y = 0;
    int age ;
    @Override
    public void walk(int x, int y,int age) {
        this.x = x + 5;
        this.y = y + 5;
        this.age = age;
        System.out.println(age+"의 나이를 가진 자식의 걸은 후 좌표는"+"{"+this.x+","+this.y+"} 입니다.");

    }

    @Override
    public void run(int x, int y) {
        this.x = x + 7;
        this.y = y + 7;
        System.out.println(age+"의 나이를 가진 자식의 뛴 후 좌표는"+"{"+this.x+","+this.y+"} 입니다.");

    }

    @Override
    public void swim(int x, int y) {
        this.x = x + 6;
        this.y = y + 6;

        System.out.println(age+"의 나이를 가진 자식의 수영한 후 좌표는"+"{"+this.x+","+this.y+"} 입니다.");
    }
}

class Parent implements Person{

    int x,y = 0 ;
    int age ;
    @Override
    public void walk(int x, int y, int age) {
        this.x = x + 3;
        this.y = y + 3;
        this.age = age;
        System.out.println(age+"의 나이를 가진 부모의 걸은 후 좌표는"+"{"+this.x+","+this.y+"} 입니다.");
    }

    @Override
    public void run(int x, int y) {
        this.x = x + 5;
        this.y = y + 5;

        System.out.println(age+"의 나이를 가진 부모의 걸은 후 좌표는"+"{"+this.x+","+this.y+"} 입니다.");
    }

    @Override
    public void swim(int x, int y) {
        System.out.println("부모는 수영을 하지 못합니다.");
    }
}

class Old implements Person{
    int x,y = 0;
    int age;
    @Override
    public void walk(int x, int y, int age) {
        this.x = x + 1;
        this.y = y + 1;
        this.age = age;
        System.out.println(age+"의 나이를 가진 조부모의 걸은 후 좌표는"+"{"+this.x+","+this.y+"} 입니다.");
    }

    @Override
    public void run(int x, int y) {
        System.out.println("조부모는 뛰지 못합니다.");
    }

    @Override
    public void swim(int x, int y) {
        System.out.println("조부모는 수영을 하지 못합니다.");
    }
}


public class Main {
    public static void main(String[] args) {
        Person son = new Son();
        Person parent = new Parent();
        Person old = new Old();

        son.walk(1,1,25);
        parent.walk(1,1,56);
        old.walk(1,1,77);

        son.run(2,2);
        parent.run(2,2);
        old.run(2,2);

        son.swim(3,-1);
        parent.swim(3,-1);
        old.swim(3,-1);


    }
}
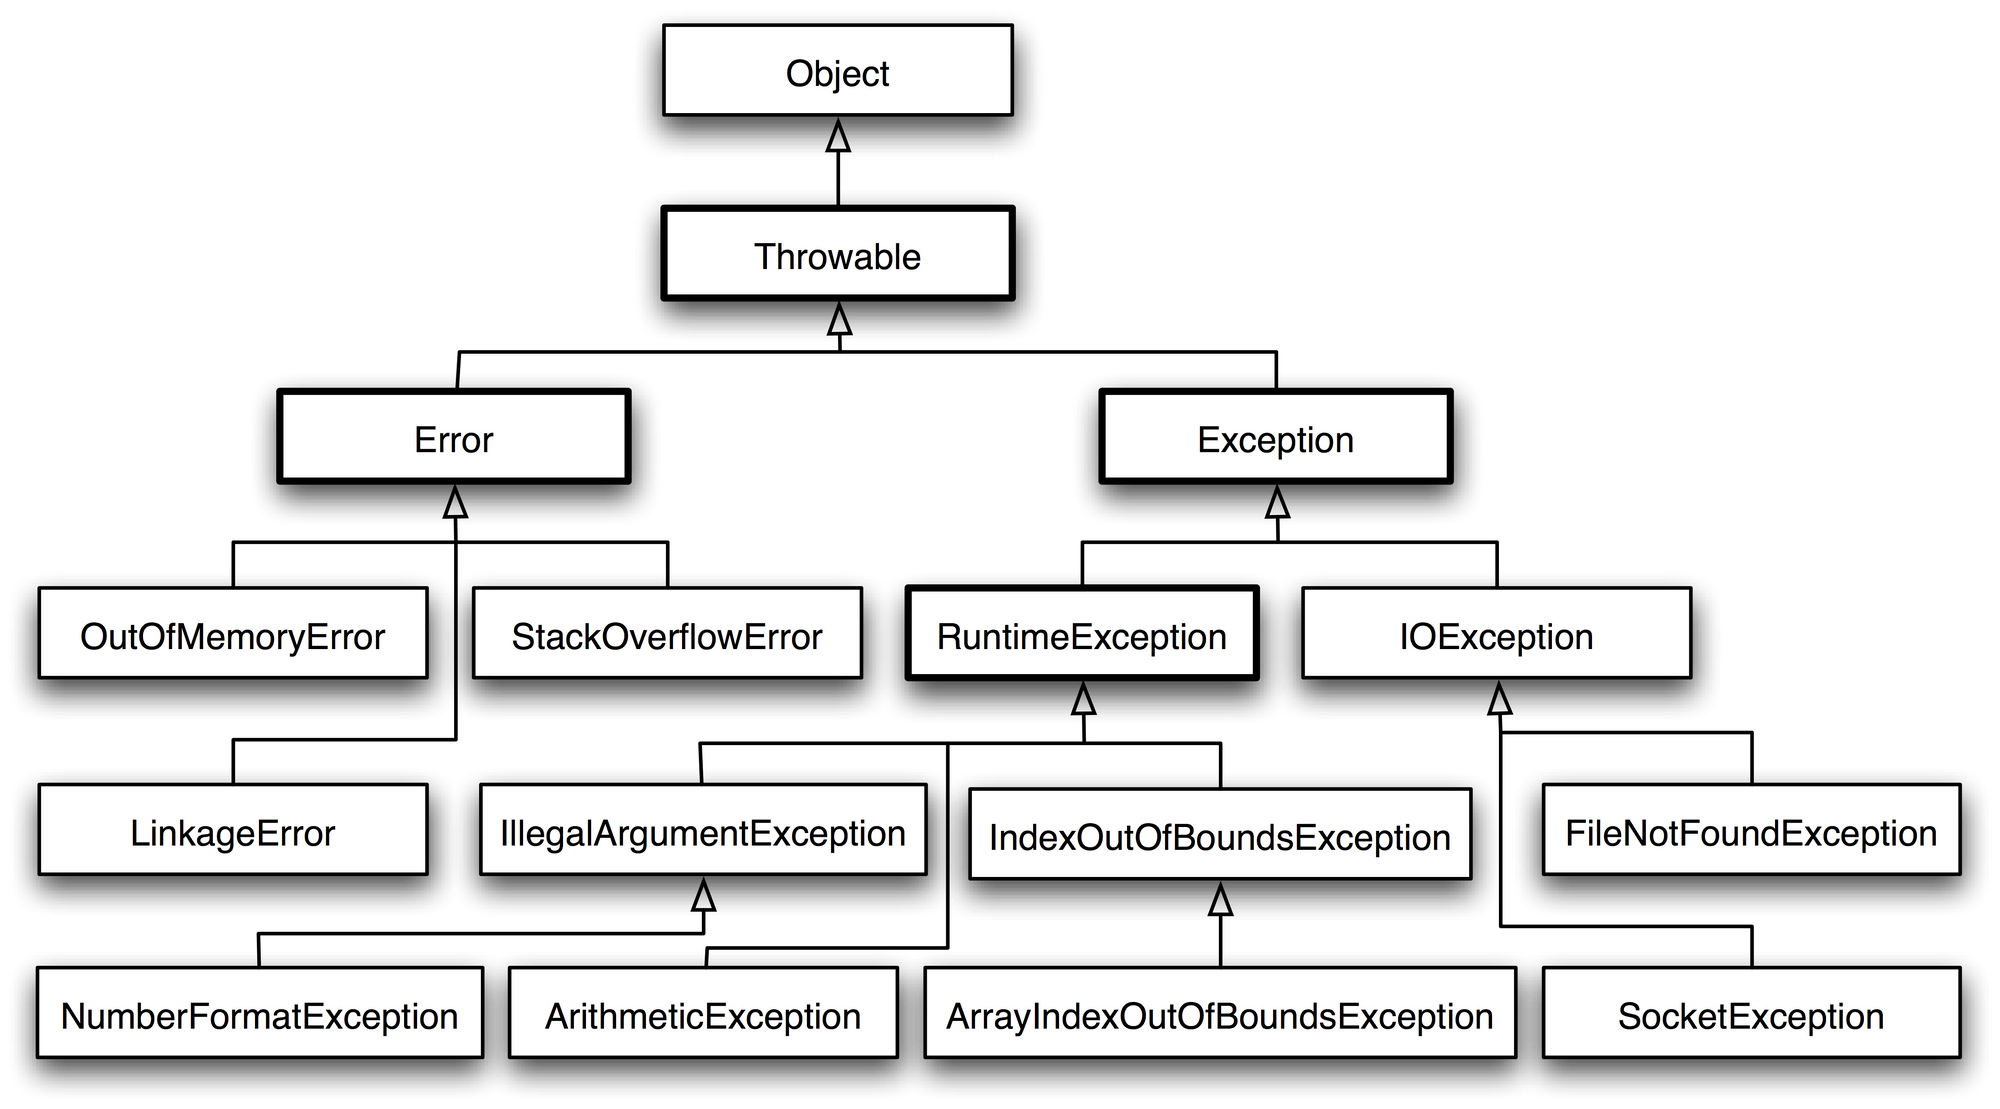
- 예외처리
👉 예외 발생으로 프로그램이 비정상적으로 종료되는 것을 막기 위함
👉 문제 발생 시 개발자에게 알려 코드를 보완하기 위해!!
- 0으로 나눌 수 없는 Exception 발생 예제
public class Main {
    public static void main(String[] args) {

        int number = 10;
        int result;

        for(int i= 10 ; i >= 0 ; i --){

            try {
                result = number / i;
                System.out.println(result);
            }catch (Exception e){
                System.out.println("예외 발생!"+e.getMessage());
            }finally {
                System.out.println("항상 실행되는 finally");
            }
        }
    }
}
- IOException 예제 -1
import java.io.FileOutputStream;
import java.io.IOException;

public class Main {
    public static void main(String[] args) {

        try (FileOutputStream out = new FileOutputStream("test.txt")) {  --> () 가 있네 FileOutputStream 때문..! 위에 선언하고 괄호 안써도 되긴함..

            out.write("hello sparta!".getBytes());
            out.flush();
        } catch (IOException e) {
            System.out.println("IOException발생!!" + e.getMessage());
            e.printStackTrace();
        }
    }
}
- IOException 예제 -1 -2
👉 위와 내용은 같지만 throws로 명시
import java.io.FileNotFoundException;
import java.io.FileOutputStream;
import java.io.IOException;

public class Main {
    public static void main(String[] args) throws IOException {
        FileOutputStream out = new FileOutputStream("test.txt");
        try  {
            out.write("hello sparta!".getBytes());
            out.flush();
        } catch (IOException e) {
            System.out.println("IOException발생!!" + e.getMessage());
            e.printStackTrace();
        }
        out.close();
    }
}
- try ~ catch 예제 ( 특정 Exception 보여주기 )
class ArrayCalculation {

    int[] arr = {0, 1, 2, 3, 4};

    public int divide(int denominatorIndex, int numeratorIndex) throws ArithmeticException, ArrayIndexOutOfBoundsException {
        return arr[denominatorIndex] / arr[numeratorIndex];
    }
}

public class Main {
    public static void main(String[] args) {
        ArrayCalculation arrayCalculation = new ArrayCalculation();

        System.out.println("2 / 1 = " + arrayCalculation.divide(2, 1));
        try {
            System.out.println("1 / 0 = " + arrayCalculation.divide(1, 0)); // java.lang.ArithmeticException: "/ by zero"

        } catch (ArithmeticException arithmeticException) {
            System.out.println("잘못된 계산입니다 : " + arithmeticException.getMessage());
        }

        try {
            System.out.println("Try to divide using out of index element = "
                    + arrayCalculation.divide(5, 0)); // java.lang.ArrayIndexOutOfBoundsException: 5

        }catch (ArrayIndexOutOfBoundsException arrayIndexOutOfBoundsException){
            System.out.println("잘못된 계산입니다 : "+(arrayCalculation.arr.length-1)+"만큼의의 길이를 가집니다."+arrayIndexOutOfBoundsException.getMessage());
        }

    }

}
- 날짜와 시간 다루기
👉 로그를 남길 때 시간을 같이 기록해줘야 발생 타임에 따른 유추가 가능하다 -> 그 때 사용!! Time package
 System.out.println("now usage");
        LocalDate date = LocalDate.now();
        LocalTime time = LocalTime.now();
        LocalDateTime dateTime = LocalDateTime.now();

        System.out.println(date); // 2022-11-16
        System.out.println(time); // 00:11:25.407544900
        System.out.println(dateTime); // 2022-11-16T00:11:25.407544900

        System.out.println("of () usage");
        LocalDate dateOf = LocalDate.of(2022,11,16); // 2022-11-16
        LocalTime timeOf = LocalTime.of(22,50,0); // 22:50

        System.out.println(dateOf);
        System.out.println(timeOf);
👉 현재 값을 불러오는데 내가 다른 정해진 형식으로 출력하고 싶다!
import java.time.LocalDate;
import java.time.LocalDateTime;
import java.time.LocalTime;
import java.time.format.DateTimeFormatter;
import java.time.format.FormatStyle;

public class Main {
    public static void main(String[] args) {

        DateTimeFormatter formatter = DateTimeFormatter.ofLocalizedTime(FormatStyle.SHORT); // FormatStlye에는 많은 형식이 있음
        String shortFormat = formatter.format(LocalTime.now());
        System.out.println(shortFormat);
    }

}
👉 현재 값을 불러오는데 내가 형식을 직접 지정하고 싶다!
public class Main {
    public static void main(String[] args) {

       DateTimeFormatter myFormatter = DateTimeFormatter.ofPattern("yyyy/MM/dd");
       String myDate = myFormatter.format(LocalDate.now());
        System.out.println(myDate);
    }

}
- 사이의 기간을 계산하는 예제
public class Main {
    public static void main(String[] args) {

        LocalDate today = LocalDate.now();
        LocalDate birthDay = LocalDate.of(2020,1,1);
        Period period = Period.between(today,birthDay);
        System.out.println(period.getMonths());
        System.out.println(period.getDays());

    }

}
- 날짜와 시간 원하는 형식으로 출력하기 예제 다시 해보기
public class Main {
    public static void main(String[] args) {

        DateTimeFormatter myFormatter = DateTimeFormatter.ofPattern("yyyy/MM/dd h/mm");
        String now = myFormatter.format(LocalDateTime.now());
        System.out.println(now);

    }
}
3. 느낀점⭐
1) 상속과 인터페이스를 사용할 때, 공통적인 속성을 정의할 때는
상속을 어떠한 기능에 대한 명세를 정의하고 구현하는 것은 인터페이스를 사용하자!!!
2) 알고리즘을 생각할 때는 예시를 통해 쉽게 접근하자!
3) 알고리즘을 생각할 때는 순서대로 차근차근 원하는 것이 무엇인지 정리하고 순차적으로 코딩하자!

기록하는 습관