useReducer는 언제 필요할까?
useReducer()는 useState()와 같은 상태 관리, 상태 업데이트 훅(Hook)이다.
변경할 값이 많을 때, 즉 상태 관리할 데이터가 많아질 때 구조화된 방식으로 상태 관리할 수 있다.
여러 개의 하위 값을 포함하는 복잡한 스테이트를 다뤄야 할 때,
useState 대신 useReducer를 사용하면 코드를 훨씬 깔끔하고 유지보수하기 편하게 만들 수 있다.
- Reducer
복잡한 논리를 단순하게 축소해서 처리하는 행위 ... - Reduce
프로그래밍 분야에서 [입력에 어떤 처리]를 해서 원하는 결과로 [축소시키는 과정]
💡 useReducer를 구성하는 세 가지 요소는 무엇인가?
- 리듀서(Reducer): 스테이트를 업데이트하는 역할
- 디스패치(Dispatch): 리듀서에게 스테이트 업데이트를 요구하는 행위
- 액션(Action): 디스패치에 담기는 요구의 내용
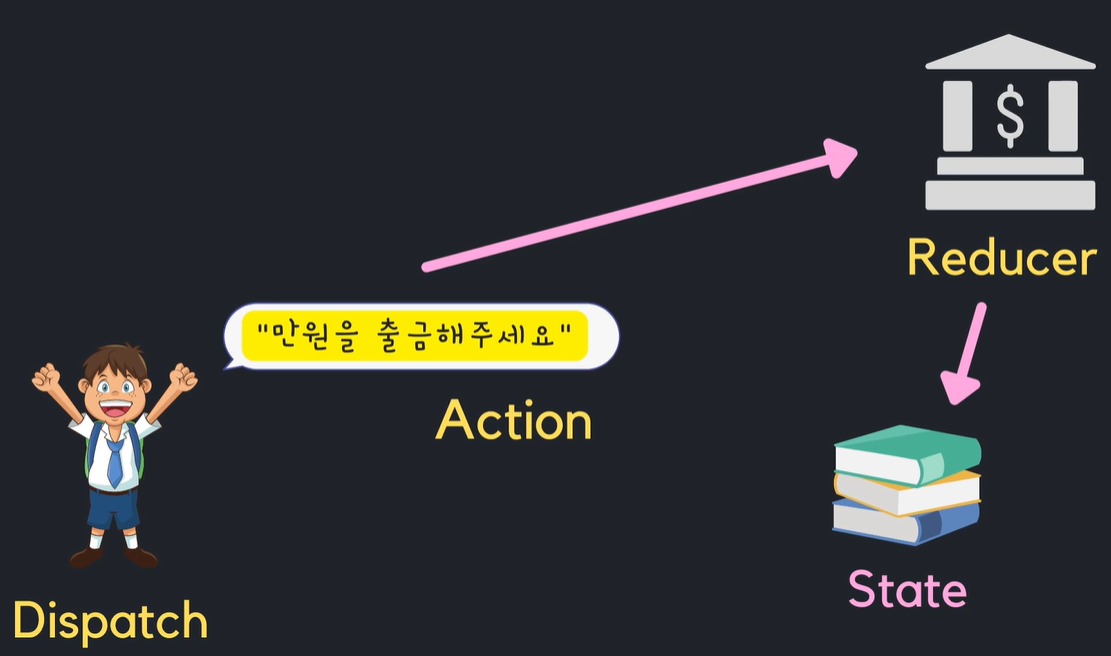
철수가 은행에 가서 1만원 출금을(Action) 요구하면(Dispatch) 계좌에 1만원이 빠져나가는데 거래 내역(state)을 만드는 것은 철수가 아닌 은행(Reducer)이 처리한다.
컴포넌트가 직접 상태를 수정하는 것이 아니라, 요청을 받으면 Reducer가 action의 내역대로 state를 바꾸는 것이다.
기본문법
reducer()는 2가지 인자를 받는다
state : 위에서 선언한 state값 이 들어간다. (초기 값은 당연히 initialState에서 설정한 값)
action : 업데이트를 위한 정보를 가지고 있는 '객체' 즉 위에서 선언한 dispatch라고 생각 (주문서)
function reducer(state, action) {
  switch (action.type) {
    case 'PLUS':
          return state + 1;
    case 'MINUS':
          return state - 1;
    default: return state;
  }
}
예제 코드
import React, { useState, useReducer } from 'react'; // hook import

const Action_Type = {
  DEPOSIT: 'deposit',
  WITHDRAW: 'withdraw'
};

// reducer - state를 업데이트하는 역할 (은행)
// dispatch - state 업데이트를 위한 요구
// action - 요구의 내용
const reducer = (state, action) => {
  console.log('reducer가 일을 합니다.', state, action);

  switch(action.type){
    case Action_Type.DEPOSIT:
      return state + action.payload;
    case Action_Type.WITHDRAW:
      return state - action.payload;
    default:
      return state;
  }
};

function App() {
  const [number, setNumber] = useState(0);
  const [money, dispatch] = useReducer(reducer, 0); // money는 reducer를 통해서만 수정

  return (
    <div>
      <h2>useReducer 은행에 오신것을 환영합니다</h2>
      <p>잔고 : {money}원</p>

      <input
        type="number"
        value={number}
        onChange={(e) => setNumber(parseInt(e.target.value))}
        step="1000"
      />

      <button onClick={() => {
        dispatch({ type: Action_Type.DEPOSIT, payload: number });
      }}>예금</button>

      <button onClick={() => {
        dispatch({ type: Action_Type.WITHDRAW, payload: number });
      }}>출금</button>
    </div>
  );
}

export default App;
리듀서로 스테이츠가 바뀌어도 리랜더링된다.
리듀서는 액션으로 전달받은대로만 state를 업데이트한다.
만약 알수없는 액션이 들어오면 리듀서는 아무일도 하지 않는다.
따라서 예상한대로만 state를 업데이트 할 수 있다. -> 실수를 줄여준다.
Action Type을 상수 객체로 만들어서 깔끔하게 만들었다.
위 예시는 단순해서 usestate를 사용하는 것이 더 좋을 것 같다.
하지만 더 복잡한 state를 다룰 때 reducer를 사용하면 깔끔한 코드관리에 큰 도움이 될 것 이다.
복잡한 스테이트 관리 예제 코드
이번에는 출석부를 만들어보았다. 학생의 이름을 추가하면 하단의 목록과 총 학생수가 표기된다.
이름부분을 한번 더 누르면 이름에 줄이 그어져서 출석여부를 체크할 수 있다.
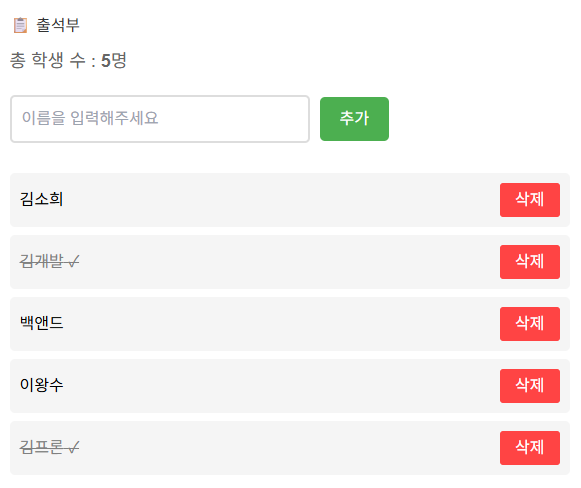
Student.jsx
import React from 'react';

const Student = ({ name, dispatch, id, isHere }) => {
  return (
    <div>
      <span
        onClick={() => {
          dispatch({ type: 'mark-student', payload: { id } });
        }}
        style={{
          textDecoration: isHere ? 'line-through' : 'none',
          color: isHere ? 'gray' : 'black',
          cursor: 'pointer'
        }}
      >
        {name}
      </span>

      <button
        onClick={() => {
          dispatch({ type: 'delete-student', payload: { id } });
        }}
      >
        삭제
      </button>
    </div>
  );
};

export default Student;
App.jsx
import React, { useReducer, useState } from 'react';
import Student from './Student'; // import 꼭!

const reducer = (state, action) => {
  switch (action.type) {
    case 'add-student': {
      const name = action.payload.name;
      const newStudent = {
        id: Date.now(),
        name,
        isHere: false,
      };
      return {
        count: state.count + 1,
        students: [...state.students, newStudent],
      };
    }

    case 'delete-student':
      return {
        count: state.count - 1,
        students: state.students.filter(student => student.id !== action.payload.id),
      };

    case 'mark-student':
      return {
        count: state.count,
        students: state.students.map(student =>
          student.id === action.payload.id
            ? { ...student, isHere: !student.isHere }
            : student
        ),
      };

    default:
      return state;
  }
};

const initialState = {
  count: 0,
  students: [],
};

function App() {
  const [name, setName] = useState('');
  const [studentsInfo, dispatch] = useReducer(reducer, initialState);

  return (
    <div>
      <h1>출석부</h1>
      <p>총 학생 수 : {studentsInfo.count}</p>

      <input
        type="text"
        placeholder="이름을 입력해주세요"
        value={name}
        onChange={(e) => setName(e.target.value)}
      />
      <button onClick={() => {
        dispatch({ type: 'add-student', payload: { name } });
        setName('');
      }}>추가</button>

      {studentsInfo.students.map((student) => {
        return (
          <Student
            key={student.id}   {/* map 시 key 필수 */}
            name={student.name}
            dispatch={dispatch}
            id={student.id}
            isHere={student.isHere}
          />
        );
      })}
    </div>
  );
}

export default App;
map()으로 컴포넌트 반복 렌더링 시에는key값이 반드시 필요하다. (React가 DOM diffing 할 때 필요)- useReducer는 state를 직접 수정하지 않고 action(요구) 을 보내고 reducer(규칙) 가 state를 바꾼다.
- state는 절대 직접 변경하지 않고
return { ...state, 변경내용 }형식으로 새 객체를 반환해야 한다. - 학생 이름을 클릭하면 dispatch가 실행되고 →
mark-studentaction이 reducer에게 전달되어 출석 여부가 토글된다. - reducer는 반드시
switch(action.type)형태로 분기 처리하는 것이 가장 안정적이며 정석적인 구조다. - initialState는 컴포넌트 밖에서 정의하는 것이 일반적이며, 상태 구조가 복잡할 때 특히 유리하다.
W3Schools 예제코드
import { useReducer } from 'react';
import { createRoot } from 'react-dom/client';

const initialScore = [
  {
    id: 1,
    score: 0,
    name: "John",
  },
  {
    id: 2,
    score: 0,
    name: "Sally",
  },
];

const reducer = (state, action) => {
  switch (action.type) {
    case "INCREASE":
      return state.map((player) => {
        if (player.id === action.id) {
          return { ...player, score: player.score + 1 };
        } else {
          return player;
        }
      });
    default:
      return state;
  }
};

function Score() {
  const [score, dispatch] = useReducer(reducer, initialScore);

  const handleIncrease = (player) => {
    dispatch({ type: "INCREASE", id: player.id });
  };

  return (
    <>
      {score.map((player) => (
        <div key={player.id}>
          <label>
            <input
              type="button"
              onClick={() => handleIncrease(player)}
              value={player.name}
            />
            {player.score}
          </label>
        </div>
      ))}
    </>
  );
}

createRoot(document.getElementById('root')).render(
  <Score />
);
컴포넌트가 처음 렌더링될 때, initialScore 라는 배열(John, Sally 두 명의 플레이어 정보)을 useReducer 의 초기값으로 넣어서 상태를 만든다. 이 상태는 score 라는 변수에 들어있고, 상태 변경을 요청하는 함수가 dispatch 이다.
점수를 올리고 싶은 사람이 있을 때는 handleIncrease(player) 를 호출하고, 이 함수는 reducer 에게 dispatch({ type: "INCREASE", id: player.id }) 라고 요청을 보낸다.
그러면 reducer 함수가 실행되고, 현재 state 배열을 map 으로 돌면서 id 가 일치하는 플레이어만 찾아서 그 사람의 score 를 +1 한 새로운 객체를 반환하고, id 가 다른 사람은 원래 그대로 반환한다. 이렇게 해서 변경된 새로운 state 배열이 다시 컴포넌트의 state 로 저장된다.
React 는 변경된 score 값에 맞게 화면을 다시 렌더링하고, 버튼 옆 숫자가 증가한 값으로 화면에 출력된다.
결국 흐름은
버튼 클릭 → dispatch 호출 → reducer 에서 로직 실행 → 해당 플레이어 점수 +1 → React 가 다시 렌더링 → 화면에서 숫자가 올라간다
참고자료