Spring Boot + Spring AI(OpenAI) 를 이용해
로컬에서 업로드한 이미지를 Vision 모델로 분석하는 기능을 구현해보았다.
이미지 파일을 업로드하고, 메시지를 함께 전달하면
서버에서 OpenAI Vision 모델로 분석한 결과를 JSON으로 반환하는 구조다.
UI는 타임리프를 이용하였다.
1. Gradle 설정
Spring AI(OpenAI) Vision 모델을 사용하기 위해서는
spring-ai-starter-model-openai 의존성이 필요하다.
dependencies {
    implementation 'org.springframework.boot:spring-boot-starter-thymeleaf'
    implementation 'org.springframework.boot:spring-boot-starter-web'

    // Spring AI - OpenAI 모델
    implementation 'org.springframework.ai:spring-ai-starter-model-openai'

    compileOnly 'org.projectlombok:lombok'
    developmentOnly 'org.springframework.boot:spring-boot-devtools'
    annotationProcessor 'org.projectlombok:lombok'
}
2. application.properties 설정
OpenAI Key와 파일 업로드 정책을 지정한다.
spring.application.name=spring_AI_6
server.port=8090

spring.ai.openai.api-key=${OPENAI_API_KEY}

# 파일 업로드 설정
spring.servlet.multipart.max-file-size=10MB
spring.servlet.multipart.max-request-size=10MB
3. Thymeleaf 업로드 페이지
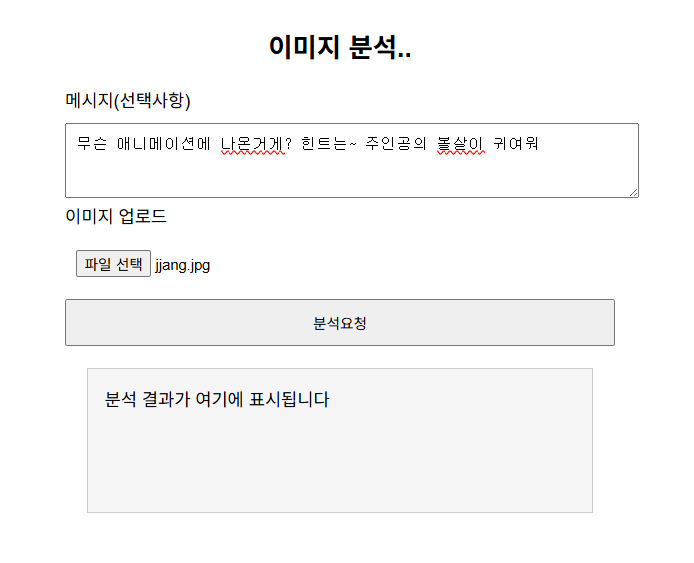
이미지와 텍스트 메시지를 함께 입력할 수 있는 폼을 만든다.
<form id="visionForm"
      enctype="multipart/form-data"
      method="post"
      th:action="@{/upload}">

    <label for="message">메시지(선택사항)</label>
    <textarea rows="3"
              name="message"
              id="message"
        placeholder="이미지에 대해 알고 싶은 내용을 입력하세요..."></textarea>

    <label for="file">이미지 업로드</label>
    <input type="file"
           name="file"
           id="file"
           accept="image/*"
           required="required">

    <button type="submit">분석요청</button>
</form>

<div id="resultBox">분석 결과가 여기에 표시됩니다</div>
여기서는 submit 방식으로 전송하지만,
fetch() ajax로 바꾸면 더 매끄럽게 처리할 수 있다.
4. fetch()로 비동기 분석 요청 보내기
이미지와 텍스트를 함께 보내려면 FormData 를 사용해야 한다.
<script>
document.getElementById("visionForm").addEventListener("submit", async function(e){
    e.preventDefault();

    const formData = new FormData();
    formData.append("file", document.getElementById("file").files[0]);
    formData.append("message", document.getElementById("message").value);

    const response = await fetch("/upload", {
        method: "POST",
        body: formData
    });

    const data = await response.json();
    document.getElementById("resultBox").innerText = data.result || data.error;
});
</script>
5. Vision Controller 구현
Spring AI의 Vision API는 기존 Chat API와 동일한 형태지만
이미지를 전달할 때 media() 를 사용한다.
MultipartFile.getResource() 를 넘기면
Spring AI가 자동으로 Vision 입력으로 처리해 준다.
package kr.or.kosa.controller;

import java.util.HashMap;
import java.util.Map;

import org.springframework.ai.chat.client.ChatClient;
import org.springframework.http.HttpStatus;
import org.springframework.http.ResponseEntity;
import org.springframework.stereotype.Controller;
import org.springframework.util.MimeType;
import org.springframework.web.bind.annotation.GetMapping;
import org.springframework.web.bind.annotation.PostMapping;
import org.springframework.web.bind.annotation.RequestParam;
import org.springframework.web.bind.annotation.ResponseBody;
import org.springframework.web.multipart.MaxUploadSizeExceededException;
import org.springframework.web.multipart.MultipartFile;
import java.util.Objects;

@Controller
public class visionController {
	// ChatClient AI 객체 선언
	private final ChatClient chatClient;

	public visionController(ChatClient.Builder Builder) {
		this.chatClient = Builder.build(); // open AI 연결한 객체의 주소
	}

	@GetMapping
	public String visionPage() {
		return "vision";
	}

	@PostMapping("/upload")
	@ResponseBody
	public ResponseEntity<Map<String, String>> vision(@RequestParam("file") MultipartFile file,
													  @RequestParam("message") String message){
		Map<String, String> response = new HashMap<>();

		try {
			String useMessage = (message == null || message.isEmpty()) ? "이미지 분석해줘" : message;

			//AI 요청
			  String result = chatClient.prompt()
					                    .user(userSpec -> userSpec.text(useMessage)
					                    .media(MimeType.valueOf(
                                        		Objects.requireNonNull(
                                                file.getContentType())),file.getResource()))
					                    .call()
					                    .content();
			  response.put("result", result); //분석 결과
			  System.out.println("결과 result : " + response);

			return ResponseEntity.ok(response);

		} catch(MaxUploadSizeExceededException e) {
			response.put("error", "최대 10MB까지 가능합니다.");
			return ResponseEntity.status(HttpStatus.PAYLOAD_TOO_LARGE).body(response);
		} catch(Exception e) {
			response.put("error", "파일 업로드 중 오류 발생");
			return ResponseEntity.status(HttpStatus.INTERNAL_SERVER_ERROR).body(response);
		}
	}

}
6. 실행 결과
분석 내용은 틀렸지만,
이미지를 기반으로 된 설명을 반환하는 것을 확인할 수 있다.

결과 result : {result=점심으로 김밥을 드신 것 같네요! 다양한 재료가 들어간 맛있는 김밥이군요. 함께 나눠 먹으니 더 맛있을 것 같아요!}
결과 result : {result=이 장면은 애니메이션 "슬램덩크"에 등장하는 캐릭터들로, 이들은 주로 코믹한 장면에서 어울리는 의상을 입고 춤추는 모습으로 유명합니다. 이 애니메이션은 농구를 주제로 한 이야기로, 많은 사랑을 받았습니다.}
결과 result : {result=이 장면은 애니메이션 "유유백서"에서 등장하는 캐릭터들입니다. 이 애니메이션은 액션과 유머가 어우러진 작품으로, 다양한 캐릭터와 스토리를 가지고 있습니다. 주인공의 귀여운 볼살이 특징인 캐릭터도 이 시리즈에 포함되어 있습니다.}
참고자료
책 - 이것이 SPRING AI다

백엔드 개발자의 노트