1. android studio 설치 및 xml에 EditText 및 Button 띄우기
- LinearLayout 을 사용한 xml 꾸미기
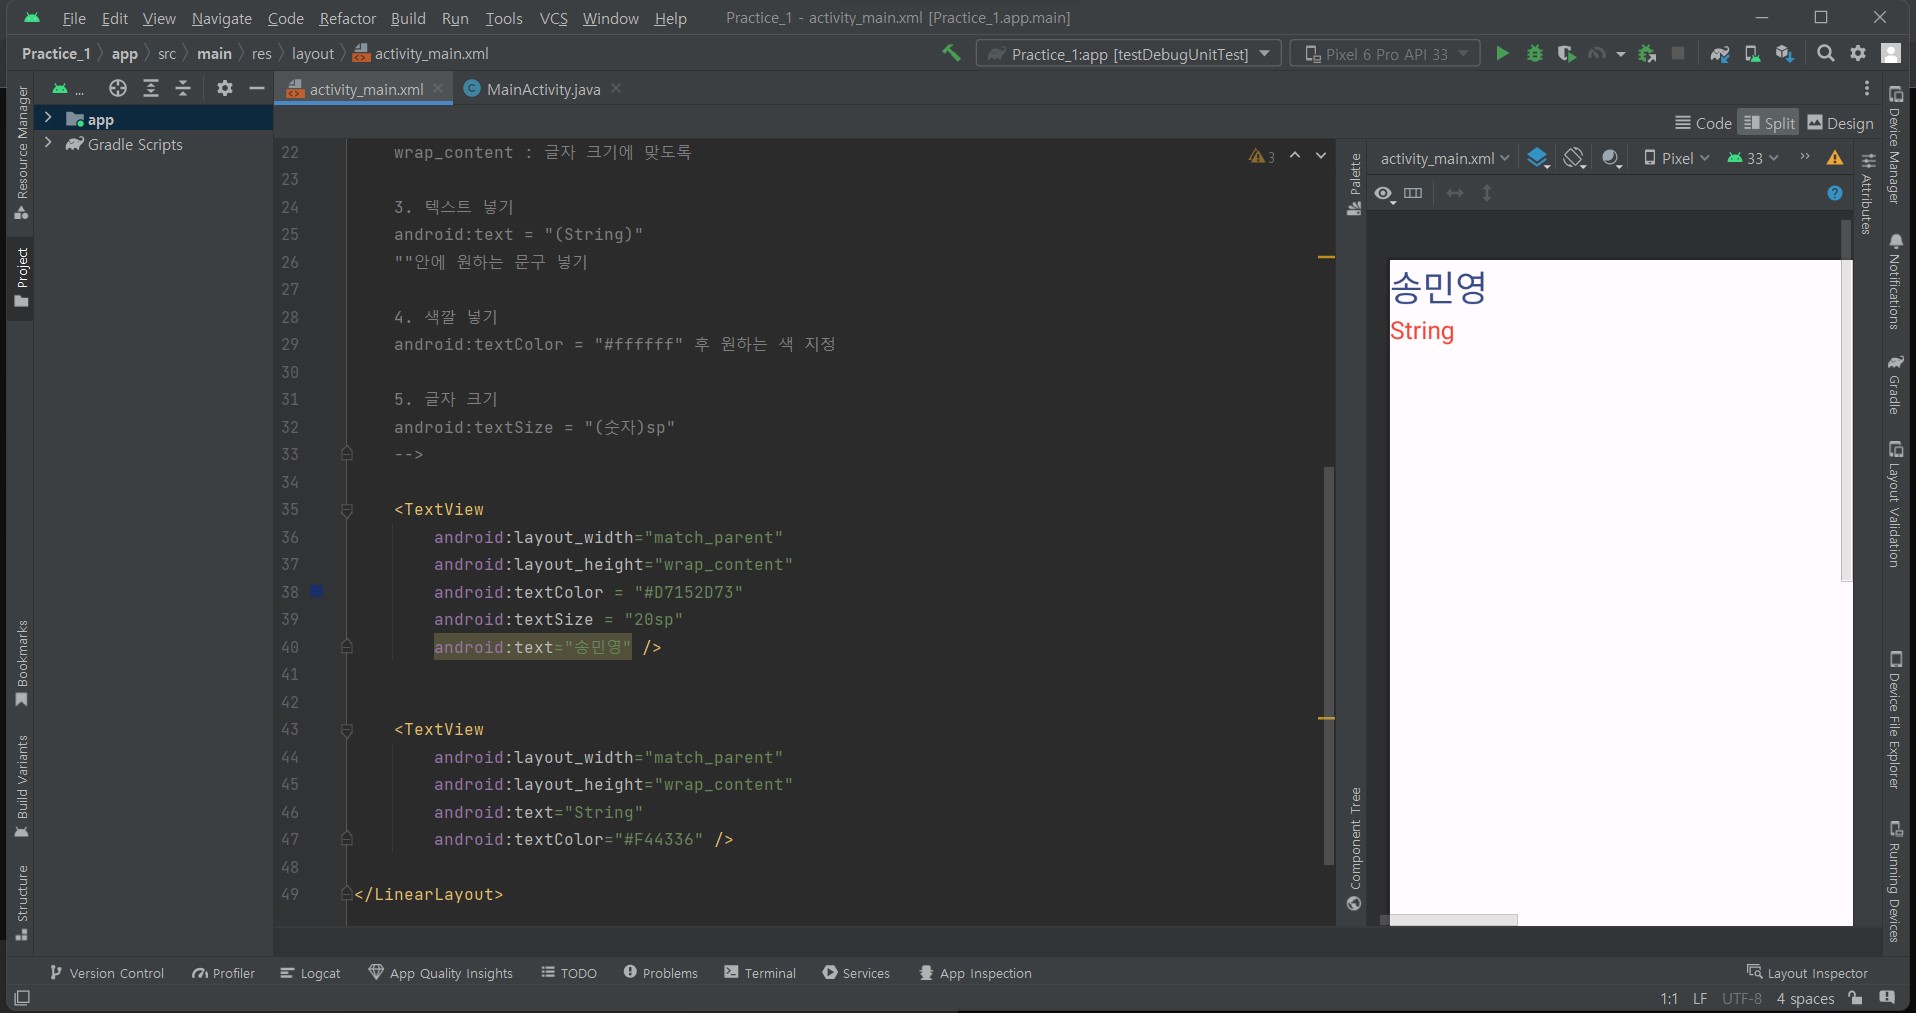
<?xml version="1.0" encoding="utf-8"?>

<!-- LinearLayout는 orientation(나아가야할 방향)을 지정해줘야 함
    -> vertical : 세로로 나아가겠다는 뜻 -->

<LinearLayout xmlns:android="http://schemas.android.com/apk/res/android"
    xmlns:app="http://schemas.android.com/apk/res-auto"
    xmlns:tools="http://schemas.android.com/tools"
    android:layout_width="match_parent"
    android:layout_height="match_parent"
    android:orientation = "vertical"
    tools:context=".MainActivity">


    <!-- 텍스트 (기본)
    1.레이아웃
    레이아웃 : 가로(width) / 세로(height)
           layout_width / layout_height

    2. 가로,세로 길이 정하기
    match_parent : 부모의 가로 또는 세로 길이에 맞도록
    wrap_content : 글자 크기에 맞도록

    3. 텍스트 넣기
    android:text = "(String)"
    ""안에 원하는 문구 넣기

    4. 색깔 넣기
    android:textColor = "#ffffff" 후 원하는 색 지정

    5. 글자 크기
    android:textSize = "(숫자)sp"
    -->

    <TextView
        android:layout_width="match_parent"
        android:layout_height="wrap_content"
        android:textColor = "#D7152D73"
        android:textSize = "20sp"
        android:text="송민영" />


    <TextView
        android:layout_width="match_parent"
        android:layout_height="wrap_content"
        android:text="String"
        android:textColor="#F44336" />

</LinearLayout>- constraintLayout 을 사용한 xml 꾸미기
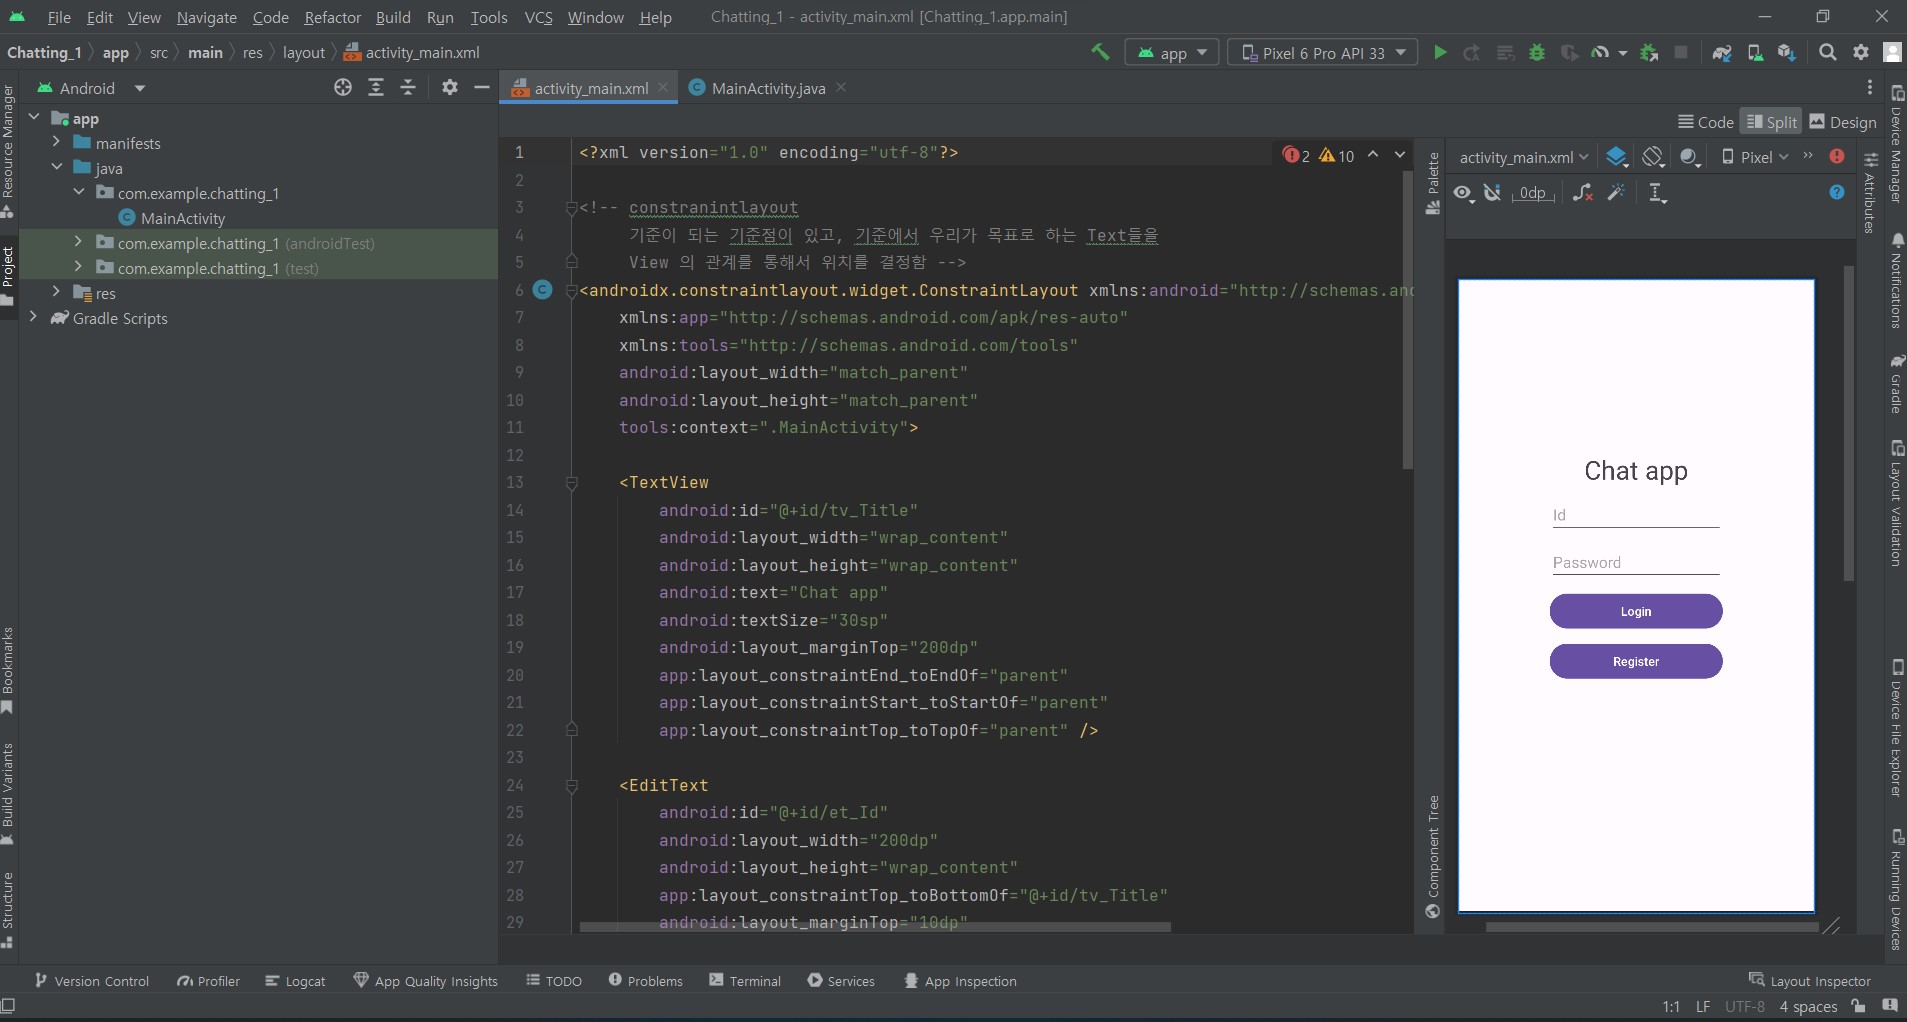
<?xml version="1.0" encoding="utf-8"?>

<!-- constranintlayout
     기준이 되는 기준점이 있고, 기준에서 우리가 목표로 하는 Text들을
     View 의 관계를 통해서 위치를 결정함 -->
<androidx.constraintlayout.widget.ConstraintLayout xmlns:android="http://schemas.android.com/apk/res/android"
    xmlns:app="http://schemas.android.com/apk/res-auto"
    xmlns:tools="http://schemas.android.com/tools"
    android:layout_width="match_parent"
    android:layout_height="match_parent"
    tools:context=".MainActivity">

    <TextView
        android:id="@+id/tv_Title"
        android:layout_width="wrap_content"
        android:layout_height="wrap_content"
        android:text="Chat app"
        android:textSize="30sp"
        android:layout_marginTop="200dp"
        app:layout_constraintEnd_toEndOf="parent"
        app:layout_constraintStart_toStartOf="parent"
        app:layout_constraintTop_toTopOf="parent" />

    <EditText
        android:id="@+id/et_Id"
        android:layout_width="200dp"
        android:layout_height="wrap_content"
        app:layout_constraintTop_toBottomOf="@+id/tv_Title"
        android:layout_marginTop="10dp"
        app:layout_constraintStart_toStartOf="parent"
        app:layout_constraintEnd_toEndOf="parent"
        android:hint="Id"
        />

    <EditText
        android:id="@+id/et_Password"
        android:layout_width="200dp"
        android:layout_height="wrap_content"
        app:layout_constraintTop_toBottomOf="@+id/et_Id"
        android:layout_marginTop="10dp"
        app:layout_constraintStart_toStartOf="parent"
        app:layout_constraintEnd_toEndOf="parent"
        android:hint="Password"
        />

    <Button
        android:id="@+id/btn_login"
        android:layout_width="200dp"
        android:layout_height="wrap_content"
        app:layout_constraintTop_toBottomOf="@+id/et_Password"
        android:layout_marginTop="10dp"
        app:layout_constraintStart_toStartOf="parent"
        app:layout_constraintEnd_toEndOf="parent"
        android:text="Login"
        />

    <Button
        android:id="@+id/btn_register"
        android:layout_width="200dp"
        android:layout_height="wrap_content"
        app:layout_constraintTop_toBottomOf="@+id/btn_login"
        android:layout_marginTop="10dp"
        app:layout_constraintStart_toStartOf="parent"
        app:layout_constraintEnd_toEndOf="parent"
        android:text="Register"
        />

</androidx.constraintlayout.widget.ConstraintLayout>
참고자료 :
https://www.youtube.com/watch?v=P8MxuR24HFw&feature=youtu.be
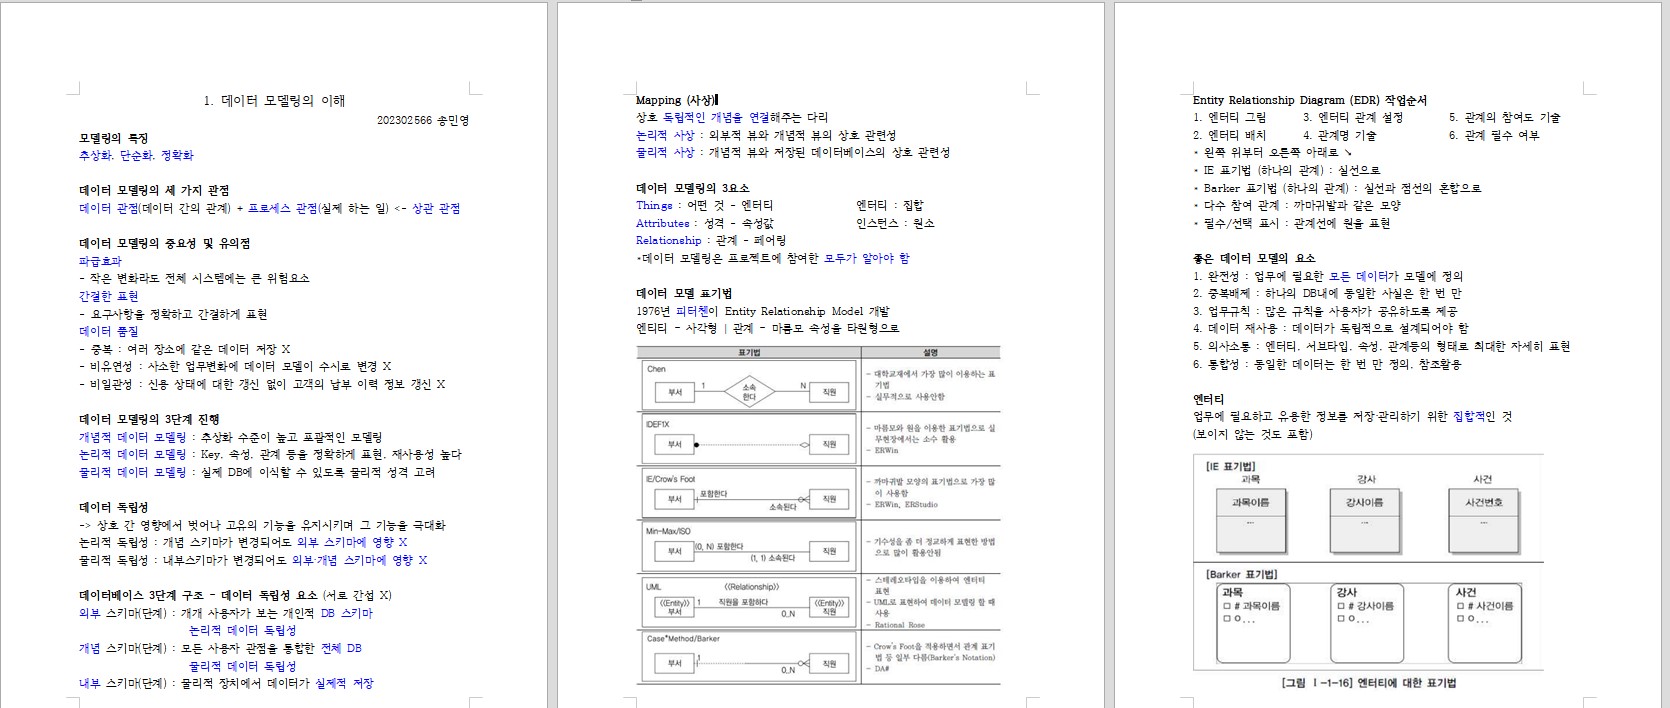
2. SQLD 1-1 데이터 모델링의 이해 공부하기
<중요 내용 요약>
데이터 모델링의 중요성 및 유의점
파급효과
-작은 변화라도 전체 시스템에는 큰 위험요소
간결한 표현
-요구사항을 정확하고 간결하게 표현
데이터 품질
-중복 : 여러 장소에 같은 데이터 저장 X
-비유연성 : 사소한 업무변화에 데이터 모델이 수시로 변경 X
-비일관성 : 신용 상태에 대한 갱신 없이 고객의 납부 이력 정보 갱신 X
데이터베이스 3단계 구조 – 데이터 독립성 요소 (서로 간섭 X)
외부 스키마(단계) : 개개 사용자가 보는 개인적 DB 스키마
논리적 데이터 독립성
개념 스키마(단계) : 모든 사용자 관점을 통합한 전체 DB
물리적 데이터 독립성
내부 스키마(단계) : 물리적 장치에서 데이터가 실제적 저장
좋은 데이터 모델의 요소
1. 완전성 : 업무에 필요한 모든 데이터가 모델에 정의
2. 중복배제 : 하나의 DB내에 동일한 사실은 한 번 만
3. 업무규칙 : 많은 규칙을 사용자가 공유하도록 제공
4. 데이터 재사용 : 데이터가 독립적으로 설계되어야 함
5. 의사소통 : 엔터티, 서브타입, 속성, 관계등의 형태로 최대한 자세히 표현
6. 통합성 : 동일한 데이터는 한 번 만 정의, 참조활용
출처 :
https://ongbike.tistory.com/364#%EC%-A%A-%EC%-A%A-%EB%A-%-C%EC%--%-D%EC%--%B-%EC%--%AC%EB%B-%--

컴퓨터융합학부