1. android studio 각 xml 및 Sign Up 만들기
1) activity_main.xml 작업하기
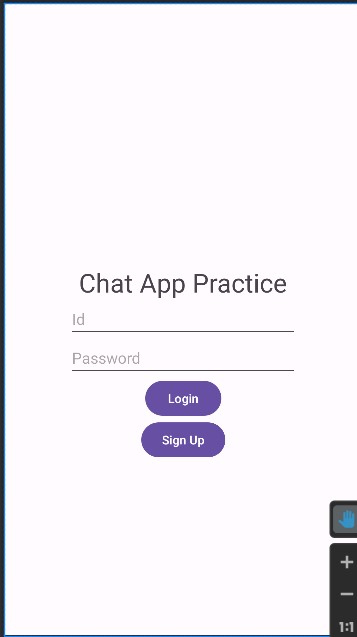
activity_main.xml의 모습
MainActivity.java에서 구현해야 할 목표
1. Login 버튼을 통해 id, password를 Firebase와 비교하여 맞을 경우 activity_chat.xml로 넘어가고, 틀릴 경우는 그대로 있도록 한다.
2. Sign Up 버튼을 통해 activity_register.xml로 넘어간다.
<!-- activity_main.xml 코드 -->


<?xml version="1.0" encoding="utf-8" ?>
<androidx.constraintlayout.widget.ConstraintLayout xmlns:android="http://schemas.android.com/apk/res/android"
    xmlns:app="http://schemas.android.com/apk/res-auto"
    xmlns:tools="http://schemas.android.com/tools"
    android:layout_width="match_parent"
    android:layout_height="match_parent"
    tools:context=".MainActivity" >


    <!-- Chat App Practice 텍스트 띄우기 -->
    <TextView
        android:id="@+id/tv_chat"
        android:layout_width="wrap_content"
        android:layout_height="wrap_content"
        android:text="Chat App Practice"
        android:textSize="30sp"
        app:layout_constraintBottom_toTopOf="@+id/et_id"
        app:layout_constraintStart_toStartOf="parent"
        app:layout_constraintEnd_toEndOf="parent"/>


    <!-- id 쓰는 칸 만들기 (inputType : Email) -->
    <EditText
        android:id="@+id/et_id"
        android:layout_width="40mm"
        android:layout_height="wrap_content"
        app:layout_constraintBottom_toBottomOf="parent"
        app:layout_constraintEnd_toEndOf="parent"
        app:layout_constraintStart_toStartOf="parent"
        app:layout_constraintTop_toTopOf="parent"
        android:hint="Id"
        android:inputType="textEmailAddress"/>


    <!-- Password 쓰는 칸 만들기 (inputType : Password) -->
    <EditText
        android:id="@+id/et_password"
        android:layout_width="40mm"
        android:layout_height="wrap_content"
        app:layout_constraintTop_toBottomOf="@+id/et_id"
        app:layout_constraintStart_toStartOf="parent"
        app:layout_constraintEnd_toEndOf="parent"
        android:hint="Password"
        android:inputType="textPassword"/>

    <!-- Login 버튼 -->
    <Button
        android:id="@+id/btn_login"
        android:layout_width="wrap_content"
        android:layout_height="wrap_content"
        android:text="Login"
        app:layout_constraintTop_toBottomOf="@+id/et_password"
        app:layout_constraintStart_toStartOf="parent"
        app:layout_constraintEnd_toEndOf="parent" />

    <!-- Sign Up 버튼 -->
    <Button
        android:id="@+id/btn_register"
        android:layout_width="wrap_content"
        android:layout_height="wrap_content"
        android:text="Sign Up"
        app:layout_constraintTop_toBottomOf="@id/btn_login"
        app:layout_constraintStart_toStartOf="parent"
        app:layout_constraintEnd_toEndOf="parent" />


</androidx.constraintlayout.widget.ConstraintLayout>
2) activity_register.xml 작업하기
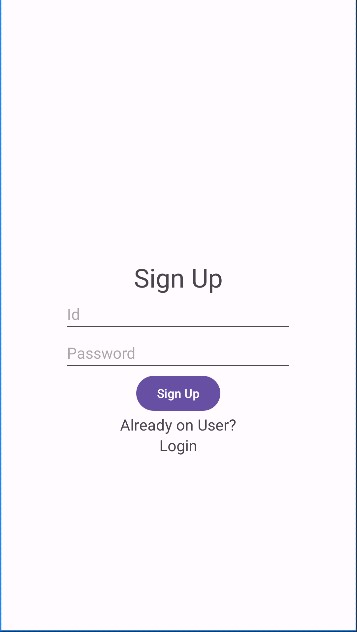
activity_register.xml의 모습
RegisterActivity.java에서 구현해야 할 목표
1. Login 텍스트를 통해 activity_main.xml로 넘어간다.
2. Sign Up 버튼을 통해 회원가입 형식과 맞을 경우 Firebase에 저장 후 activity_main.xml로 넘어가고, 형식과 틀릴 경우 틀린 이유를 출력한다.
<!-- activity_register.xml 코드-->


<?xml version="1.0" encoding="utf-8"?>
<androidx.constraintlayout.widget.ConstraintLayout xmlns:android="http://schemas.android.com/apk/res/android"
    xmlns:app="http://schemas.android.com/apk/res-auto"
    xmlns:tools="http://schemas.android.com/tools"
    android:layout_width="match_parent"
    android:layout_height="match_parent"
    tools:context=".RegisterActivity">

    <!-- Sign Up 텍스트 띄우기 -->
    <TextView
        android:id="@+id/tv_SignUp"
        android:layout_width="wrap_content"
        android:layout_height="wrap_content"
        android:text="Sign Up"
        android:textSize="30sp"
        app:layout_constraintBottom_toTopOf="@+id/et_registerId"
        app:layout_constraintStart_toStartOf="parent"
        app:layout_constraintEnd_toEndOf="parent"/>


    <!-- id 쓰는 칸 만들기 (inputType : Email) -->
    <EditText
        android:id="@+id/et_registerId"
        android:layout_width="40mm"
        android:layout_height="wrap_content"
        app:layout_constraintBottom_toBottomOf="parent"
        app:layout_constraintEnd_toEndOf="parent"
        app:layout_constraintStart_toStartOf="parent"
        app:layout_constraintTop_toTopOf="parent"
        android:hint="Id"
        android:inputType="textEmailAddress"/>


    <!-- Password 쓰는 칸 만들기 (inputType : Password) -->
    <EditText
        android:id="@+id/et_RegisterPassword"
        android:layout_width="40mm"
        android:layout_height="wrap_content"
        app:layout_constraintTop_toBottomOf="@+id/et_registerId"
        app:layout_constraintStart_toStartOf="parent"
        app:layout_constraintEnd_toEndOf="parent"
        android:hint="Password"
        android:inputType="textPassword"/>

    <!-- Login 버튼 -->
    <Button
        android:id="@+id/btn_SignUp"
        android:layout_width="wrap_content"
        android:layout_height="wrap_content"
        android:text="Sign Up"
        app:layout_constraintTop_toBottomOf="@+id/et_RegisterPassword"
        app:layout_constraintStart_toStartOf="parent"
        app:layout_constraintEnd_toEndOf="parent" />

    <TextView
        android:id="@+id/tv_returnText"
        android:layout_width="wrap_content"
        android:layout_height="wrap_content"
        android:text="Already on User?"
        android:textSize="18dp"
        app:layout_constraintTop_toBottomOf="@id/btn_SignUp"
        app:layout_constraintStart_toStartOf="parent"
        app:layout_constraintEnd_toEndOf="parent"/>

    <TextView
        android:id="@+id/tv_returnLogin"
        android:layout_width="wrap_content"
        android:layout_height="wrap_content"
        android:text="Login"
        android:textSize="18dp"
        app:layout_constraintTop_toBottomOf="@id/tv_returnText"
        app:layout_constraintStart_toStartOf="parent"
        app:layout_constraintEnd_toEndOf="parent"/>

</androidx.constraintlayout.widget.ConstraintLayout>
3) activity_chat.xml 작업하기
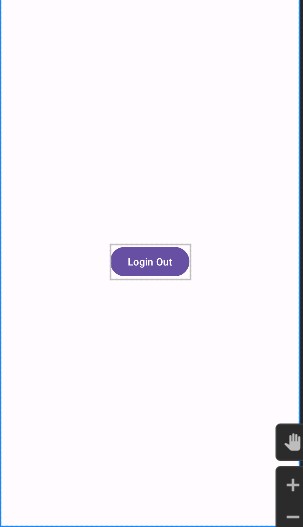
activity_chat.xml의 모습
ChatActivity.java에서 구현해야 할 목표
1. Login Out 버튼을 통해 로그아웃 후 activitiy_main.xml로 넘어간다.
2. 나머지 기능들은 다음 시간에..
<!-- activity_main.xml 코드 -->


<?xml version="1.0" encoding="utf-8"?>
<androidx.constraintlayout.widget.ConstraintLayout xmlns:android="http://schemas.android.com/apk/res/android"
    xmlns:app="http://schemas.android.com/apk/res-auto"
    xmlns:tools="http://schemas.android.com/tools"
    android:layout_width="match_parent"
    android:layout_height="match_parent"
    tools:context=".ChatActivity">


    <!-- Login out 버튼 -->
    <Button
        android:id="@+id/btn_loginOut"
        android:layout_width="wrap_content"
        android:layout_height="wrap_content"
        android:text="Login Out"
        app:layout_constraintTop_toTopOf="parent"
        app:layout_constraintBottom_toBottomOf="parent"
        app:layout_constraintStart_toStartOf="parent"
        app:layout_constraintEnd_toEndOf="parent" />

</androidx.constraintlayout.widget.ConstraintLayout>
4) RegisterActivity.java 작업하기
RegisterActivity.java에서 구현해야 할 목표
1. Login 텍스트를 통해 activity_main.xml로 넘어간다.
2. Sign Up 버튼을 통해 회원가입 형식과 맞을 경우 Firebase에 저장 후 activity_main.xml로 넘어가고, 형식과 틀릴 경우 회원가입을 할 수 없는 이유를 출력한다.
package com.example.firebase_practice;

import androidx.annotation.NonNull;
import androidx.appcompat.app.AppCompatActivity;

import android.content.Intent;
import android.os.Bundle;
import android.view.View;
import android.widget.Button;
import android.widget.EditText;
import android.widget.TextView;
import android.widget.Toast;

import com.google.android.gms.tasks.OnCompleteListener;
import com.google.android.gms.tasks.Task;
import com.google.firebase.auth.AuthResult;
import com.google.firebase.auth.FirebaseAuth;

/* RegisterActivity에서 구현해야 할 것
1. FireBase와 연동하여 회원가입 할 것
2. Sign Up 버튼을 눌러 다시 MainActivity (로그인 창)로 넘어갈 것
3. 이미 계정이 있어 MainActivtiy로 넘어갈 것 */

public class RegisterActivity extends AppCompatActivity {

    // (1) Firebase Authentication (사용자 및 인증 관리) 가져오기
    private FirebaseAuth auth;
    private EditText et_RegisterId, et_RegisterPassword;
    private Button btn_SignUp;

    // (3) TextView의 tv_returnLogin 변수 선언
    private TextView tv_returnLogin;

    @Override
    protected void onCreate(Bundle savedInstanceState) {
        super.onCreate(savedInstanceState);
        setContentView(R.layout.activity_register);


        // (1) Firebase에서 인스턴스 가져오기
        auth = FirebaseAuth.getInstance();
        // (1) 각 변수에 맞는 id 저장하기
        et_RegisterId = findViewById(R.id.et_registerId);
        et_RegisterPassword = findViewById(R.id.et_RegisterPassword);
        btn_SignUp = findViewById(R.id.btn_SignUp);

        // (1) btn_SignUp 버튼을 클릭 했을 때
        btn_SignUp.setOnClickListener(new View.OnClickListener() {
            @Override
            public void onClick(View v) {

                // (1) 각 변수에 EditText에서 적었던 내용을 String 형으로 바꾸어서 텍스트를 가져옴
                // getText() : 텍스트를 가져옴
                // toString : String 형으로 바꿈
                // trim() : 앞 뒤 공백 문자를 제거함
                String email = et_RegisterId.getText().toString().trim();
                String pass = et_RegisterPassword.getText().toString().trim();


                // Sign Up 하는 알고리즘
                if(email.isEmpty()){
                    // 사용자의 회원정보를 FireBase에 저장하기 전, id를 검사하는 알고리즘
                    et_RegisterId.setError("Email cannot be empty");
                }
                if(pass.isEmpty()){
                    // 사용자의 회원정보를 FireBase에 저장하기 전, password를 검사하는 알고리즘
                    et_RegisterPassword.setError("Password cannot be empty");
                }

                // (1) id나 password가 정상일 때, 회원정보를 생성하는 알고리즘
                else{
                    // (1) auth의 createUserWithEmailAndPassword({id},{password}) 메서드를 이용하여 생성할 id와 password를 저장하고,
                    // (1) addOnCompleteListener 를 사용하여 Firebase에 추가함
                    // (1)                                                                                       AuthResult 생성
                    auth.createUserWithEmailAndPassword(email,pass).addOnCompleteListener(new OnCompleteListener<AuthResult>() {
                        @Override
                        // (1)                          task 생성 <AuthResult>
                        public void onComplete(@NonNull Task<AuthResult> task) {

                            // task가 성공할 때의 알고리즘
                            if(task.isSuccessful()) {

                                // (1) 성공했다는 텍스트 띄우기
                                Toast.makeText(RegisterActivity.this, "Sign Up Successful", Toast.LENGTH_SHORT).show();
                                // (2) Intent 객체를 사용하여 MainAcitvity로 이동하기
                                startActivity(new Intent(RegisterActivity.this, MainActivity.class));
                            }
                            else{
                                // (1) 실패했다는 텍스트와 예외 발생 이유까지 같이 띄우기
                                Toast.makeText(RegisterActivity.this,"Sign Up failed" + task.getException().getMessage(), Toast.LENGTH_SHORT).show();
                            }

                        }
                    });
                }


            }
        });

        // (3) activity_register 의 id값 불러오기
        tv_returnLogin = findViewById(R.id.tv_returnLogin);

        // (3) MainActivity로 이동하기
        tv_returnLogin.setOnClickListener(new View.OnClickListener() {
            @Override
            public void onClick(View v) {
                startActivity(new Intent(RegisterActivity.this, MainActivity.class));
            }
        });


    }
}
참고자료 :
https://www.youtube.com/watch?v=TStttJRAPhE&ab_channel=AndroidKnowledge
2. SQLD 2-1 SQL 기본
<중요 내용 요약>
SQLD - 테이블 생성(1)


생성할 테이블 기틀

<topic>
id 	title 	description 	created(year)
---------------------------------------------
1 	ORACLE	ORACLE is ...	2019-7-29
2	MySQL	(NULL)		2013-6-30
3	MSSQL	MSSQL is...	2019-9-19


// 테이블 생성 키워드
// CREATE TABLE {name} ();
CREATE TABLE topic(

	// {name} {data type} {NULL/NOT NULL},

	// NUMBER : 숫자만
	id NUMBER NOT NULL,

	// VARCHAR2({NUMBER}) : 가변 문자열 (숫자까지)
 	title VARCHAR2(50) NOT NULL,
	description VARCHAR(4000) NULL,

	// DATE : ORACLE에서 제공하는 data 타입
	created DATE NOT NULL

);


SELECT *
	FROM topic;

// 칼럼  추가
INSERT INTO topic

	// 칼럼 추가할 목록
	(id, title, description, created)

	// 구체적으로 값을 넣어주겠다는 키워드
	VALUES

	// 값 추가			  현재
	(1, 'ORACLE', 'ORALCLE is ...', SYSDATE);

INSERT INTO topic

	(id, title, description, created)
	VALUES
	(2, 'MySQL', '', SYSDATE);


INSERT INTO topic

	(id, title, description, created)
	VALUES
	(3, 'MSSQL', 'MSSQL is ...', SYSDATE);


SQLD - 조회하기(1)


// 가져올 행 키워드 : SELECT
// * : 모두
// FROM {Table name}
SELECT * FROM topic;


// 컬럼을 제한하는 방법
SELECT (id/title/description/created) FROM topic;

ex) SELECT id, title FROM topic;
-> id와 title 칼럼만 보여줌


// value에 해당하는 column인 행만 가져오기
SELECT * FROM {table} WHERE {column} = {value};

// id가 1인 행만 가져옴
ex) SELECT * FROM topic WHERE id = 1;

// id가 1보다 큰 행만 가져옴
ex) SELECT * FROM topic WHERE id > 1;


// 칼럼 제한 + 행 가져오기
SELECT (id/title/description/created)
	FROM topic WHERE {column} = {value};


SQLD - 출력 형식 바꾸기(1)

<정렬 - ORDER 키워드>
Ascend : ASC
Descend : DESC

//  ORDER {칼럼} DESC : {칼럼}을 기준으로 정렬함 (내림차순)
// ORDER {칼럼} ASC : {칼럼} 을 기준으로 정렬함 (올림차순)

ex) SELECT * FROM topic ORDER BY id DESC;
ex) SELECT * FROM topic ORDER BY title ASC;


*SQLD - 조회하기(2)


// SELECT * FROM {table} OFFSET {index} ROWS;
// {index} 이후부터 행을 출력함 (index 포함)

ex) SELECT * FROM topic OFFSET 1 ROWS;
// topic 테이블에서 index가 1 이상부터 행을 출력함

(출력결과)

id 	title 	description 	created(year)
---------------------------------------------

2	MySQL	(NULL)		2013-6-30
3	MSSQL	MSSQL is...	2019-9-19


// SELECT * FROM {table}
	OFFSET {index} ROWS
	FETCH NEXT {num} ROWS ONLY;
// {index}를 포함한 그 이상부터 {num}개의 행을 출력함

ex) SELECT * FROM topic
	OFFSET 1 ROWS
	FETCH NEXT 1 ROWS ONLY;
// topic 테이블에서 index가 1 이상부터의 행을 1개만 출력함

(출력결과)

id 	title 	description 	created(year)
---------------------------------------------

2	MySQL	(NULL)		2013-6-30

컴퓨터융합학부