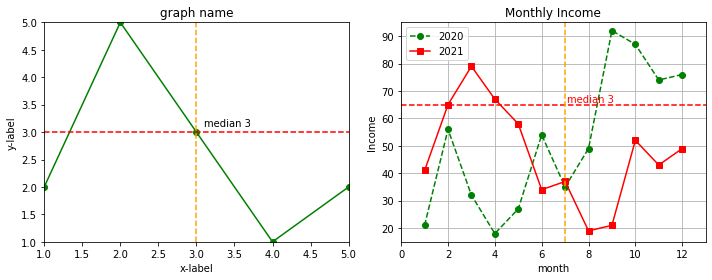
라이브러리 불러오기
- pyplot은 plt로 쓰는 게 국룰이다.
import matplotlib.pyplot as pltpyplot을 이용한 시각화
- 딕셔너리와 리스트 형태의 데이터들을 시각화할 수 있다.
x=[1,2,3,4,5]
y=[2,5,3,1,2]
dict1={'v1': [1,2,3,4,5], 'v2': [2,5,3,1,2]}

# 크기 조절
plt.figure(figsize=(10,4))
plt.subplot(1, 2, 1)

#타이틀
plt.xlabel('x-label') # X축 레이블 추가
plt.ylabel('y-label') # Y축 레이블 추가
plt.title('graph name') #타이틀

# 스타일 조정 : [color][marker][linestyle] # 순서 상관없음
plt.plot(x, y, 'go-')

#축 범위 조정하기
plt.xlim(1, 5)
plt.ylim(1, 5)

# 기준선 - 여러 개 추가 가능
plt.axhline(3, color='red', linestyle='--')
plt.axvline(3, color='orange', linestyle='--')

# 텍스트 표시
plt.text(3.1, 3.1, 'median 3') # (x좌표, y좌표, '표시할 텍스트')
# color='r' 색 지정도 가능


##
# 하나의 그래프에 여러 그래프 겹쳐 그리기
plt.subplot(1, 2, 2)

dict1 = {'x':[1,2,3,4,5,6,7,8,9,10,11,12],
         'y1':[21,56,32,18,27,54,35,49,92,87,74,76],
         'y2':[41,65,79,67,58,34,37,19,21,52,43,49]}

# 스타일 조정 : [color][marker][linestyle] # 순서 상관없음
plt.plot('x', 'y1', 'go--', data=dict1, label='2020')  # label속성으로 이름 지정 가능
plt.plot('x', 'y2', 'rs-', data=dict1, label='2021')

plt.xlabel('month')
plt.ylabel('Income')
plt.title('Monthly Income')

plt.legend()  # 범례 추가 - plot()에 label속성 필요 / 리스트 형태로 파라미터에 label값 주기
plt.grid()  # 그리드

# 축 범위 조정하기
plt.xlim(0, 13)
plt.ylim(15, 95)

# 기준선 - 여러 개 추가 가능
plt.axhline(65, color='red', linestyle='--')
plt.axvline(7, color='orange', linestyle='--')

# 텍스트 표시
plt.text(7.1, 66, 'median 3', color='r') # (x좌표, y좌표, '표시할 텍스트')
# color='r' 색 지정도 가능

plt.tight_layout()  #그래프 간 간격 적절히 맞추기
plt.show()

plt.savefig('file_name') # 'file_name'명으로 파일로 저장 # 기본 형식은 png
스타일 조정 : [color][marker][linestyle]
-
순서 상관없음
-
The following format string characters are accepted to control the line style or marker:
| character | description |
|---|---|
| '-' | solid line style |
| '--' | dashed line style |
| '-.' | dash-dot line style |
| ':' | dotted line style |
| '.' | point marker |
| ',' | pixel marker |
| 'o' | circle marker |
| 'v' | triangle_down marker |
| '^' | triangle_up marker |
| '<' | triangle_left marker |
| '>' | triangle_right marker |
| '1' | tri_down marker |
| '2' | tri_up marker |
| '3' | tri_left marker |
| '4' | tri_right marker |
| 's' | square marker |
| 'p' | pentagon marker |
| '*' | star marker |
| 'h' | hexagon1 marker |
| 'H' | hexagon2 marker |
| '+' | plus marker |
| 'x' | x marker |
| 'D' | diamond marker |
| 'd' | thin_diamond marker |
| ' | ' |
| '_' | hline marker |
- The following color abbreviations are supported:
| character | color |
|---|---|
| ‘b’ | blue |
| ‘g’ | green |
| ‘r’ | red |
| ‘c’ | cyan |
| ‘m’ | magenta |
| ‘y’ | yellow |
| ‘k’ | black |
| ‘w’ | white |
출처: https://matplotlib.org/2.1.2/api/_as_gen/matplotlib.pyplot.plot.html
