많이 물어보는 질문이나 상담사 연결이 어려울 때 많이 사용되는 챗봇에 대해 구현 방법이 궁금해서 클로바 챗봇 API를 사용해보았습니다.
CLOVA API를 이용하려면 이용 신청을 해야하는데 하는 과정에서 API Gateway 연동을 해야합니다.
https://guide.ncloud-docs.com/docs/chatbot-chatbot-5-1
링크에 설명이 나와있습니다.
이용 신청에 대한 자세한 내용은 https://chucoding.tistory.com/124 여기에 자세히 설명되어 있습니다.
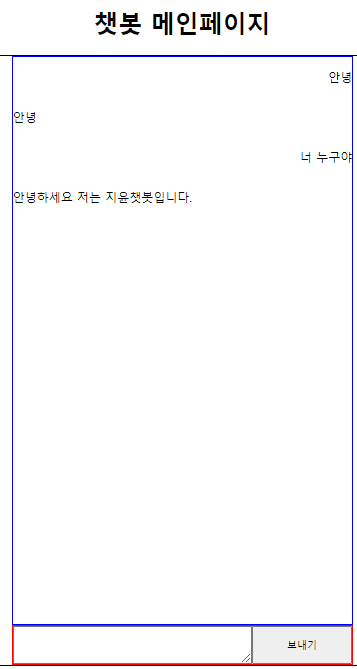
보여지는 화면에 대해서는 간단한 html과 css로 만들었고 질문을 했을 때 어떻게 답변이 오고가는지에 대해 알아보았습니다.
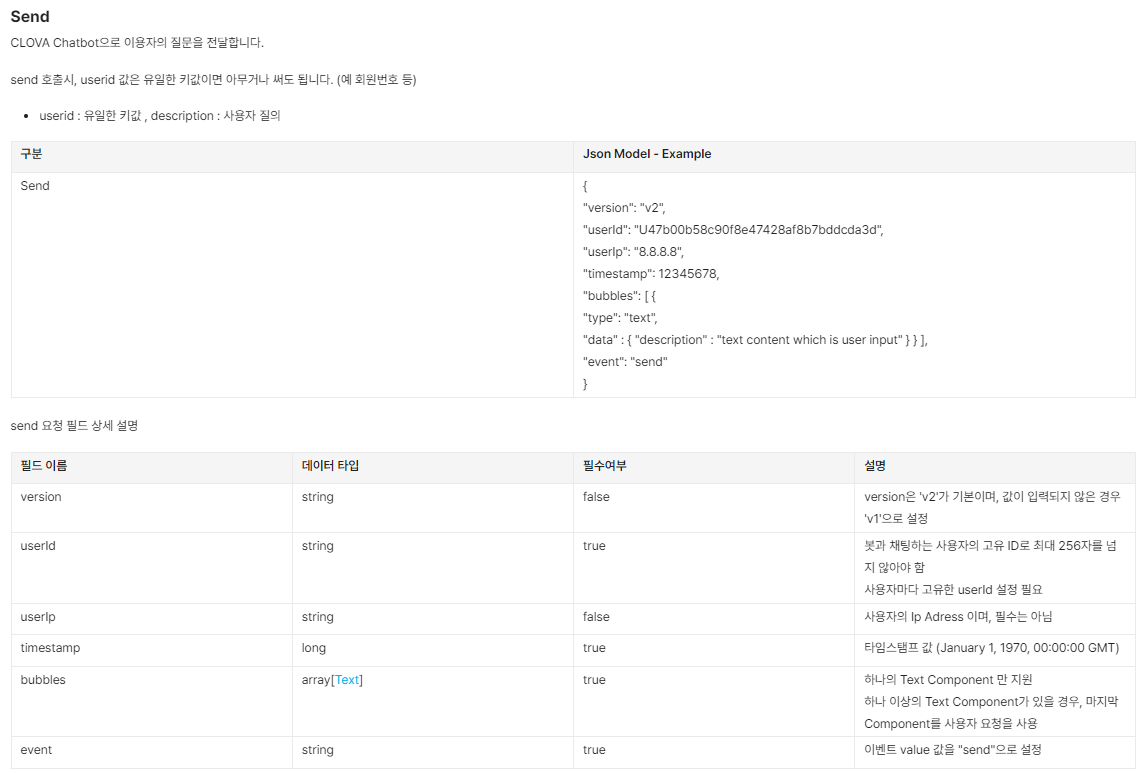
https://api.ncloud-docs.com/docs/ai-application-service-chatbot-chatbot
이 url에 접속하면 Custom 채널에서 CLOVA Chatbot으로 요청을 보내는 방법이 나와있는데 HTTP METHOD를 이용하여 POST 요청을 보내고 챗봇에 메시지를 보낼 때 보내는 형식에 대해 설명이 나와있습니다.
이걸 토대로 js에서 controller로 요청을 보낸 코드입니다.
console.log("chatbot.js 연결 확인");

// textarea에 적은 내용 가져오기
const inputChatting = document.getElementById("inputChatting");

// 보내기 버튼 가져오기
const sendBtn = document.getElementById("send");

// 보내기 버튼 클릭 시
sendBtn.addEventListener("click", e => {

    // textArea에 아무것도 입력 안 했을 경우
    if(inputChatting.value.trim().length == 0) {
        alert("채팅을 입력해주세요.");
        inputChatting.value = "";
        return;
    }

    const ul = document.querySelector("#display-chatting");
    // textArea에 질문을 입력했을 경우
    const li = document.createElement("li");
    li.classList.add("my-chat");
    const p = document.createElement("p");
    p.classList.add("chat");
    p.innerText = inputChatting.value;

    li.append(p);
    ul.append(li);

    const requestBody = {
        version: "v2",
        userId: "user1234", // 유일한 키값 입력해야함.
        timestamp: Date.now(),
        bubbles: [
            {
                type: "text",
                data: {
                    description: inputChatting.value
                }
            }
        ],
        event: "send"
    };

    console.log("Sending request body:", JSON.stringify(requestBody)); // 보낼 데이터를 확인

    // 입력된 값이 있을 때 비동기 요청
    fetch("/chatbot/question", {
        method : "POST",
        headers : {"Content-Type" : "application/json"},
        body : JSON.stringify(requestBody)
    })
    .then(resp => resp.json())
    .then(result => {
        const description = result.bubbles[0].data.description;
        console.log("챗봇의 답변 : ", description);

        // 챗봇 답변 쌓을 부분
        const li = document.createElement("li");
        li.classList.add("chatbotAnswer");
        const p = document.createElement("p");
        p.classList.add("chat");
        p.innerText = description;

        li.append(p);
        ul.append(li);

        inputChatting.value = "";
    })

})
html 화면에서 textarea 창에 입력을 받아 send 버튼으로 보내기 요청을 할 수 있도록 js를 작성하였습니다. li 태그로 대화를 쌓아서 css로 보낸 대화와 받은 답변을 처리하였습니다.
보낼 때마다 POST로 비동기 요청을 보내고 controller에서 받아서 처리하는 코드를 적었습니다.
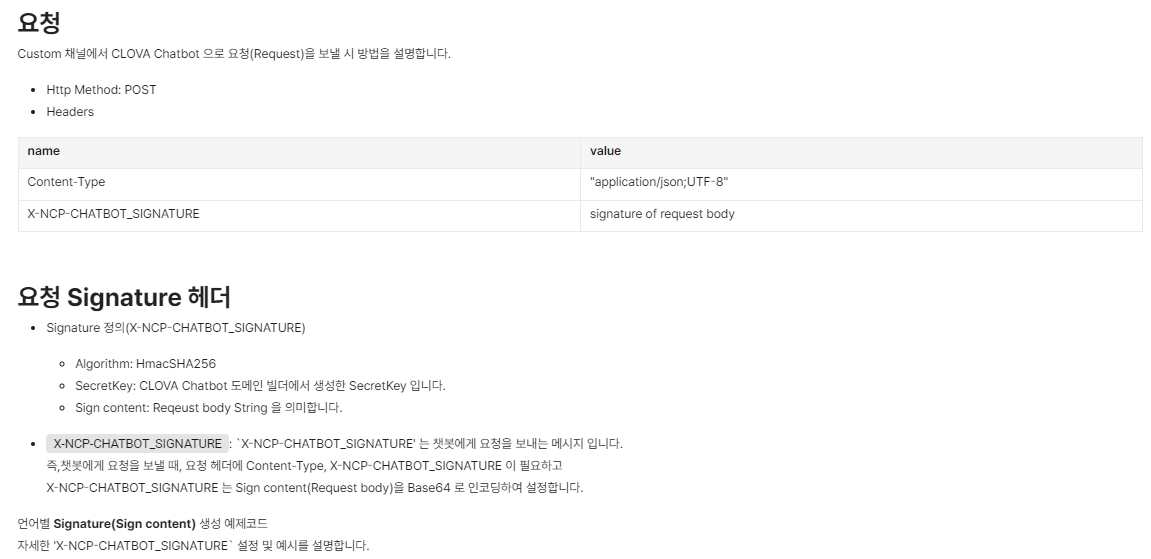

요청 Signature 헤더를 함수로 생성하여 아래와 같이 코드를 작성하였습니다.
    // 서명 생성 함수 (HMAC-SHA256 사용)
    private String makeSignature(String requestBody, String secretKey) throws Exception {
        SecretKeySpec signingKey = new SecretKeySpec(secretKey.getBytes("UTF-8"), "HmacSHA256");
        Mac mac = Mac.getInstance("HmacSHA256");
        mac.init(signingKey);

        byte[] rawHmac = mac.doFinal(requestBody.getBytes("UTF-8"));
        // Java 기본 Base64 클래스를 사용해 인코딩
        return Base64.getEncoder().encodeToString(rawHmac);
    }
위에서 만든 함수를 1번에서 호출하여 값을 담아주었습니다.
SecretKey와 invoke URL은 챗봇 이용 신청을 해서 받을 수 있는 키이고 저는 config.properties 파일에 값을 숨겨두었습니다.
package com.test.project.chatbot.controller;

import java.util.Base64;

import javax.crypto.Mac;
import javax.crypto.spec.SecretKeySpec;

import org.springframework.beans.factory.annotation.Value;
import org.springframework.context.annotation.PropertySource;
import org.springframework.http.HttpEntity;
import org.springframework.http.HttpHeaders;
import org.springframework.http.HttpMethod;
import org.springframework.http.ResponseEntity;
import org.springframework.stereotype.Controller;
import org.springframework.web.bind.annotation.GetMapping;
import org.springframework.web.bind.annotation.PostMapping;
import org.springframework.web.bind.annotation.RequestBody;
import org.springframework.web.bind.annotation.RequestMapping;
import org.springframework.web.bind.annotation.ResponseBody;
import org.springframework.web.client.RestTemplate;

import lombok.extern.slf4j.Slf4j;

// chatbot 사용시 config.properties 에서 Secret Key, Invoke URL 가져와서 쓸 거
@PropertySource("classpath:/config.properties")
@Controller
@RequestMapping("chatbot")
@Slf4j
public class ChatbotController {

	// lombok 아니고 springFramework
	// ${} 으로 가져와야 함.
	@Value("${my.chatbot.invoke.url}")
	private String invokeUrl;

	@Value("${my.chatbot.Secret.key}")
	private String secretKey;

	@GetMapping("chatbotMain")
	public String chatbotMain() {
		return "chatbot/chatbotMain";
	}

    @PostMapping("/question")
    @ResponseBody
    public String sendQuestionToChatbot(@RequestBody String requestBody) {

        try {

        	log.info("Received Request Body: " + requestBody);
            // 1. 요청 본문을 기반으로 서명 생성
            String signature = makeSignature(requestBody, secretKey);

            // 2. HttpHeaders 설정
            HttpHeaders headers = new HttpHeaders();
            headers.set("Content-Type", "application/json");
            headers.set("X-NCP-CHATBOT_SIGNATURE", signature);

            // 3. 요청 본문과 헤더를 함께 요청 객체로 생성
            HttpEntity<String> entity = new HttpEntity<>(requestBody, headers);

            // 4. RestTemplate을 사용해 API 호출
            RestTemplate restTemplate = new RestTemplate();
            ResponseEntity<String> response = restTemplate.exchange(invokeUrl, HttpMethod.POST, entity, String.class);

            // 5. 응답 처리
            return response.getBody();
        } catch (Exception e) {
            e.printStackTrace();
            log.error("Chatbot API 호출 중 error 발생", e);
            return "CLOVA Chatbot API Error : " + e.getMessage();
        }
    }
}
클로버 챗봇 대화 생성을 많이 해서 많은 질문에 정확한 답변이 오게 작성해줘야하고 빌드해서 테스트를 한 다음 서비스 배포를 해서 사용하면 간단하게 사용할 수 있는 챗봇 api였습니다.