위임 필터 및 필터 빈 초기화
DelegatingFilterProxy
서블릿 필터에서 서블릿 필터를 구현한 스프링 빈에게 요청을 위임해주는 대리자 역할의 서블릿 필터이다.
스프링 시큐리티는 모든 요청에 대한 인증 및 인가와 같은 보안 처리를 필터 기반으로 처리하고 있는데, 필터에서도 스프링의 기술(스프링 빈)을 사용하고 싶은 요구사항이 있다.
이를 충족하기 위해 스프링에서도 스프링 빈을 만들어 서블릿 필터로 빈을 구현했는데, 이 스프링 빈이 springSecurityFilterChain이다. 하지만, 서블릿 필터에선 스프링 빈들을 주입하거나 사용할 수 없는데, 이러한 필터와 빈을 연결해줄 수 있는 클래스가 DelegatingFilterProxy이다. 이 클래스는 서블릿 필터인데, 요청을 받아서 스프링에게 관리하는 필터에게 요청을 위임하는 역할을 하고 있다.
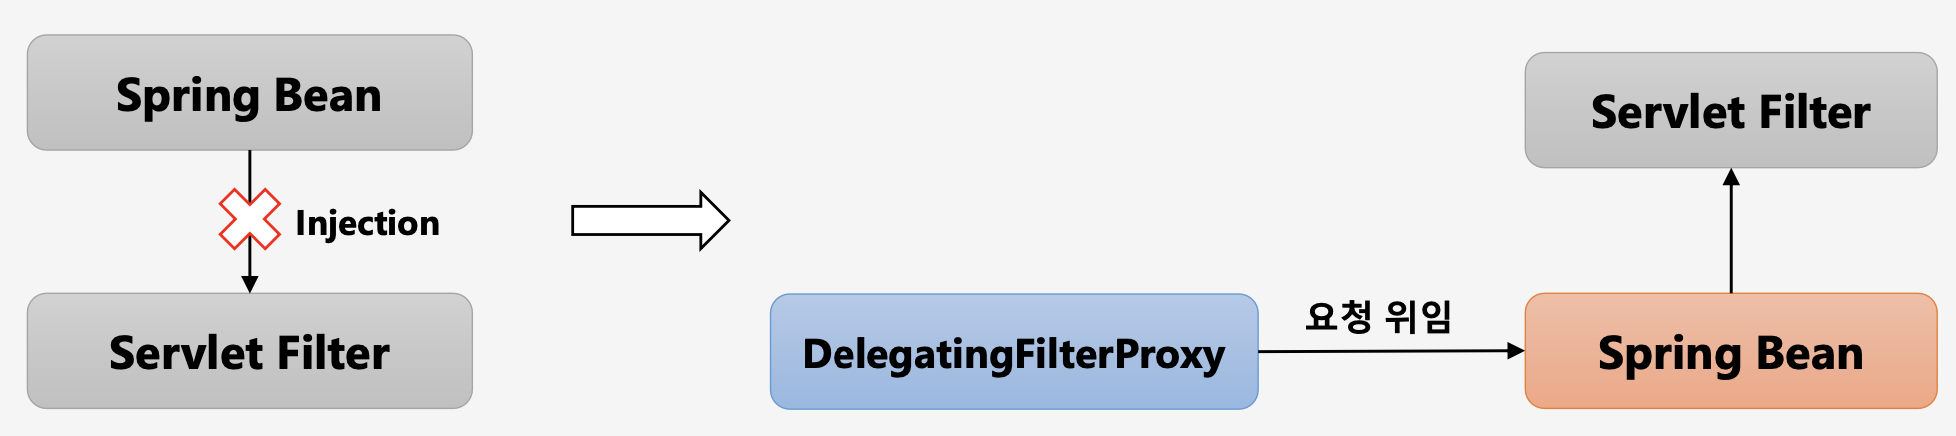
- 서블릿 필터는 스프링에서 정의된 빈을 주입해서 사용할 수 없다.
→ Spring Bean은 스프링 컨테이너에서 생성 및 관리하는 컴포넌트들이고, ServletFilter는 서블릿 컨테이너에서 생성 및 관리하는 필터들이기 때문에 서로 실행되는 위치가 다르기 때문이다. 하지만, 서블릿 필터와 스프링 빈 간에 호출하고 사용해야 하는 경우가 생기는 데, 이 때 서블릿 필터는DelegatingFilterProxy클래스를 사용해서 스프링 빈에게 요청을 위임하고 그 결과 스프링 빈에서 구현한 서블릿 필터를 이용해 책임을 수행하게 된다. - 특정한 이름을 가진 스프링 빈을 찾아 그 빈에게 요청을 위임한다.
→springSecurityFilterChain이름으로 생성된 빈을ApplicationContext에서 찾아 요청을 위임한다.
→ 실제 보안 처리를 하진 않는다.
FilterChainProxy
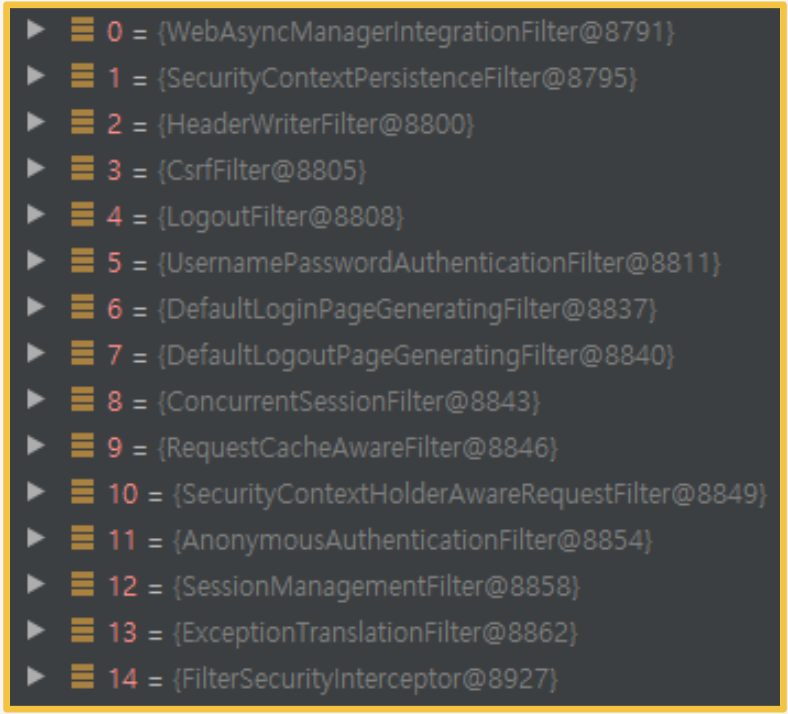
FilterChainProxy는 각 필터들을 순서대로 호출하며 인증/인가처리 및 각종 요청에 대한 처리를 수행한다.springSecurityFilterChain의 이름으로 생성되는 필터 빈DelegatingFilterProxy로 부터 요청을 위임 받고 실제 보안 처리- 스프링 시큐리티 초기화 시 생성되는 필터들을 관리하고 제어
- 스프링 시큐리티가 기본적으로 생성하는 필터
- 설정 클래스에서 API 추가 시 생성되는 필터
- 사용자의 요청을 필터 순서대로 호출하여 전달
- 사용자 정의 필터를 생성해서 기존의 필터 전, 후로 추가 가능
- 필터의 순서를 잘 정의
- 마지막 필터까지 인증 및 인가 예외가 발생하지 않으면 보안 통과
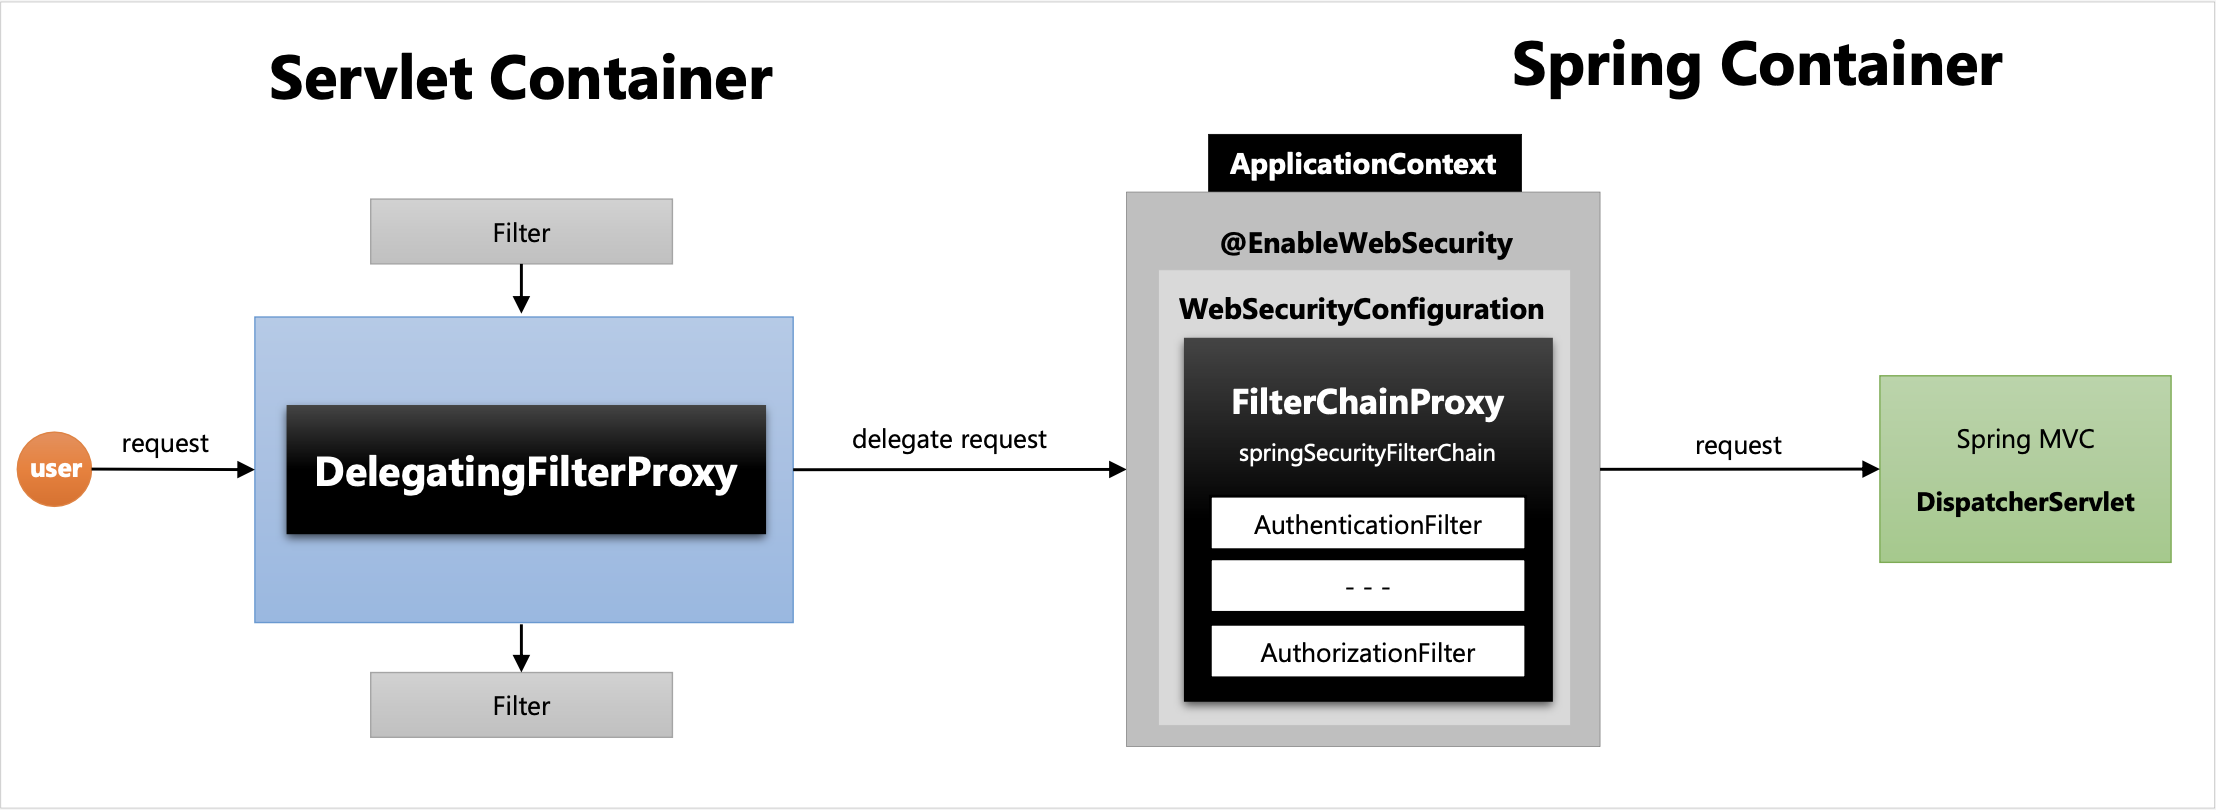
서블릿 컨테이너에서 스프링 컨테이너로 DelegatingFilterProxy 필터를 이용해 요청을 위임하는 flow는 위 그림과 같다.
- 사용자가 자원 요청
- Servlet Container의 필터들이 처리를 하게되고 그 중
DelegatingFilterProxy가 요청을 받게 될 경우 자신이 요청받은 요청 객체를 delegate request로 요청 위임을 한다. - 요청 객체는 특정한 필터(
springSecurityFilterChain)에서 받게 된다.
→DelegatingFilterProxy가 필터로 등록될 때springSecurityFilterChain동일한 이름으로 등록하여 내부적으로 해당 이름을 가진 객체를 찾는 것.
→springSecurityFilterChain필터를 가지고 있는 빈(Bean)이FilterChainProxy이다. FilterChainProxy에서는 자신이 가진 각각의 필터들을 차례대로 수행하며 보안 처리를 수행한다.- 보안처리가 완료되면 최종 자원에 요청을 전달하여 다음 로직이 수행된다.
필터 초기화와 다중 보안 설정
스프링 시큐리티에선 보안 설정을 단일 설정이 아닌 여러 개의 설정을 만들어서 동시에 사용할 수 있다.

- 설정클래스 별로 보안 기능이 각각 작동
- 설정클래스 별로
RequestMatcher설정http.antMatcher("/admin/**")
- 설정클래스 별로 필터가 생성
FilterChainProxy가 각 필터들을 가지고 있음- 요청에 따라
RequestMatcher와 매칭되는 필터가 작동하도록 함
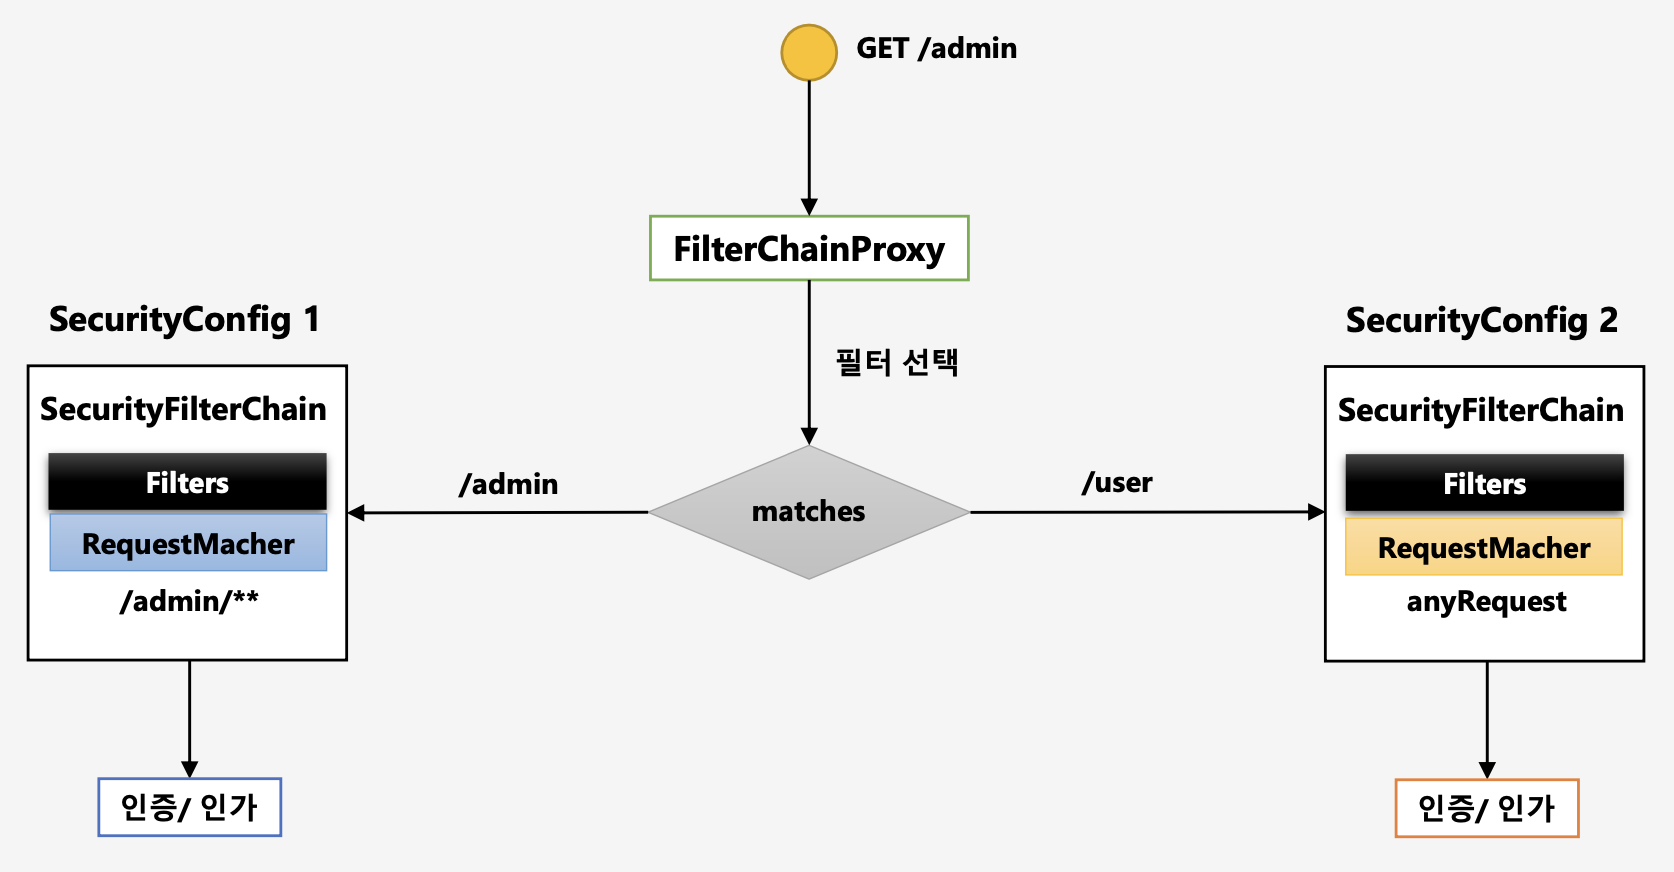
GET방식으로/admin주소로 자원 요청FilterChainProxy에서 요청을 받아 요청을 처리할 필터를 선택- 요청 URL과 matches를 하여 true가 되는 Filter를 선택한다.
- 일치하는 객체의 필터를 수행하여 인증/인가 처리를 한다.
@Configuration
@EnableWebSecurity
public class SecurityConfig extends WebSecurityConfigurerAdapter {

    protected void configure(HttpSecurity http) throws Exception {
        http
        		.antMatcher("/admin/**")
                .authorizeRequests()
                .anyRequest().authenticated()
            .and()
            	.httpBasic();
    }
}

@Configuration
@Order(1)
class SecurityConfig2 extends WebSecurityConfigurerAdapter {

    protected void configure(HttpSecurity http) throws Exception {
        http
                .authorizeRequests()
                .anyRequest().permitAll()
            .and()
            	.httpLogin();
    }
}
@Order 애노테이션도 순서를 잘 정해서 선언해줘야 한다. 그 이유는 접근 권한 검사 부분에서 좁은 범위부터 설정을 해야 하는 이유와 동일하다. 넓은 범위부터 검사해버리면 통과했을 경우 좁은 범위의 접근 권한을 검사하지 않기 때문에 그 결과 자원 접근을 막지 못하게 된다.
인증 개념 이해 - Authentication
당신이 누구인지 증명하는 것
- 사용자의 인증 정보를 저장하는 토큰 개념
- 인증 시 id와 password를 담고 인증 검증을 위해 전달되어 사용된다.
- 인증 후 최종 인증 결과(user 객체, 권한정보)를 담고
SecurityContext에 저장되어 전역적으로 참조가 가능하다.Authentication authentication = SecurityContextHolder.getContext().getAuthentication()
- 구조
1)principal: 사용자 아이디 혹은 User 객체를 저장
2)credentials: 사용자 비밀번호
3)authorities: 인증된 사용자의 권한 목록
4)details: 인증 부가 정보
5)Authenticated: 인증 여부(boolean)
Flow
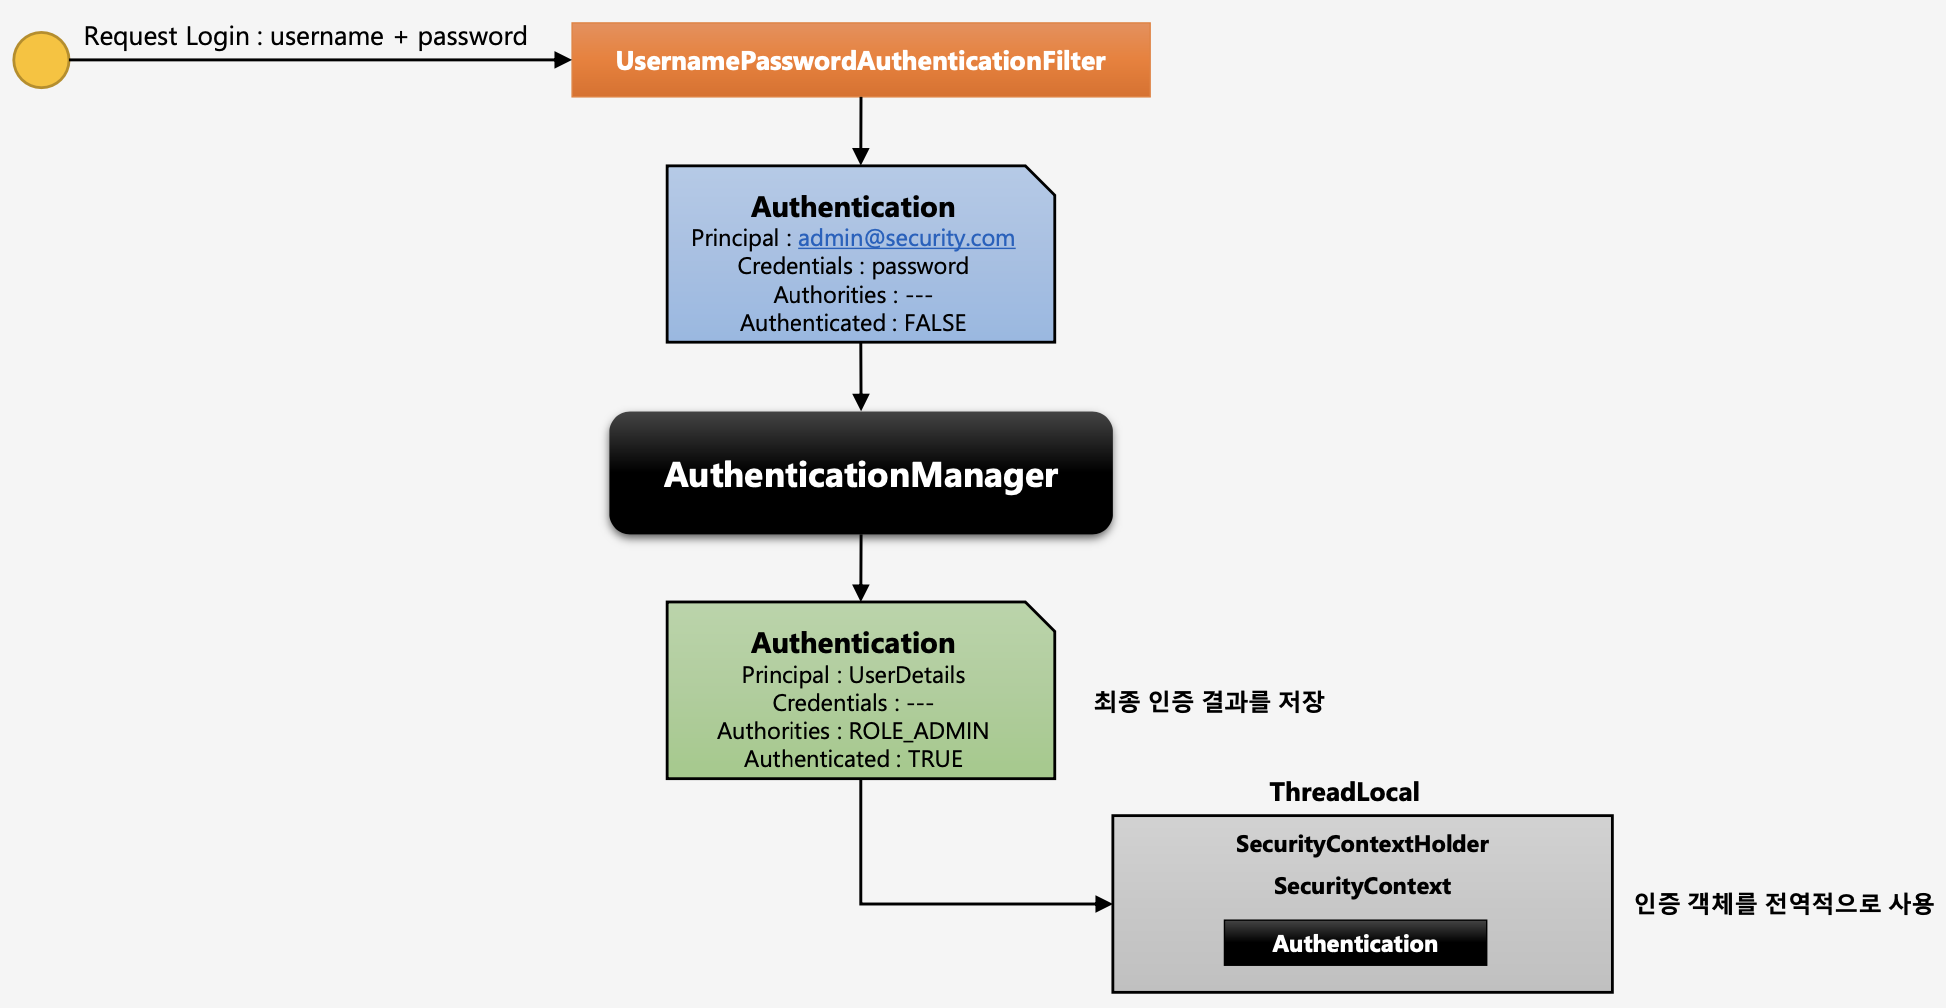
- 사용자가 로그인을 시도(username, password 입력 및 전달)
UsernamePasswordAuthenticationFilter(인증 필터) 가 요청 정보를 받아 정보 추출 뒤 인증 객체(Authentication) 생성AuthenticationManager가 인증 객체를 가지고 인증 처리를 수행한다.
→ 인증 실패시 예외 발생- 인증 성공 후
Authentication인증 객체를 만들어서 내부의Principal,Credentials,Authorities,Authenticated들을 채워 넣는다. SecurityContextHolder객체 안의SecurityContext에 저장한다.
→ 인증 객체를 전역적으로 사용할 수 있게 된다.
📌 사용자별
Authentication인증 객체를 어떻게 구분하는가?
위 그림에 나온바와 같이SecurityContextHolder라는 전역 객체 안에SecurityContext에 인증 객체를 저장한다.SecurityContextHolder는 ThreadLocal에 저장되기 때문에 각기 다른 쓰레드 별로 다른SecurityContextHolder인스턴스를 가지고 있어서 사용자 별로 각기 다른 인증 객체를 가질 수 있다.
📌 참고! -
UserDetails
UserDetails를 단순하게 생각하면, Spring Security를 사용하기 위해 필요한 것들과 데이터베이스와의 어댑터라고 생각하면 된다. OAuth2 방식이나 JWT 방식에서 User 엔티티와의 flow에 있어 개인적으론 어디에 왜 사용되는지 이해가 안됐었는데, 이번 포스팅을 하기 위해 구글링을 하던 도중 간단하게 이해해버렸다.
인증 저장소 - SecurityContextHolder, SecurityContext
SecurityContextHolder
Authentication객체가 저장되는 보관소로 필요 시 언제든지Authentication객체를 꺼내어 쓸 수 있도록 제공되는 클래스ThreadLocal에 저장되어 아무 곳에서나 참조가 가능하도록 설계함- 인증이 완료되면
HttpSession에 저장되어 애플리케이션 전반에 걸쳐 전역적인 참조가 가능하다.
SecurityContext
SecurityContext객체 저장 방식MODE_THREADLOCAL: 스레드당SecurityContext객체를 할당. 기본값MODE_INHERITABLETHREADLOCAL: 메인 스레드와 자식 스레드에 관하여 동일한SecurityContext를 유지MODE_GLOBAL: 응용 프로그램에서 단 하나의 SecurityContext를 저장한다.
Authentication authentication = SecurityContextHolder.getContext().getAuthentication()
Flow

- 사용자가 Login 시도
- 서버가 요청을 받아서 Thread를 생성(ThreadLocal 할당)
- Thread가 인증 처리 시도 → 인증 객체(
Authentication) 생성 - (인증 실패)
SecurityContextHolder.clearContext()인증 객체 초기화 - (인증 성공)
SecurityContextHolder안의SecurityContext에 인증 객체 저장
→ThreadLocal이SecurityContextHolder를 담고 있는 것이다. SecurityContext에서 최종적으로HttpSession에 저장 된다.
→SPRING_SECURITY_CONTEXT라는 이름으로 저장됨.
@RestController
public class SecurityController {

    @GetMapping("/")
    public String index(HttpSession session) {

        // authentication, authentication1의 내용은 결과적으로 같다.
        Authentication authentication =
        	SecurityContextHolder.getContext().getAuthentication();
        SecurityContext context =
        	(SecurityContext) session.getAttribute(
            	HttpSessionSecurityContextRepository.SPRING_SECURITY_CONTEXT_KEY);
        Authentication authentication1 = context.getAuthentication();

        return "home";
    }

    // 위 요청 매핑과 SecurityContext가 공유되지 않는다.
    // 서로 다른 ThreadLocal
    @GetMapping("/thread")
    public String thread() {
        new Thread(
        	new Runnable() {
            	@Override
                public void run() {
                	Authentication authentication =
                    	SecurityContextHolder.getContext().getAuthentication();
                }
            }
        ).start();
        return "thread";
    }
}MODE_INHERITABLETHREADLOCAL전략 사용 시 SecurityContext가 공유된다.
protected void configure(HttpSecurity http) throws Exception {
http
.authorizeRequests()
.anyRequest().permitAll()
.and()
.formLogin();
SecurityContextHolder.setStrategyName(SecurityContextHolder.MODE_INHERITABLETHREADLOCAL);
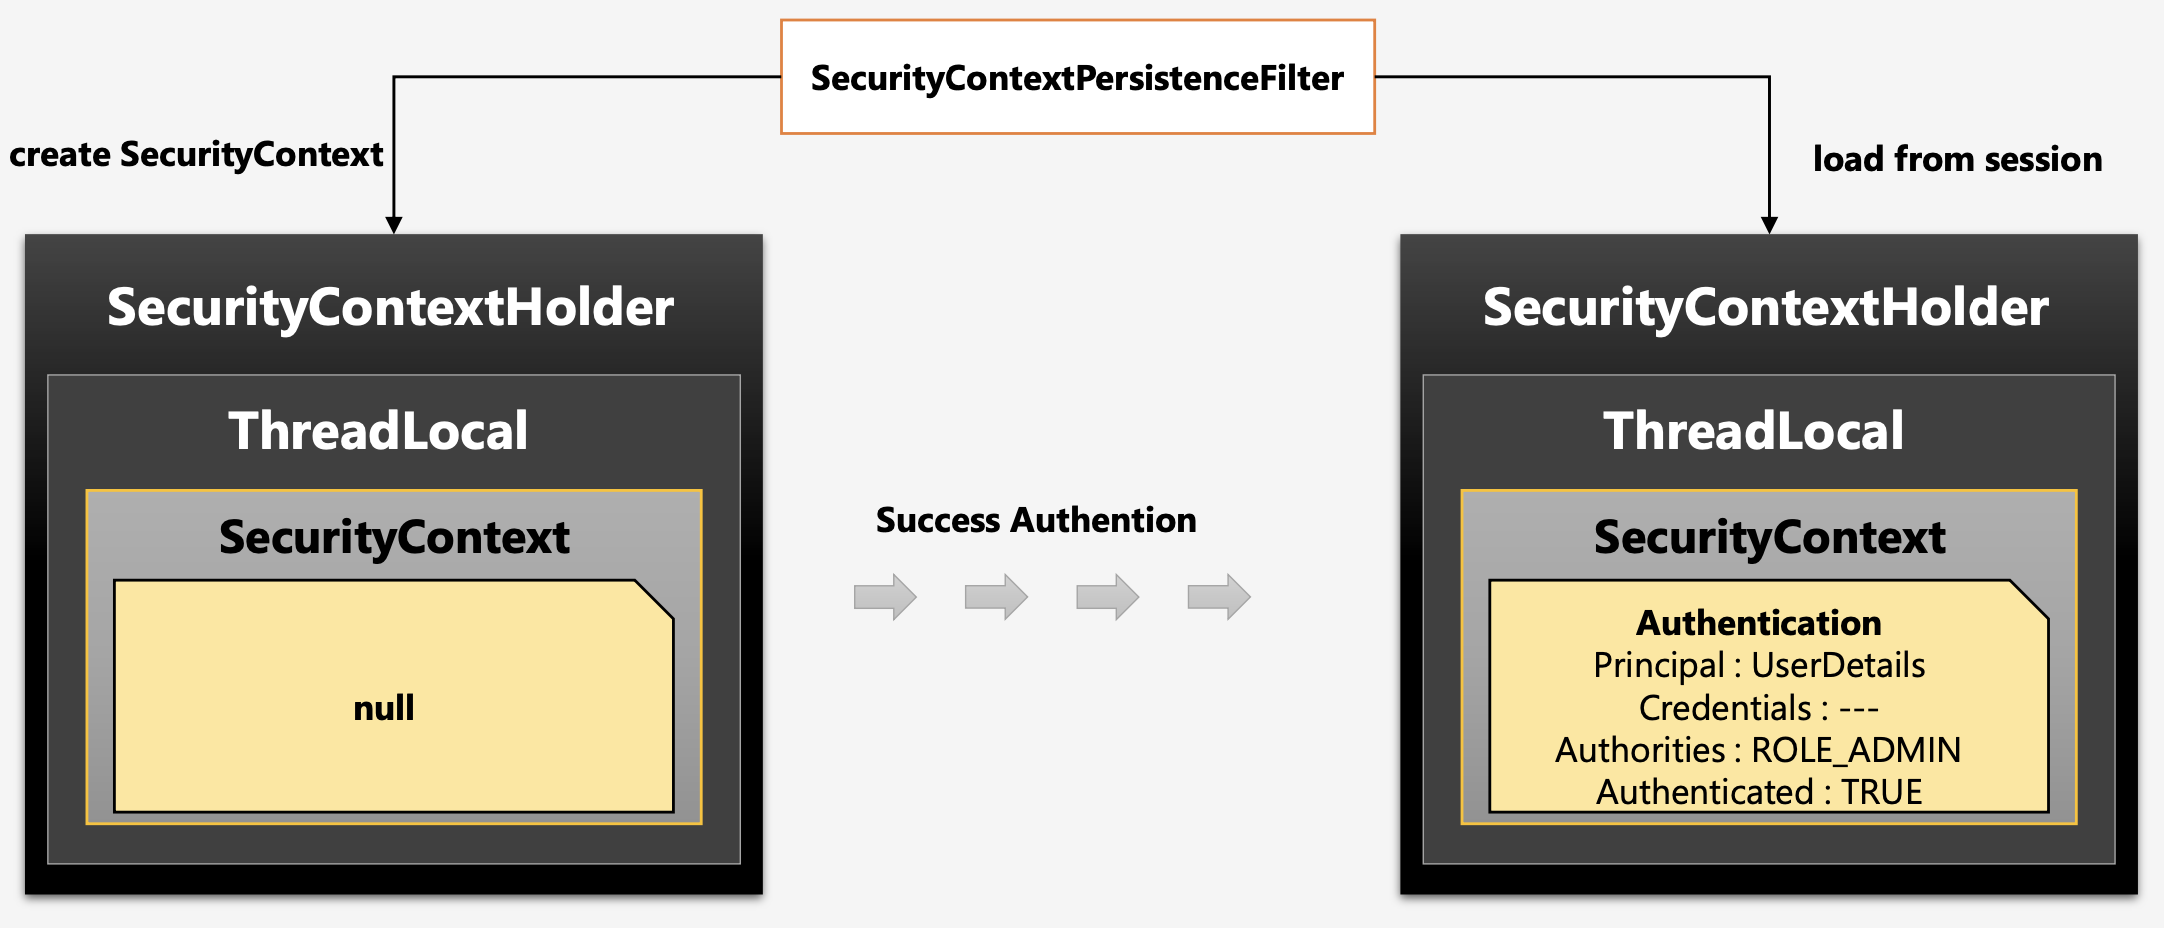
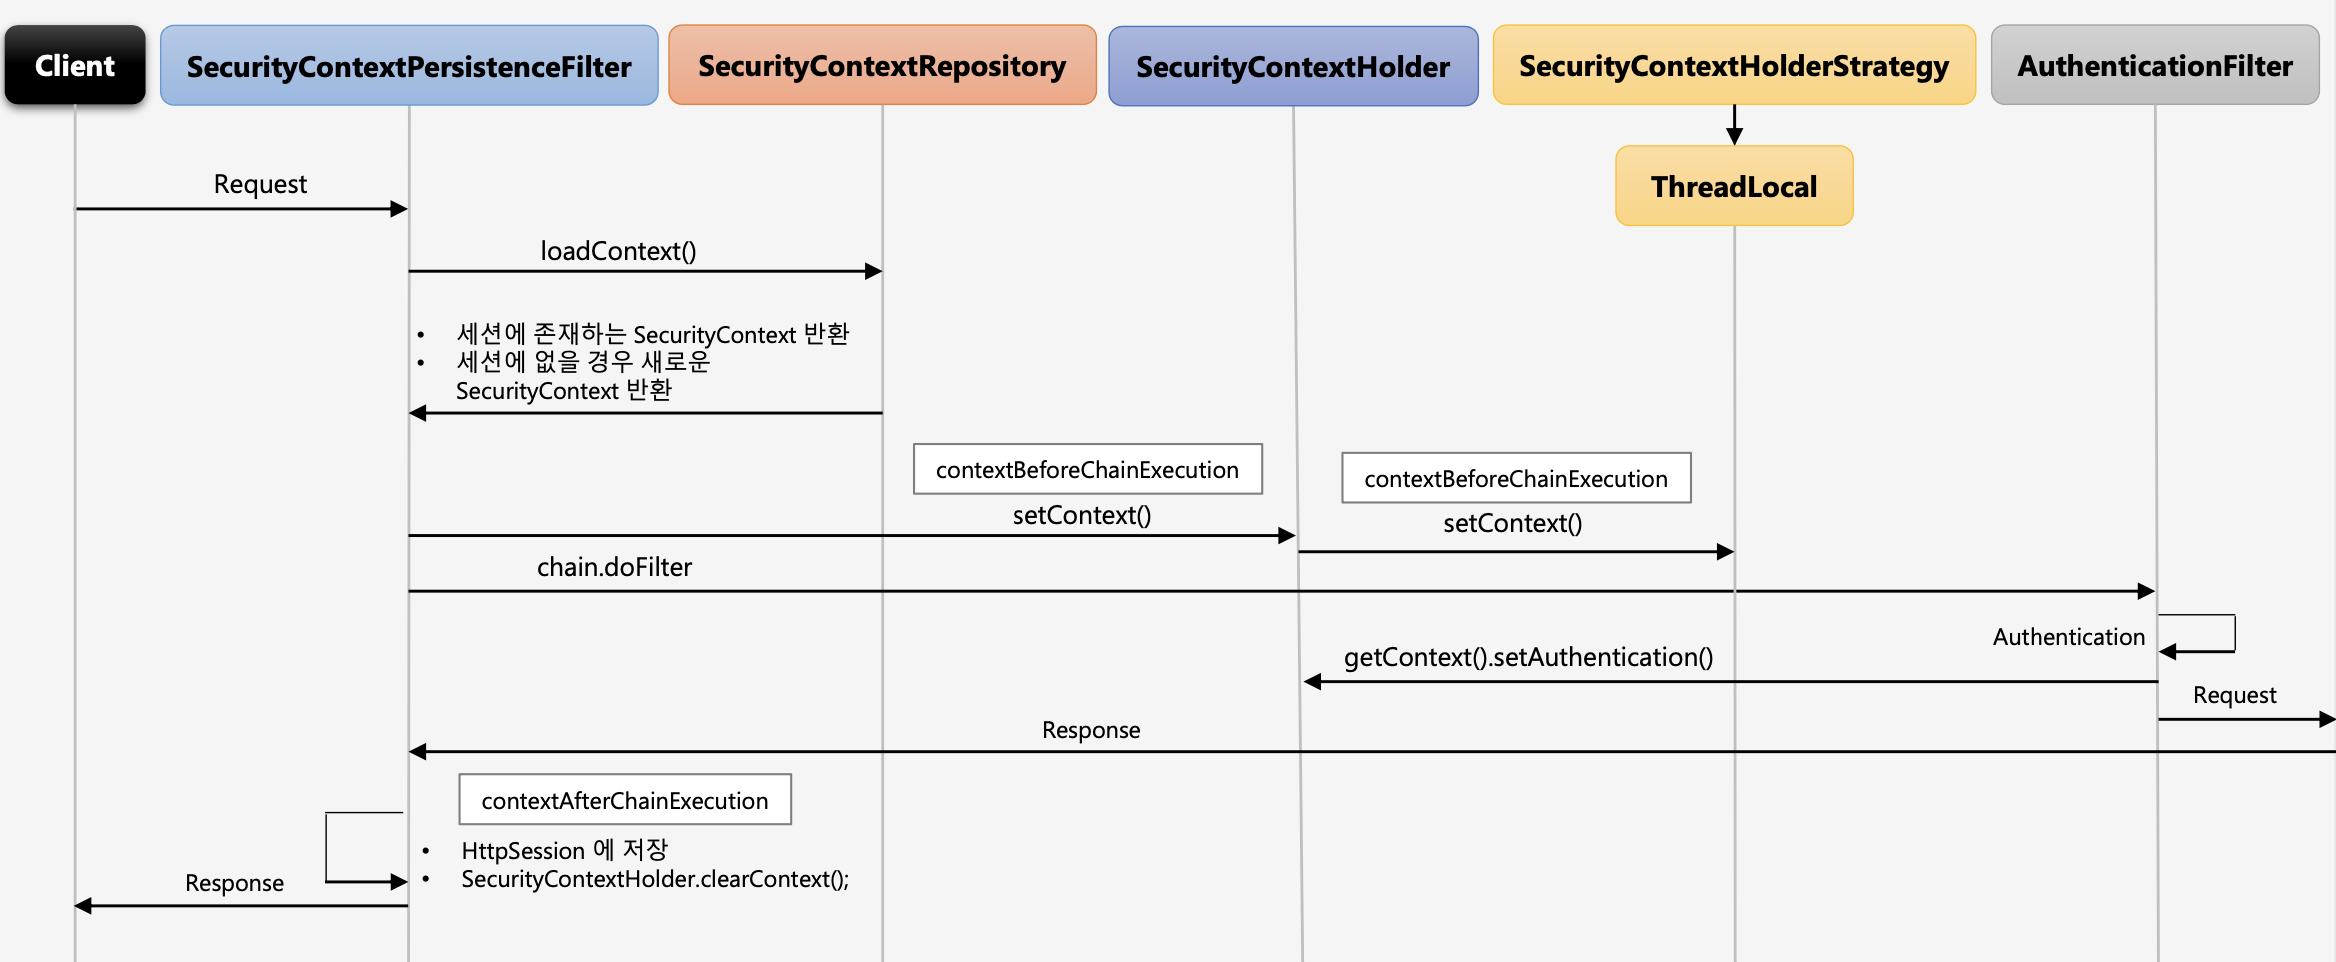
}인증 저장소 필터 - SecurityContextPersistenceFilter
SecurityContext 객체의 생성, 저장, 조회
- 익명 사용자
- 새로운
SecurityContext객체를 생성하여SecurityContextHolder에 저장 AnonymousAuthenticationFilter에서AnonymousAuthenticationToken객체를SecurityContext에 저장
- 새로운
- 인증 시
- 새로운
SecurityContext객체를 생성하여SecurityContextHolder에 저장 UsernamePasswordAuthenticationFilter에서 인증 성공 후SecurityContext에UsernamePasswordAuthenticationToken객체를 저장- 인증이 최종 완료되면 Session에
SecurityContext를 저장
- 새로운
- 인증 후
- Session에서
SecurityContext를 꺼내어SecurityContextHolder에 저장 SecurityContext안에Authentication객체가 존재하면 계속 인증을 유지한다.
- Session에서
- 최종 응답 시 공통
SecurityContextHolder.clearContext()
Flow
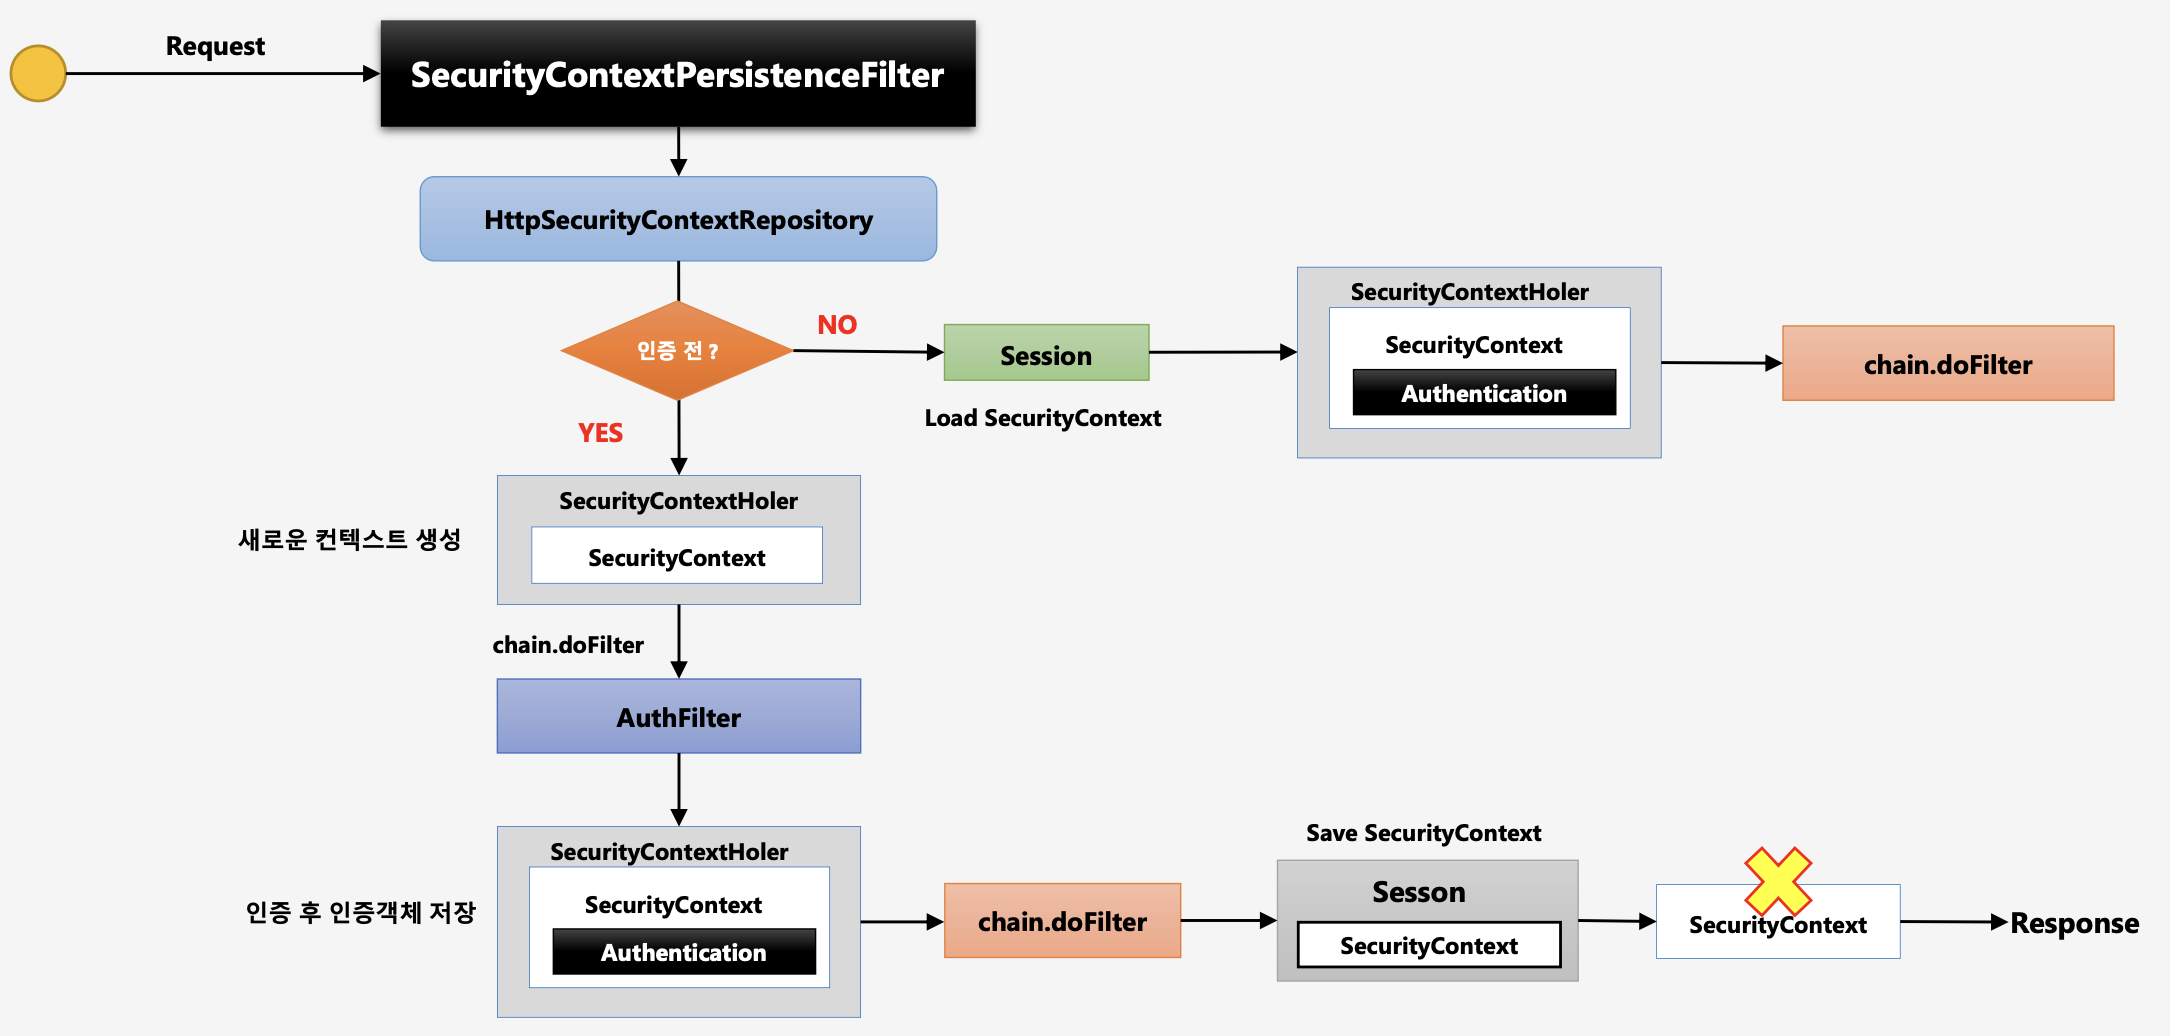
- 사용자가 Request 요청
SecurityContextPersistenceFilter는 매번 요청 마다 수행된다.SecurityContextPersistenceFilter내부적으로HttpSecurityContextRepository가 로직 수행
→HttpSecurityContextRepository:SecurityContext객체를 생성, 조회 하는 역할을 하는 클래스
- 인증 전
- 새로운 컨텍스트 생성(
SecurityContextHolder)
→ 이 때SecurityContext객체는 null이다. - 그 다음 필터로 이동한다.(
chain.doFilter) - 인증 필터(
AuthFilter)가 인증을 처리한다. - 인증이 완료되면 인증객체(
Authentication) 생성 후SecurityContext객체 안에 저장된다. - 다음 필터 수행(
chain.doFilter) - Client에게 응답하는 시점에서 Session에
SecurityContext저장
→SecurityContextPersistenceFilter가 하는 것이다. SecurityContext제거 (Clear())- 응답(Response)
- 인증 후
- Session에서
SecurityContext가 있는지 확인
→ 인증이 된 이후이므로 존재한다. SecurityContext를 꺼내어SecurityContextHolder에 넣는다.- 다음 필터 수행(
chain.doFilter)
Sequence Diagram
References