출처
1. Nest Js 소개
1.1) Node JS 설치하기
- 안정화 버전 다운
1.2)Nest JS CLI로 Nest JS 시작하기
- NestJs를 이용해서 프로젝트를 시작할 때 Nest CLI를 이용하면 간단히 프로젝트를 시작할 수 있다.
- Nest CLI를 이요해서 아래의 명령어를 작성하면, 새 프로젝트 디렉터리가 생성되고 초기 핵심 Nest 파일 및 지원 모듈로 디렉터리가 채워져 프로젝트의 기존 기본 구조가 생성된다.
npm i -g @nestjs/cli
nest new [project-name]
npm 선택!
2.CRUD 앱(기본 앱) 구성하며 Nest Js 기본 구성 (로컬 메모리)
2.1)게시물 CRUD 애플리케이션 소개
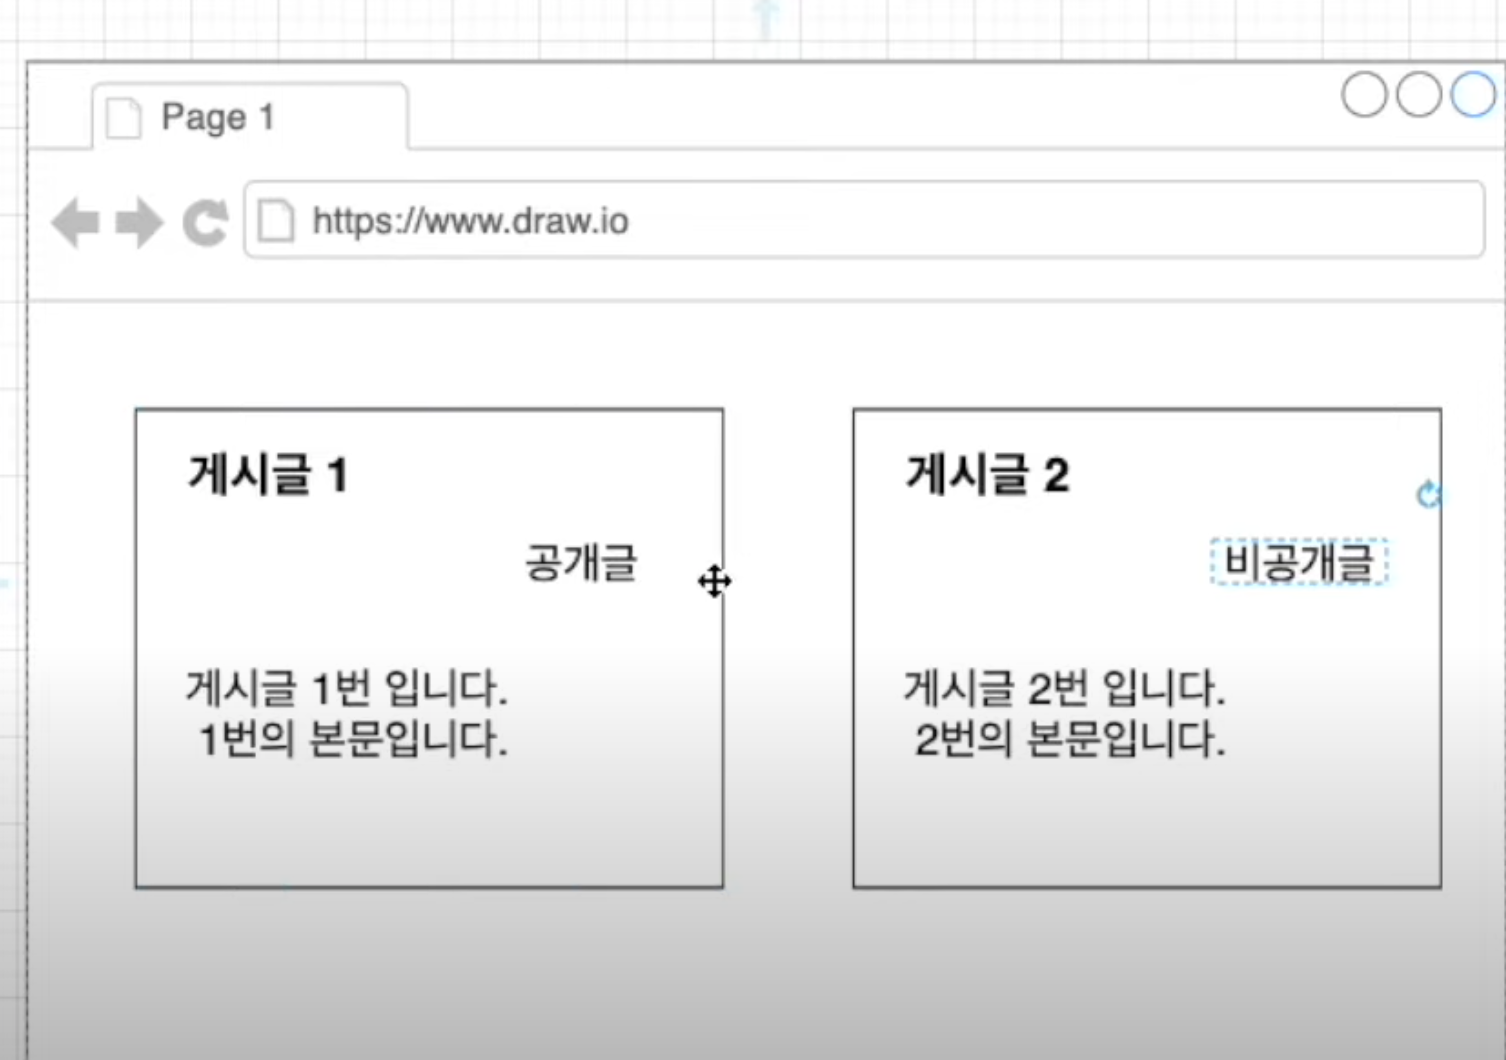
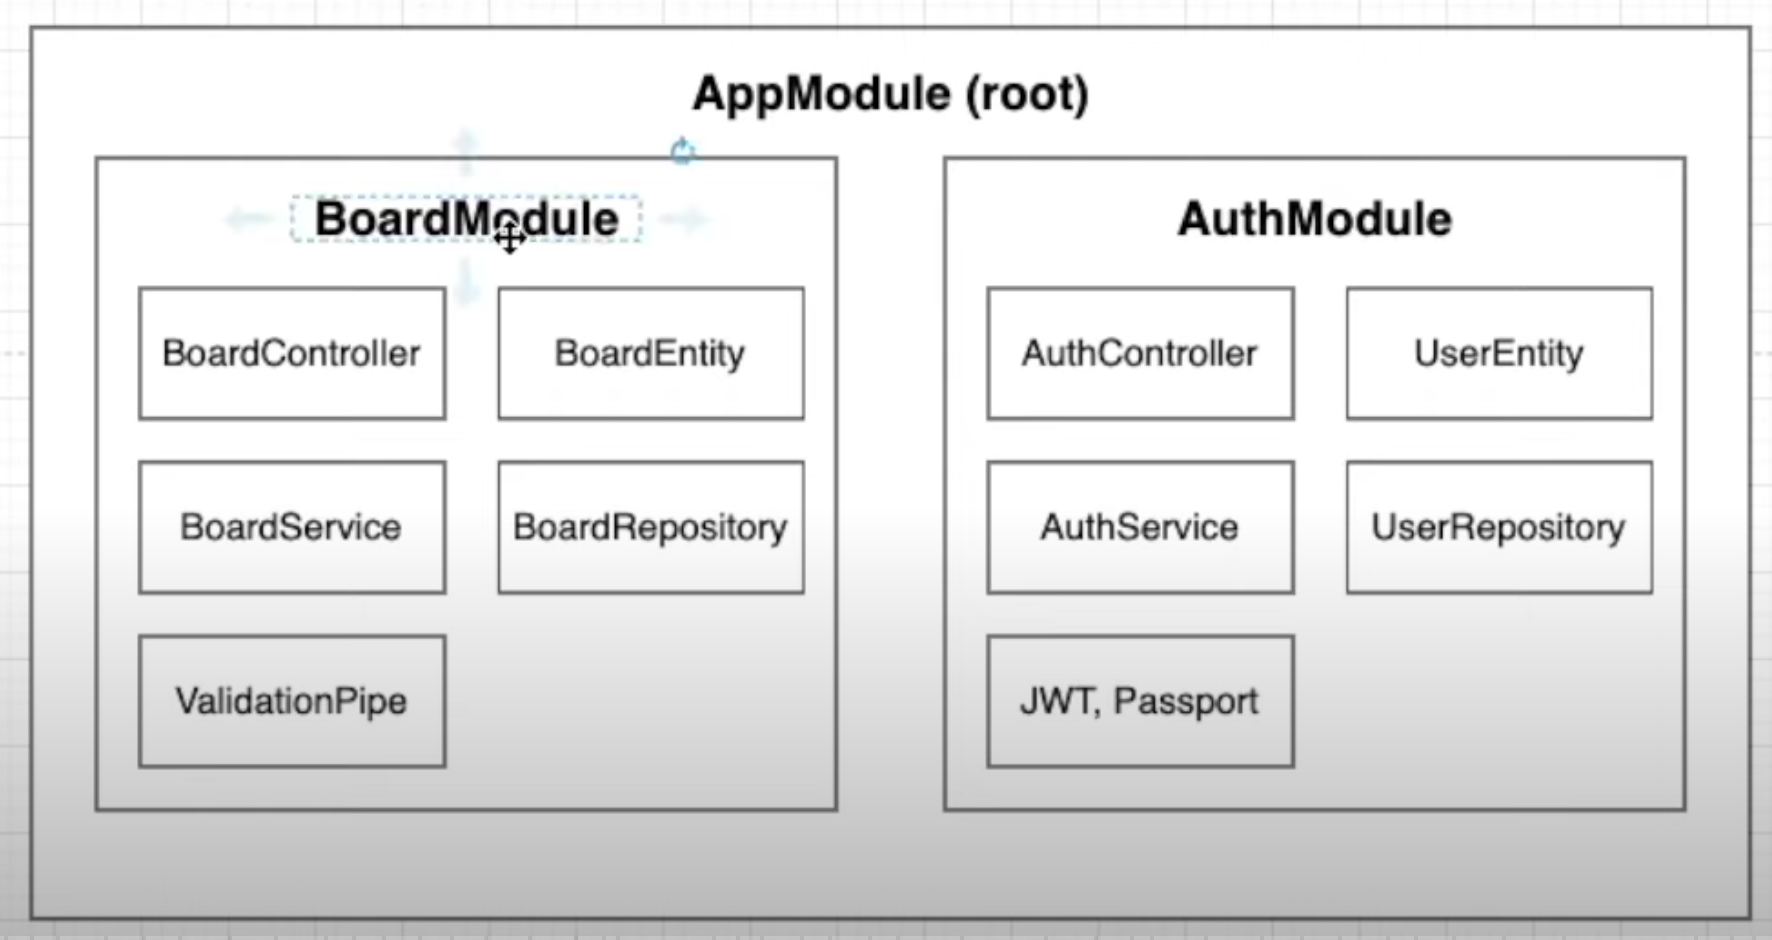
앱을 만들 때 Nest JS에서 사용할 것들(앱구조)
- 게시글을 만드는 것이기 때문에 게시글에 관한 모듈과 그 게시글을 만드는 사람에 대한 인증 모듈이 필요하다.
- 각 모듈을 구성하는 Controller, Service, Repository 등이 있는데 이러한 용어 NestJS에서는 어떠한 용도로 사용되는지
3. 프로젝트 시작하기
3.1) cli 파일 알아보기
src폴더
.eslintrc.js
- 개발자들이 특정한 규칙을 가지고 코드를 깔끔하게 짤 수 있게 도와주는 라이브러리. 타입스크립트를 쓰는 가이드 라인 제시, 문법에 오류가 나면 알려주는 역할 등등
.prettierrc
- 주로 코드 형식을 맞추는데 사용
- 작은 따옴표를 사용할지 큰 따옴표를 사용할지, Indent 값을 2로 줄지 4로 줄지 등등, 에러 찾는 것이 아닌 코드 포맷터 역할.
nest-cli.json
- nest 프로젝트를 위해 특정한 설정을 할 수 있는 json파일
tsconfig.json
- 어떻게 타입스크립트를 컴파일 할지 설정
tsconfig.build.json
- tsconfig.json의 연장선상 파일이며 build를 할 때 필요한 설정들 "excludes"에서는 빌드할 때 필요 없는 파일들 명시
package.json
- build : 운영 환경을 위한 빌드
- fromat : 린트에러가 났을시 수정 (린트에러?)
- start : 앱 시작
3.2) NestJs 로직 흐름
- http메소드
@Get(): 엔드 포인트(주소의 마지막 ex. localhost:3000/)가 '/'로 들어간다는 의미.
진입점(app.module.ts)
- 이곳에서 UserModule, BoardModule 구분
board.controller.ts
- 모듈의 엔드 포인트에 따라 처리하게 나눔.
board.serice.ts
- 연산 작업이나 리턴값을 보내줌
3.3) NestJS 모듈이란?
- 모듈은 @Module() 데코레이터로 주석이 달린 클래스이다.
@Module() 데코레이터는 Nest가 애플리케이션 구조를 구성하는 데 사용하는 메타 데이터를 제공합니다. - 각 응용 프로그램에는 하나 이상의 모듈(루트 모듈)이 있습니다. 루트 모듈은 Nest가 사용하는 시작점이다.(= 어떤 NestJS 애플리케이션은 하나 이상의 root모듈을 가져야한다.)
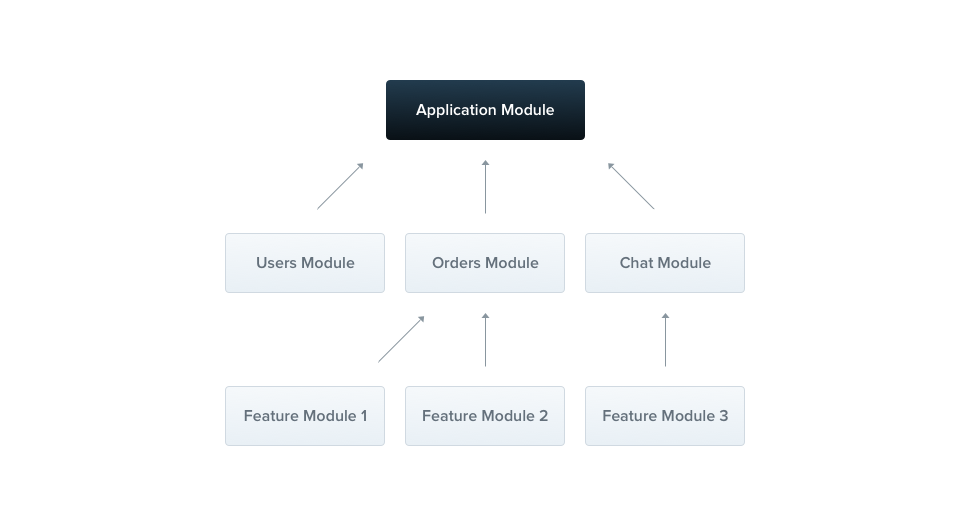
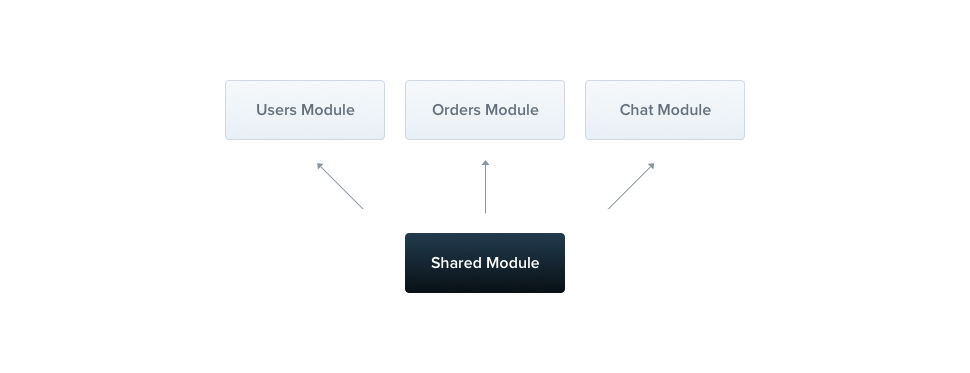
- 모듈은 밀접하게 관련된 기능 집합으로 구성 요소를 구성하는 효과적인 방법.(기능별로 만든다 ex. 유저, 주문, 챗)
- 같은 기능에 해당하는 것들은 하나의 모듈 폴더안에 넣어서 사용(UserController, UserSErvice, UserEnitity 다 같은 기능이라 UserModule안에 넣는다.)
- 모듈은 기본적으로 싱글 톤이므로 여러 모듈간에 쉽게 공급자의 동일한 인스턴스를 공유할 수 있다. (= 어떠한 모듈 하나를 만들어서 유저모드에서도 오더 모드에서도 쓸 수 있게 함.)
3.4) Board Module 생성하기
- src 에서
app.module.ts와main.ts만 남기고 삭제
nest g module boards
--명령어 해석--
nest : using nestcli
g :  generate (생성한다)
module: schematic that i want to create
boards: name of the schematic (생성하는 모듈의 이름)
3.5) NestJS Controllers?
- 컨트롤러는 들어오는 요청을 처리하고 클라이언트에 응답을 반환합니다.
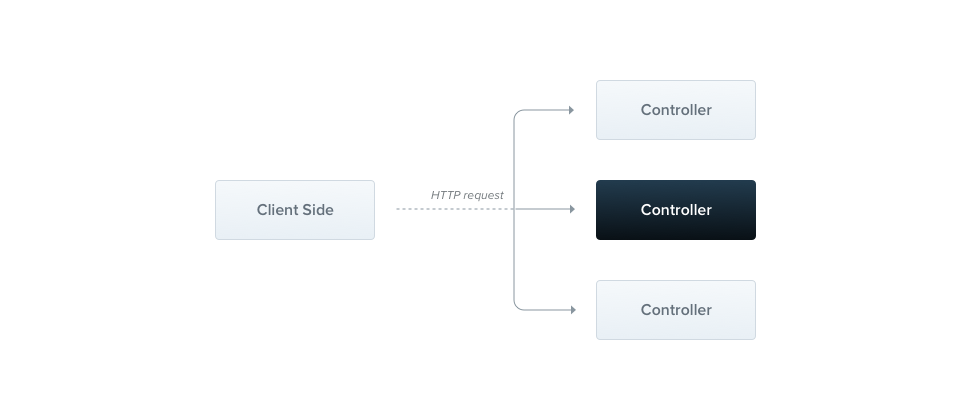
콘트롤러는 @Controller 데코레이터로 클래스를 데코레이션 하여 정의된다.
3.6) Board Controllers 생성하기
nest g controller boards --no-spec
--명령어 해석--
nest : using nestcli
g : generate
controller : controller schematic
boards : name of the schematic
--no-spec : 테스트를 위한 소스 코드 생성 x
3.7) Board Service 만들기
- Service 안에서는 데이터베이스 관련된 로직을 처리. 데이터베이스엥서 데이터를 가져오거나 데이터베이스 안에 게시판을 생성할 때 그 생성한 게시판 정보를 넣어주는 등의 로직을 처리.
nest g service boards --no-spec- 생성된 파일(boards.service.ts) 안에는 Injectable 데코레이터가 있으며 이 NestJS는 이것을 이용해서 다른 컴포너트에서 이 서비스를 사용 할 수있게(Injectable)만들어줍니다. 그리고 CLI로 Service 생성시에는 module에도 자동으로 Service가 추가된다.
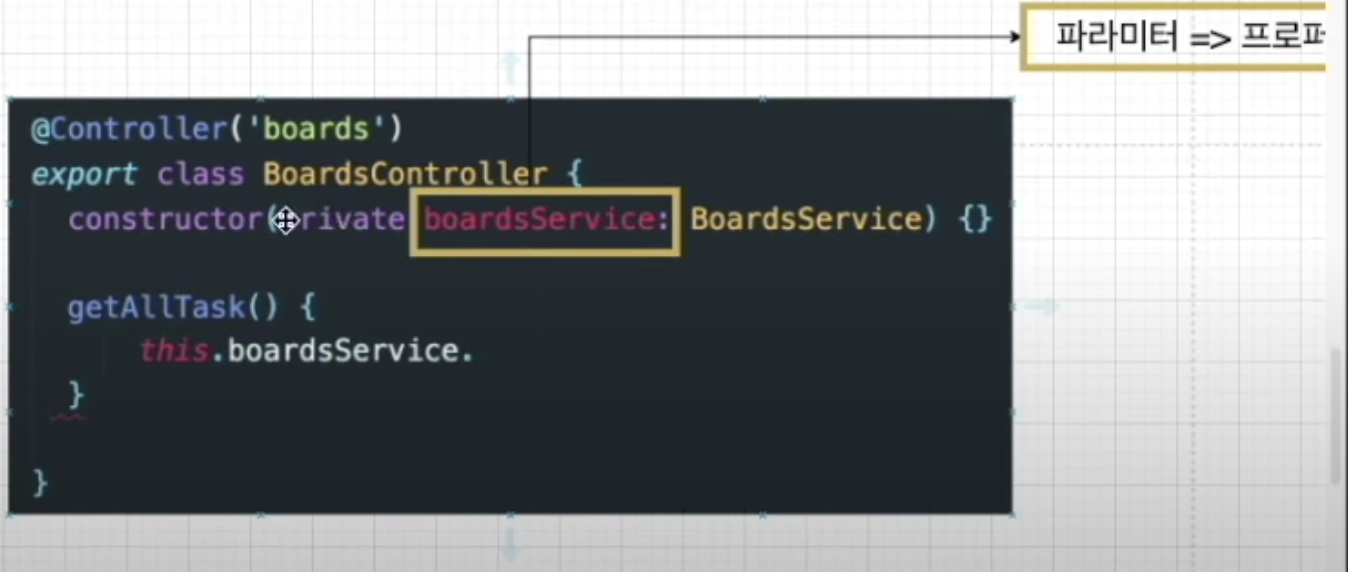
Board Service 를 Board Controller에서 이용할 수 있게 해주기(Dependency Injection= 종속성 주입)
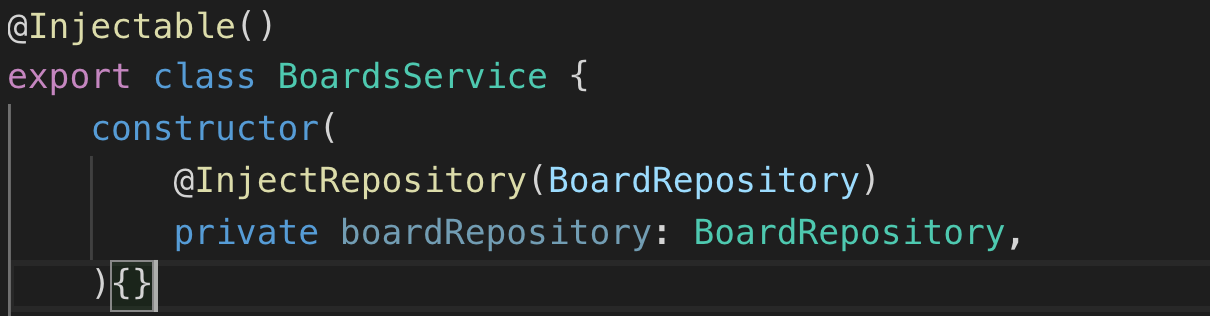
- NestJS에서 Dependency Injection은 클래스의 Constructor 안에서 이루어진다.

- 위와 같은 코드는 Typescript의 도움을 받아서 가능하게 된다. 자바스크립트에서는 private같은 접근 제한자를 사용할 수 없지만 타입스크립트에서는 사용 가능하기 때문
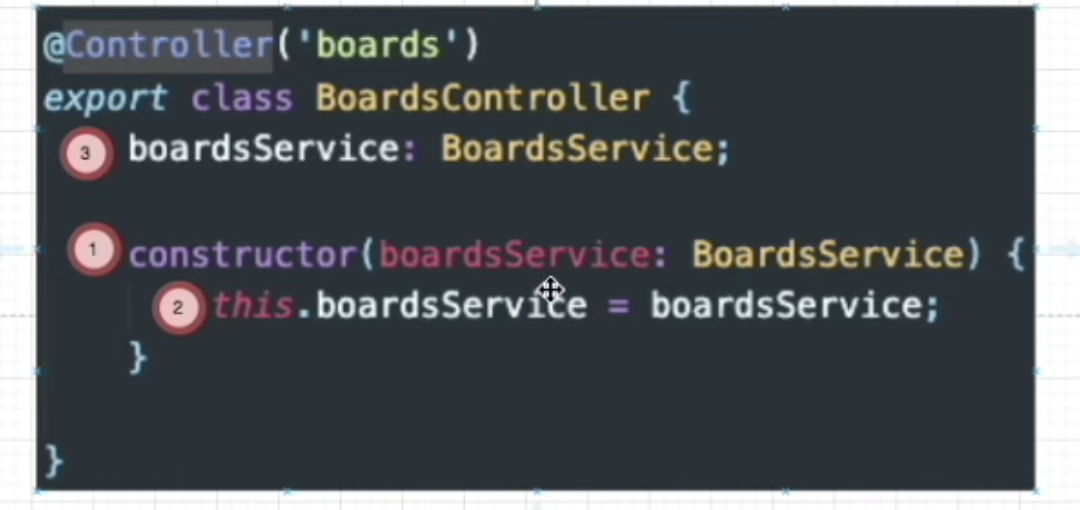
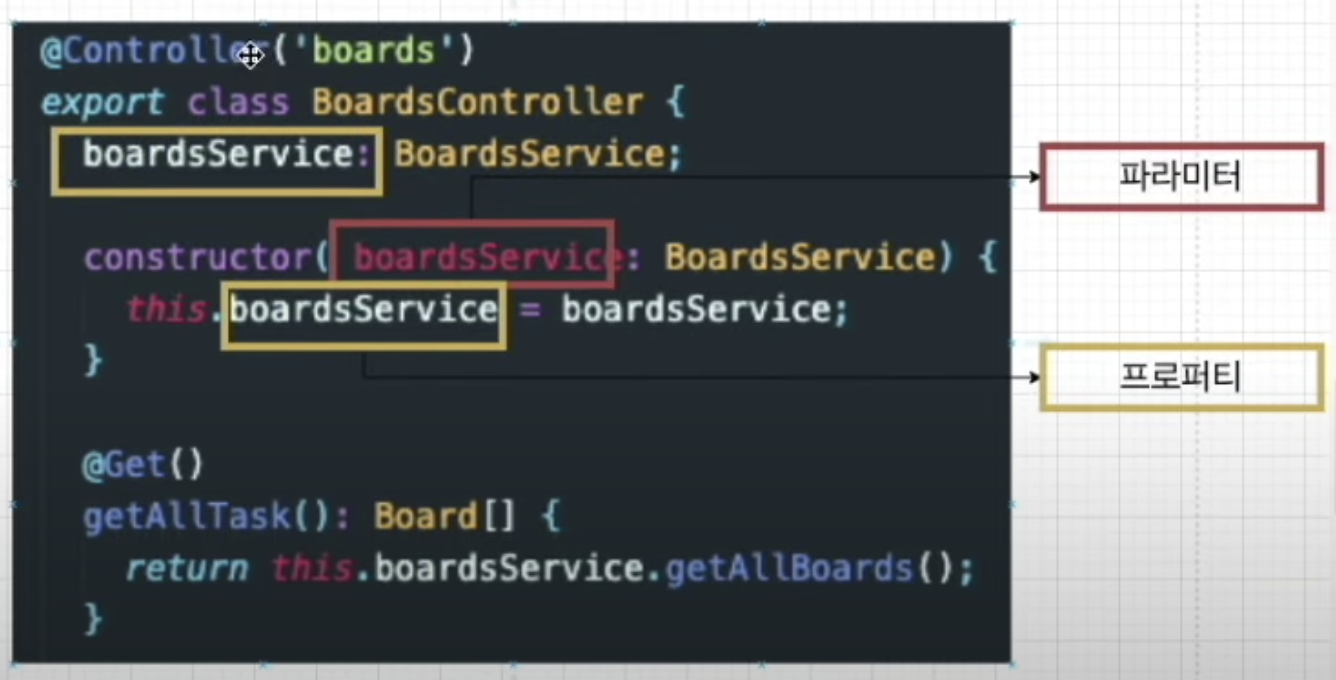
- boardsService 파라미터에 BoardsService 객체를 타입으로 지정.
- 이 boardsService 파라미터를 BoardsController 클래스 안에서 사용하기 위해서 this.boardsService 프로미터에 boardsService 파라미터를 할당해준다.
- 하지만 타입스크립트에서는 선언한 값만 객체의 프로퍼티로 사용가능하기 때문에 위에 boardsService:BoardsService로 선언해줍니다.
- 이렇게 갖게된 boardsService 프로퍼티를 이용해서 BoardsController 클래스 안에서 활용을 할 수가 있다.
프로퍼티?
- 일부 객체 지향 프로그래밍 언어에서 필드(데이터 멤버)와 메소드 간 기능의 중간인 클래스 멤버ㅓ의 특수한 유형. 프로퍼티의 읽기와 쓰기는 일반적으로 게터(getter)와 세터(setter) 메소드 호출로 변환된다.
접근 제한자를 이용해서 소스 간단하게 하기
- 접근 제한자(public, protected, private)을 생성자 파라미터에 선언하면 접근 제한자가 사용된 생성자 파라미터는 암묵적으로 클래스 프로퍼티로 선언된다.
private을 사용하면?
- private이 선언되었기 때문에 boardsService 프로퍼티는 BoardsController 클래스 내부에서만 사용 가능.
3.8) NestJS Providers, Service란?
Providers?
- Nest의 기본 개념. 대부분의 기본 Nest 클래스는 서비스, 레포지퇼, 팩토리, 헬퍼 등 프로바이더로 취급될 수 있다. 프로바이더의 주요 아이디어는 종속성으로 주입할 수 있다는 것. 즉, 객체는 서로 다양한 관계를 만들 수 있으며 객체의 인스턴스를 "연결"하는 기능은 대부분 Nest 런타임 시스템에 위임될 수 있습니다.
Service?
- 서비스는 소프트웨어 개발내의 공통개념이며, NestJS, Javascript에서만 쓰이는 개념이 아니다.
- @Injectable 데코레이터로 감싸져서 모듈에 제공되며, 이 서비스 인스턴스는 애플리케이션 전체에서 사용 될 수 있다.
- 서비스는 컨트롤러에서 데이터의 유효성 체크를 하거나 데이터베이스에 아이템을 생성하는 등의 작업을 하는 부분을 처리함.
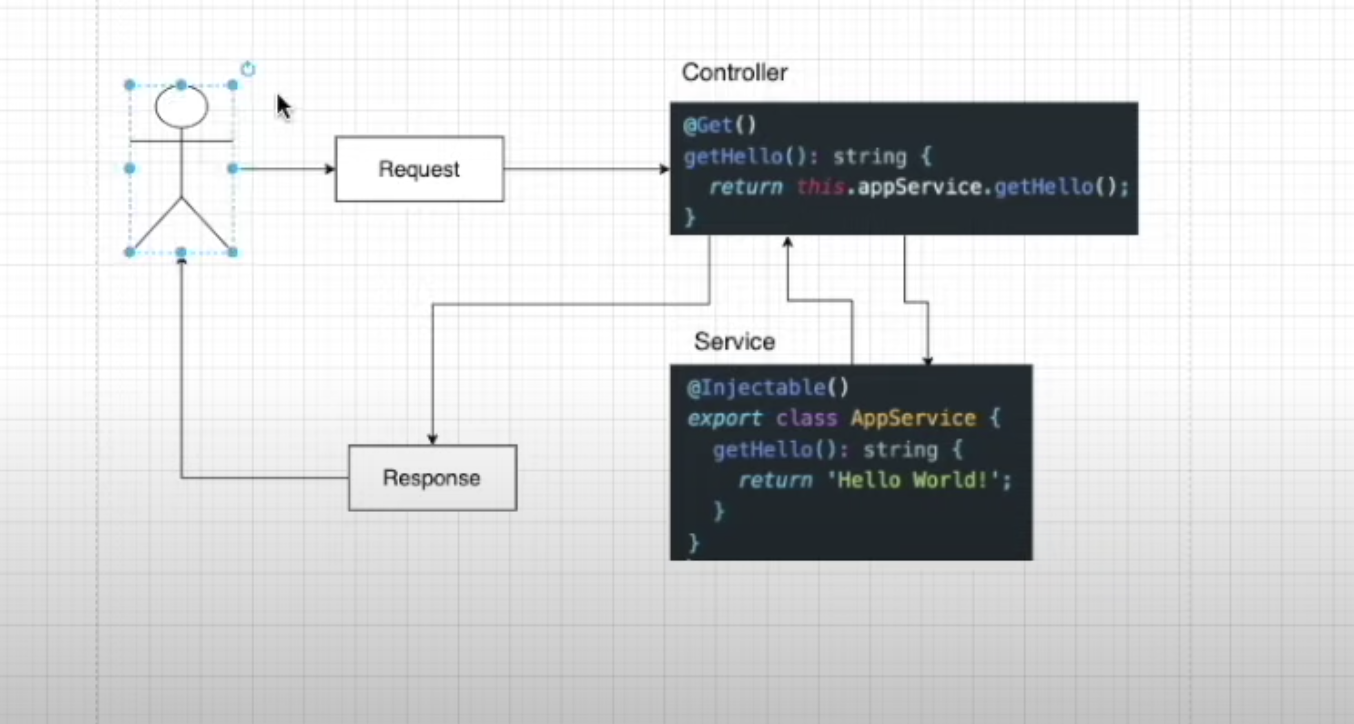
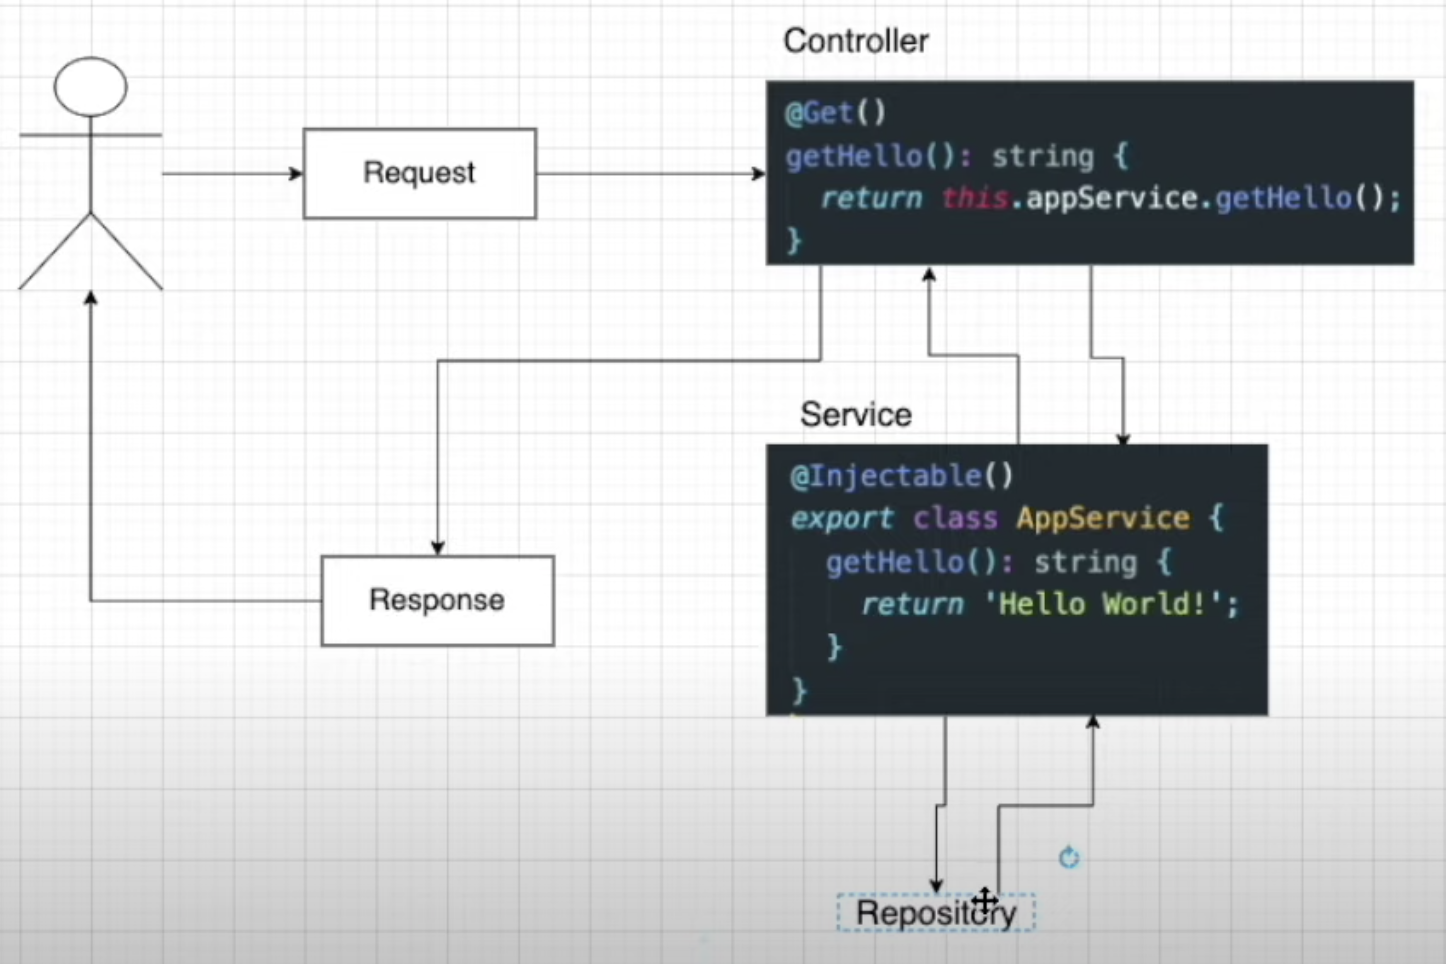
Service를 Controller에서 이용할 수 있는 방법(Dependency Injection)
- 위에 보면 Controller에서 this.appService.getHello(); 이런식으로 Service에 정의해놓은 메소드를 보면 Controller에서 가져와서 쓰는 걸 볼 수 있다.
Provider 등록하기
- Provider를 사용하기 위해서는 이것을 Nest에 등록해줘야 사용할 수 있다. 등록은 module 파일에서 할 수 있다. module 파일에 providers항목안에 해당 모듈에서 사용하고자 하는 Provider를 넣어주면 된다.
3.8) Boards Service 만들기
- Service 안에서는 데이터베이스 관련 로직을 처리하려한다. 데이터베이스에서 데이터를 가져오거나 데이터베이스안에 게시판을 생성할 때 그 생성한 게시판 정보를 넣어주는 등의 로직을 처리하려한다.
모든 게시물을 가져오는 서비스 만들기(CRUD 중 R에 해당)
- Service에서 구현해주면 된다. 바로 데이터베이스와 연동해서 하면 되지만, 처음부터 데이터베이스에 연결해서 하면 헷갈릴 수 있기 때문에 우선 데이터를 로컬메모리에 담아서 처리해본다.
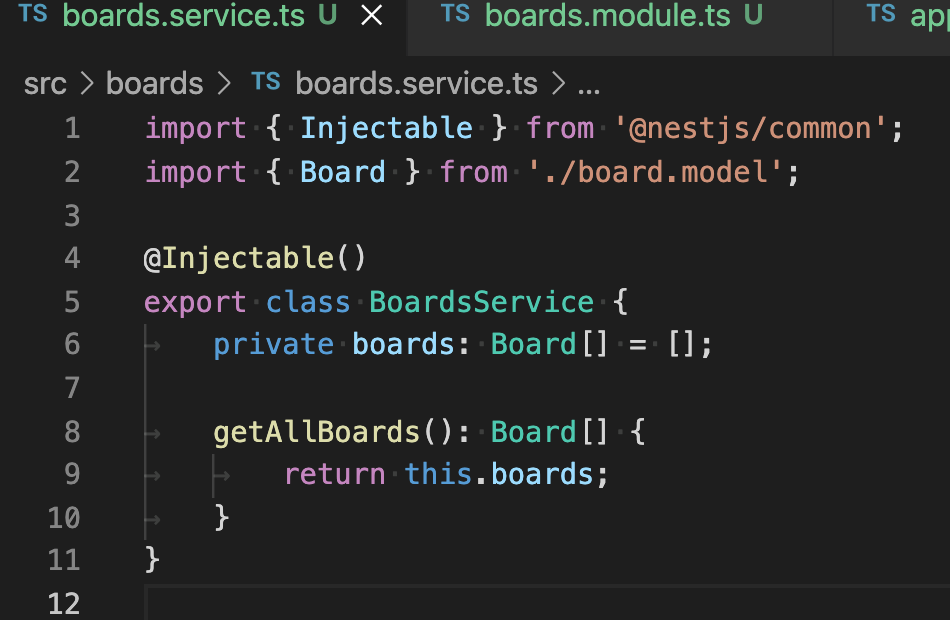
boards.service.ts 파일
import { Injectable } from '@nestjs/common';

@Injectable()
export class BoardsService {
	private boards = [];

	getAllBoards() {
		return this.boards;
	}
}
- private 사용 이유: 다른 컴포넌트에서 보드라는 배열값을 수정하는 것을 차단하기위해 사용.
- getAllBoards() 함수: boards 배열에 있는 모든 값을 리턴
boards.controller.ts파일
import { Controller, Get } from '@nestjs/common';
import { BoardsService } from './boards.service';

@Controller('boards')
export class BoardsController {
	constructor(private boardsService: BoardsService) {}

	@Get()
	getAllBoard() {
		return this.boardsService.getAllBoards();
	}

}
결과값
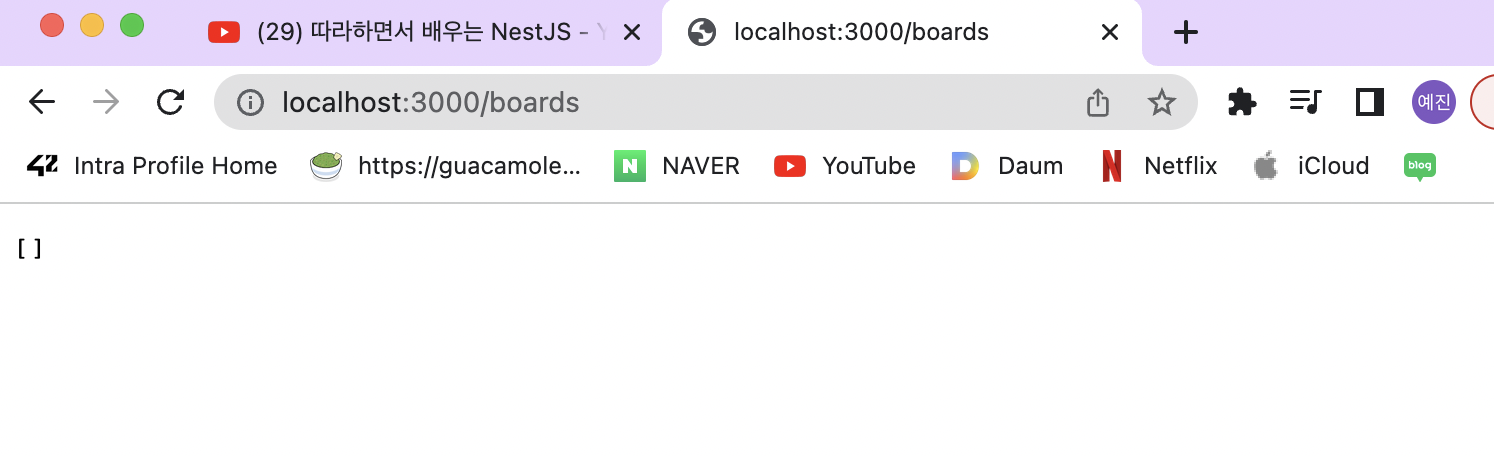
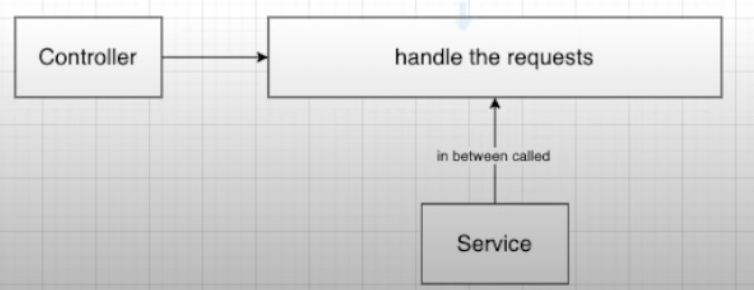
정리
- 클라이언트에서 요청을 보내면 먼저 컨트롤러로 가며 컨트롤러에서 알맞은 요청 경로에 라우팅해서 해당 핸들러로 가게 해준다. 그런 후 요청을 처리해주기 위해서 서비스로 들어가며 그 요청에 맞는 로직을 서비스에서 처리해준 후 컨트롤러에 리턴값을 보내준 후 컨트롤러에서 클라이언트로 결과값을 보내준다.
그래서 컨트롤러에서는 요청을 처리하고 결과값을 리턴해주는 역할을 한다.
Board Model 정의하기
- 게시물의 고유id(번호), 게시물의 이름, 설명, 게시물의 상태(공개, 비공개) 상태값 을 정의 = Borad Model
게시물 생성 기능을 만들기 전에!
- 게시물에 필요한 데이터가 어떤 것이 필요한지를 정의해주기 위해 게시물의 모델을 만들어준다. 예를들어 게시물 데이터에는 ID가 필요하고 이름이나 설명등이 필요하다.
- board Model 파일 생성 -> board.model.ts
모델을 정의하기 위해서는
- Class 를 이용하거나 Interface를 이용하면 된다.
- Interface -> 변수의 타입만을 체크
- Classes -> 변수의 타입도 체크하고 인스턴스 또한 생성할 수 있다.
- 우선 연습을 위해! board의 구조만 정의하기 위해 Interface를 사용한다.
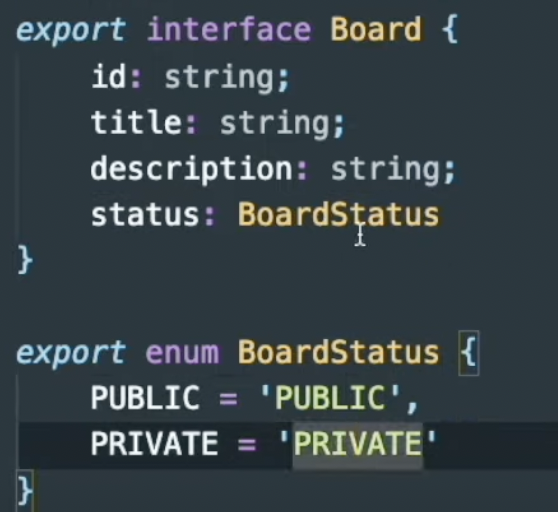
Board 모델 만들기
- board.model.ts 생성
- interfacefh 구조 정의
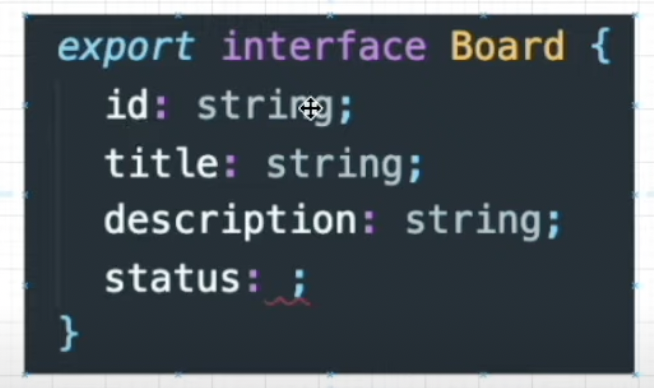
BoardStatus란?
- 이 게시물이 공개, 비공개 인지 나눠주는 것
- 이 두가지 상태 이외에는 나오면 안되기 때문에 타입스크립트의 기능 enumeration을 이용.
-
생성한 Board 모델을 이용해서 타입을 정의
- Controller의 핸들러에서 결과값을 리턴해주는 부분도 타입을 정의
타입 정의의 장점
- 타입 정의는 선택사항이다.
- 그러나, 타입을 정의해주므로서 원하는 타입과 다른 코드를 사용할 시 에러가 발생.
- 그리고 코드를 읽는 입장에서 코드를 더 쉽게 이해할 수 있다. (readable)
3.9) 게시물 생성하기 (CRUD 중 C): Service
게시물 생성 기능 만들기 위해
- 게시물에 관한 로직을 처리하는 곳 = Service이다. 고로
Service에서 로직을 처리해준 후Controller에서 서비스를 불러오겠다.
boards.service.ts 파일
import { Injectable } from '@nestjs/common';
import { Board, BoardStatus } from './boards.model';

@Injectable()
export class BoardsService {
	private boards: Board[] = [];

	getAllBoards(): Board[] {
		return this.boards;
    }

    createBoard(title: string, description: string) {
        const board: Board = {
            title// = title: title,
            description// = description: description,
            status: BoardStatus.PUBLIC
        }
    }
}
//board 부분 에러 -> id 값 없기 때문!!
게시물 ID는 어떻게 처리하나요?
- ID는 모든 게시물에 유니크해야함. 그래서 만약 데이터베이스에 데이터를 넣어줄 때, 데이터베이스가 알아서 유니크한 값을 준다. 하지만, 현재는 데이터베이스를 안쓰기 때문에 임의로 유니크한 값을 줘야함. 여러 방법을 사용할 수 있는데 그 중에서 uuid모듈을 이용할 것.
uuid(= 유효id) 모듈 사용하기
npm install uuid --save만약 오류(ERR)가 발생한다면 --legacy-peer-deps 붙여보기
import { Injectable } from '@nestjs/common';
import { Board, BoardStatus } from './boards.model';
import { v1 as uuid } from 'uuid';

@Injectable()
export class BoardsService {
	private boards: Board[] = [];

	getAllBoards(): Board[] {
		return this.boards;
    }

    createBoard(title: string, description: string) {
        const board: Board = {
            id: uuid(),
            title,
            description,
            status: BoardStatus.PUBLIC
        }
        this.boards.push(board); //boards배열에 넣는다.
        return board; //어떤 board가 생성되었는지 return
    }
}
--legacy-peer-deps란?
- peerDependency가 맞지 않아도 일단 설치
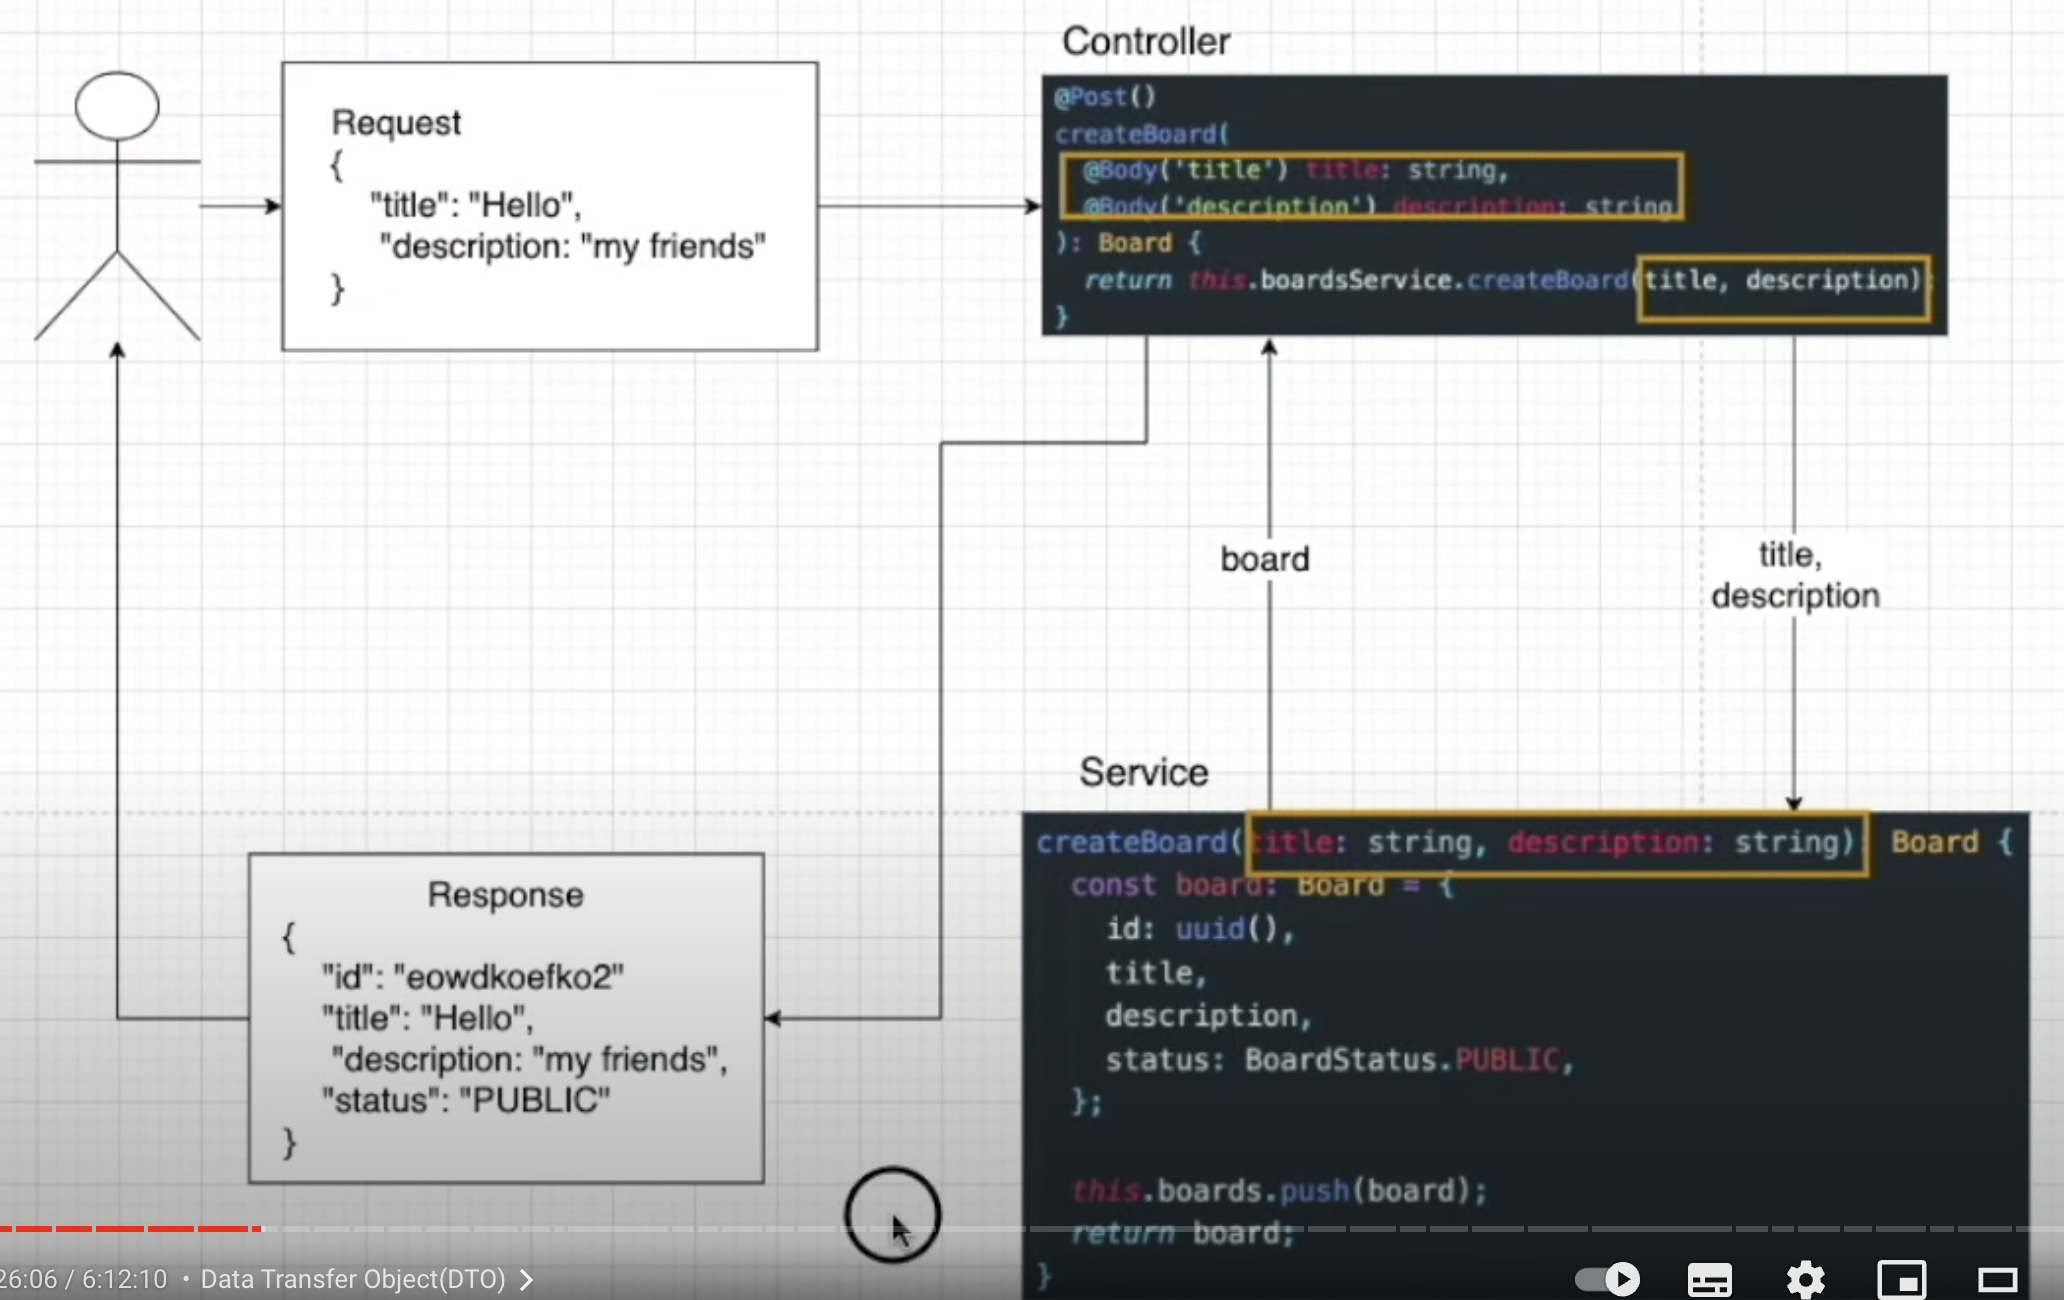
3.10) 게시물 생성하기 (CRUD 중 C): Controller
Request와 Response 부분 처리 => Controller에서 처리
클라이언트에서 보내온 값을 어떻게 핸들러에 가져오나요?
- NestJS에서는 @Body body (게시물에 대한 이름과 설명이 들어있음) 를 이용해서 가져온다. 이렇게 하면 모든 request에서 보내온 값을 가져올 수 있으며, 하나씩 가져오려면 @Body('title') title 혹은 @Body('description') description식으로 가져오면 된다.
// 1번째 방법
@Post()
createBoard(@Body() body) {
console.log('body', body);
}
// 2번째 방법
@Post()
createBoard(
@Body('title') title: string,
@Body('description') description: string,
) {
return this.boardsService.createBoard(title, description);
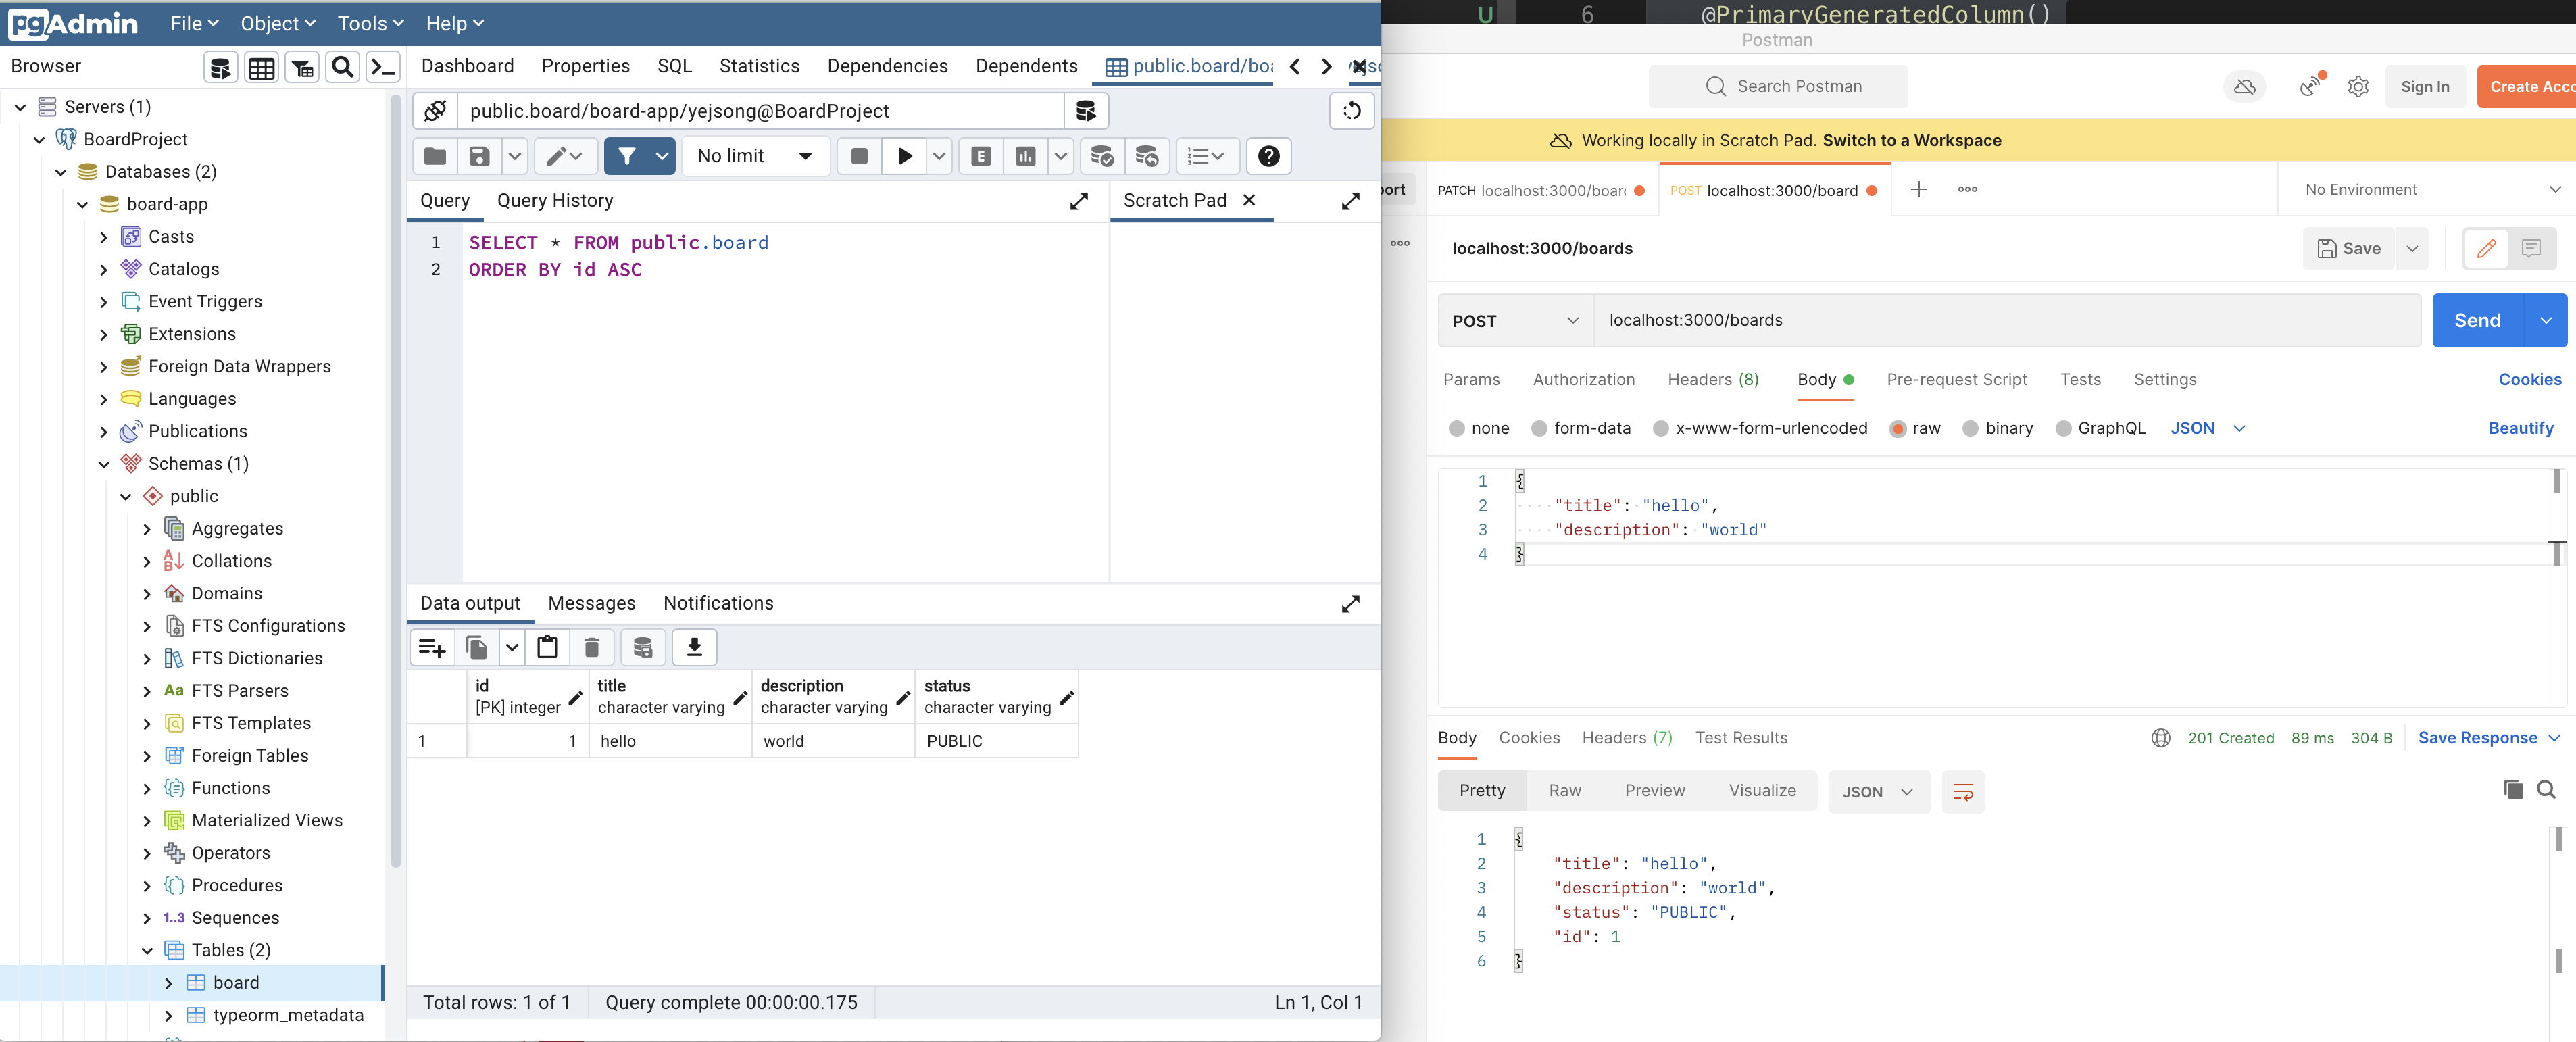
}Postman을 통해서 (1:22:06) 잘 작동하는지 확인
3.11) Data transfer object(DTO)
- 1:24:33 초
DTO란?
- 계층간 데이터 교환을 위한 객체.
- DB에서 데이터를 얻어 Service 나 Controller등으로 보낼 때사용하는 객체를 말함.
- DTO는 데이터가 네트워크를 통해 전송되는 방법을 정의하는 객체.
- interface나 class를 이용해 정의될 수 있다. (NestJS에서는 클래스를 이용하는 것을 추천)
DTO를 사용하는 이유?
- 데이터 유효성을 체크하는데 효율적이다.
- 더 안정적인 코드로 만들어준다. 타입스크립트의 타입으로도 사용된다.
ex. Board를 위한 Property들을 여러 곳에서 사용하고 있다.(title, description..) 지금은 몇개의 프로퍼티만 불러주고 수정하면된다 하지만 나중에 많은 프로퍼티가 생겼을 때 고치다가 에러날 수 있음. 그래서 DTO사용함.
3.12) 게시물 생성을 위한 DTO
DTO 파일 작성
- 클래스는 인터페이스와 다르게 런타임에서 작동하기 때문에 파이프 같은 기능을 이용할 때 더 유용하다. 그래서 클래스를 사용해 DTO작성한다.

DTO 적용하기
- Controller와 Service에서 DTO를 적용한다.
- Controller
import { Controller, Get, Post, Body } from '@nestjs/common';
import { BoardsService } from './boards.service';
import { Board } from './boards.model';
import { CreateBoardDto } from './dto/create-Board.dto'

@Controller('boards')
export class BoardsController {
	constructor(private boardsService: BoardsService) {}

	@Get()
	getAllBoard(): Board[] {
		return this.boardsService.getAllBoards();
    }

    @Post()
    createBoard(
        @Body() createBoardDto: CreateBoardDto
    ): Board {
        return this.boardsService.createBoard(createBoardDto);
    }
}- Service
import { Injectable } from '@nestjs/common';
import { Board, BoardStatus } from './boards.model';
import { v1 as uuid } from 'uuid';
import { CreateBoardDto } from './dto/create-Board.dto'

@Injectable()
export class BoardsService {
	private boards: Board[] = [];

	getAllBoards(): Board[] {
		return this.boards;
    }

    createBoard(createBoardDto: CreateBoardDto): Board {
        const {title, description } = createBoardDto;
        const board: Board = {
            id: uuid(),
            title,
            description,
            status: BoardStatus.PUBLIC,
        };
        this.boards.push(board);
        return board;
    }
}
3.13) ID로 특정 게시물 가져오기(CRUD 중 R)
- service
getBoardById(id: string): Board {
        return this.boards.find((board) => board.id === id);
}- controller
    @Get('/:id')
    getBoardById(@Param('id') id: string): Board {
        return this.boardsService.getBoardById(id);
    }
@Param 으로 여러개 가져올때
localhost:5000?id=alkjdf&title=werdf
라고 나와있을 때
@Param() params: string[]으로 얻고
id 만 얻고 싶다면
@Param('id') id: string으로 얻는다.
3.14) ID로 특정 게시물 지우기
- service
    deleteBoard(id: string): void {
        this.boards = this.boards.filter((board) => board.id !== id);
} // 특정 id가 아니면 남기겠다는 뜻!- Controller
    @Delete('/:id')
    deleteBoard(@Param('id') id: string): void {
        this.boardsService.deleteBoard(id);
    }
3.15) 특정 게시물의 상태 업데이트
- PUBLIC or PRIVATE 를 업데이트 해주는 기능
- service
    updateBoardStatus(id: string, status: BoardStatus): Board {
        const board = this.getBoardById(id);
        board.status = status;
        return board;
}- controller
    @Patch('/:id/status')
    updateBoardSatus(
        @Param('id') id: string,
        @Body('status') status: BoardStatus,
    ) {
        return this.boardsService.updateBoardStatus(id, status);
    }
3.16) NestJS Pipes
Pipe란?
- 파이프는 @Injectable() 데코레이터로 주석이 달린 클래스
- 파이프는 data transformation(데이터 변형)과 data validation(데이터 유효성 검사)을 위해서 사용
- 파이프는 컨트롤러 경로 처리기에 의해 처리되는 인수에 대해 작동
- Nest는 메소드가 호출되기 직전에 파이프를 삽입하고 파이프는 메소드로 향하는 인수를 수신하고 이에대해 작동한다.
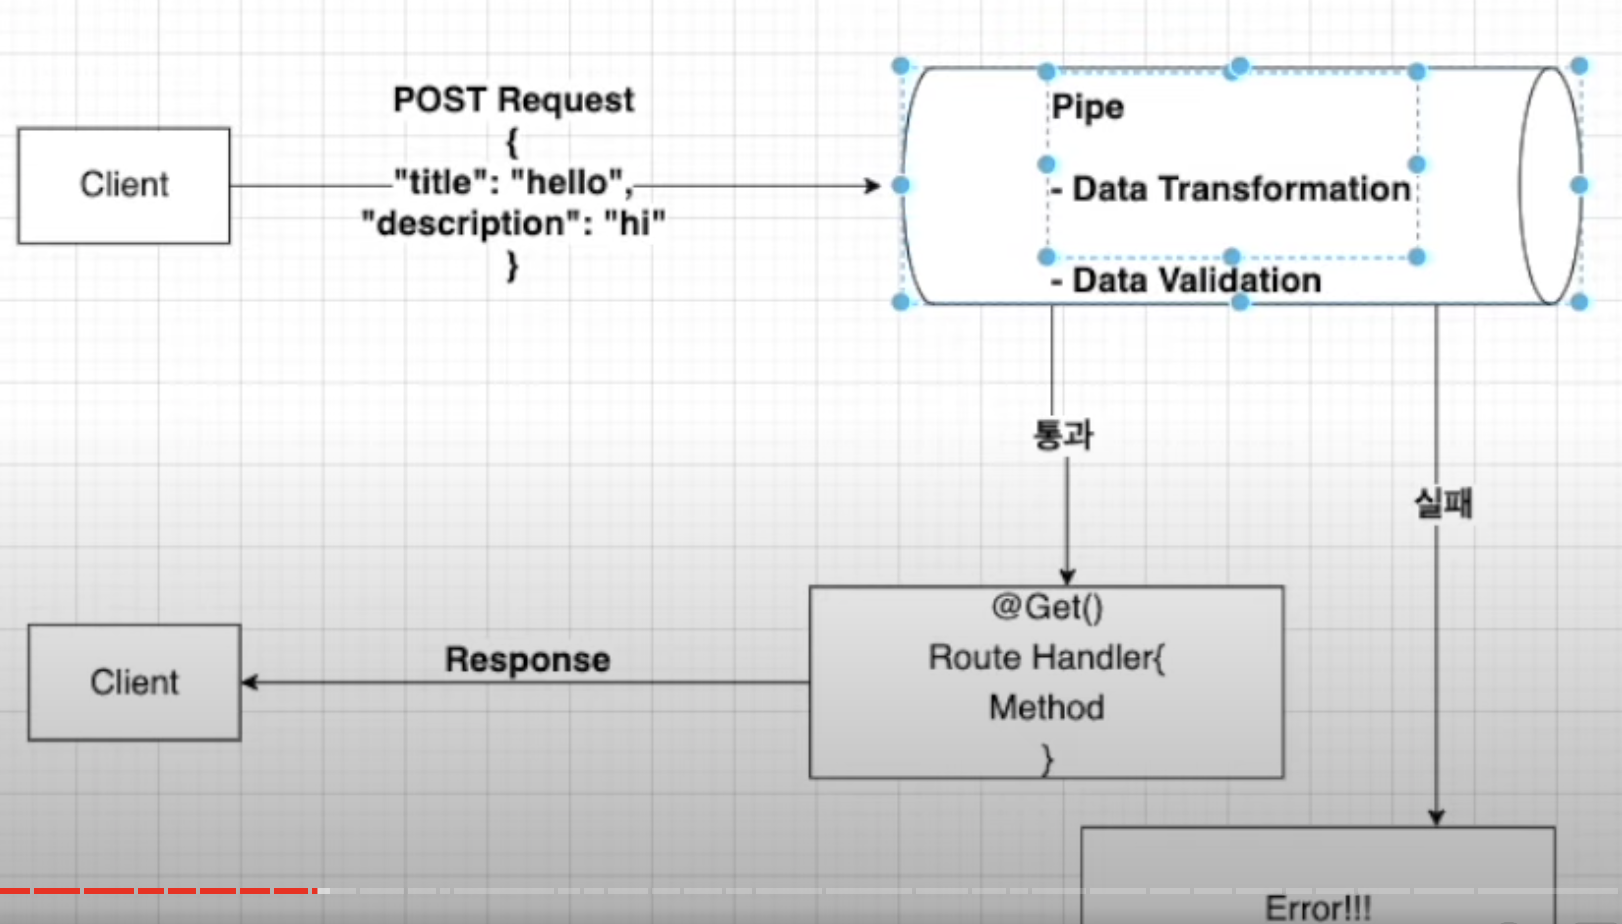
data transformation?
- 입력 데이터를 원하는 형식으로 변환(ex. 문자열에서 정수로)
data validation?
- 입력 데이터를 평가하고 유효한 경우 변경되지 않은 상태로 전달하면 된다. 그렇지 않으면 데이터가 올바르지 않을 때 예외를 발생시킨다. (ex. 이름의 길이가 10자 이하여야 하는데 10자 이상 되면 에러를 발생)
PIPE 사용 방법(Binding Pipes)
- 파이프를 사용하는 방법은 3가지
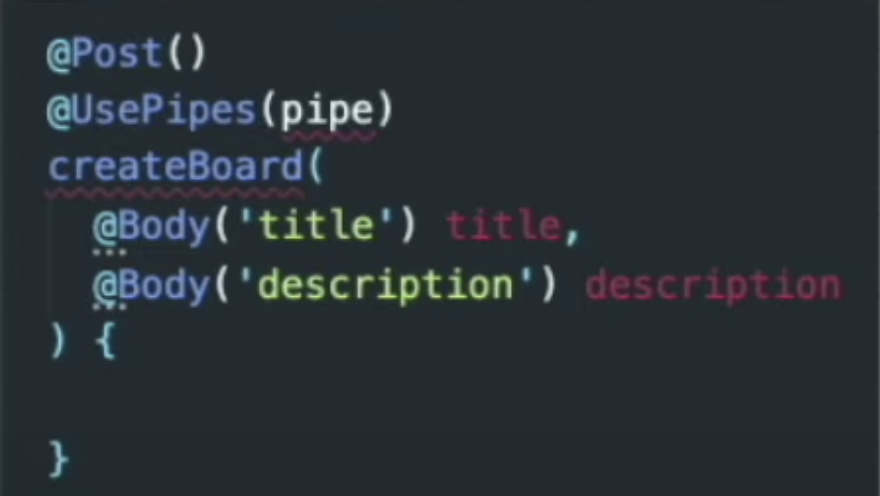
1. Handler-level Pipes- 핸들러 레벨에서 @UsePipes() 데코레이터를 이용해서 사용 할 수 있다. 이 파이프는 모든 파라미터에 적용된다. (title, description)
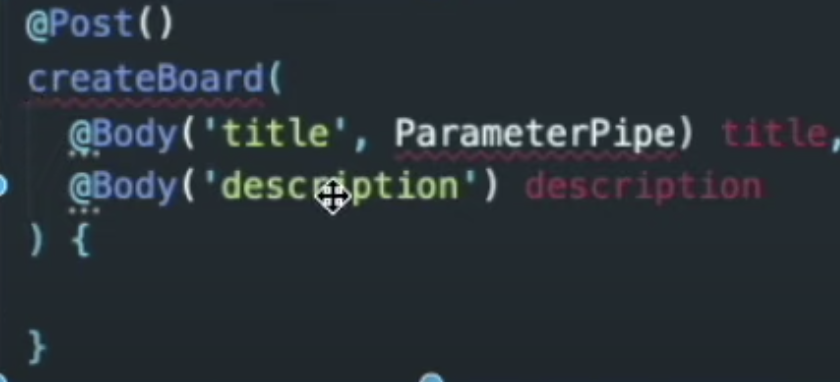
2. Parameter-level Pipes - 파라미터 레벨의 파이프이기에 특정한 파라미터에게만 적용 되는 파이프이다. 아래와 같은 경우 title만 파라미터 파이프가 적용 된다.
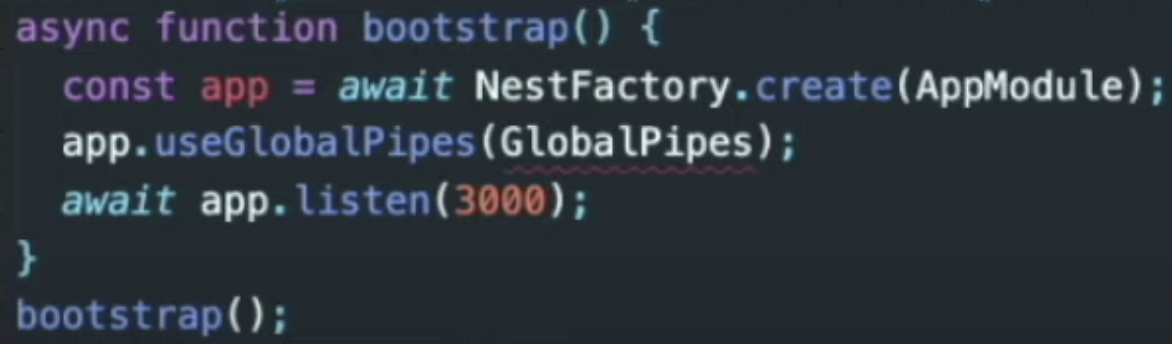
3. Global-level Pipes
- 글로벌 파이프로서 애플리케이션 레벨의 파이프이다. 클라이언트에서 들어오는 모든 요청에 적용된다. 가장 상단 영역인main.ts에 넣어주면 된다.
- 핸들러 레벨에서 @UsePipes() 데코레이터를 이용해서 사용 할 수 있다. 이 파이프는 모든 파라미터에 적용된다. (title, description)
Built-in Pipes
- NestJS에 기본적으로 사용할 수 있게 만들어 놓은 6가지 파이프가 있다.
1. ValidationPipe
2. ParseIntPipe
3. ParseBoolPipe
4. ParseArrayPipe
5. ParseUUIDPipe
6. DefaultValuePipe
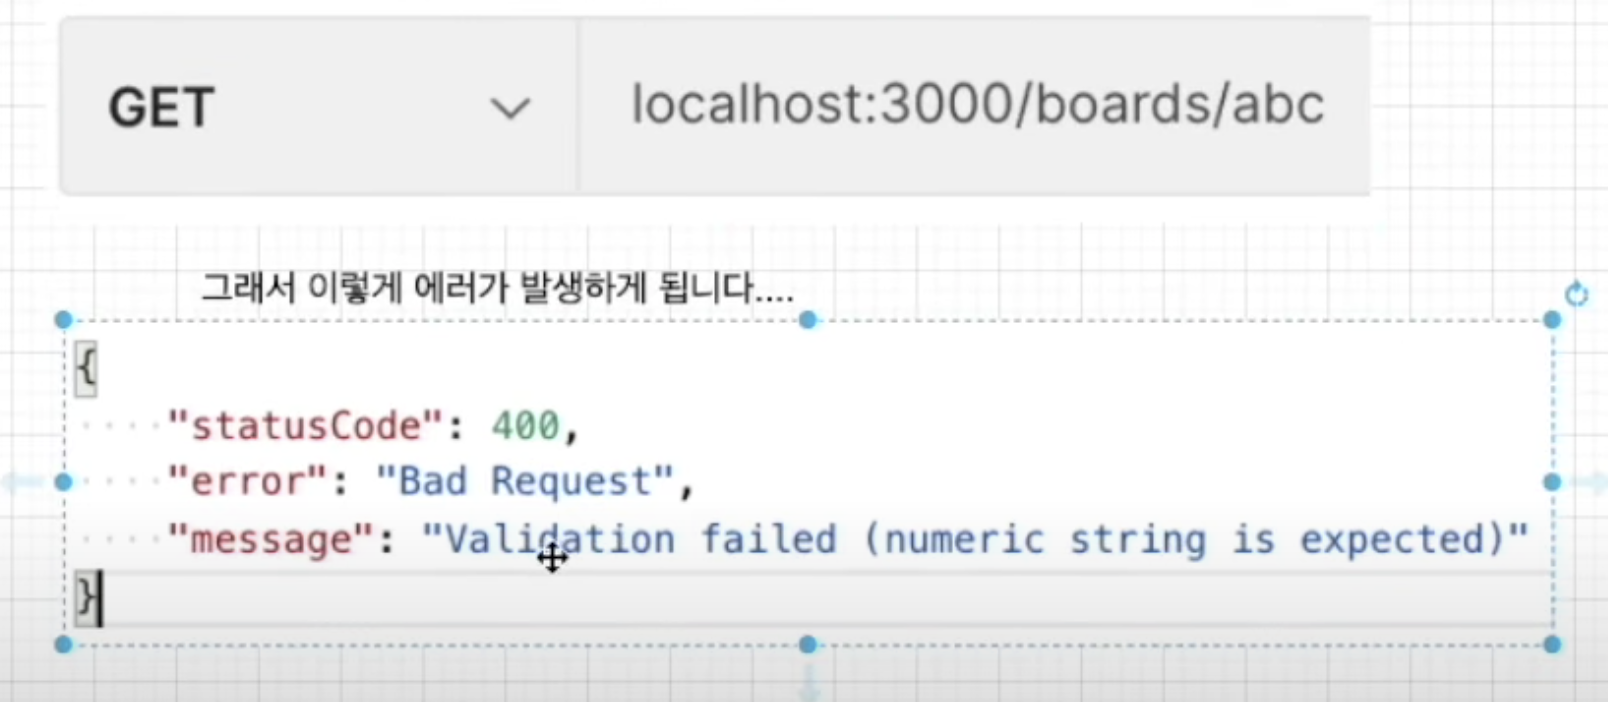
ex. ParseIntPipe 사용해보기

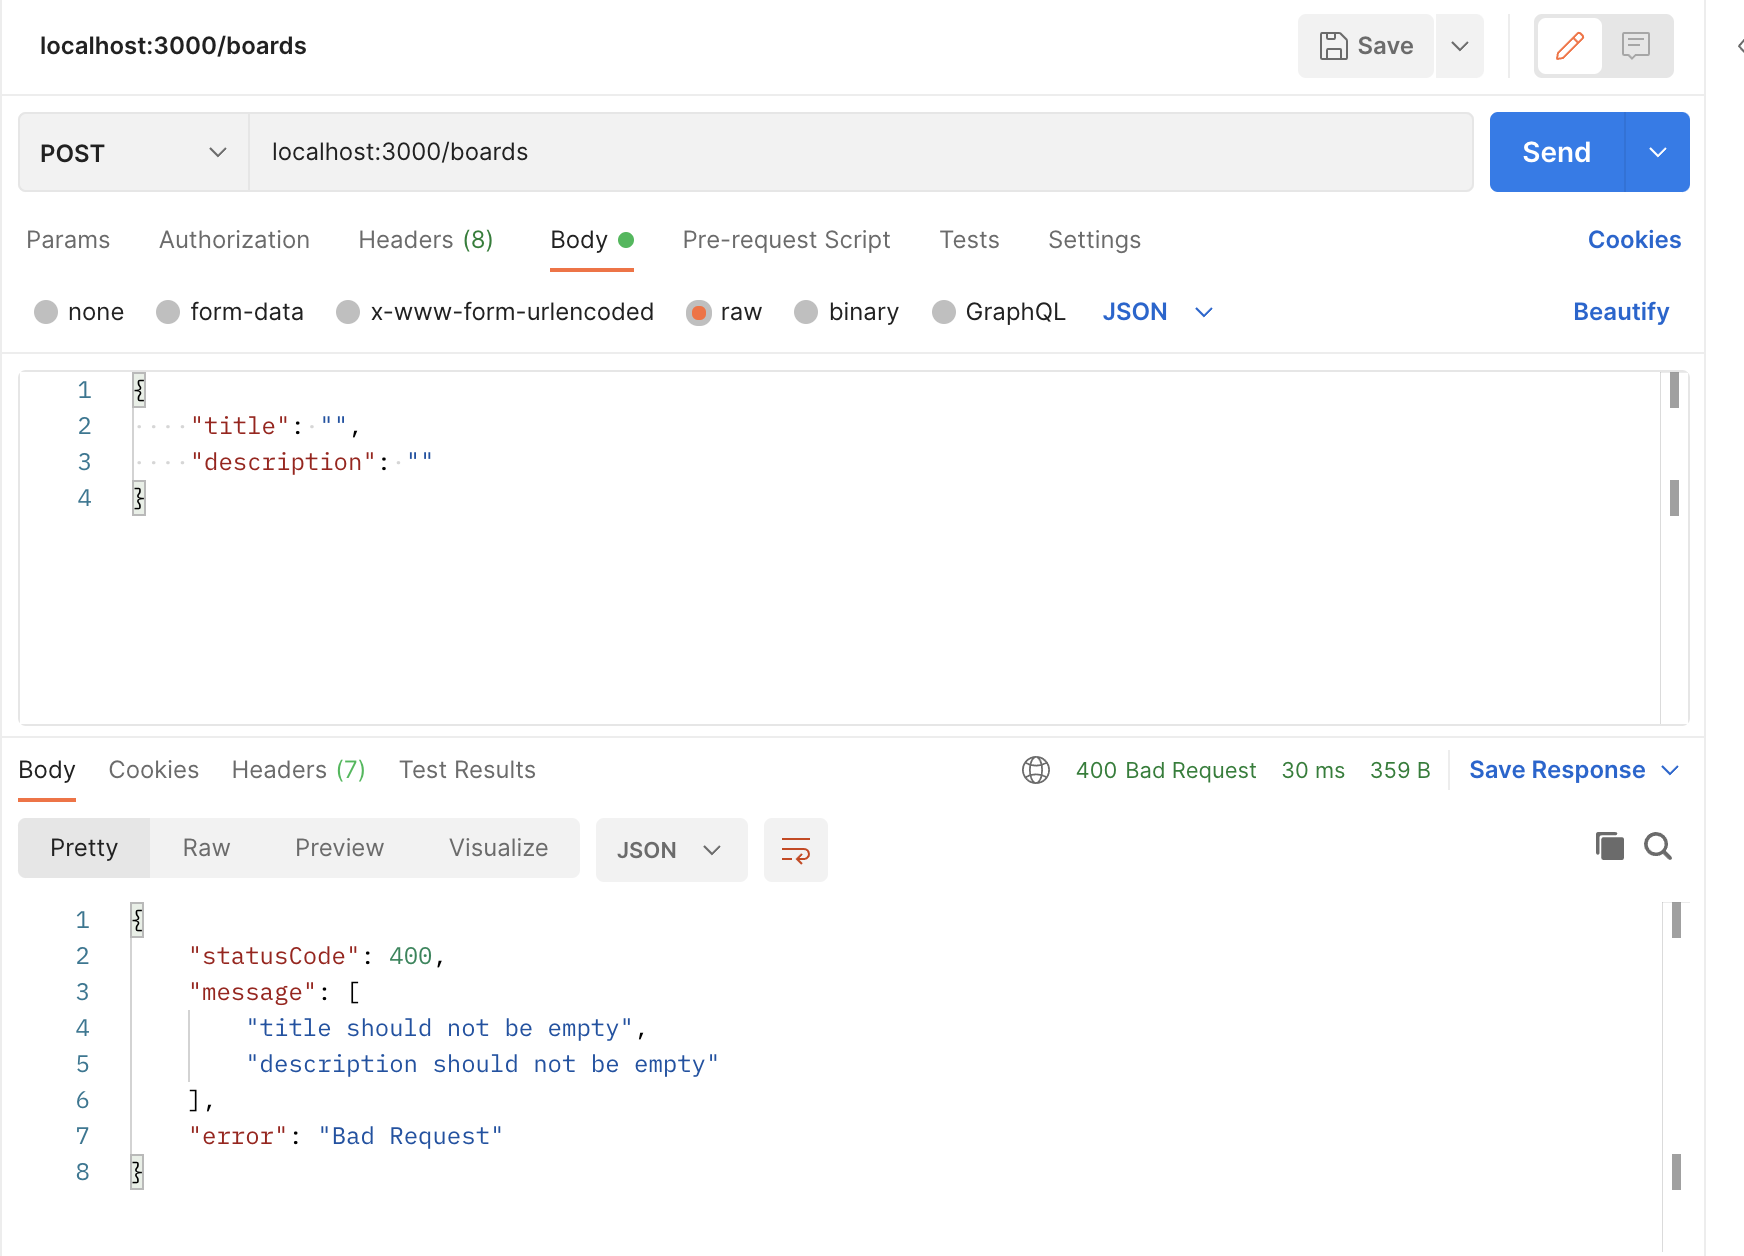
3.17) 파이프를 이용한 유효성 체크
- 파이프를 이용해서 게시물을 생성할 떄 유효성 체크를 한다.
ex. title과 description이 비어있는 상태일 때 board를 생성하지 않게 하려면~
npm install class-validator class-transformer --save여기도 오류(ERR)발생한다면 --legacy-peer-deps 붙여보기
파이프 생성하기
- create-board.dto.ts파일
import { IsNotEmpty } from "class-validator";

export class CreateBoardDto {
    @IsNotEmpty()
    title: string;

    @IsNotEmpty()
    description: string;
}- boards.controller.ts 파일
    @Post()
    @UsePipes(ValidationPipe) //파이프를 사용하겠다고 말해줘야함
    createBoard(
        @Body() createBoardDto: CreateBoardDto
    ): Board {
        return this.boardsService.createBoard(createBoardDto);
    }
3.18) 특정 게시물을 찾을 때 없는 경우 결과 값 처리
- 특정 게시물을 ID로 가져올 때 만약 없는 아이디의 게시물을 가져오려고 한다면 결과값으로 아무 내용 없이 돌아오기 때문에 이 부분을 처리할 것
에러 표출해주기
- 예외 인스턴스를 생성해 이용하기
- boards.service.ts 파일
    getBoardById(id: string): Board {
        const found = this.boards.find((board) => board.id === id);

        if (!found) {
            throw new NotFoundException(`Can't find Board with id ${id}` //원하는 에러문구 넣는 곳);
        }
        return found;
    }
3.19) 없는 게시물을 지우려 할 때 결과 값 처리
- 날아감,,,,,, 2:09:22부터 보세염,,,
3.20) 커스텀 파이프를 이용한 유효성 체크
- boards/pipes/board-status-validation.pipe.ts 생성 후 작성
import { PipeTransform, ArgumentMetadata } from "@nestjs/common";

export class BoardStatusValidationPipe implements PipeTransform {
    transform(value: any, metadata: ArgumentMetadata){
        console.log('value', value);
        console.log('metadata', metadata);

        return value;
    }
}- boards.controller.ts 파일
    @Patch('/:id/status')
    updateBoardSatus(
        @Param('id') id: string,
        @Body('status', BoardStatusValidationPipe) status: BoardStatus,
    ) {
        return this.boardsService.updateBoardStatus(id, status);
    }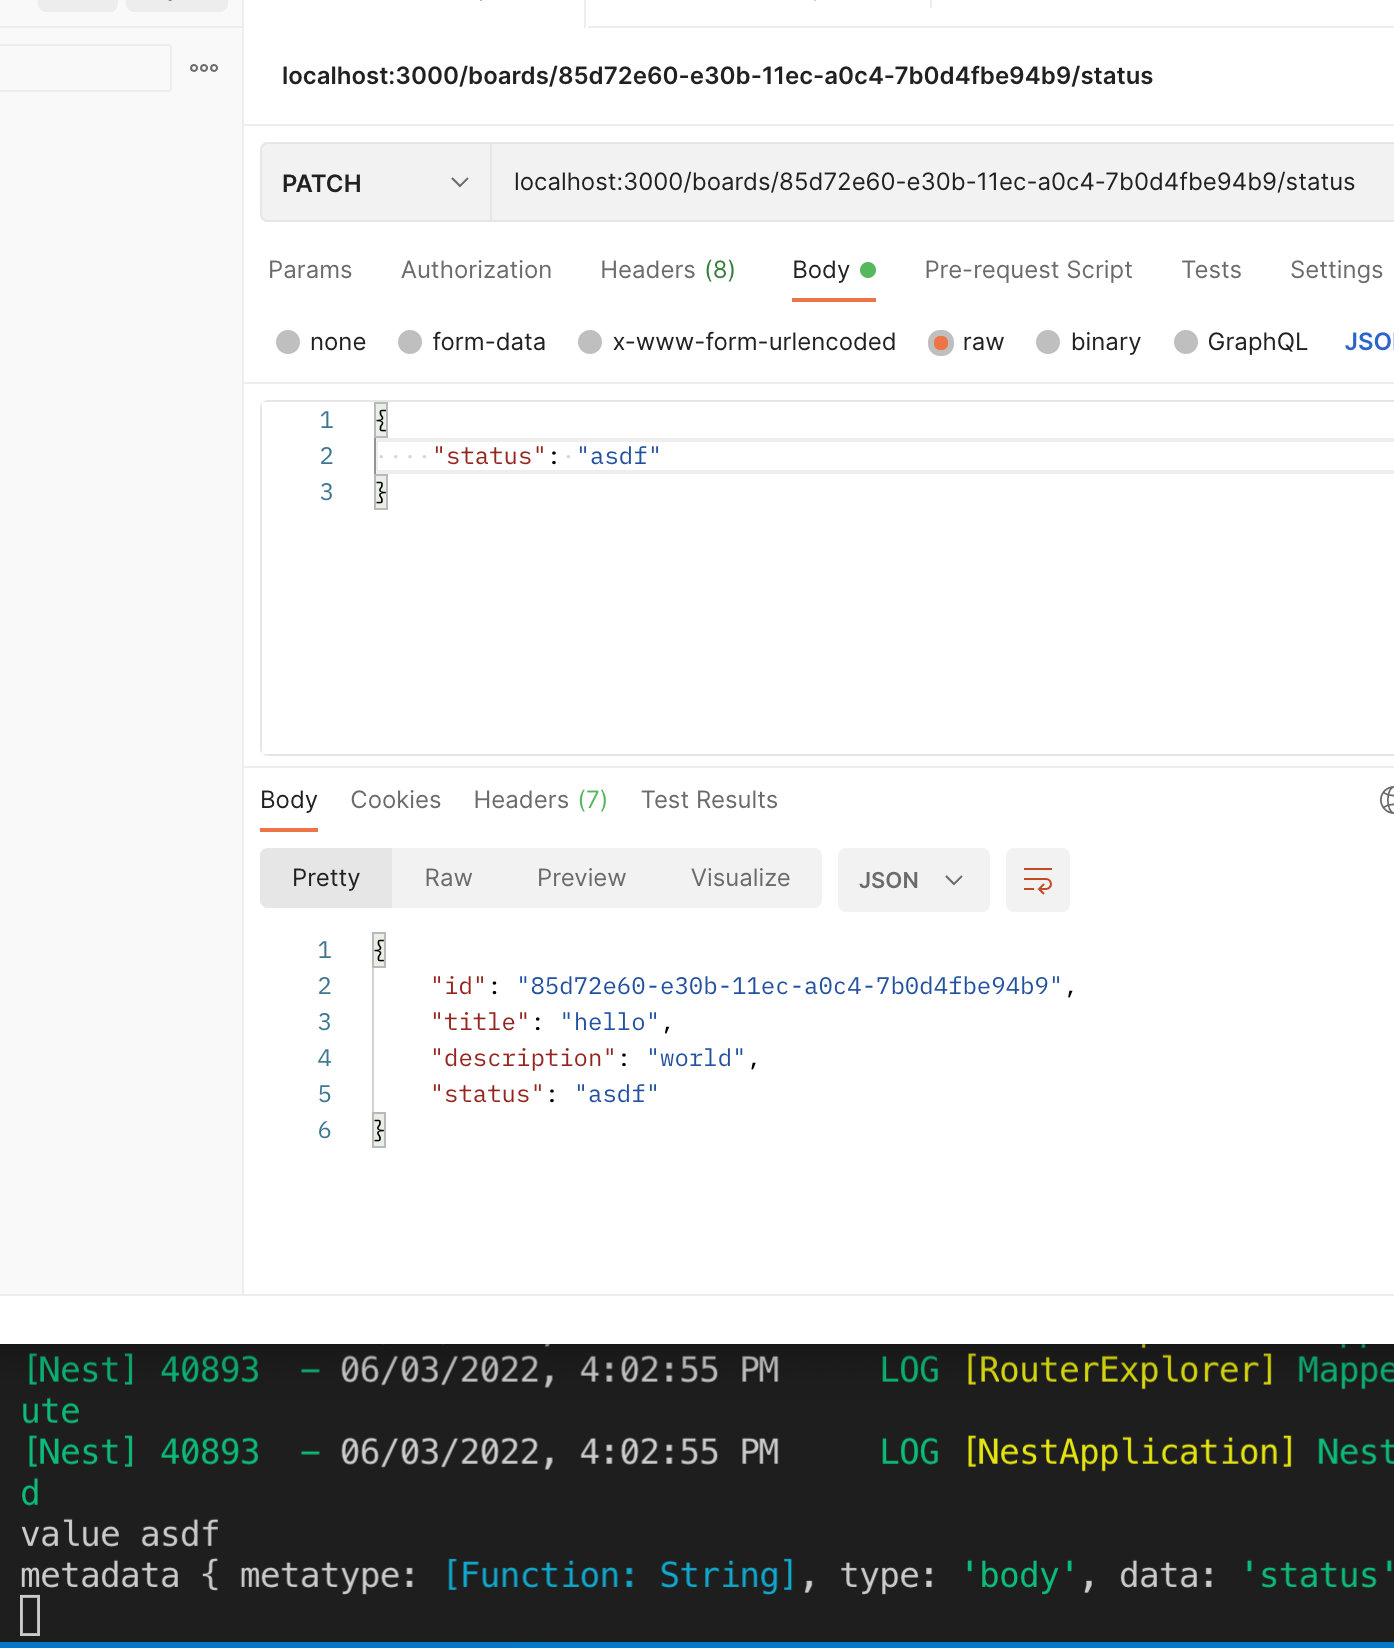
- status에 아무 값이나 넣어도 들어간다. 이 상황을 막기위해 커스텀 파이프를 만들어보자!
커스텀 파이프 만들기
- 구현할 기능: 상태는 PUBLIC과 PRIVATE외에 에러를 보내줘야함.
- 접두사(prefix)인 readonly는 속성을 읽기 전용으로 만드는데 사용. 읽기 전용 멤버는 클래스 외부에서 접근 가능하지만 해당 값은 변경 할 수 없다.
4.PG DB & Type DRM 이용해 앱 구성 (DB 연결)
- 이 전까지는 NestJS 기능을 익히기 위해 데이터를 보관할 때 메모리를 사용했다. 이제부터는 애플리케이션에 데이터베이스를 연결해서 보관해보겠다.
- 설치할 것 (PostgresSQL, pgAdmin(=데이터 베이스를 보는 툴))
4.1) 설치
brew install postgres
pgAdmin홈페이지 가서 다운받고 goinfre에 넣기!
pgAdmin 켜서 서버 만든후에 postgresql 이름을 yejsong으로 바꾸기
brew services start posgres해주면 오류 해결 가능
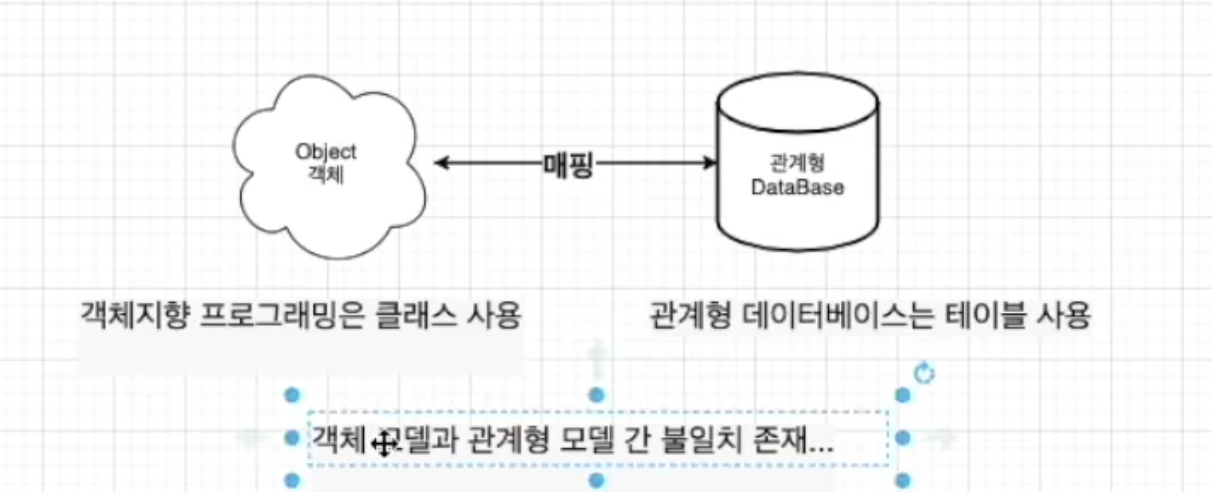
4.2) TypeORM(Object Relational Mapping)소개
TypeORM이란?
- TypeORM은 node.js에서 실행되고 TypeScript로 작성된 객체 관계형 매퍼 라이브러리이다.
ORM이란?
- 객체와 관계형 데이터베이스의 데이터를 자동으로 변형 및 연결하는 작업이다.
- ORM을 이용한 개발은 객체와 데이터베이스의 변형에 유연하게 사용할 수 있다.
-
TypeORM 특징과 이점
- 모델을 기반으로 데이터베이스 테이블 체계를 자동으로 생성한다.
- 데이터베이스에서 개체를 쉽게 삽입, 업데이트 및 삭제할 수 있다.
-테이블 간의 매핑(1:1, 1:다, 다:다)을 만듭니다. - 간단한 CLI 명령을 제공한다.
- TypeORM은 간단한 코딩으로 ORM 프레임 워크를 사용하기 쉽다.
- TypeORM은 다른 모듈과 쉽게 통합된다.
4.3) TypeORM 애플리케이션에서 이용하기
모듈 설치하기
typeorm : typeorm 모듈 (@0.2.45 버전 쓰기)
@nestjs/typeorm : nestjs에서 typeorm을 사용하기 위한 모듈 (@8.0.3 버전)
npm pg typeorm@0.2.45 @nestjs/typeorm @8.0.3 --save --legacy-peer-depsTypeORM 애플리케이션에 연결하기
- TypeORM 설정파일 생성 2:39:48
- src/configs/typeorm.config.ts
import { TypeOrmModuleOptions } from "@nestjs/typeorm";

export const typeORMConfig : TypeOrmModuleOptions = {
    type: 'postgres',
    host: 'localhost',
    port: 5432,
    username: 'yejsong',
    password: 'postgres',
    database: 'board-app',
    entities: [__dirname + '/../**/*.entity.{js,ts}'], //엔티티를 이용해서 데이터베이스 테이블을 생성해준다. 그래서 엔티티 파일이 어디있는지 설정해준다.
    synchronize: true //true값을 주면 애플리케이션을 다시 실행할 떄 엔티티안에서 수정된 컬럼의 길이 타입 변경값등을 해당 테이블을 Drop한 후 다시 생성해줌
}- app.module.ts 수정
import { Module } from '@nestjs/common';
import { BoardsModule } from './boards/boards.module';
import { TypeOrmModule } from '@nestjs/typeorm';
import { typeORMConfig } from './configs/typeorm.config';

@Module({
  imports: [
    TypeOrmModule.forRoot(typeORMConfig),
    BoardsModule],
})
export class AppModule {}
forRoot안에 넣어준 설정은 모든 sub-module 부수적인 모듈들에 다 적용된다.
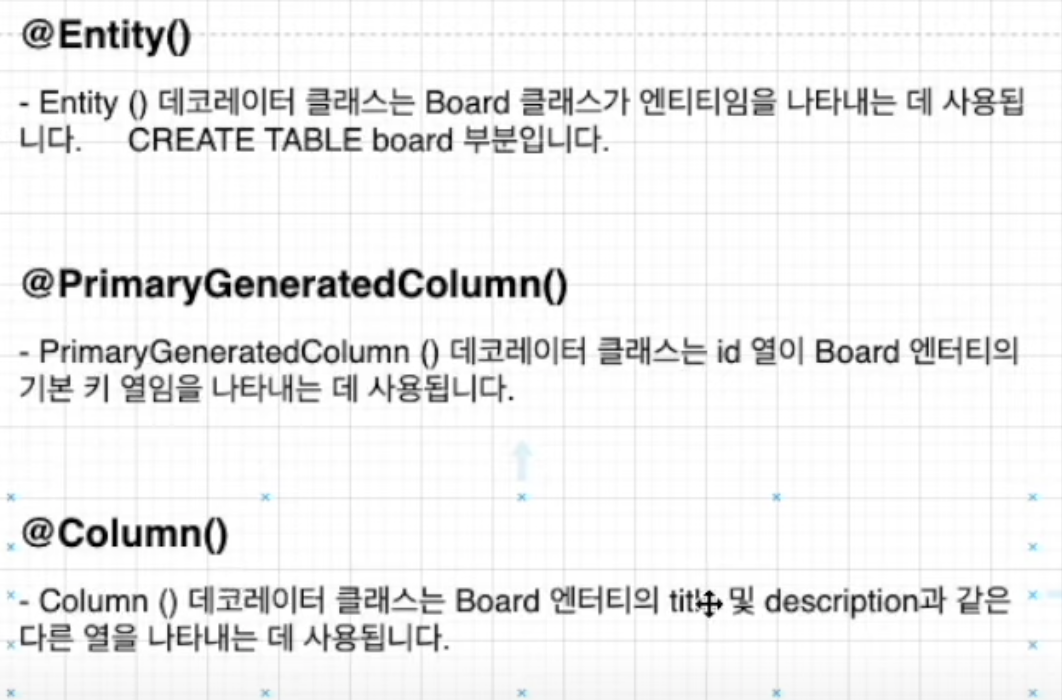
4.4) 게시물을 위한 엔티티(Entity) 생성하기
생성하는 이유?

엔티티 생성 소스 코드
- boards/board.entity.ts 파일 생성
import { BaseEntity, PrimaryGeneratedColumn, Column } from "typeorm";
import { BoardStatus } from "./boards.model";

@Entity()
export class Board extends BaseEntity {
    @PrimaryGeneratedColumn()
    id: number;

    @Column()
    title: string;

    @Column()
    description: string;

    @Column()
    status: BoardStatus;
}
4.5) Repository 생성하기
Repository란?
- 엔티티 개체와 함께 작동하며 엔티티 찾기, 삽입, 업데이트, 삭제 등을 처리한다.
데이터베이스 관련된 일을 서비스에서 하는게 아닌 레포지토리에서 해주면된다.(= Repository Pattern)
생성하기
- board.repository.ts 생성하기
import { EntityRepository, Repository } from "typeorm";
import { Board } from "./boards.entity";

@EntityRepository(Board)
export class BoardRepository extends Repository<Board> {

}- 생성한 파일에 Repository를 위한 클래스 생성하기
-> 생성시 Repository 클래스를 extends해준다.(find, insert, delete 등 엔티티를 컨트롤 해줄 수 있다.)
@EntityRepository()
-클래스를 사용자 정의(CUSTOM) 저장소로 선언하는 데 사용된다. 사용자 지정 저장소는 일부 특정 엔티티를 관리하거나 일반 저장소 일 수 있다.
- 생성 한 Repository를 다른 곳에서도 사용할 수 있게 하기 위해 (Injectable) board.module에서 import해준다.
import { Module } from '@nestjs/common';
import { BoardsController } from './boards.controller';
import { BoardsService } from './boards.service';
import { TypeOrmModule } from '@nestjs/typeorm';
import { BoardRepository } from './boards.repository';

@Module({
  imports: [
    TypeOrmModule.forFeature([BoardRepository]),
  ],
  controllers: [BoardsController],
  providers: [BoardsService]
})
export class BoardsModule {}
4.6) 데이터베이스와 함께 CRUD 구현 위해 정리할 부분
- Service 와 Controller 파일에서 로직들을 다 수정하기 위해 주석처리
- 메모리에 데이터 저장을 하는 것이 아니므로 Service에 board배열을 지워준다.
- 게시물 데이터를 정의하는데 Entity를 이용하기 때문에 Board Model파일에 있는 Board Interface 지워준다.
- 하지만 Status Enum은 아직 필요하기 때문에 이 부분만을 위한 파일을 생성해서 넣어준다.
- board.model.ts파일 삭제호 board-status.enum.ts생성
4.7) 아이디를 이용해서 특정 게시물 가져오기
- 데이터베이스에서 가져오고 TypeORM을 쓸 때는 Repository 패턴을 사용한다고 했기 때문에 Board 서비스에 Board 리포지터리를 넣어준다.(Injection)
- boards.service.ts
@Injectable(): 이 데코레이터를 이용해서 이 서비스에서 BoardRepository를 이용한다고 이걸 boardRepository 변수에 넣어준다.
Service에서 getBoardById 메소드 생성하기
- typeORM에서 제공하는 findOne 메소드 사용하기
- async await을 이용해 데이터베이스 작업이 끝난 후 결과값을 받을 수 있게 해주기
- boards.service.ts
    async getBoardById(id: number): Promise <Board> {
        const found = await this.boardRepository.findOne(id);

        if (!found){
            throw new NotFoundException(`Can't find Board with id ${id}`);
        }
        return found;
}- boards.controller.ts
    @Get('/:id')
    getBoardById(@Param('id')id: number): Promise<Board> {
        return this.boardsService.getBoardById(id);
    }
4.8) 게시물 생성하기
- boards.service.ts
    async createBoard(createBoardDto: CreateBoardDto) : Promise<Board> {
        const { title, description } = createBoardDto;

        const board = this.boardRepository.create({
            title,
            description,
            status: BoardStatus.PUBLIC
        })

        await this.boardRepository.save(board);
        return board;
}- boards.controller.ts
    @Post()
    @UsePipes(ValidationPipe)
    createBoard(@Body() createBoardDto: CreateBoardDto): Promise<Board> {
        return this.boardsService.createBoard(createBoardDto);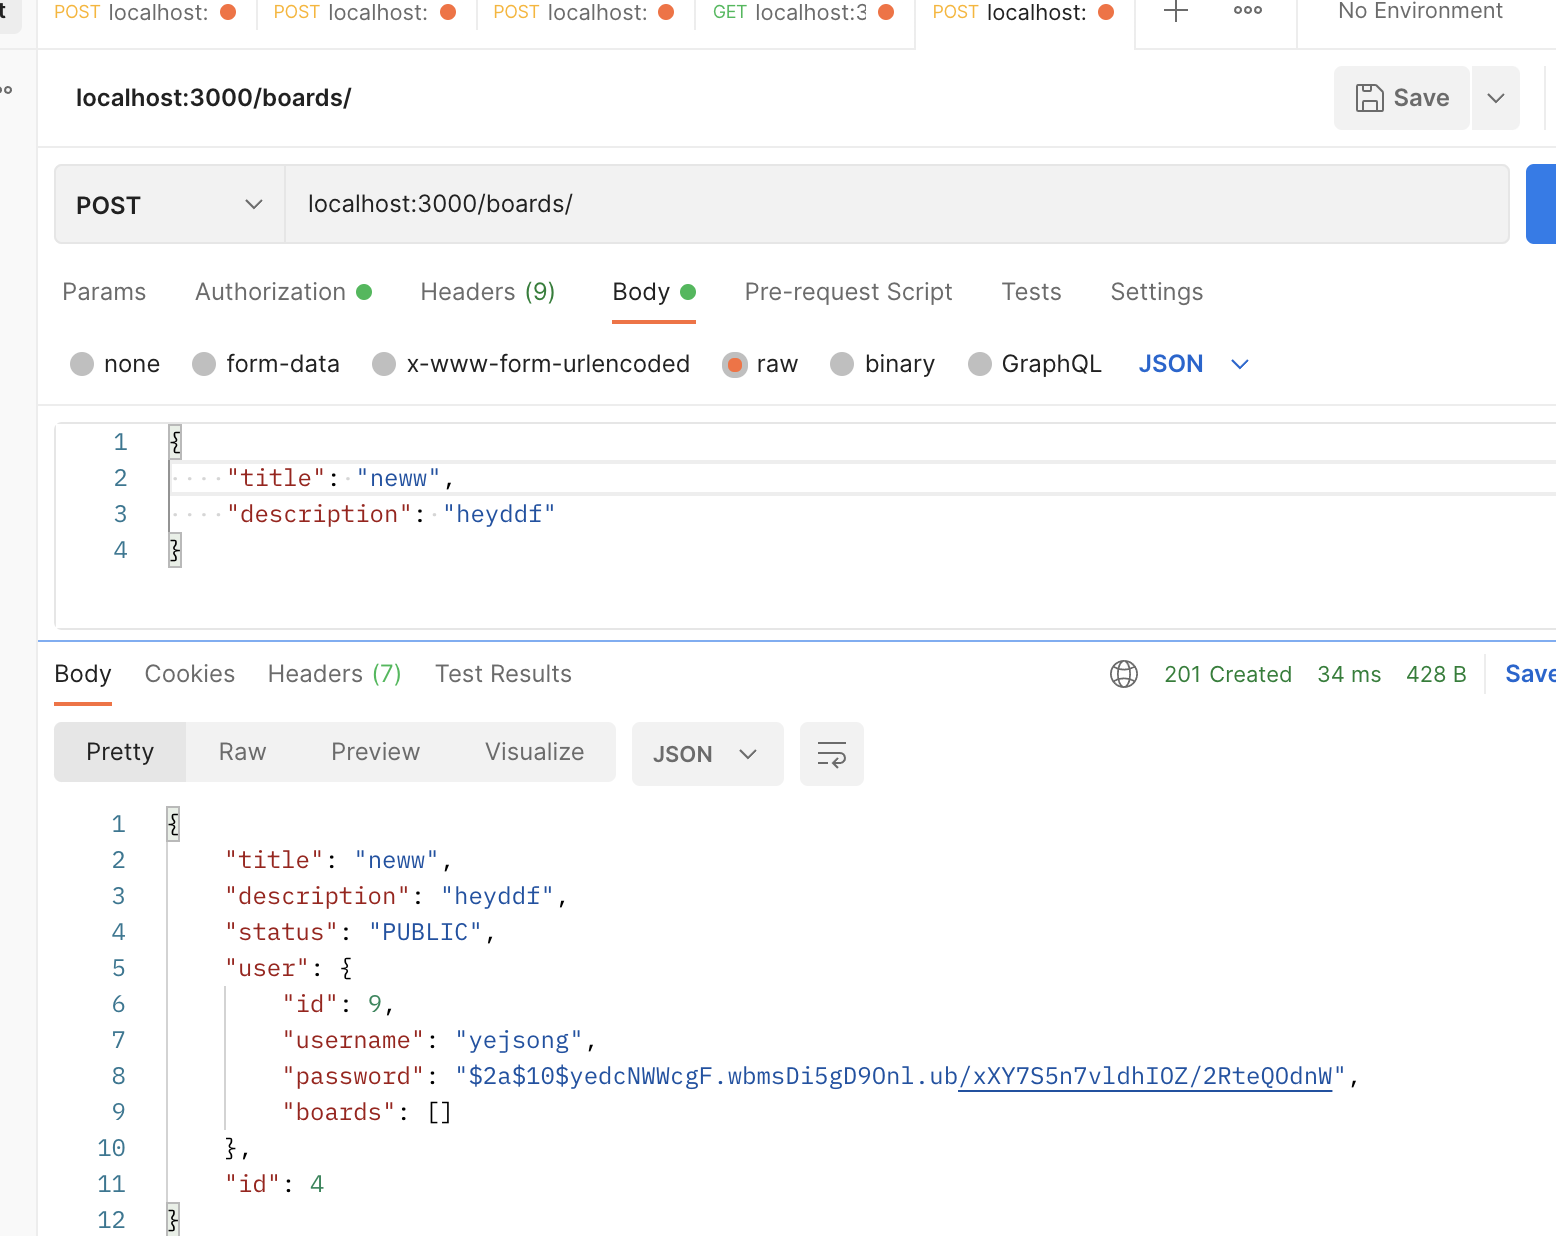
}- Postman으로 테스트해보기
데이터베이스 관련 로직 Repository로 이동
- boards.repository.ts
import { EntityRepository, Repository } from "typeorm";
import { Board } from "./boards.entity";
import { CreateBoardDto } from "./dto/create-Board.dto";
import { BoardStatus } from "./board-status.enum";

@EntityRepository(Board)
export class BoardRepository extends Repository<Board> {
    async createBoard(createBoardDto: CreateBoardDto): Promise<Board> {
        const { title, description } = createBoardDto;

        const board = this.create({
            title,
            description,
            status: BoardStatus.PUBLIC
        })

        await this.save(board);
        return board;
    }
}- boards.service.ts
    createBoard(createBoardDto: CreateBoardDto) : Promise<Board> {
        return this.boardRepository.createBoard(createBoardDto);
    }
4.9) 게시물 삭제하기
remove() vs delete()?
- remove() : 무조건 존재하는 아이템을 remove 메소드를 이용해서 지워야함 그렇지 않으면 404Error 발생
- delete(): 만약 아이템이 존재하면 지우고 존재하지 않으면 아무런 영향이 없다.
-> 이러한 차이때문에 remove를 이요하면 하나의 아이템을 지울 때 두번 데이터베이스를 이용해야하기 때문에(아이템 유무+ 지우기) 데이터베이스에 한번만 접근해도 되는 delete 메소드를 사용 - boards.service.ts
    async deleteBoard(id: number): Promise<void> {
        const result = await this.boardRepository.delete(id);

        console.log('result', result);
}- boards.controller.ts
    @Delete(':id')
    deleteBoard(@Param('id', ParseIntPipe) id: number): Promise<void> {
        return this.boardsService.deleteBoard(id);
}- boards.service.ts (delete를 사용했을 시 없는 게시물을 삭제할 때 오류 메세지를 발생시키는 방법)
    async deleteBoard(id: number): Promise<void> {
        const result = await this.boardRepository.delete(id);

        if (result.affected === 0) {
            throw new NotFoundException(`Can't find Board with id ${id}`);
        }

        console.log('result', result);
    }
4.10) 게시물 상태 업데이트하기
- boards.service.ts
    async updateBoardStatus(id: number, status: BoardStatus): Promise<Board> {
        const board = await this.getBoardById(id);
        board.status = status;
        await board.save();
        return (board);
    }
- boards.controller.ts
    @Patch('/:id/status')
    updateBoardStatus(
        @Param('id', ParseIntPipe) id: number,
        @Body('status', BoardStatusValidationPipe) status: BoardStatus,
    ): Promise<Board> {
        return this.boardsService.updateBoardStatus(id, status);
    }
4.11) 모든 게시물 가져오기
- boards.service.ts
    async getAllBoards(): Promise<Board[]> {
        return this.boardRepository.find();
}- boards.controller.ts
    @Get()
    getAllTask(): Promise<Board[]> {
        return this.boardsService.getAllBoards();
    }
5. 인증 처리 추가(JWT)
5.1) 인증 기능 구현을 위한 준비
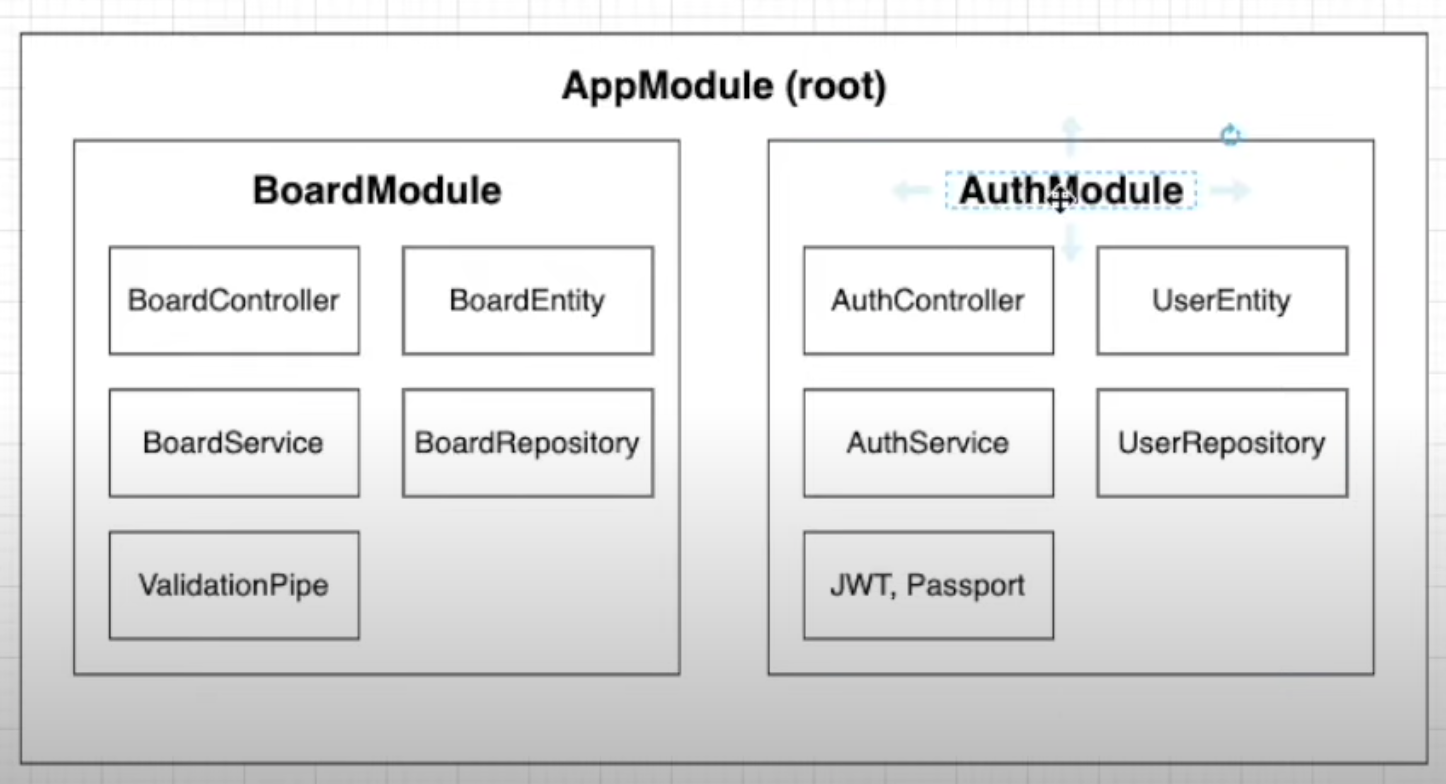
4에서는 BoardModule을 만들었다.
5부터는 AuthModule을 만든다.
=> 게시판을 생성한 사람만 게시물을 삭제할 수 있도록 권한을 처리하게 하기 위한 모듈임.
CLI를 이용한 모듈, 컨트롤러, 서비스 생성
nest g module auth
nest g controller auth --no-spec
nest g service auth --no-spec
User를 위한 Entity 생성
- 유저에 대한 인증을 하는 것이니 유저가 필요하다. 유저 데이터를 위한 유저 Entity를 생성해준다.
- src/auth/user.entity.ts 파일 생성
import { BaseEntity, PrimaryGeneratedColumn, Column, Entity } from "typeorm";

@Entity()
export class User extends BaseEntity {
    @PrimaryGeneratedColumn()
    id: number;

    @Column()
    username: string;

    @Column()
    password: string;
}
Repository 생성
- User, Entity를 생성, 수정, 삭제등의 로직을 처리하기 위해 Repository를 작성한다
- user.repository.ts 파일 작성
import { EntityRepository, Repository } from "typeorm";
import  { User } from "./user.entity";

@EntityRepository(User)
export class UserRepository extends Repository<User> {

}
생성된 User Repository를 다른 곳에서 사용하기 위해서
- auth module에서 imports 안에 UserRepository를 넣어준다.
- auth.module.ts
import { Module } from '@nestjs/common';
import { AuthController } from './auth.controller';
import { AuthService } from './auth.service';
import { TypeOrmModule } from '@nestjs/typeorm';
import { UserRepository } from './user.repository';

@Module({
  imports: [
    TypeOrmModule.forFeature([UserRepository]) //forFeature은 이 모듈안에 UserRepository 등록을 해주는 것
  ],
  controllers: [AuthController],
  providers: [AuthService]
})
export class AuthModule {}
Repository Injection
- User Repository를 auth Service안에서 사용하기 위해 유저 리포지터리를 넣어준다.
- auth.service.ts
import { Injectable, Inject } from '@nestjs/common';
import { UserRepository } from './user.repository';

@Injectable()
export class AuthService {
    constructor(
        @Inject(UserRepository)
        private userRepository: UserRepository
    ){ }
}
5.2) 회원 가입 기능 구현
- user.repository.ts
import { EntityRepository, Repository } from "typeorm";
import  { User } from "./user.entity";
import { AuthCredentialDto } from "./dto/auth-credential.dto";

@EntityRepository(User)
export class UserRepository extends Repository<User> {
    async createUser(authCredentialDto: AuthCredentialDto): Promise<void> {
        const {username, password} = authCredentialDto;
        const user = this.create({ username, password });
        await this.save(user);
    }
}- auth/dto/auth-credential.dto.ts
export class AuthCredentialDto {
    username: string;
    password: string;
}- auth.service.ts
import { Injectable, Inject } from '@nestjs/common';
import { UserRepository } from './user.repository';
import { AuthCredentialsDto } from "./dto/auth-credential.dto";

@Injectable()
export class AuthService {
    constructor(
        @Inject(UserRepository)
        private userRepository: UserRepository
    ){ }

    async signUp(authCredentialsDto: AuthCredentialsDto): Promise<void> {
        return this.userRepository.createUser(authCredentialsDto);
    }
}
- user.controller.ts
import { Controller, Post, Body } from '@nestjs/common';
import { AuthService } from './auth.service';
import { AuthCredentialsDto } from './dto/auth-credential.dto';

@Controller('auth')
export class AuthController {
    constructor ( private authService: AuthService ) {}

    @Post('/signup')
    signUp(@Body() authcredentialsDto: AuthCredentialsDto): Promise <void> {
        return this.authService.signUp(authcredentialsDto);
    }
}
5.3) 유저 데이터 유효성 체크
Class-validator
- 유효성 체크를 위해 class-validator 모듈을 이용한다.
- Dto 파일에서 Request로 들어오는 값을 정의해주고 있기 때문에 Dto 파일 값들 하나하나에 class-validaotr를 이용해서 유효성 조건을 넣어준다.
- auth-credential.dto.ts
import { IsString, MinLength, MaxLength, Matches } from "class-validator";

export class AuthCredentialsDto {
    @IsString()
    @MinLength(4)
    @MaxLength(20)
    username: string;

    @IsString()
    @MinLength(4)
    @MaxLength(20)
    //영어랑 숫자만 가능한 유효성 체크, (옵션)유효성 체크를 통과하지 못할 경우 나올 메세지
    @Matches(/^[a-zA-Z0-9]*$/, {
        message: 'password only accepts english and number'})
    password: string;
}
ValidationPipe
- 요청이 컨트롤러에 있는 핸들러로 들어왔을 떄 Dto에 있는 유효성 조건에 맞게 체크를 해주려면 ValidationPipe를 해줘야함
- auth.controller.ts
    @Post('/signup')
    signUp(@Body(ValidationPipe) authcredentialsDto: AuthCredentialsDto): Promise <void> {
        return this.authService.signUp(authcredentialsDto);
    }
5.4) 유저 이름에 유니크한 값 주기
- repository 에서 findOne 메소드를 이용해서 이미 같은 유저 이름을 가진 아이디가 있는지 확인하고 없다면 데이터를 저장하는 방법. -> 이 방법은 데이터베이스 처리를 두번한다.
- 데이터베이스 레벨에서 만약 같은 이름을 가진 유저가 있다면 에러를 던지는 방법
두번째 방법으로 구현
- user.entity.ts에서 원하는 유니크한 값을 원하는 필드 값을 정해주면된다.
import { BaseEntity, PrimaryGeneratedColumn, Column, Entity, Unique } from "typeorm";

@Entity()
@Unique(['username'])
export class User extends BaseEntity {
    @PrimaryGeneratedColumn()
    id: number;

    @Column()
    username: string;

    @Column()
    password: string;
}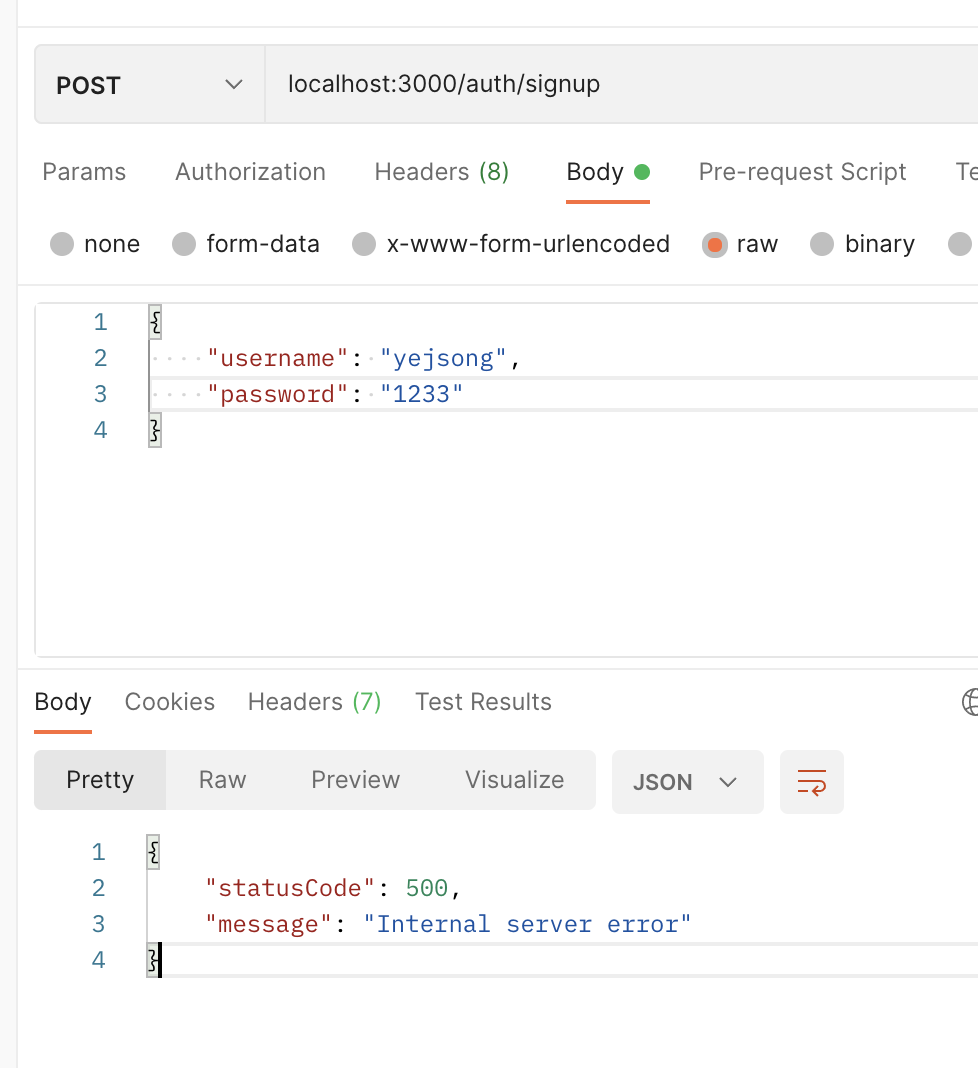
- 이미 있는 유저를 다시 생성하려 하면 위와 같은 에러가 나온다.
- NestJS에서 에러가 발생하고 그걸 try catch구문인 catch에서 잡아주지 않는 다면 이 에러가 Controller레벨로 가서 그냥 500에러를 던진다.
- 이러한 이유로 try catch 구문으로 에러를 잡아줘야한다.
- 에러를 콘솔로 출력했을 때

- user.repository.ts
import { EntityRepository, Repository } from "typeorm";
import  { User } from "./user.entity";
import { AuthCredentialsDto } from "./dto/auth-credential.dto";
import { ConflictException, InternalServerErrorException } from "@nestjs/common";

@EntityRepository(User)
export class UserRepository extends Repository<User> {
    async createUser(authcredentialsDto: AuthCredentialsDto): Promise<void> {
        const {username, password} = authcredentialsDto;
        const user = this.create({ username, password });

        try {
            await this.save(user);
        } catch (error) {
            if (error.code === '23505') {
                throw new ConflictException('Existing username')
            } else {
                throw new InternalServerErrorException();
            }
        }
    }

}
5.5) 비밀번호 암호화 하기
bcryptjs 모듈 사용
npm install bcryptjs --save --legacy-peer-deps비밀번호를 데이터베이스에 저장하는 방법
- 원본 비밀번호를 저장 (최악)
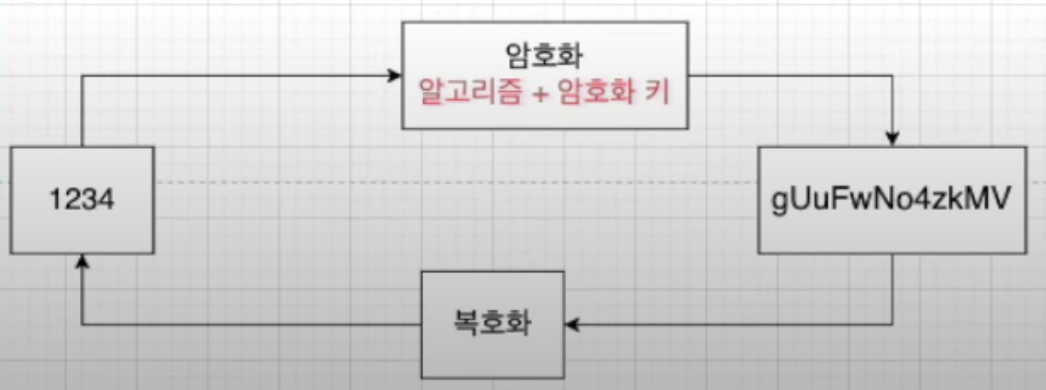
- 비밀번호를 암호화 키와 함께 암호화(양방향)
- 어떠한 암호를 이용해서 비밀번호를 암호화 하고 그 암호를 이용하여 복호화도 가능
- 암호화 키가 노출되면 알고리즘은 대부분 오픈되어 있기 때문에 위험도 높음
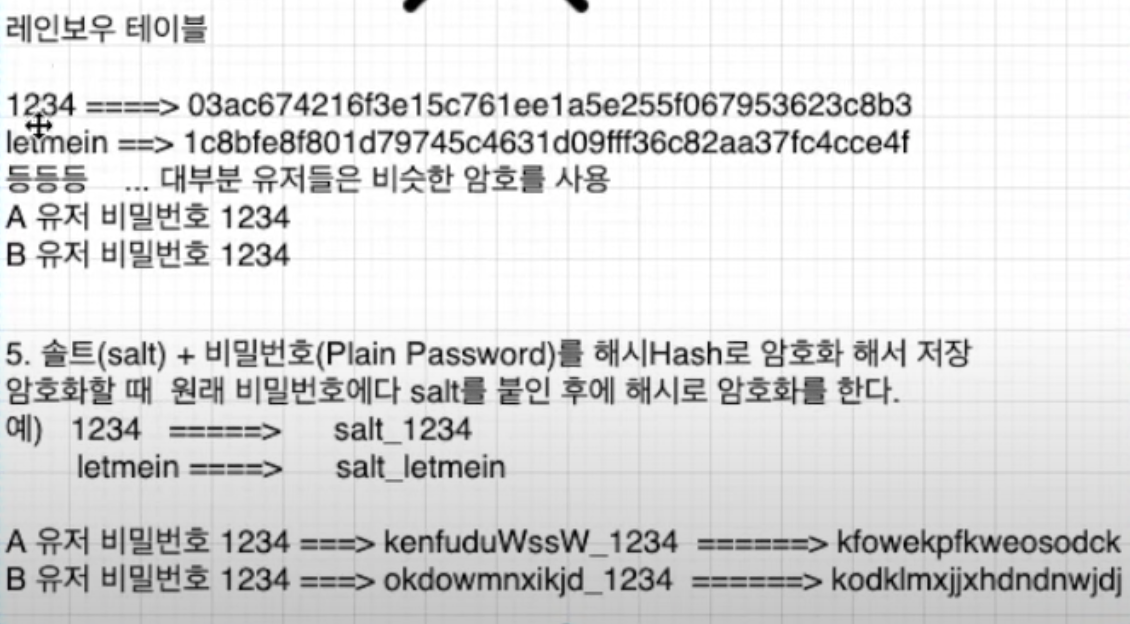
- SHA256등 hash로 암호화해서 저장(단방향)
- 레인보우 테이블을 만들어서 암호화된 비밀번호를 비교해서 비밀번호 알아냄

레인보우 테이블
-
- user.repository.ts
import { EntityRepository, Repository } from "typeorm";
import  { User } from "./user.entity";
import { AuthCredentialsDto } from "./dto/auth-credential.dto";
import { ConflictException, InternalServerErrorException } from "@nestjs/common";
import * as bcrypt from 'bcryptjs';

@EntityRepository(User)
export class UserRepository extends Repository<User> {
    async createUser(authcredentialsDto: AuthCredentialsDto): Promise<void> {
        const {username, password} = authcredentialsDto;

        const salt = await bcrypt.genSalt();
        const hashedPassword = await bcrypt.hash(password, salt);
        const user = this.create({ username, password: hashedPassword });

        try {
            await this.save(user);
        } catch (error) {
            if (error.code === '23505') {
                throw new ConflictException('Existing username')
            } else {
                throw new InternalServerErrorException();
            }
        }
    }

}
5.6) 로그인 기능 구현하기
기능 구현 순서
- 클라이언트에서 제공받은 아이디를 이용해서 해당 아이디가 데이터베이스에 있는 아이디인지 확인
- auth.service.ts
    async singIn(authcredentialsDto: AuthCredentialsDto): Promise<string> {
        const { username, password } =  authcredentialsDto;
        const user = await this.userRepository.findOne({username});

        if (user && (await (await bcrypt.compare(password, user.password)))) {
            return 'login success';
        } else {
            throw new UnauthorizedException('login Failed')
        }
}- auth.controller.ts
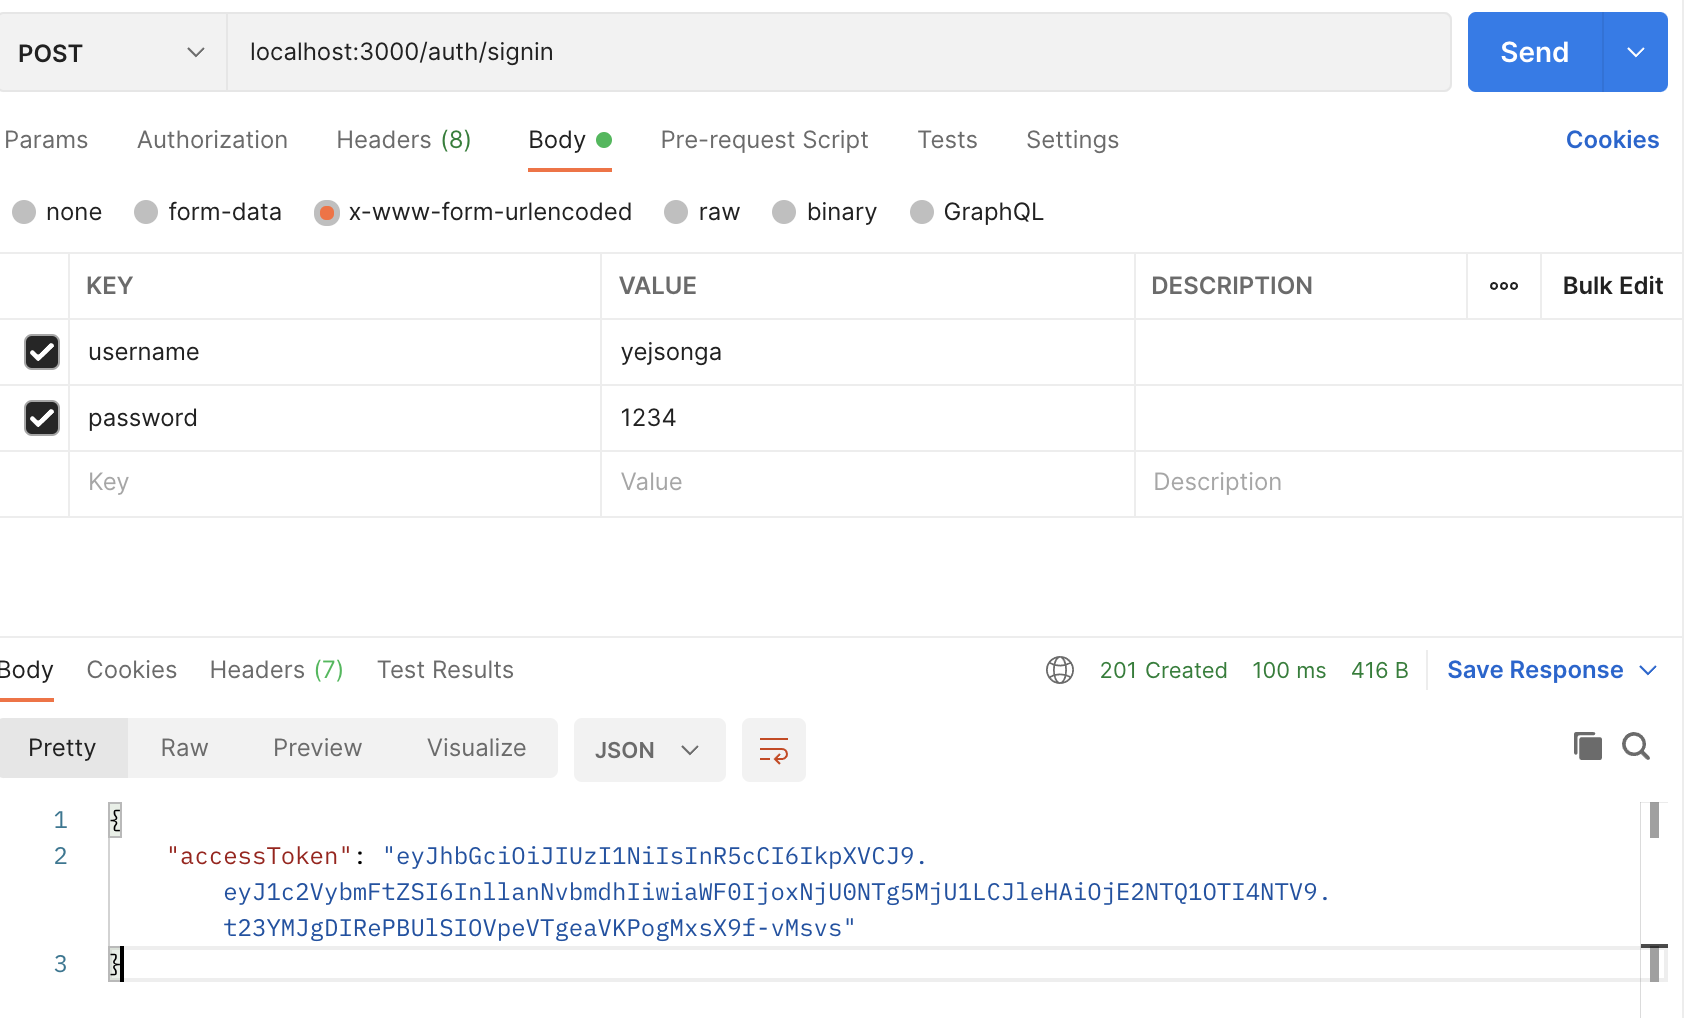
    @Post('/signin')
    signin(@Body(ValidationPipe) authCredentialsDto: AuthCredentialsDto) {
        return this.authService.singIn(authCredentialsDto);
    }
5.7) JWT에 대하여
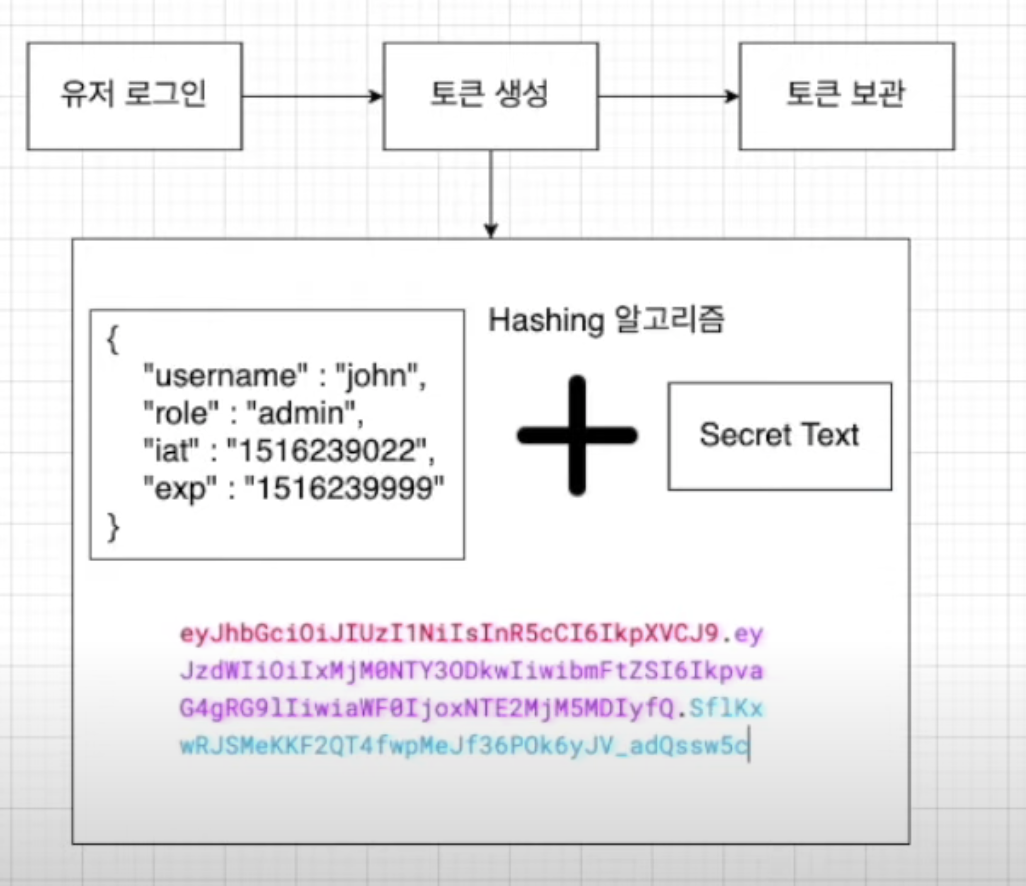
- 로그인 할 때 그 로그인한 고유 유저를 위한 토큰을 생성해야함. 그 토큰을 생성할 때 JWT라는 모듈을 사용한다.
JWT란?
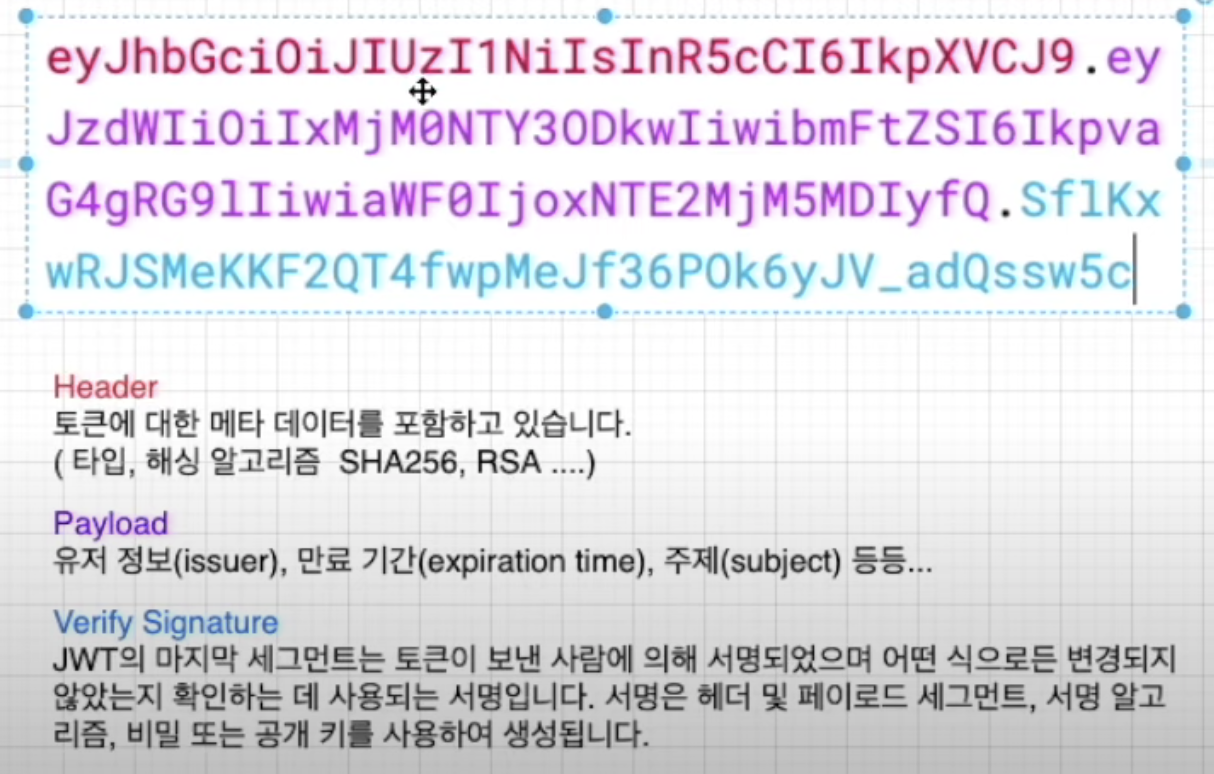
- JWT(JSON Web Token)는 당사자간에 정보를 JSON개체로 안저하게 전송하기위한 컴팩트하고 독립적인 방식을 정의하는 개방형 표준입니다. 이 정보는 디지털 서명이 되어있으므로 확인하고 신뢰할 수 있다.
- 간단하게 말해, 정보를 안전하게 전할 때 혹은 유저의 권한 같은 것을 체크하기 위해 사용하는데 유용한 모듈이다.
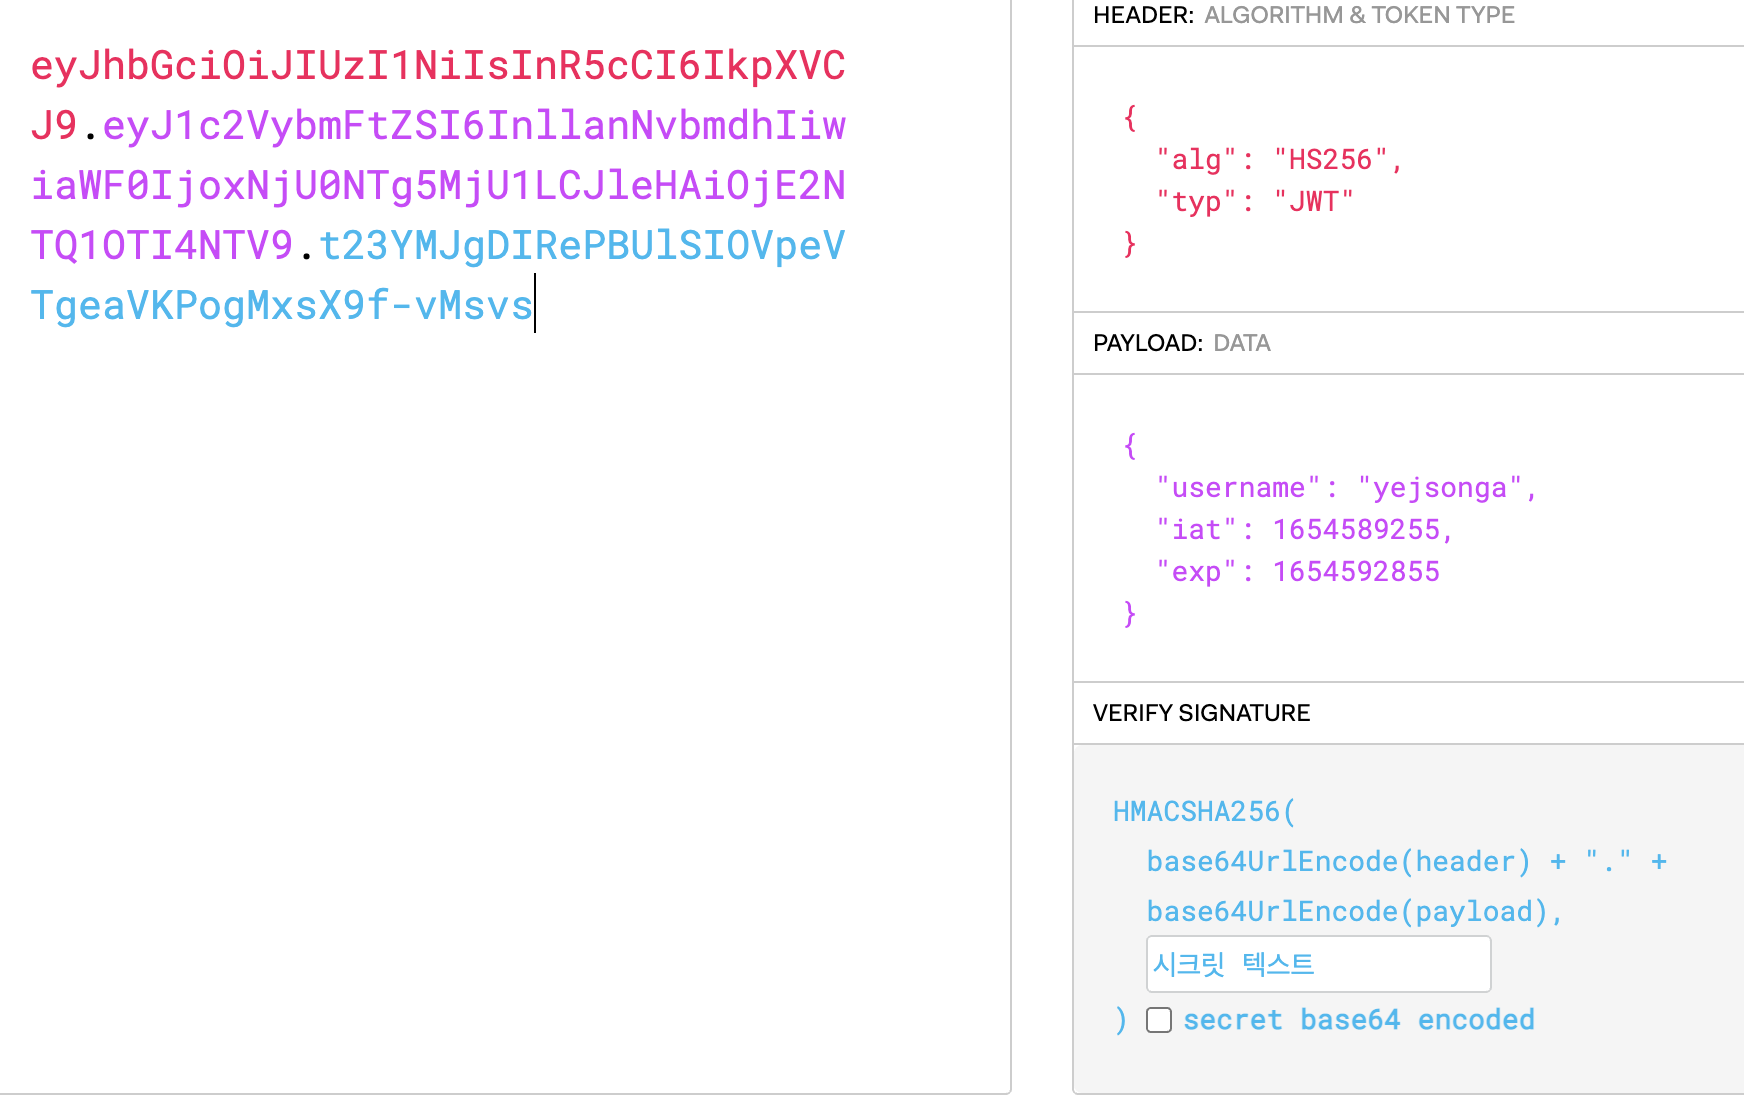
JWT의 구조?
JWT 사용 흐름
ex)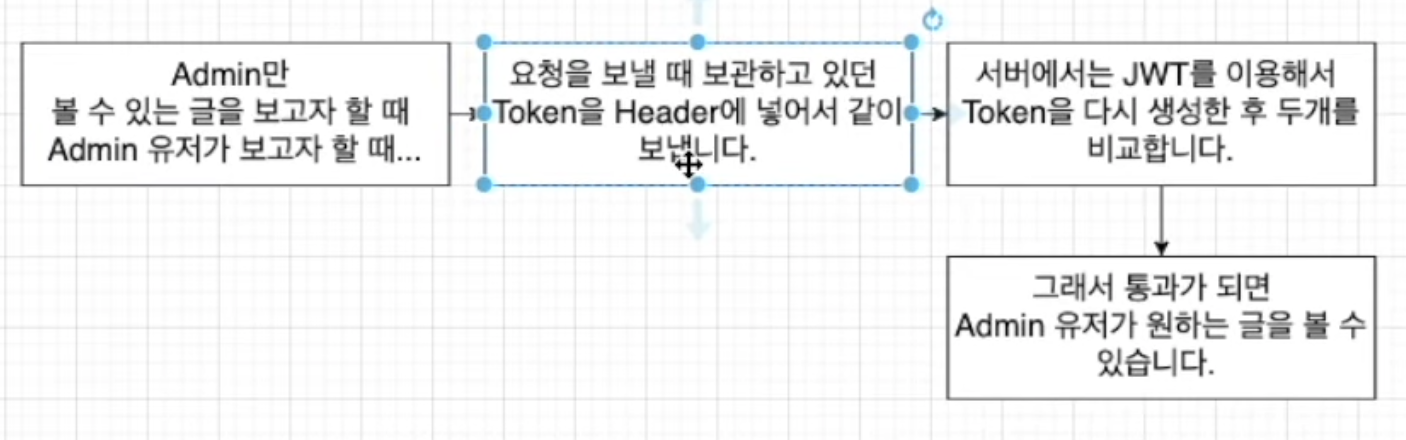
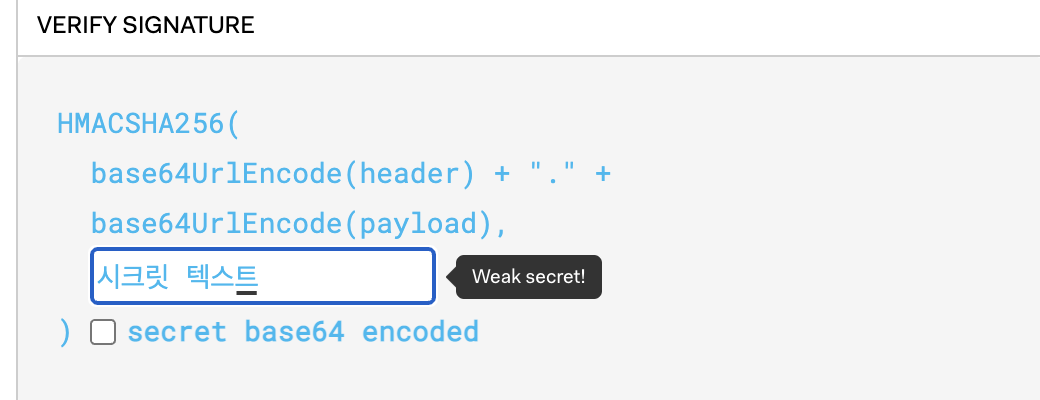
비교하는 과정
- 시크릿 텍스트를 Encoded된 거에 합해서 비교함.
5.8) JWT를 이용해서 토큰 생성하기
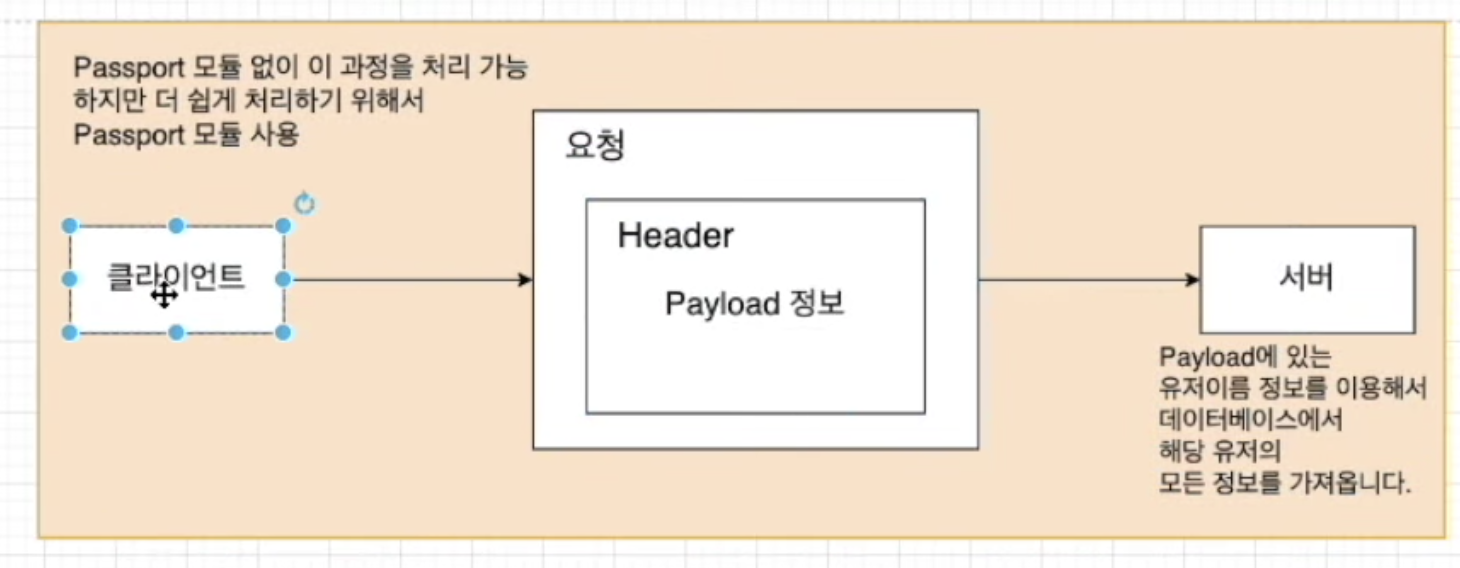
- Passport라는 모듈도 함께 사용할 것이다. 그 이유는 이 모듈이 저번 5.7에서 JWT를 이용해 인증 처리하고 하는 등의 과정을 훨씬 쉽게 만들어 주기 때문.
필요한 모듈
@nestjs/jwt: nestjs에서 jwt를 사용하기 위한 모듈@nestjs/passport: nestjs에서 passport를 사용하기 위해 필요한 모듈passport: passport 모듈passport-jwt: jwt모듈
npm install @nestjs/jwt @nestjs/passport passport passport-jwt -save --legacy-peer-deps애플리케이션에 JWT모듈 등록하기
- auth.module.ts
import { Module } from '@nestjs/common';
import { AuthController } from './auth.controller';
import { AuthService } from './auth.service';
import { TypeOrmModule } from '@nestjs/typeorm';
import { UserRepository } from './user.repository';
import { JwtModule } from '@nestjs/jwt';
import { PassportModule } from '@nestjs/passport';

@Module({
  imports: [
    JwtModule.register({
      secret: 'Secret1234',
      signOptions: {
        expiresIn: 60 * 60, //토큰의 유효시간 3600 = 1시간
      }
    }),
    TypeOrmModule.forFeature([UserRepository])
  ],
  controllers: [AuthController],
  providers: [AuthService]
})
export class AuthModule {}
애플리케이션에 Passport모듈 등록하기
- auth 모듈 import에 넣어주기
@Module({
  imports: [
    PassportModule.register({ defaultStrategy: 'jwt' }),
    JwtModule.register({
      secret: 'Secret1234',
      signOptions: {
        expiresIn: 60 * 60, //토큰의 유효시간 3600 = 1시간
      }
    }),
    TypeOrmModule.forFeature([UserRepository])
  ],
  controllers: [AuthController],
  providers: [AuthService]
})
export class AuthModule {}
로그인 성공 시 JWT를 이용해서 토큰 생성해주기
- Service의 singin 메소드에서 생성해주면 된다.
auth 모듈에 JWT를 등록해주었기때문에 Service에서 JWT를 가져올 수 있다.
import { Injectable, Inject, UnauthorizedException } from '@nestjs/common';
import { UserRepository } from './user.repository';
import { AuthCredentialsDto } from "./dto/auth-credential.dto";
import * as bcrypt from 'bcryptjs';
import { JwtService } from '@nestjs/jwt';

@Injectable()
export class AuthService {
    constructor(
        @Inject(UserRepository)
        private userRepository: UserRepository,
        private jwtService: JwtService
    ){ }

    async signUp(authcredentialsDto: AuthCredentialsDto): Promise<void> {
        return this.userRepository.createUser(authcredentialsDto);
    }

    async singIn(authcredentialsDto: AuthCredentialsDto): Promise<{accessToken: string}> {
        const { username, password } =  authcredentialsDto;
        const user = await this.userRepository.findOne({username});

        if (user && (await (await bcrypt.compare(password, user.password)))) {
            // 유저 토큰 생성 ( Secret + Payload )
            const payload = { username } //payload에는 중요한 정보는 넣지 않는다. 정보를 가져가기 쉬워서
            const accessToken = await this.jwtService.sign(payload);

            return { accessToken };
        } else {
            throw new UnauthorizedException('login Failed');
        }
    }
}
- auth.controller.ts
    @Post('/signin')
    signin(@Body(ValidationPipe) authCredentialsDto: AuthCredentialsDto): Promise<{accessToken: string}> {
        return this.authService.singIn(authCredentialsDto);
    }
테스트
6. 권한 처리 추가(PASSPORT)
6.1) Passport, Jwt 이용해 토큰 인증 후 유저 정보 가져오기
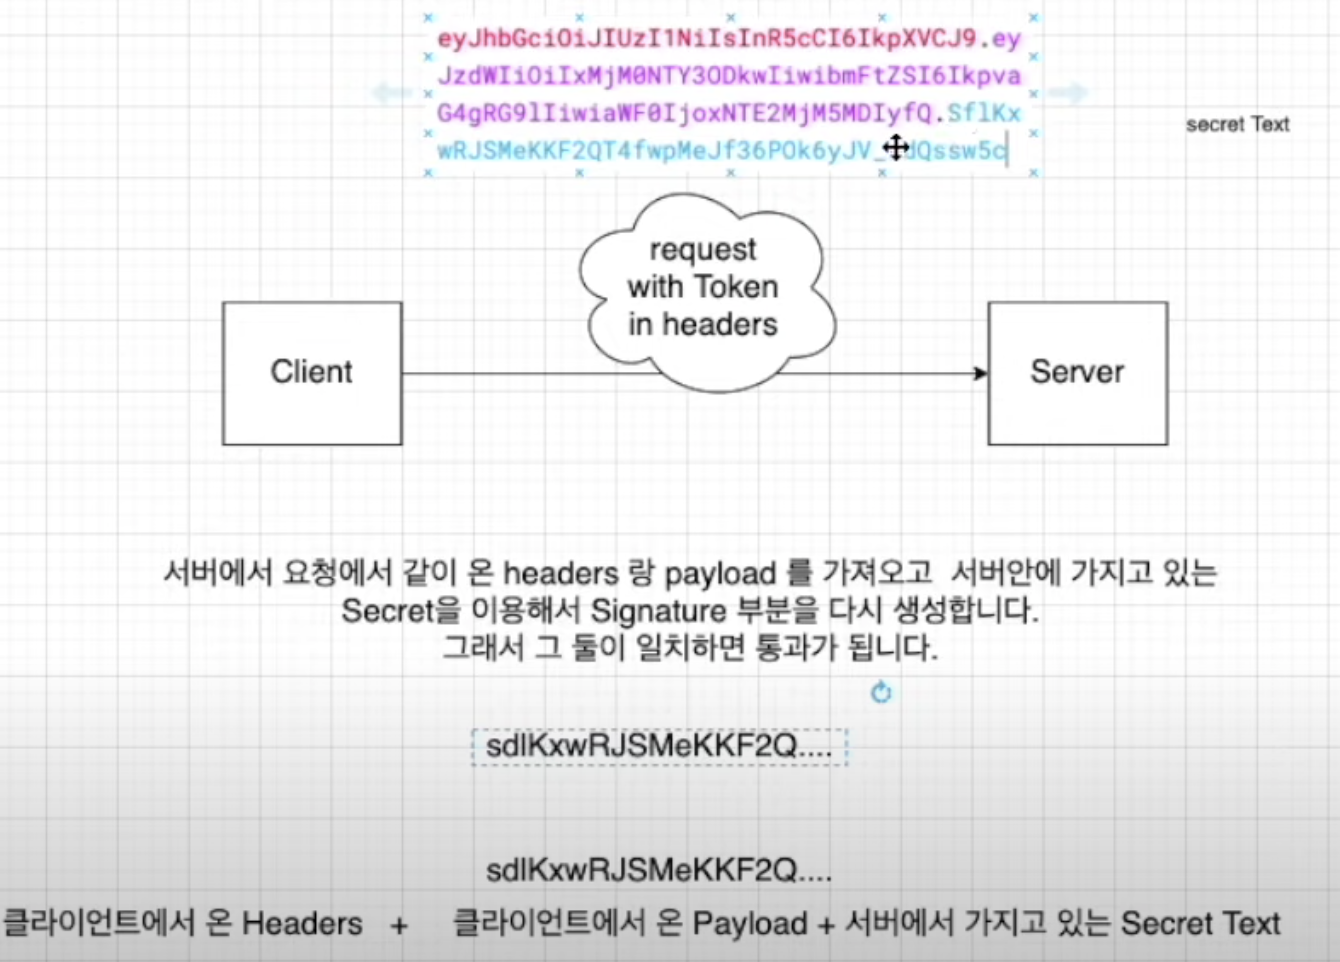
- JWT를 이용해서 유저가 로그인 할 때 토큰을 생성해줬다. 그래서 이제는 그 유저가 요청을 보낼 때 그 요청 안에 있는 Header에 토큰을 넣어서 요청을 보내는데 그것을 통해서 요청 안에 유저 정보가 들어있게 해줄 수 있다. 그래서 그 유저 정보를 이용해 인증 처리, 권한 처리 등을 해줄 수 있다. 이러한 처리를 쉽게 해주는 것 = Passport 모듈
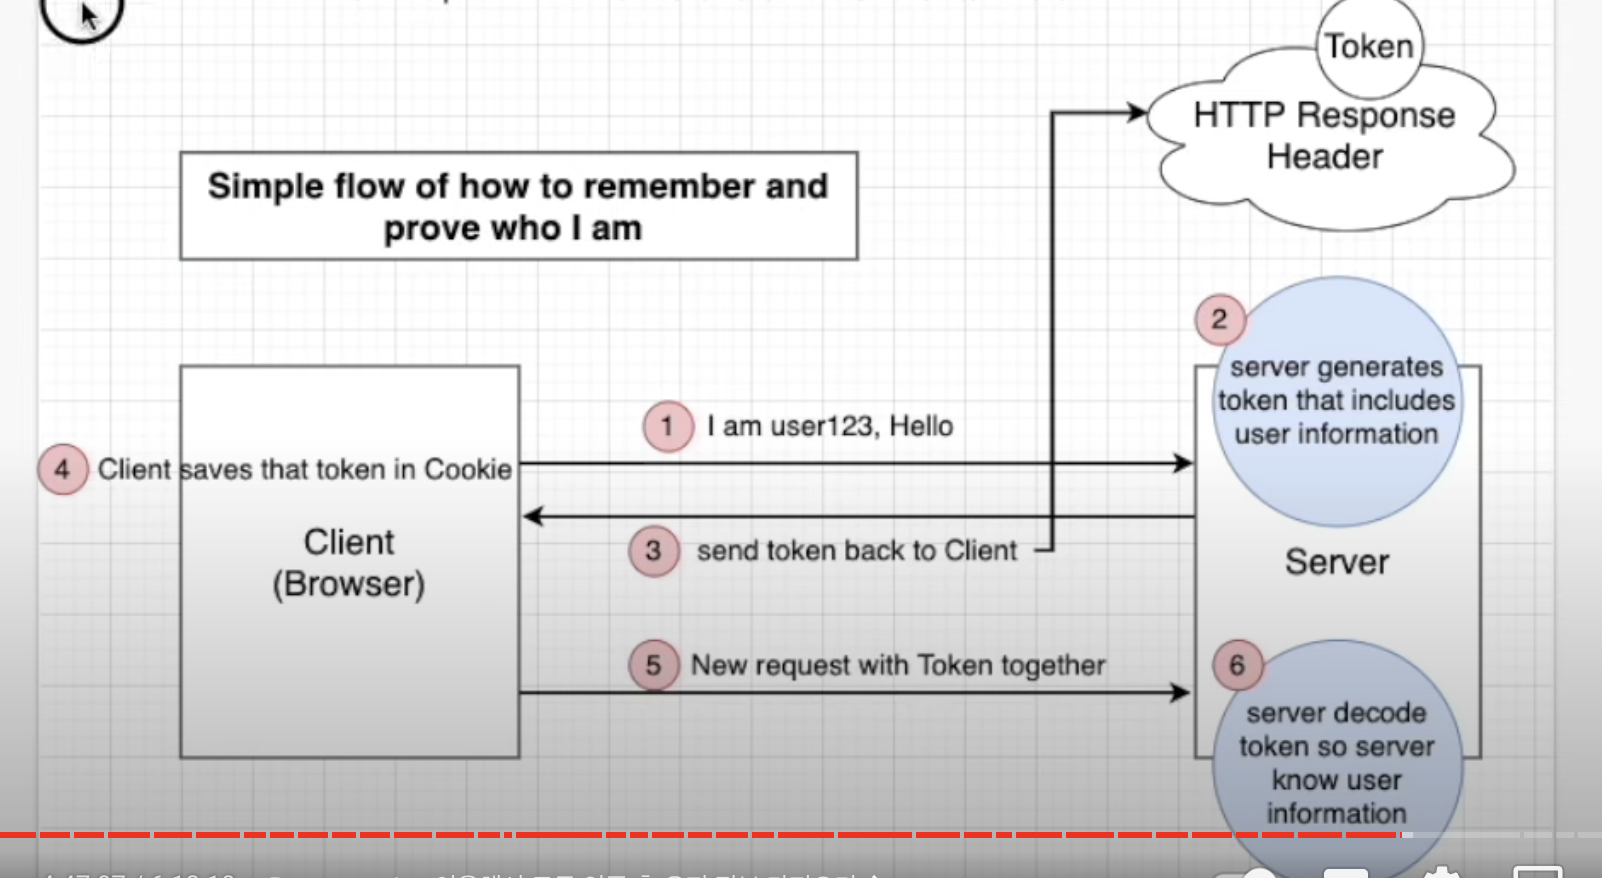
- 1~4번까지 내용 = 5
- 지금부터는 5~6 내용 시작: 토큰을 가지고 요청을 보낼 때 서버에서 그 토큰이 유효한 것인지 체크한 후 만약 유효한 것이라면 payload 안에 있는 username 이용해서 데이터베이스에 있는 유저인지 체크한 후 있는 유저라면 유저 객체를 데이터베이스에서 가져오고 없다면 error보낸다.
위의 과정을 구현하는 순서
@types/passport-jwt: passport-jwt 모듈을 위한 타입 정의 모듈
npm install @types/passport-jwt --save --legacy-peer-deps- jwt.strategy.ts파일 생성
import { Injectable, UnauthorizedException } from "@nestjs/common";
import { PassportStrategy } from "@nestjs/passport";
import { InjectRepository } from "@nestjs/typeorm";
import { ExtractJwt, Strategy } from "passport-jwt";
import { UserRepository } from "./user.repository";
import { User } from "./user.entity";

@Injectable()
// 주입을 해서 다른 곳에서도 사용할 수 있게 하기 위해서
export class JwtStrategy extends PassportStrategy(Strategy) {
    // PassportStrategy 안에 있는 기능을 이용하기 위해 이를 상속해 JwtStrategy class를 만든다.
    // passport-jwt Strategy를 사용하기 위해 넣어준다. = 이름은 Strategy이지만 import 되는 곳은 passport-jwt이다.
    constructor (
        @InjectRepository(UserRepository) //UserRepository를 주입시켜주는 이유 = 나중에 토큰이 유효한지 확인 후 payload안에 username으로 유저 객체를 데이터베이스에서 가져옴을 구현하기 위해
        private userRepository: UserRepository
    ) {
        super({
            secretOrKey: 'Secret1234',
            // auth.module이랑 똑같이 넣어준다. 토큰을 유효한지 체크할 때 쓰는 것.
            jwtFromRequest: ExtractJwt.fromAuthHeaderAsBearerToken()
            // 토큰이 어디에서 가져오는지 알아낼때 Header에서 BearerToken타입으로 넘어오는걸 가져와서 유효성을 체크하겠다는 뜻.
        });
    }
    // 토큰이 유효한지 확인한 후 페이로드 안에 있는 유저 이름으로 유저 정보가 데이터베이스에 있는지 확인.
    async validate(payload) {
        const {username} = payload;
        const user: User = await this.userRepository.findOne({username});

        if (!user) { //없다면 오류
            throw new UnauthorizedException();
        }
        return user; //있다면 유저 정보 리턴 -> 리퀘스트 객체 안에서 사용가능 (몇가지 더 필요 6.2 참고)
    }
}
6.2) 방금 만든 JwtStrategy를 사용하기 위해
- AuthModule Providers 항목에 넣어주고 다른 곳에서도 JwtStrategy와 PassportModule도 사용해줘야하기 때문에 export 항목에도 넣어준다.
- auth.module.ts
import { Module } from '@nestjs/common';
import { AuthController } from './auth.controller';
import { AuthService } from './auth.service';
import { TypeOrmModule } from '@nestjs/typeorm';
import { UserRepository } from './user.repository';
import { JwtModule } from '@nestjs/jwt';
import { PassportModule } from '@nestjs/passport';
import { JwtStrategy } from './jwt.strategy';

@Module({
  imports: [
    PassportModule.register({defaultStrategy: 'jwt'}),
    JwtModule.register({
      secret: 'Secret1234', // 토큰을 생성할 때 씀
      signOptions: {
        expiresIn: 60 * 60, //토큰의 유효시간 3600 = 1시간
      }
    }),
    TypeOrmModule.forFeature([UserRepository])
  ],
  controllers: [AuthController],
  providers: [AuthService, JwtStrategy], //auth모듈에서 사용할 때
  exports: [JwtStrategy, PassportModule] //auth모듈 뿐만아니라 다른 모듈에서도 사용하기 위해
})
export class AuthModule {}
중간 테스트
- auth.controller.ts 에 테스트코드 작성
    @Post('/test')
    test(@Req() req) {
        console.log('req', req);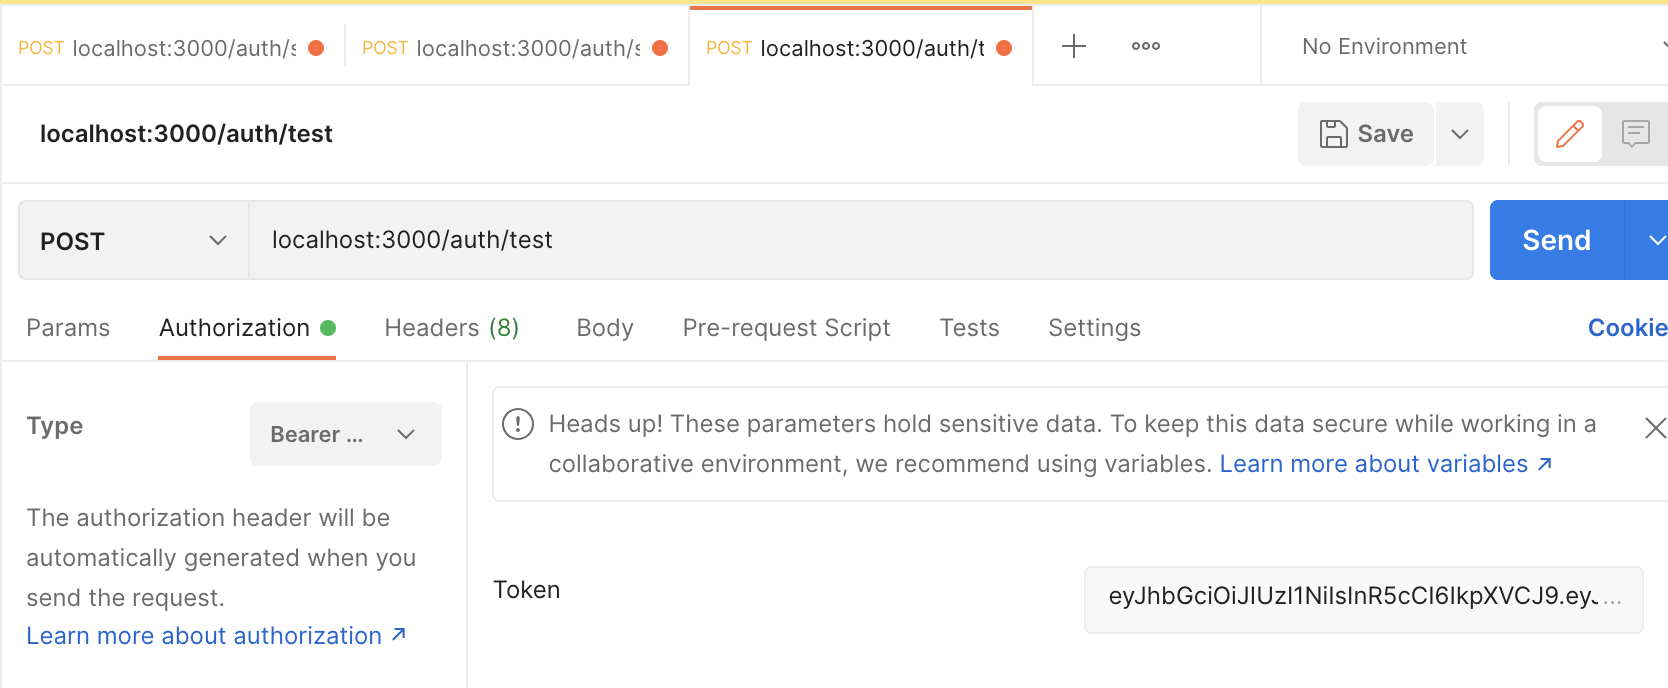
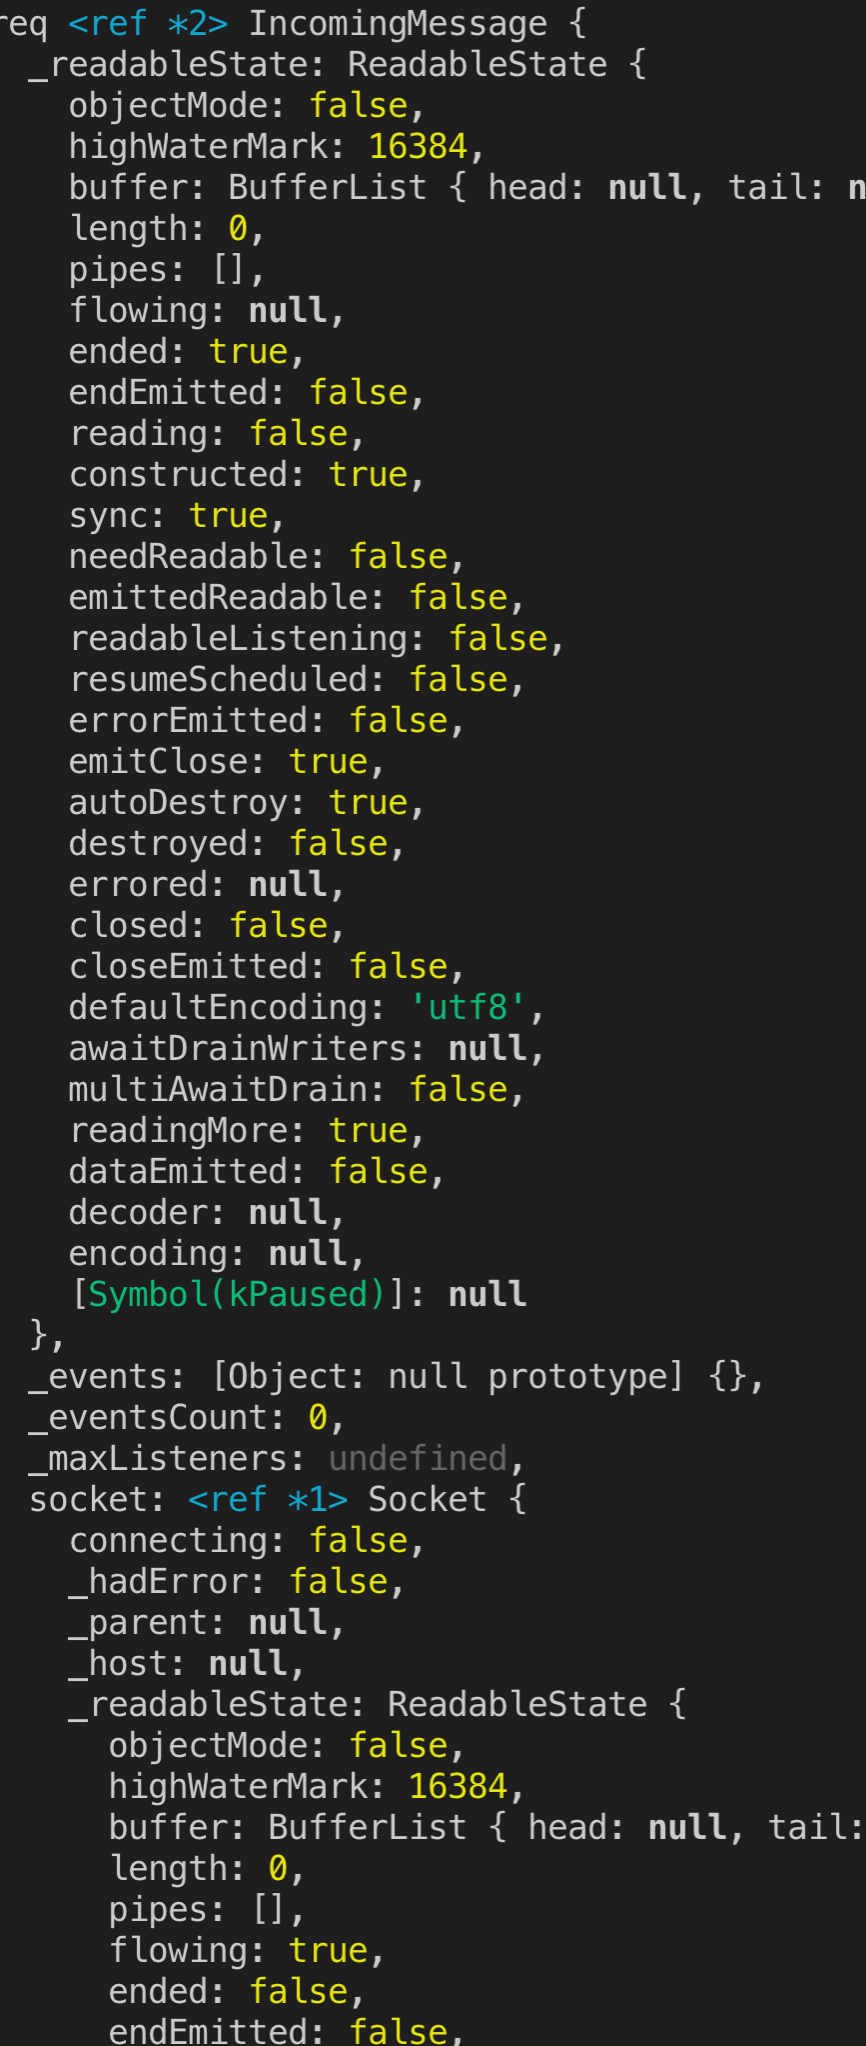
이러한 결과 값들 안에 user객체가 존재하지 않는다.
요청안에 유저 정보(유저 객체)가 들어가게 하는 방법
Q. validate 메소드에서 return 값을 user객체로 주었다. 그래서 요청값 안에 user객체가 들어있으면 하는데 현재 요청을 보낼 때는 user객체가 없다. 어떠한 방식으로 가져와야하는가?
A. UseGuards안에 @nestjs/passport에서 가져온 AuthGuard()를 이용하면 요청 안에 유저 정보를 넣어줄 수 있다.
NestJS에서 Middleware들에 대해
- Pipes: 파이프는 요청 유효성 거사 및 페이로드 변환을 위해 만들어진다. 데이터를 예상한 대로 직렬화.
- Filters: 필터는 오류 처리 미들웨어이다. 특정 오류 처리기를 사용할 경로와 각 경로 주변의 복잡성을 관리하는 방법을 알 수 있다.
- Guards: 가드는 인증 미들웨이다. 지정된 경로로 통과할 수 있는 사람과 허용되지 않는 사람을 서버에 알려줌.
- Interceptors: 인터셉터는 응답 매핑 및 캐시 관리와 함께 요청 로깅과 같은 전후 미들웨어이다. 각 요청 전후에 이를 실행하는 기능은 매우 강력하고 유용합니다.각각의 미들웨어가 불러지는 순서
middleware -> guard -> interceptor(befor) -> pipe -> controller -> service -> controller -> interceptor(after) -> filter(if applicable) -> client
- auth.controller.ts
@Post('/test')
@UseGuards(AuthGuard())
test(@Req() req) {
console.log('req', req);
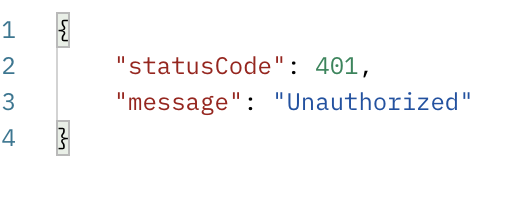
}
- 잘못된 token이 들어갔을 경우
6.3) 커스텀 데코레이터 생성하기
req.user가 아닌 바로 user라는 파라미터로 가져올 수 있는 방법?
- 커스텀 데코레이터를 이용하면 된다.
- src/auth/get-user.decorator.ts
import { createParamDecorator, ExecutionContext } from "@nestjs/common";
import { User } from "./user.entity";

export const GetUser = createParamDecorator((data, ctx: ExecutionContext): User => {
    const req = ctx.switchToHttp().getRequest();
    return req.user;
})- auth.controler.ts
    @Post('/test')
    @UseGuards(AuthGuard())
    test(@GetUser() user: User) {
        console.log('user', user);
    }
6.4) 인증된 유저만 게시물 보고 쓸 수 있게 만들기
유저에게 게시물 접근 권한 주기
- 인증에 관한 모듈을 board 모듈에서 쓸 수 있어야 하기에 board module에서 인증 모듈 imports 해오기(이렇게 되면 AuthModule에서 export 하는 어떤 것이든 board Module에서 사용 가능하게 된다.)
- board.module.ts
@Module({
  imports: [
    TypeOrmModule.forFeature([BoardRepository]),
    AuthModule
  ],
  controllers: [BoardsController],
  providers: [BoardsService]
})
export class BoardsModule {}- boards.controller.ts
@Controller('boards')
@UseGuards(AuthGuard())
6.5) 유저와 게시물의 관계 형성 해주기
- 게시물을 생성할 떄도 어떤 유저가 생성해줬는지 정보를 넣어줘야함.(=관계 형성)
유저와 게시물 데이터의 관계 형성
- 관계 형성을 위해 엔티티에 서로간의 필드를 넣어줘야함.
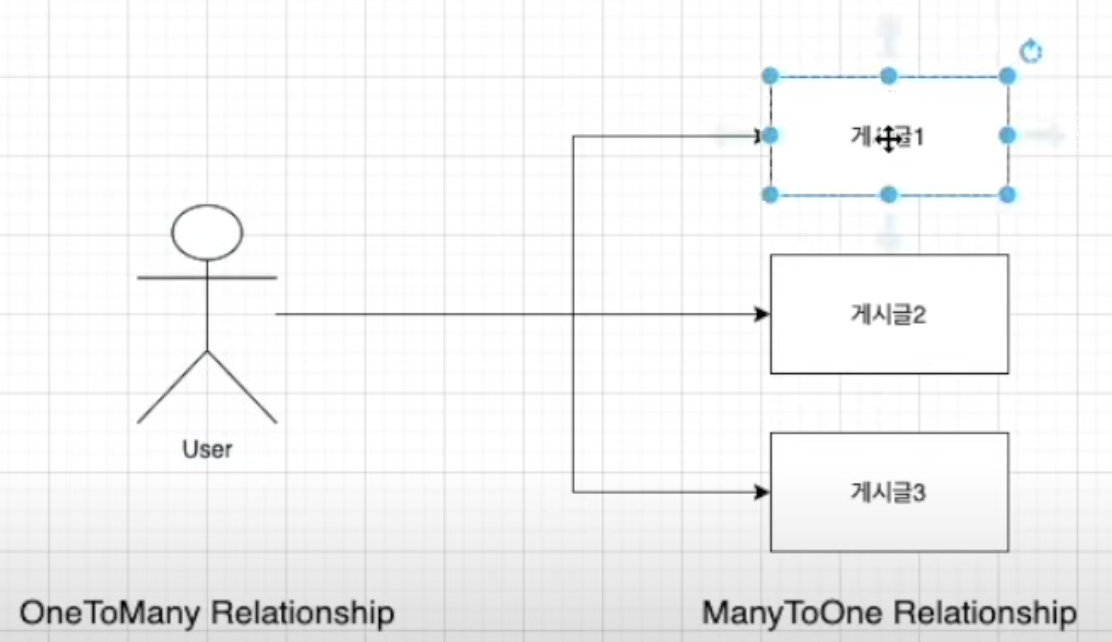
- user.entity.ts
    @OneToMany(type => Board, board => board.user, { eager: true })
boards: Board[];//여러개가 들어갈 수 있으니 배열- boards.entity.ts
    @ManyToOne(type => User, user => user.boards, { eager: false })
user: User;- Type : 유저가 무슨 보드 만들었는지, 보드가 누구에 의해 게시되었는지
- inverseSide : board에서 유저로 접근하려면 board.user로 접근해야한다고 알려주는 부분
- option : eager: true 일 때는 user 정보를 가져올 때 board도 같이 가져옴
6.6) 게시물 생성할 때 유저 정보 넣어주기
- 유저와 게시물의 관계를 엔티티를 이용해서 형성해주었다. 그래서 이제는 실제로 게시물을 생성할 때 유저 정보를 게시물에 넣어준다.
- 게시물 생성 요청
- 헤더안에 있는 토큰으로 유저 정보
- 유저 정보와 게시물 관계 형성하며 게시물 생성
- boards.controller.ts
    @Post()
    @UsePipes(ValidationPipe)
    createBoard(
        @Body() createBoardDto: CreateBoardDto,
        @GetUser() user:User
        ): Promise<Board> {
        return this.boardsService.createBoard(createBoardDto, user);
}- boards.service.ts
    createBoard(createBoardDto: CreateBoardDto,
        user: User) : Promise<Board> {
        return this.boardRepository.createBoard(createBoardDto, user);
}- boards.repository.ts
async createBoard(createBoardDto: CreateBoardDto,
        user: User): Promise<Board> {
        const { title, description } = createBoardDto;

        const board = this.create({
            title,
            description,
            status: BoardStatus.PUBLIC,
            user
        })

        await this.save(board);
        return board;
    }
6.7) 해당 유저의 게시물만 가져오기(getAllBoards)
- createQueryBuilder
- 지금까지는 NestJS에 Repository API만 사용했다.
ex) find, findOne, remove - mysql같은 것은 query를 사용하는데 typeORM을 사용할 때도 query를 사용할 수 있다. Query Builder를 사용할 수 있음.
복잡한 것을 할 때는 query 사용해보는ㄱ,,,?
where, insert - createQueryBuilder로 쿼리빌더를 생성 board게시판에 접근을 하기위해 board를 넣어주고
query.where절을 = 어떠한 조건에 맞는 게시물을 가져올 것인지 board.userId와 가져온 user.id와 같은 것을 query.getMany() 여기서 나오는 데이터를 전부 다 가져올 때 사용. - boards.controller.ts
    @Get()
    getAllBoard(
        @GetUser() user: User
    ): Promise<Board[]> {
        return this.boardsService.getAllBoards(user);
}- boards.service.ts
    async getAllBoards(
        user: User
    ): Promise<Board[]> {
        const query = this.boardRepository.createQueryBuilder('board');

        query.where('board.userId = :userId', { userId: user.id });
        const boards = await query.getMany();

        return boards;
    }
로그 남기기
설정
