점프 투 자바 (22/01/27)
0. 출처
1. 설치
환경에 맞게 알잘딱.
2. 시작
2.1 자바 소스의 구조
- 클래스명.java
/* 클래스 블록 */
public class 클래스명 {

    /* 메서드 블록 */
    [public|private|protected] [static] (리턴자료형|void) 메서드명1(입력자료형 매개변수, ...) {
        명령문(statement);
        ...
    }

    /* 메서드 블록 */
    [public|private|protected] [static] (리턴자료형|void) 메서드명2(입력자료형 매개변수, ...) {
        명령문(statement);
        ...
    }

    ...
}3. 자료형
3.4 문자열
리터럴 표기
- 리터럴 표기:
String a = "happy java"String b = new String("happy java")
리터럴 표기법 = 문자열을 JVM의 intern pool 이라는 메모리 공간에 저장하고 다음에 다시 동일한 문자열이 선언될때는 cache 된 문자열을 리턴,
두번째 방식은 항상 새로운 String 객체를 만든다.원시(primitive) 자료형
- int, long, double, float, boolean, char
- 원시 자료형은 new 키워드 X. 리터럴로만 셋팅할 수 있다.
- String은 리터럴로 표기 가능하나. 원시 자료형 X. 특별대우
- Wrapper 클래스: 값 대신 객체를 주고 받을 수 있어 코드를 객체 중심적으로 작성하는데 유리. 또한 멀티스레딩 환경에서 동기화를 지원하기 위해서도 Wrapper 클래스 필요.
3.5 StringBuffer
- 문자열을 추가하거나 변경 할 때 주로 사용하는 자료형.
- ex1)
StringBuffer sb = new StringBuffer();  // StringBuffer 객체 sb 생성
sb.append("hello");
sb.append(" ");
sb.append("jump to java");
String result = sb.toString();
System.out.println(result); // "hello jump to java" 출력- ex2)
String result = "";
result += "hello";
result += " ";
result += "jump to java";
System.out.println(result); // "hello jump to java" 출력-
위 두 예제 결과 동일. 내부적으로 객체가 생성되고 메모리가 사용되는 과정은 다르다.
-
ex1은 StringBuffer 객체는 한번만 생성된다.
-
ex2는 String 자료형에
+연산이 있을 때 마다 새로운 String 객체가 생성. String 자료형은 한번 값이 생성되면 그 값을 변경 X (=immutalbe하다). <-> StringBuffer 값 변경 O(=mutable하다.) -
StringBuffer 자료형은 String 자료형보다 무거운 편에 속한다. 알잘딱하게 선택해 사용하자.
StringBuilder
- 사용법은 StringBuffer과 동일
- StringBuffer는 멀티 스레드 환경에서 안전.
- StringBuilder는 성능이 우수.3.7 리스트 (List)
- 배열과 비슷. 배열은 크기 정해짐. 리스트는 동적으로 변한다.
- List 자료형에는 ArrayList, Vector, LinkedList 등의 List 인터페이스를 구현한 자료형이 있다. 여기서 말하는 List 자료형은 인터페이스인데 인터페이스에 대해서는 뒤에서 자세히 다루도록 한다.
ArrayList
- ex)
import java.util.ArrayList;
public class Sample {
public static void main(String[] args) {
ArrayList pitches = new ArrayList();
pitches.add("138");
pitches.add("129");
pitches.add("142");
}
}
#### 제네릭스
- `ArrayList<String> pitches = new ArrayList<>();` 처럼 객체를 포함하는 자료형도 어떤 객체를 포함하는지에 대해 명확하게 표현할 것을 권고.

### 3.8 맵 (Map)
- Map 인터페이스를 구현한 Map 자료형에는 HashMap, LinkedHashMap, TreeMap 등이 있다. 인터페이스에 대해서는 객체지향 챕터에서 자세하게 다룰 것이다.
> **LinkedHashMap과 TreeMap**
	Map의 가장 큰 특징은 순서에 의존하지 않고 key로 value를 가져오는데 있다. 하지만 가끔은 Map에 입력된 순서대로 데이터를 가져오고 싶은 경우도 있고 때로는 입력된 key에 의해 소트되도록 저장하고 싶을 수도 있을 것이다. 이런경우에는 LinkedHashMap과 TreeMap을 사용하는 것이 유리하다.
	- LinkedHashMap은 입력된 순서대로 데이터를 저장하는 특징을 가지고 있다.
	- TreeMap은 입력된 key의 오름차순 순서로 데이터를 저장하는 특징을 가지고 있다.

### 3.9 집합(Set)
#### 집합 자료형은 어떻게 만들까?
- Set 자료형에는 HashSet, TreeSet, LinkedHashSet 등의 Set 인터페이스를 구현한 자료형이 있다. 여기서 말하는 Set 자료형은 인터페이스이다.
#### 집합 자료형의 특징
- 중복을 허용하지 않는다.
- 순서가 없다.(Unordered) -> 인덱싱을 통해 값을 얻을 수 없다.
+) 중복을 허용하지 않는 집합 자료형의 특징은 자료형의 중복을 제거하기 위한 필터로 종종 사용된다.
> TreeSet과 LinkedHashSet
	- TreeSet: 오름차순으로 값을 정렬하여 저장
    - LinkedHashSet: 입력한 순서대로 값을 정렬하여 저장

## 3.11 형변환
- ex) string->int
``` java
public class Sample {
    public static void main(String[] args) {
        String num = "123";
        int n = Integer.parseInt(num);
        System.out.println(n);  // 123 출력
    }
}- Integer는 Int자료형의 Wrapper 클래스.
- ex) int -> string (빈문자열
""을 더해주는 것)
public class Sample {
    public static void main(String[] args) {
        int n = 123;
        String num = "" + n;
        System.out.println(num);  // 123 출력
    }
}String.valueOf(정수),Integer.toString(정수)모두 정수를 문자열로 바꾸어 리턴한다.- ex)
public class Sample {
    public static void main(String[] args) {
        int n1 = 123;
        double d1 = n1;  // 정수를 실수로 바꿀때에는 캐스팅이 필요없다.
        System.out.println(d1);  // 123.0 출력

        double d2 = 123.456;
        int n2 = (int) d2; // 실수를 정수로 바꿀때에는 반드시 정수형으로 캐스팅해 주어야 한다.
        System.out.println(n2);  // 소숫점이 생략된 123 출력
    }
}
final
- 자료형에 값을 단 한번만 설정할 수 있게 강제하는 키워드.
- 리스트의 경우도 final로 선언시 재할당 불가능하다.
Unmodifialbe List
- 리스트의 경우 final로 선언시 리스트에 값을 더하거나 빼는 것은 가능하다. 다만 재할당이 불가능. 만약 그 값을 더하거나 빼는 것도 불가능하게 하고 싶은 경우List.of로 수정이 불가능한 리스트(Unmodifiable List)를 사용해야 한다.
4. 제어문
4.2 switch/case 문
switch(입력변수) {
    case 입력값1: ...
         break;
    case 입력값2: ...
         break;
    ...
    default: ...
         break;
}- 입력값 이외의 값이 들어온다면 default 문장이 수행된다.
4.3 while 문
continue : while문 조건문으로 돌아가기
- ex)
int a = 0;
while (a < 10) {
    a++;
    if (a % 2 == 0) {
        continue;  // 짝수인 경우 조건문으로 돌아간다.
    }
    System.out.println(a);  // 홀수만 출력된다.
}
4.5 for each 문
- ex
String[] numbers = {"one", "two", "three"};
for(String number: numbers) {
    System.out.println(number);
}
one
two
three- 구조
for (type var: iterate) {
    body-of-loop
}- for each 문은 따로 반복횟수를 명시적으로 주는 것이 불가능, 1스탭씩 순차적으로 반복할 때만 사용가능하다.
5. 객체지향 프로그래밍
5.2 클래스
객체에 대하여
- ex)
class Animal {
}

public class Sample {
    public static void main(String[] args) {
        Animal cat = new Animal();
    }
}
객체와 인스턴스
- 클래스에 의해 만들어진 객체 = 인스턴스
-Animal cat = new Animal()cat은 객체이다. 그리고 cat이라는 객체는 Animal의 인스턴스(instance) 이다.
- 인스턴스라는 말은 특정 객체(cat)가 어떤 클래스(Animal)의 객체인지를 관계위주로 설명할 때 사용된다. 즉, "cat은 인스턴스" 보다는 "cat은 객체"라는 표현이 "cat은 Animal의 객체" 보다는 "cat은 Animal의 인스턴스" 라는 표현이 훨씬 잘 어울린다.
객체 변수(Instance variable)
- ex)
class Animal {
    String name;
}

public class Sample {
    public static void main(String[] args) {
        Animal cat = new Animal();
    }
}- Animal 클래스에 name 이라는 String 변수를 추가. 클래스에 선언된 변수 객체 변수(=인스턴스 변수, 멤버 변수, 속성)
- 객체.객체변수 로 접근 가능
메서드
- 메서드: 클래스 내에 구현된 함수를 의미.
- ex)
class Animal {
    String name;

    public void setName(String name) {
        this.name = name;
    }
}

public class Sample {
    public static void main(String[] args) {
        Animal cat = new Animal();
        cat.setName("boby");  // 메서드 호출
        System.out.println(cat.name);
    }
}boby객체 변수는 공유되지 않는다.
- 클래스에서 가장 중요한 부분 이 객체 변수 값이 독립적으로 유지된다는 점.
5.3 메서드(Method)
- 자바는 클래스를 떠나 존재하는 것 있을 수 없다. 자바의 함수는 따로 존재 X. 클래스 내에 존재.
(= 메서드)
메서드 내에서 선언된 변수의 효력 범위
- 메서드에서 쓰이는 매개변수의 이름은 메서드 밖의 변수 이름과는 전혀 상관이 없다.
5.4 Call by value
- 메서드에 객체를 전달할 경우 메서드에서 객체의 객체변수(속성)값을 변경할 수 있다.
- ex)
class Updater {
    void update(int count) {
        count++;
    }
}

class Counter {
    int count = 0;  // 객체변수
}

public class Sample {
    public static void main(String[] args) {
        Counter myCounter = new Counter();
        System.out.println("before update:"+myCounter.count);
        Updater myUpdater = new Updater();
        myUpdater.update(myCounter.count);
        System.out.println("after update:"+myCounter.count);
    }
}
before update:0
after update:0-
객체 변수 count의 값을 update 메서드에 넘겨서 변경시키더라도 값에 변화가 없다. 그 이유는 update 메서드는 값(int 자료형)을 전달받았기 때문.
-
ex)
class Updater {
    void update(Counter counter) {
        counter.count++;
    }
}

class Counter {
    int count = 0;  // 객체변수
}

public class Sample {
    public static void main(String[] args) {
        Counter myCounter = new Counter();
        System.out.println("before update:"+myCounter.count);
        Updater myUpdater = new Updater();
        myUpdater.update(myCounter);
        System.out.println("after update:"+myCounter.count);
    }
}
before update:0
after update:15.5 상속
상속
class Animal {
    String name;

    void setName(String name) {
        this.name = name;
    }
}

class Dog extends Animal {  // Animal 클래스를 상속한다.
}

public class Sample {
    public static void main(String[] args) {
        Dog dog = new Dog();
        dog.setName("poppy");
        System.out.println(dog.name);
    }
}poppy- 클래스 상속을 위해 extends라는 키워드를 사용.
부모 클래스의 기능을 확장
class Animal {
    String name;

    void setName(String name) {
        this.name = name;
    }
}

class Dog extends Animal {
    void sleep() {
        System.out.println(this.name+" zzz");
    }
}

public class Sample {
    public static void main(String[] args) {
        Dog dog = new Dog();
        dog.setName("poppy");
        System.out.println(dog.name);
        dog.sleep();
    }
}
poppy
poppy zzzIS-A 관계
- Dog는 Animal에 포함되기 때문에 "개는 동물이다"라고 표현할 수 있다. 자바는 이러한 관계를 IS-A 관계라고 표현한다. 즉 "Dog is a Animal" 과 같이 말할 수 있는 관계를 IS-A 관계라고 한다.
Animal dog = new Dog(); // Dog is a Animal주의할 점
Dog 객체를 Animal 자료형으로 사용할 경우 Dog 클래스에만 존재하는 sleep 메서드를 사용할 수 없다.
반대의 경우, 부모 클래스로 만들어진 객체를 자식 클래스의 자료형으로는 사용 할 수 없다.
Object 클래스
- 자바에서 만드는 모든 클래스는 Object 클래스를 상속받는다. 따라서 자바에서 만드는 모든 객체는 Object자료형으로 사용할 수 있다.
메서드 오버라이딩(Method overriding)
- ex)
class Animal {
    String name;

    void setName(String name) {
        this.name = name;
    }
}

class Dog extends Animal {
    void sleep() {
        System.out.println(this.name + " zzz");
    }
}

class HouseDog extends Dog {
    void sleep() {
        System.out.println(this.name + " zzz in house");
    }
}

public class Sample {
    public static void main(String[] args) {
        HouseDog houseDog = new HouseDog();
        houseDog.setName("happy");
        houseDog.sleep();  // happy zzz in house 출력
    }
}
happy zzz in house- 부모클래스의 메서드를 자식클래스가 동일한 형태로 또다시 구현하는 행위를 메서드 오버라이딩이라고 한다.(메서드 덮어쓰기)
메서드 오버로딩(method overloading)
- ex)
class Animal {
    String name;

    void setName(String name) {
        this.name = name;
    }
}

class Dog extends Animal {
    void sleep() {
        System.out.println(this.name + " zzz");
    }
}

class HouseDog extends Dog {
    void sleep() {
        System.out.println(this.name + " zzz in house");
    }

    void sleep(int hour) {
        System.out.println(this.name + " zzz in house for " + hour + " hours");
    }
}

public class Sample {
    public static void main(String[] args) {
        HouseDog houseDog = new HouseDog();
        houseDog.setName("happy");
        houseDog.sleep();  // happy zzz in house 출력
        houseDog.sleep(3);  // happy zzz in house for 3 hours 출력
    }
}
happy zzz in house
happy zzz in house for 3 hours다중 상속
- 다중 상속: 클래스가 동시에 하나 이상의 클래스를 상속받는 것을 뜻한다. 자바는 다중 상속을 지원하지 않는다
5.6 생성자
생성자(Constructor)
- ex)
(... 생략 ...)

class HouseDog extends Dog {
    HouseDog(String name) {
        this.setName(name);
    }

    void sleep() {
        System.out.println(this.name + " zzz in house");
    }

    void sleep(int hour) {
        System.out.println(this.name + " zzz in house for " + hour + " hours");
    }
}- 메서드명이 클래스명과 동일하고 리턴 자료형을 정희하지 않는 메서드 = 생성자
- 생성자 규칙
1. 클래스며오가 메서드명이 동일하다.- 리턴타입을 정의하지 않는다.(void도 사용하지 않는다.)
- 생성자는 메서드와 마찬가지로 다양한 입력을 받을 수 있다.
디폴트 생성자
1.
class Dog extends Animal {
    void sleep() {
        System.out.println(this.name + " zzz");
    }
}

2.
class Dog extends Animal {
    Dog() {
    }

    void sleep() {
        System.out.println(this.name + " zzz");
    }
}
1번 코드 = 생성자의 입력 항목이 없고 생성자 내부에 아무 내용이 없는 생성자 = 디폴트 생성자
클래스에 생성자가 하나도 없다면 컴파일러는 자동으로 위와같은 디폴트 생성자를 추가한다. 하지만 사용자가 작성한 생성자 하나라도 있다면 컴파일러는 디폴트 생성자를 추가하지 않음.
생성자 오버로딩
- 하나의 클래스에 여러개의 입력항목이 다른 생성자를 만들 수 있다.
class HouseDog extends Dog {
    HouseDog(String name) {
        this.setName(name);
    }

    HouseDog(int type) {
        if (type == 1) {
            this.setName("yorkshire");
        } else if (type == 2) {
            this.setName("bulldog");
        }
    }

    void sleep() {
        System.out.println(this.name + " zzz in house");
    }

    void sleep(int hour) {
        System.out.println(this.name + " zzz in house for " + hour + " hours");
    }
}

public class Sample {
    public static void main(String[] args) {
        HouseDog happy = new HouseDog("happy");
        HouseDog yorkshire = new HouseDog(1);
        System.out.println(happy.name);  // happy 출력
        System.out.println(yorkshire.name);  // yorkshire 출력
    }
}
5.7 인터페이스
인터페이스 작성하기
- 인터페이스는 class가 아닌 interface라는 키워드를 이용해 작성한다.
interface Predator {
}

class Animal {
    String name;

    void setName(String name) {
        this.name = name;
    }
}

(... 생략 ...)
(... 생략 ...)

class Tiger extends Animal implements Predator {
}

class Lion extends Animal implements Predator {
}

(... 생략 ...)
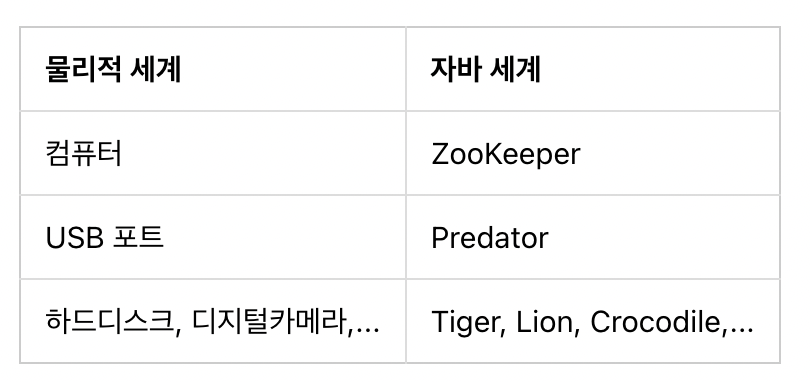
- tiger: Tiger 클래스의 객체, Predator 인터페이스의 객체
- lion: Lion 클래스의 객체, Predator 인터페이스의 객체
- 이와같이 객체가 한 개 이상의 자료형 타입을 갖게되는 특성을 다형성(폴리모피즘)이라고 한다.
interface Predator {
    String getFood();
}

(... 생략 ...)

class Tiger extends Animal implements Predator {
    public String getFood() {
        return "apple";
    }
}

class Lion extends Animal implements Predator {
    public String getFood() {
        return "banana";
    }
}

(... 생략 ...)- 인터페이스의 메서드는 항상 public으로 구현해야 한다.
(... 생략 ...)

class ZooKeeper {
    void feed(Predator predator) {
        System.out.println("feed "+predator.getFood());
    }
}

(... 생략 ...)
인터페이스의 핵심과 개념
- ZooKeeper 클래스가 동물들의 종류에 의존적인 클래스에서 동물들의 종류와 상관없는 독립적인 클래스가 되었다는 점
상속과 인터페이스
- 위에서 작성한 Predator 인터페이스 대신 Animal 클래스에 getFood 메서드를 추가하고 Tiger, Lion 등에서 getFood 메서드를 오버라이딩한 후 Zookeeper의 feed 메서드가 Predator 대신 Animal을 입력 자료형으로 사용해도 동일한 효과를 거둘 수 있다. 하지만 상속은 자식 클래스가 부모 클래스의 메서드를 오버라이딩하지 않고 사용할 수 있기 때문에 해당 메서드를 반드시 구현해야 한다는 "강제성"을 갖지 못한다. 상황에 맞게 상속을 사용할 것인지 인터페이스를 사용해야 할 지를 결정해야겠지만 인터페이스는 인터페이스의 메서드를 반드시 구현해야 하는 "강제성"을 갖는다는 점을 반드시 기억하자.
디폴트 메서드
- 인터페이스의 메서드는 몸통(구현체)을 가질 수 없지만 디폴트 메서드를 사용하면 실제 구현된 형태의 메서드를 가질 수 있다.
interface Predator {
    String getFood();

    default void printFood() {
        System.out.printf("my food is %s\n", getFood());
    }
}- 디폴트 메서드는 메서드명 가장 앞에 "default" 라고 표기해야 한다.
- 디폴트 메서드는 오버라이딩 가능하다. 즉, printFood 메서드를 실제 클래스에서 다르게 구현하여 사용할 수 있다.
스태틱 메서드
- 인터페이스에서 스태틱 메서드를 구현하면
인터페이스명.스태틱메서드명과 같이 사용하여 일반 클래스의 스태틱 메서드를 사용하는 것과 동일하게 사용할 수 있다.
interface Predator {
    String getFood();

    default void printFood() {
        System.out.printf("my food is %s\n", getFood());
    }

    int LEG_COUNT = 4;  // 인터페이스 상수

    static int speed() {
        return LEG_COUNT * 30;
    }
}
인터페이스 상수
- 위 코드에서 사용한int LEG_COUNT = 4;문장은 인터페이스에 정의한 상수이다. 인터페이스에 정의한 상수는int LET_COUNT = 4;처럼public static final을 생략해도 자동으로public static final이 적용된다.(다른 형태의 상수 정의는 불가능)
5.8 다형성
- 객체지향 프로그래밍의 특징 중 다형성(Polymorphism)
instanceof는 어떤 객체가 특정 클래스의 객체인지를 조사할 때 사용되는 자바 내장 명령어- 하나의 객체가 여러개의 자료형 타입을 가질 수 있는 것 = 다형성
Tiger tiger = new Tiger();  // Tiger is a Tiger
Animal animal = new Tiger();  // Tiger is a Animal
Predator predator = new Tiger();  // Tiger is a Predator
Barkable barkable = new Tiger();  // Tiger is a Barkable
interface Predator {
(... 생략 ...)
}
interface Barkable {
void bark();
}
interface BarkablePredator extends Predator, Barkable {
}
(... 생략 ...)- 위와 같이 getFood와 bark 메서드를 모두 포함하는 새로운 인터페이스를 만들어 사용.
- 인터페이스는 일반 클래스와 달리 extends를 이용하여 여러개의 인터페이스를 동시에 상속할 수 있다. (= 다중 상속 지원O)
- 일반 클래스는 단일 상속만 가능.
5.9 추상클래스(Abstract Class)
- 추상클래스는 인터페이스의 역할도 하면서 클래스의 기능도 가지고 있는 자바의 돌연변이 클래스!
abstract class Predator extends Animal {
    abstract String getFood();

    ~~default~~ void printFood() {  // default 를 제거한다.
        System.out.printf("my food is %s\n", getFood());
    }

    static int LEG_COUNT = 4;  // 추상 클래스의 상수는 static 선언이 필요하다.
    static int speed() {
        return LEG_COUNT * 30;
    }
}

(... 생략 ...)- 추상클래스를 만들기 위해서는 class 앞에 abstract라고 표기해야 한다.
- 인터페이스의 메서드와 같은 역할을 하는 메서드(ex. getFood)에도 역시 abstract를 붙여야한다. abstract 메서드는 인터페이스의 메서드와 마찬가지로 몸통이 없다. (= 상속 받는 클래스에서 해당 abstract 메서드를 구현해야만 한다.)
- 인터페이스의 디폴트 메서드는 더이상 사용할 수 없으므로 default 키워드를 삭제하여 일반 메서드로 변경
- LEG_COUNT 상수도 인터페이스에서는 자동으로 static 으로 인식하지만 추상클래스는 명시적으로 적어줘야함.
- 추상 클래스는 일반 클래스와 달리 단독으로 객체 생성 X. 추상 클래스를 상속한 실제 클래스를 통해서만 객체 생성 가능.
- 추상 클래스에 abstract로 선언된 메서드는 인터페이스의 메서드와 마찬가지로 반드시 구현해야 하는 메서드이다.
- 추상 클래스에는 abstract 메서드 외에 실제 메서드도 사용할 수 있다.
인터페이스와 추상 클래스의 차이
자바8 버전부터 인터페이스에 default 메서드가 추가되어 차이점이 살짝 모호. 하지만 추상 클래스는 인터페이스와는 달리 일반 클래스처럼 객체변수, 생성자, private 메서드 등을 가질 수 있다.6. 입출력
6.1 콘솔 입출력
콘솔?
- 사용자의 입력을 받거나 사용자에게 문자열을 출력해 주는 역할을 하는 것.콘솔 입력
System.in을 사용InputStream은 자바의 내장 클래스이다.- 자바의 내장 클래스중에
java.lang패키지에 속해 있지 않은 클래스는 위 코드처럼 필요할 때 항상import해서 사용해야 한다.InputStream in = System.in;
int a;
a = in.read();
- InputStream의 read 메서드는 1byte의 사용자의 입력을 받아들인다.
- 하지만 read 메서드로 읽은 1 byte의 데이터는 byte 자료형으로 저장되는 것이 아니라 int 자료형으로 저장된다. 저장되는 int 값은 0~255 사이의 정수값으로 아스키 코드값이다.
#### InputStream
- InputStream의 read 메서드는 1 byte만 읽는다.
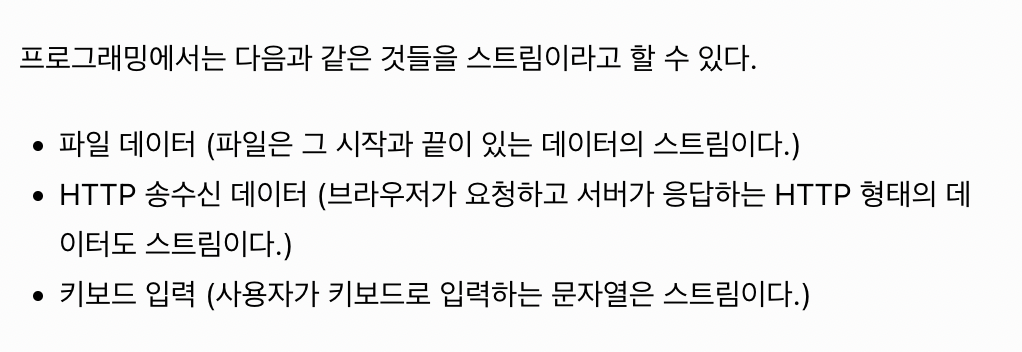
- 스트립: 이어져 있는 데이터(byte)의 형태를 의미
#### InputStreamReader
- 입력 스트림을 읽으려면 `InputStreamReader`
``` Java
import java.io.IOException;
import java.io.InputStream;
import java.io.InputStreamReader;
public class Sample {
public static void main(String[] args) throws IOException {
InputStream in = System.in;
InputStreamReader reader = new InputStreamReader(in);
char[] a = new char[3];
reader.read(a);
System.out.println(a);
}
}- 고정된 길이로만 스트림을 읽어야 한다.
BufferedReader
- 사용자가 엔터키를 입력할 때까지 사용자의 입력을 전부 받아들일 수 있게 함.
import java.io.IOException;
import java.io.BufferedReader;
import java.io.InputStream;
import java.io.InputStreamReader;

public class Sample {
    public static void main(String[] args) throws IOException {
        InputStream in = System.in;
        InputStreamReader reader = new InputStreamReader(in);
        BufferedReader br = new BufferedReader(reader);

        String a = br.readLine();
        System.out.println(a);
    }
}- BufferedReader는 객체 생성시 생성자의 입력값으로 InputStreamReader의 객체가 필요.
- BufferedReader의 readLine메서드를 이용하면 사용자가 엔터키를 입력할 때까지 입력했던 문자열 전부를 읽을 수 있게 된다.
Scanner
java.util.Scanner클래스
import java.util.Scanner;

public class Sample {
    public static void main(String[] args) {
        Scanner sc = new Scanner(System.in);
        System.out.println(sc.next());
    }
}
콘솔 출력
System.out은 PrintStream 클래스의 객체.
6.2 파일 입출력
파일 쓰기
import java.io.FileOutputStream;
import java.io.IOException;

public class Sample {
    public static void main(String[] args) throws IOException {
        FileOutputStream output = new FileOutputStream("c:/out.txt");
        output.close();
    }
}output.close();라는 문장은 사용한 파일 객체를 닫아준다. 문장 생략 가능하다. 자바 프로그램이 종료할 때 사용한 파일 객체를 자동으로 닫아주기 때문. 하지만, 직접 사용한 파일을 닫아주는 것이 좋다. 사용했던 파일을 닫지 않고 다시 사용하려할 때 오류가 발생.
FileOutputStream
import java.io.FileOutputStream;
import java.io.IOException;

public class Sample {
    public static void main(String[] args) throws IOException {
        FileOutputStream output = new FileOutputStream("c:/out.txt");
        for(int i=1; i<11; i++) {
            String data = i+" 번째 줄입니다.\r\n";
            output.write(data.getBytes());
        }
        output.close();
    }
}- OutputStream 역시 바이트 단위로 데이터를 처리, FileOutputStream은 OutputStream 클래스를 상속받아 만든 클래스이다.
- FileOutputStream에 값을 쓸 때는 byte 배열로 써야하므로 위와 같이 String을 byte배열로 바꿔주는
getBytes()메서드를 이용.
FileWriter
- 문자열을 파일에 쓸 때
import java.io.FileWriter;
import java.io.IOException;

public class Sample {
    public static void main(String[] args) throws IOException {
        FileWriter fw = new FileWriter("c:/out.txt");
        for(int i=1; i<11; i++) {
            String data = i+" 번째 줄입니다.\r\n";
            fw.write(data);
        }
        fw.close();
    }
}
PrintWriter
\n을 문자열 뒤에 붙여야 하는 불편함.
import java.io.IOException;
import java.io.PrintWriter;

public class Sample {
    public static void main(String[] args) throws IOException {
        PrintWriter pw = new PrintWriter("c:/out.txt");
        for(int i=1; i<11; i++) {
            String data = i+" 번째 줄입니다.";
            pw.println(data);
        }
        pw.close();
    }
}
파일에 내용 추가하기
- 추가모드로 열어서 추가내용을 작성해야함.
import java.io.FileWriter;
import java.io.IOException;

public class Sample {
    public static void main(String[] args) throws IOException {
        FileWriter fw = new FileWriter("c:/out.txt");
        for(int i=1; i<11; i++) {
            String data = i+" 번째 줄입니다.\r\n";
            fw.write(data);
        }
        fw.close();

        FileWriter fw2 = new FileWriter("c:/out.txt", true);  // 파일을 추가 모드로 연다.
        for(int i=11; i<21; i++) {
            String data = i+" 번째 줄입니다.\r\n";
            fw2.write(data);
        }
        fw2.close();
    }
}- FileWriter 대신 PrintWriter의 경우
import java.io.FileWriter;
import java.io.IOException;
import java.io.PrintWriter;

public class Sample {
    public static void main(String[] args) throws IOException {
        PrintWriter pw = new PrintWriter("c:/out.txt");
        for(int i=1; i<11; i++) {
            String data = i+" 번째 줄입니다.";
            pw.println(data);
        }
        pw.close();


        PrintWriter pw2 = new PrintWriter(new FileWriter("c:/out.txt", true));
        for(int i=11; i<21; i++) {
            String data = i+" 번째 줄입니다.";
            pw2.println(data);
        }
        pw2.close();
    }
}- 생성자의 파라미터로 파일명 대신 추가모드로 열린 FileWriter의 객체를 전달해야함.
파일 읽기
- FileInputStream 클래스 사용. byte 배열을 이용하여 파일을 읽어야하기 때문에 정확한 길이를 모를 경우 불편.
- 파일을 라인단위로 읽게 하기 = BufferedReader
import java.io.BufferedReader;
import java.io.FileReader;
import java.io.IOException;

public class Sample {
    public static void main(String[] args) throws IOException {
        BufferedReader br = new BufferedReader(new FileReader("c:/out.txt"));
        while(true) {
            String line = br.readLine();
            if (line==null) break;  // 더 이상 읽을 라인이 없을 경우 while 문을 빠져나간다.
            System.out.println(line);
        }
        br.close();
    }
}