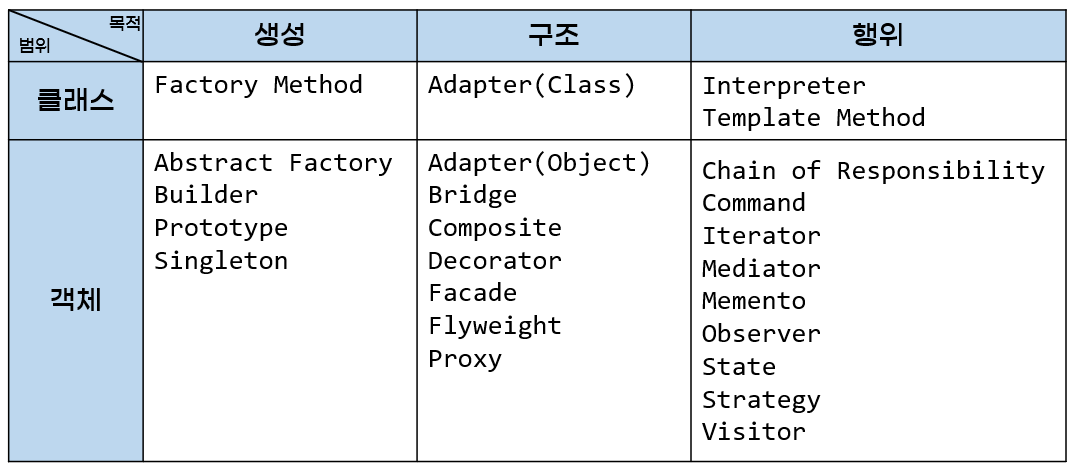
디자인 패턴은 소프트웨어 설계에서 공통적으로 발생하는 문제를 해결하는데 도움을 주는 검증된 해결 방법입니다. 일반적으로 디자인 패턴은 생성(Creational), 구조(Structural), 행위(Behavioral) 패턴으로 분류됩니다.
생성 패턴 (Creational Patterns)
생성 패턴은 객체 생성 메커니즘을 효율적으로 설계하는 데 초점을 맞춘 패턴입니다. 이 패턴들은 객체가 생성, 합성, 표현되는 방식을 캡슐화하여 시스템과 독립적인 코드를 작성할 수 있게 도와줍니다.
싱글턴 (Singleton)
클래스의 인스턴스가 오직 하나만 생성되고, 전역적으로 접근 가능하도록 제한하는 패턴입니다.
public class Singleton {
    private static Singleton instance;

    private Singleton() {}

    public static Singleton getInstance() {
        if (instance == null) {
            instance = new Singleton();
        }
        return instance;
    }
}
팩토리 메서드 (Factory Method)
생성할 객체의 클래스를 국소화시키고, 서브클래스가 인스턴스화할 클래스를 변경할 수 있도록 하는 패턴입니다.
public abstract class Creator {
    public abstract Product factoryMethod();

    public void anOperation() {
        Product product = factoryMethod();
        // Do something with the product
    }
}

public class ConcreteCreator extends Creator {
    @Override
    public Product factoryMethod() {
        return new ConcreteProduct();
    }
}
빌더 (Builder)
복잡한 객체의 생성 과정과 그 표현 방법을 분리하여 동일한 생성 절차에서 다양한 표현 결과를 만들 수 있게 해주는 패턴입니다.
public class Director {
    public void construct(Builder builder) {
        builder.buildPartA();
        builder.buildPartB();
    }
}

public interface Builder {
    void buildPartA();
    void buildPartB();
    Product getResult();
}

public class ConcreteBuilder implements Builder {
    private Product product = new Product();

    @Override
    public void buildPartA() {
        product.add("PartA");
    }

    @Override
    public void buildPartB() {
        product.add("PartB");
    }

    @Override
    public Product getResult() {
        return product;
    }
}
프로토 타입 (Prototype)
프로토 타입 패턴은 기존 객체를 복제하여 객체를 생성하는 방식입니다. 이 패턴은 객체의 생성 비용이 높거나, 객체의 타입이 런타임에 결정되어야 할 경우 유용하게 사용할 수 있습니다.
public abstract class Prototype {
    public abstract Prototype clone();
}

public class ConcretePrototype extends Prototype {
    private String field;

    public ConcretePrototype(String field) {
        this.field = field;
    }

    @Override
    public Prototype clone() {
        return new ConcretePrototype(this.field);
    }

    public void setField(String field) {
        this.field = field;
    }

    public String getField() {
        return this.field;
    }
}

public class Client {
    public static void main(String[] args) {
        ConcretePrototype original = new ConcretePrototype("initial");
        ConcretePrototype clone = (ConcretePrototype) original.clone();
        clone.setField("modified");

        System.out.println("Original: " + original.getField());
        System.out.println("Clone: " + clone.getField());
    }
}
위 예제에서 ConcretePrototype 클래스는 Prototype을 상속받아 clone 메소드를 구현합니다. 클라이언트는 original 객체를 복제하여 clone 객체를 생성하고, 이 clone의 상태를 변경할 수 있습니다.
추상 팩토리 (Abstract Factory)
추상 팩토리 패턴은 관련된 객체의 그룹을 생성하기 위해 인터페이스를 제공합니다. 이 패턴은 구체적인 클래스를 명시하지 않고도 서로 관련되거나 의존적인 인스턴스를 생성할 수 있도록 도와줍니다.
public interface AbstractFactory {
    AbstractProductA createProductA();
    AbstractProductB createProductB();
}

public interface AbstractProductA {
    void useProductA();
}

public interface AbstractProductB {
    void useProductB();
}

public class ConcreteFactory1 implements AbstractFactory {
    public AbstractProductA createProductA() {
        return new ProductA1();
    }

    public AbstractProductB createProductB() {
        return new ProductB1();
    }
}

public class ConcreteFactory2 implements AbstractFactory {
    public AbstractProductA createProductA() {
        return new ProductA2();
    }

    public AbstractProductB createProductB() {
        return new ProductB2();
    }
}

public class ProductA1 implements AbstractProductA {
    public void useProductA() {
        System.out.println("Using Product A1");
    }
}

public class ProductB1 implements AbstractProductB {
    public void useProductB() {
        System.out.println("Using Product B1");
    }
}

public class Client {
    public static void main(String[] args) {
        AbstractFactory factory = new ConcreteFactory1();
        AbstractProductA productA = factory.createProductA();
        AbstractProductB productB = factory.createProductB();

        productA.useProductA();
        productB.useProductB();
    }
}
이 예제에서는 ConcreteFactory1과 ConcreteFactory2가 각각 AbstractFactory 인터페이스를 구현합니다. 클라이언트는 구체적인 팩토리를 선택하여 관련된 제품을 생성하고 사용합니다.
구조 패턴 (Structural Patterns)
구조 패턴은 객체와 클래스를 조합하여 더 큰 구조를 만드는 패턴입니다. 예를 들어, 여러 객체가 서로 다른 방식으로 협력하는 복잡한 구조를 단순화할 수 있습니다.
어댑터 (Adapter)
인터페이스 호환성 문제로 인해 함께 사용할 수 없는 클래스들을 연결해 사용할 수 있게 하는 패턴입니다.
public interface Target {
    void request();
}

public class Adaptee {
    public void specificRequest() {
        // A specific implementation
    }
}

public class Adapter implements Target {
    private Adaptee adaptee = new Adaptee();

    @Override
    public void request() {
        adaptee.specificRequest();
    }
}
데코레이터 (Decorator)
객체에 추가적인 책임을 동적으로 첨가할 수 있게 해주며, 서브클래스를 만드는 것보다 유연한 대안을 제공하는 패턴입니다.
public interface Component {
    void operation();
}

public class ConcreteComponent implements Component {
    @Override
    public void operation() {
        // Original operation
    }
}

public class Decorator implements Component {
    private Component component;

    public Decorator(Component component) {
        this.component = component;
    }

    @Override
    public void operation() {
        component.operation();
        addedBehavior();
    }

    public void addedBehavior() {
        // Additional behavior
    }
}
브리지 (Bridge)
브리지 패턴은 추상화와 구현을 분리하여 각각 독립적으로 변형할 수 있도록 합니다. 이는 두 구조간의 결합도를 낮추어 더 유연한 코드 구조를 가능하게 합니다.
// Implementor
interface Device {
    void turnOn();
    void turnOff();
}

// Concrete Implementor
class TV implements Device {
    public void turnOn() {
        System.out.println("TV turned on.");
    }

    public void turnOff() {
        System.out.println("TV turned off.");
    }
}

// Abstraction
abstract class RemoteControl {
    protected Device device;

    protected RemoteControl(Device device) {
        this.device = device;
    }

    abstract void togglePower();
}

// Refined Abstraction
class BasicRemote extends RemoteControl {
    public BasicRemote(Device device) {
        super(device);
    }

    public void togglePower() {
        System.out.println("Using Basic Remote:");
        device.turnOn();
        device.turnOff();
    }
}

public class Main {
    public static void main(String[] args) {
        Device tv = new TV();
        RemoteControl remote = new BasicRemote(tv);
        remote.togglePower();
    }
}
컴포지트 (Composite)
컴포지트 패턴은 객체들을 트리 구조로 구성하여 개별 객체와 복합 객체를 클라이언트가 동일하게 다룰 수 있도록 합니다.
interface Component {
    void operation();
}

class Leaf implements Component {
    public void operation() {
        System.out.println("Leaf operation");
    }
}

class Composite implements Component {
    private List<Component> children = new ArrayList<>();

    public void add(Component component) {
        children.add(component);
    }

    public void operation() {
        for (Component child : children) {
            child.operation();
        }
    }
}

public class Main {
    public static void main(String[] args) {
        Composite root = new Composite();
        root.add(new Leaf());
        root.add(new Leaf());
        root.operation();
    }
}
퍼사드 (Facade)
퍼사드 패턴은 복잡한 시스템에 대한 간단한 인터페이스를 제공하여, 서브 시스템의 사용을 용이하게 합니다.
class SubsystemA {
    public void operationA() {
        System.out.println("Operation A");
    }
}

class SubsystemB {
    public void operationB() {
        System.out.println("Operation B");
    }
}

class Facade {
    private SubsystemA a = new SubsystemA();
    private SubsystemB b = new SubsystemB();

    public void operation() {
        a.operationA();
        b.operationB();
    }
}

public class Main {
    public static void main(String[] args) {
        Facade facade = new Facade();
        facade.operation();
    }
}
플라이웨이트 (Flyweight)
플라이웨이트 패턴은 객체의 효율적 공유를 통해 많은 수의 객체를 메모리 효율적으로 관리할 수 있게 합니다. 주로 데이터가 중복되는 경우에 사용됩니다.
class Flyweight {
    private String sharedState;

    public Flyweight(String sharedState) {
        this.sharedState = sharedState;
    }

    public void operation(String uniqueState) {
        System.out.println("Shared State: " + sharedState + ", Unique State: " + uniqueState);
    }
}

class FlyweightFactory {
    private Map<String, Flyweight> flyweights = new HashMap<>();

    public Flyweight getFlyweight(String key) {
        if (!flyweights.containsKey(key)) {
            flyweights.put(key, new Flyweight(key));
        }
        return flyweights.get(key);
    }
}

public class Main {
    public static void main(String[] args) {
        FlyweightFactory factory = new FlyweightFactory();
        factory.getFlyweight("X").operation("1");
        factory.getFlyweight("Y").operation("2");
        factory.getFlyweight("X").operation("3");
    }
}
프록시 (Proxy)
프록시 패턴은 다른 객체에 대한 접근을 제어하기 위해 대리자 또는 자리표시자를 제공합니다. 보안, 지연 초기화, 원격 객체 등의 처리에 사용됩니다.
interface Subject {
    void request();
}

class RealSubject implements Subject {
    public void request() {
        System.out.println("Requesting");
    }
}

class Proxy implements Subject {
    private RealSubject realSubject;

    public void request() {
        if (realSubject == null) {
            realSubject = new RealSubject();
        }
        realSubject.request();
    }
}

public class Main {
    public static void main(String[] args) {
        Proxy proxy = new Proxy();
        proxy.request();
    }
}
행위 패턴 (Behavioral Patterns)
행위 패턴은 객체 간의 통신을 처리하는 방법론을 중점으로 다루며, 특히 복잡한 제어 흐름을 간소화하는 데 도움을 줍니다.
옵서버 (Observer)
한 객체의 상태 변화에 따라 다른 종속 객체들이 자동으로 알림을 받고 갱신되는 방식으로 일대다 (one-to-many) 의존성을 정의하는 패턴입니다.
public interface Observer {
    void update();
}

public class ConcreteObserver implements Observer {
    public void update() {
        // Respond to the update
    }
}

public class Subject {
    private List<Observer> observers = new ArrayList<>();

    public void attach(Observer observer) {
        observers.add(observer);
    }

    public void detach(Observer observer) {
        observers.remove(observer);
    }

    public void notifyObservers() {
        for (Observer observer : observers) {
            observer.update();
        }
    }
}
전략 (Strategy)
알고리즘의 일부를 변경하여 알고리즘의 동작을 동적으로 변경할 수 있는 패턴입니다.
public interface Strategy {
    void algorithmInterface();
}

public class ConcreteStrategyA implements Strategy {
    public void algorithmInterface() {
        // Implement the algorithm
    }
}

public class Context {
    private Strategy strategy;

    public Context(Strategy strategy) {
        this.strategy = strategy;
    }

    public void contextInterface() {
        strategy.algorithmInterface();
    }
}
인터프리터 (Interpreter)
인터프리터 패턴은 주어진 언어의 문법에 대해 표현을 정의하고, 이 표현을 사용하여 해당 언어로 작성된 문장을 해석하는 방법을 제공합니다.
interface Expression {
    boolean interpret(String context);
}

class TerminalExpression implements Expression {
    private String data;

    public TerminalExpression(String data) {
        this.data = data;
    }

    public boolean interpret(String context) {
        return context.contains(data);
    }
}

class OrExpression implements Expression {
    private Expression expr1;
    private Expression expr2;

    public OrExpression(Expression expr1, Expression expr2) {
        this.expr1 = expr1;
        this.expr2 = expr2;
    }

    public boolean interpret(String context) {
        return expr1.interpret(context) || expr2.interpret(context);
    }
}

public class Main {
    public static void main(String[] args) {
        Expression person1 = new TerminalExpression("John");
###         Expression person2 = new TerminalExpression("Julie");
        Expression isSingle = new OrExpression(person1, person2);

        System.out.println("John is single? " + isSingle.interpret("John"));
        System.out.println("Julie and John are single? " + isSingle.interpret("Julie John"));
    }
}
템플릿 메소드 (Template Method)
템플릿 메소드 패턴은 알고리즘의 뼈대를 정의하고, 일부 단계를 서브클래스로 연기하여 서브클래스가 알고리즘의 구조를 변경하지 않고 특정 단계를 재정의할 수 있도록 합니다.
abstract class Game {
    abstract void initialize();
    abstract void startPlay();
    abstract void endPlay();

    // 템플릿 메소드
    public final void play() {
        initialize();
        startPlay();
        endPlay();
    }
}

class Cricket extends Game {
    void initialize() {
        System.out.println("Cricket Game Initialized! Start playing.");
    }

    void startPlay() {
        System.out.println("Cricket Game Started. Enjoy the game!");
    }

    void endPlay() {
        System.out.println("Cricket Game Finished!");
    }
}

public class Main {
    public static void main(String[] args) {
        Game game = new Cricket();
        game.play();
    }
}
책임 연쇄 (Chain of Responsibility)
책임 연쇄 패턴은 요청 처리 객체의 체인을 형성하고, 요청을 체인을 따라 전달함으로써 요청을 처리할 객체를 결정합니다. 요청을 처리할 수 있는 객체가 나타날 때까지 체인을 따라 요청이 전달됩니다.
abstract class Handler {
    protected Handler successor;

    public void setSuccessor(Handler successor) {
        this.successor = successor;
    }

    public abstract void handleRequest(Request request);
}

class ConcreteHandler1 extends Handler {
    public void handleRequest(Request request) {
        if (request.getValue() < 0) {
            System.out.println("Negative values are handled by ConcreteHandler1:");
            System.out.println("\tConcreteHandler1.HandleRequest : " + request.getDescription()
                             + request.getValue());
        } else if (successor != null) {
            successor.handleRequest(request);
        }
    }
}

class ConcreteHandler2 extends Handler {
    public void handleRequest(Request request) {
        if (request.getValue() >= 0) { // If eligible handle request
            System.out.println("Positive values are handled by ConcreteHandler2:");
            System.out.println("\tConcreteHandler2.HandleRequest : " + request.getDescription()
                             + request.getValue());
        } else if (successor != null) {
            successor.handleRequest(request);
        }
    }
}

class Request {
    private int value;
    private String description;

    public Request(String description, int value) {
        this.description = description;
        this.value = value;
    }

    public int getValue() {
        return value;
    }

    public String getDescription() {
        return description;
    }
}

public class Main {
    public static void main(String[] args) {
        Handler h1 = new ConcreteHandler1();
        Handler h2 = new ConcreteHandler2();

        h1.setSuccessor(h2);

        h1.handleRequest(new Request("Negative Value ", -1));
        h1.handleRequest(new Request("Negative Value ", 0));
        h1.handleRequest(new Request("Negative Value ", 1));
    }
}
커맨드 (Command)
커맨드 패턴은 요청을 객체의 형태로 캡슐화하여, 사용자가 서로 다른 요청, 큐 또는 로그 요청 및 작업을 수행할 수 있는 기능을 제공합니다. 이 패턴은 호출 작업을 요청하는 객체와 요청을 수행하는 객체를 분리합니다.
// Command interface
interface Command {
    void execute();
}

// Receiver class
class Light {
    public void turnOn() {
        System.out.println("The light is on");
    }

    public void turnOff() {
        System.out.println("The light is off");
    }
}

// Concrete Command for turning on the light
class TurnOnCommand implements Command {
    private Light light;

    public TurnOnCommand(Light light) {
        this.light = light;
    }

    public void execute() {
        light.turnOn();
    }
}

// Concrete Command for turning off the light
class TurnOffCommand implements Command {
    private Light light;

    public TurnOffCommand(Light light) {
        this.light = light;
    }

    public void execute() {
        light.turnOff();
    }
}

// Invoker
class RemoteControl {
    private Command command;

    public void setCommand(Command command) {
        this.command = command;
    }

    public void pressButton() {
        command.execute();
    }
}

public class Main {
    public static void main(String[] args) {
        Light light = new Light();
        Command switchUp = new TurnOnCommand(light);
        Command switchDown = new TurnOffCommand(light);

        RemoteControl remote = new RemoteControl();
        remote.setCommand(switchUp);
        remote.pressButton();
        remote.setCommand(switchDown);
        remote.pressButton();
    }
}
이터레이터 (Iterator)
이터레이터 패턴은 컬렉션 구현 방법을 노출시키지 않고, 컬렉션의 요소에 순차적으로 접근할 수 있는 방법을 제공합니다.
interface Iterator {
    boolean hasNext();
    Object next();
}

interface Container {
    Iterator getIterator();
}

class NameRepository implements Container {
    public String names[] = {"Robert" , "John" ,"Julie" , "Lora"};

    public Iterator getIterator() {
        return new NameIterator();
    }

    private class NameIterator implements Iterator {

        int index;

        public boolean hasNext() {
            if (index < names.length) {
                return true;
            }
            return false;
        }

        public Object next() {
            if (this.hasNext()) {
                return names[index++];
            }
            return null;
        }
    }
}

public class Main {
    public static void main(String[] args) {
        NameRepository namesRepository = new NameRepository();

        for (Iterator iter = namesRepository.getIterator(); iter.hasNext();) {
            String name = (String)iter.next();
            System.out.println("Name : " + name);
        }
    }
}
미디에이터 (Mediator)
미디에이터 패턴은 객체 간의 복잡한 통신을 캡슐화하는 중개자를 제공하여, 객체들이 직접 서로를 참조하지 않도록 하여 결합도를 낮춥니다.
interface Mediator {
    void send(String message, Colleague colleague);
}

abstract class Colleague {
    protected Mediator mediator;

    public Colleague(Mediator mediator) {
        this.mediator = mediator;
    }

    public abstract void send(String message);
    public abstract void receive(String message);
}

class ConcreteColleague1 extends Colleague {
    public ConcreteColleague1(Mediator mediator) {
        super(mediator);
    }

    public void send(String message) {
        mediator.send(message, this);
    }

    public void receive(String message) {
        System.out.println("Colleague1 received message: " + message);
    }
}

class ConcreteColleague2 extends Colleague {
    public ConcreteColleague2(Mediator mediator) {
        super(mediator);
    }

    public void send(String message) {
        mediator.send(message, this);
    }

    public void receive(String message) {
        System.out.println("Colleague2 received message: " + message);
    }
}

class ConcreteMediator implements Mediator {
    private ConcreteColleague1 colleague1;
    private ConcreteColleague2 colleague2;

    public void setColleague1(ConcreteColleague1 colleague1) {
        this.colleague1 = colleague1;
    }

    public void setColleague2(ConcreteColleague2 colleague2) {
        this.colleague2 = colleague2;
    }

    public void send(String message, Colleague colleague) {
        if (colleague == colleague1) {
            colleague2.receive(message);
        } else {
            colleague1.receive(message);
        }
    }
}

public class Main {
    public static void main(String[] args) {
        ConcreteMediator mediator = new ConcreteMediator();
        ConcreteColleague1 colleague1 = new ConcreteColleague1(mediator);
        ConcreteColleague2 colleague2 = new ConcreteColleague2(mediator);
        mediator.setColleague1(colleague1);
        mediator.setColleague2(colleague2);

        colleague1.send("Hello, how are you?");
        colleague2.send("Fine, thanks!");
    }
}
메멘토 (Memento)
메멘토 패턴은 객체의 상태를 이전 상태로 복원할 수 있게 하여, 실행 취소나 복구와 같은 기능을 구현할 수 있도록 합니다.
class Originator {
    private String state;

    public void setState(String state) {
        this.state = state;
    }

    public String getState() {
        return state;
    }

    public Memento saveStateToMemento() {
        return new Memento(state);
    }

    public void getStateFromMemento(Memento memento) {
        state = memento.getState();
    }
}

class Memento {
    private String state;

    public Memento(String state) {
        this.state = state;
    }

    public String getState() {
        return state;
    }
}

class Caretaker {
    private List<Memento> mementoList = new ArrayList<Memento>();

    public void add(Memento state){
        mementoList.add(state);
    }

    public Memento get(int index){
        return mementoList.get(index);
    }
}

public class Main {
    public static void main(String[] args) {
        Originator originator = new Originator();
        Caretaker caretaker = new Caretaker();

        originator.setState("State #1");
        originator.setState("State #2");
        caretaker.add(originator.saveStateToMemento());

        originator.setState("State #3");
        caretaker.add(originator.saveStateToMemento());

        originator.setState("State #4");
        System.out.println("Current State: " + originator.getState());

        originator.getStateFromMemento(caretaker.get(0));
        System.out.println("First saved State: " + originator.getState());
        originator.getStateFromMemento(caretaker.get(1));
        System.out.println("Second saved State: " + originator.getState());
    }
}
스테이트 (State)
스테이트 패턴은 객체의 내부 상태가 변경될 때 행동을 변경할 수 있도록 하여 객체가 클래스를 변경하는 것처럼 보이게 합니다.
interface State {
    void doAction(Context context);
}

class StartState implements State {
    public void doAction(Context context) {
        System.out.println("Player is in start state");
        context.setState(this);
    }

    public String toString(){
        return "Start State";
    }
}

class StopState implements State {
    public void doAction(Context context) {
        System.out.println("Player is in stop state");
        context.setState(this);
    }

    public String toString(){
        return "Stop State";
    }
}

class Context {
    private State state;

    public Context() {
        state = null;
    }

    public void setState(State state) {
        this.state = state;
    }

    public State getState() {
        return state;
    }
}

public class Main {
    public static void main(String[])