1. client, server 파일 업로드

기존에 로컬에서 작업하던 클라이언트 단 react 파일을 yarn build하여 build 폴더를 생성한다. nginx에서 git clone ''해서 react 프로젝트를 받아와서 배포하는 경우도 있지만 용량이 커서 빌드 파일만 올려주기로 했다. 파일질라로 접속해서 빌드폴더를 업로드 해주었다.
경로 - /home/ec2-user/[프로젝트]
build - front 파일
나머지 - express, mongodb 파일
2-1. node 실행, server에서 필요한 모듈 설치
node, npm이 설치 되어있어야 한다. 안되어 있으면 설치.
nvm을 설치해서 node, npm을 설치 해주었다.
1) nvm 설치
curl -o- https://raw.githubusercontent.com/nvm-sh/nvm/v0.34.0/install.sh | bash2) nvm 활성화
. ~/.nvm/nvm.sh3) node 설치
nvm install node4) nvm 사용
nvm ls //버전 확인
nvm use 16.15.1 // 사용할 노드 버전 선택(LTS)
node -v
npm -v //node npm 버전 확인
5) node 실행하고 모듈 설치
node index.js해당 프로젝트 파일 경로에서 서버를 실행해준다.
6) 내가 설치한 모듈들 정리
express
http 모듈처럼 사용할 수 있지만 훨씬 더 많은 기능이 있는 외부모듈
body-parser
post 요청 데이터를 추출한다.
cookie-parser
요청쿠키를 추출
mongoose
mongoDB에 접근하여 데이터를 사용할 수 있게 해주는 모듈
bcrypt
비밀번호를 암호화하기 위해 설치한 모듈
jsonwebtoken
사용자 정보를 인증하기 위해 설치한 모듈
2-2. node 실행 시 발생한 에러
Error [ERR_REQUIRE_ESM]: require() of ES Module /a/node_modules/chalk/source/index.js from /a/a.ts not supported.
Instead change the require of index.js in /a/a.ts to a dynamic import() which is available in all CommonJS modules.
위 글을 참고해서 에러를 해결하자.
//변경 전
const expree = require('express');
module.exports = { User };

//변경 후
import express from 'express';
export default User;
3. pm2
PM2는 Node.js 어플리케이션을 쉽게 관리할 수 있게 해주는 Process Manager이다. 서버를 중단하지 않고 실행시키기 위해 사용된다.
1) 설치
npm install pm2 -g2) 사용

pm2 start [index.js 실행할 파일] //사용
pm2 status index.js //상태 확인
4. nginx 설정
/etc/nginx/nginx.conf : nginx의 메인설정 파일로 nginx의 글로벌 설정을 수정.
/etc/nginx/sites-available: 해당 디렉터리에서 프록시 설정 및 어떻게 요청을 처리해야 할지에 대해 설정.
/etc/nginx/sites-enabled: 해당 디렉터리는 sites-available 디텍터리에서 연결된 파일들이 존재하는 곳.
1) 기존에 사용하던 설정 파일 수정
sites-availble, sites-enalbed 파일을 만들어서 서버 설정을 해줄 것이기 때문에 기존에 있던 기본 서버설정 내용을 주석처리 해준다.
cd /etc/nginx
sudo vi nginx.conf 실행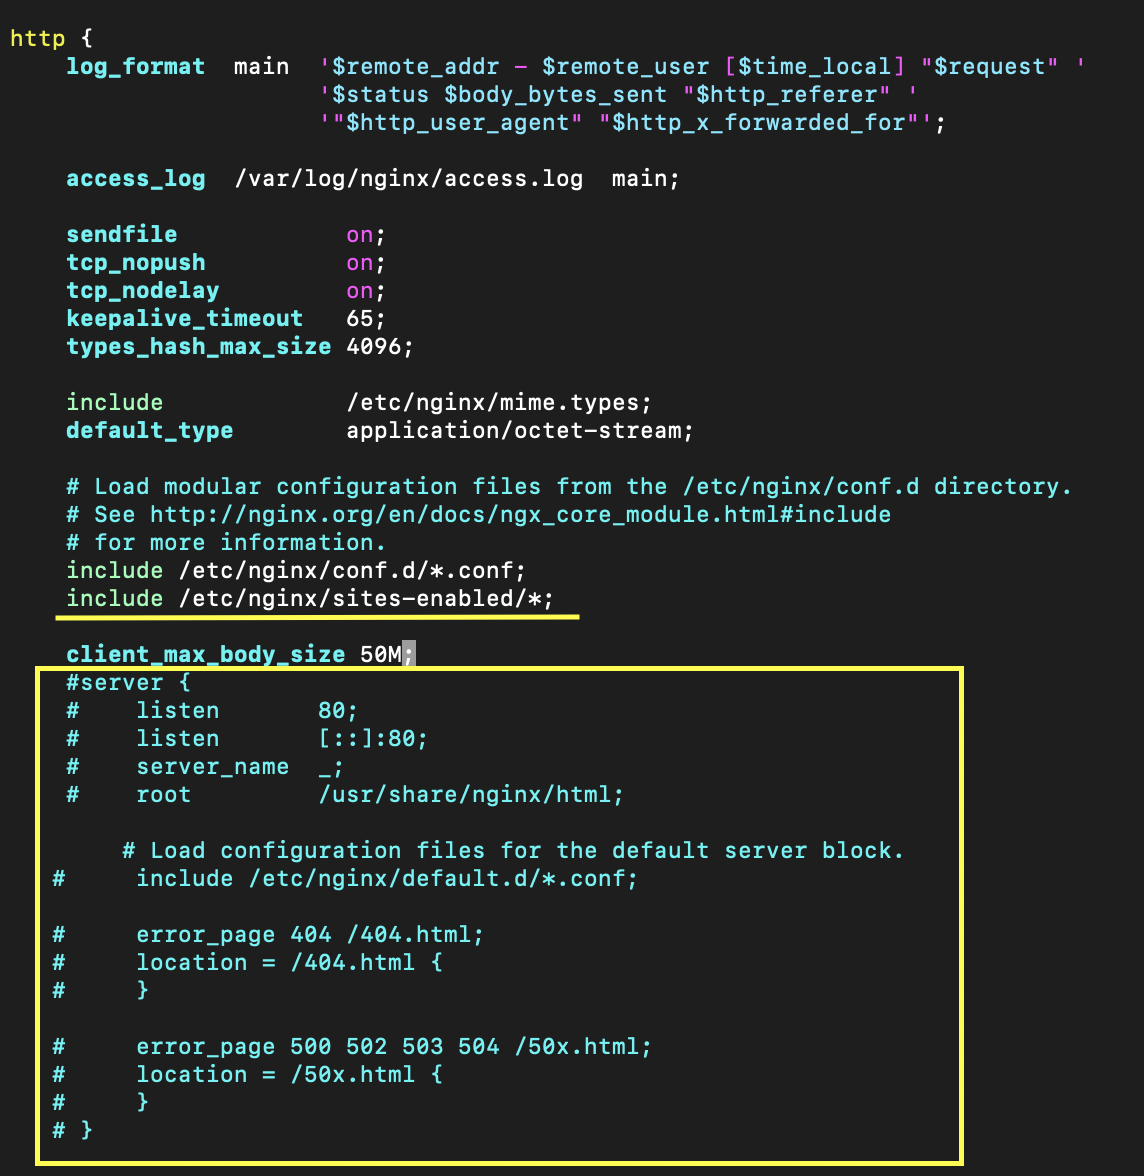
- 이미지 용량 제한 늘리기
client_max_body_size 50M;2) nginx 가상서버 환경 만들기 - sites-availble, sites-enalbed 파일 생성
/etc/nginx/nginx.conf에
include /etc/nginx/sites-enabled/*; 추가
// /etc/nginx
mkdir sites-availble
mkdir sites-enabled
cd sites-availble
sudo vi myblog.conf
myblog.conf 파일을 생성한 후, 요청 처리에 대한 파일 작성
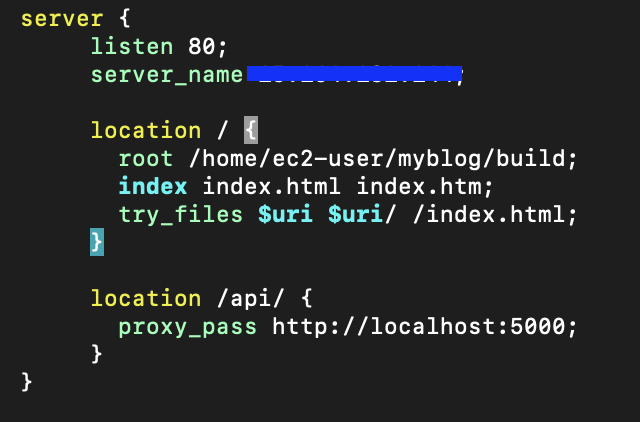
server {
	listen 80;
    server_name [퍼블릭/탄력 주소]

    location / {
      root /home/ec2-user/[프로젝트 이름]/build;
  	  index index.html index.htm
  	  try_files $uri $uri/ /index.html;
    }

	#서버 - 프록시 설정
   	location /api {
    	proxy_pass http://localhost:5000;
    }
}
_esc + wq! 로 저장
sudo touch myblog.confsites-enabled 폴더 안에 myblog.conf가 똑같이 들어가 있는지 확인해보자. 들어가 있으면 완료.
웹 서버 재시작
sudo systemctl restart nginx5. 확인