[내일배움캠프] Spring_2기 97일차
카카오
1. 카카오 로그인 앱 설정
2. application-oauth.yml에 추가
spring:
  security:
    oauth2:
      client:
        registration:
          kakao:
            client-id: ${KAKAO_CLIENT_ID}
            client-secret: ${KAKAO_CLIENT_SECRET}
            redirect-uri: http://localhost:8080/login/oauth2/code/kakao
            authorization-grant-type: authorization_code
            client-authentication-method: client_secret_post
        provider:
          kakao:
            authorization-uri: https://kauth.kakao.com/oauth/authorize
            token-uri: https://kauth.kakao.com/oauth/token
            user-info-uri: https://kapi.kakao.com/v2/user/me
            user-name-attribute: id
3. OAuthAttributes에 카카오 메서드 추가
public static OAuthAttributes of(String registrationId, String userNameAttributeName, Map<String, Object> attributes) {
	if ("kakao".equals(registrationId)) {
    	return ofKakao(userNameAttributeName, attributes);
	}
    return ofGoogle(userNameAttributeName, attributes);
}

private static OAuthAttributes ofKakao(String userNameAttributeName, Map<String, Object> attributes) {
	String providerId = String.valueOf(attributes.get("id"));

    return OAuthAttributes.builder()
    		.email(providerId + "@kakao.social")
            .provider(AuthProvider.KAKAO)
            .providerId(providerId)
            .nameAttributeKey(userNameAttributeName)
            .build();
}- 카카오에서 가입한 email을 받으려면 비즈앱 신청해야 함
- {providerId}@kakao.social 형식으로 플레이스 홀더 이메일 생성
네이버
1. 네이버 애플리케이션 설정
🔗 Naver Developers Application
2. application-oauth.yml에 추가
spring:
  security:
    oauth2:
      client:
        registration:
          naver:
            client-id: ${NAVER_CLIENT_ID}
            client-secret: ${NAVER_CLIENT_SECRET}
            redirect-uri: http://localhost:8080/login/oauth2/code/naver
            authorization-grant-type: authorization_code
        provider:
          naver:
            authorization-uri: https://nid.naver.com/oauth2.0/authorize
            token-uri: https://nid.naver.com/oauth2.0/token
            user-info-uri: https://openapi.naver.com/v1/nid/me
            user-name-attribute: response
3. OAuthAttributes에 네이버 메서드 추가
public static OAuthAttributes of(String registrationId, String userNameAttributeName, Map<String, Object> attributes) {
	if ("kakao".equals(registrationId)) {
    	return ofKakao(userNameAttributeName, attributes);
    } else if ("naver".equals(registrationId)) {
    	return ofNaver(userNameAttributeName, attributes);
    }
    return ofGoogle(userNameAttributeName, attributes);
}

private static OAuthAttributes ofNaver(String userNameAttributeName, Map<String, Object> attributes) {
	Map<String, Object> response = (Map<String, Object>) attributes.get("response");
	String providerId = (String) response.get("id");

	return OAuthAttributes.builder()
			.email(providerId + "@naver.social")
			.provider(AuthProvider.NAVER)
			.providerId(providerId)
			.nameAttributeKey(userNameAttributeName)
			.build();
}- 네이버는 구글, 카카오와 달리 json 형식의 response에 정보를 담아서 줌
- response에서 원하는 값을 꺼내면 됨
- 카카오와 동일하게 사용자 식별자에 @naver.social을 붙여 플레이스 홀더 이메일 생성
(추가) OAuth2FailureHandler
상황
 |
|---|
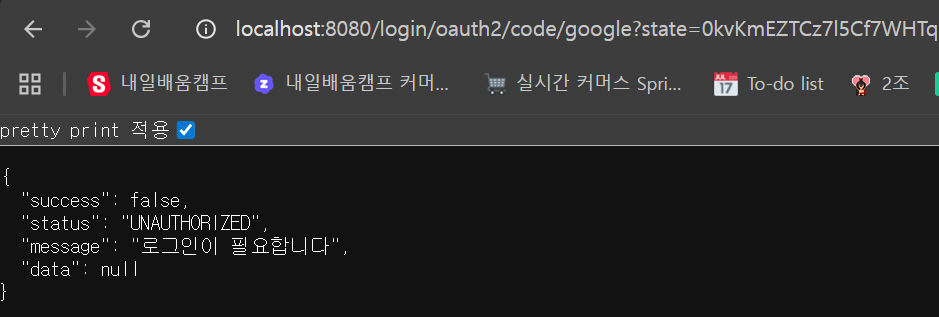 |
인텔리제이 콘솔에는 이메일 중복 에러 로그가 정상적으로 찍히는데 웹에서 확인하면 그냥 로그인 필요하다는 메시지만 뜸
해결
@Component
@RequiredArgsConstructor
public class OAuth2FailureHandler implements AuthenticationFailureHandler {

    private final ObjectMapper objectMapper;

    @Override
    public void onAuthenticationFailure(HttpServletRequest request, HttpServletResponse response, AuthenticationException exception) throws IOException, ServletException {
        String errorCode = ((OAuth2AuthenticationException) exception).getError().getErrorCode();
        HttpStatus httpStatus = HttpStatus.valueOf(errorCode);

        response.setContentType(MediaType.APPLICATION_JSON_VALUE);
        response.setCharacterEncoding("UTF-8");
        response.setStatus(httpStatus.value());
        response.getWriter().write(objectMapper.writeValueAsString(
                BaseResponse.fail(httpStatus.name(), exception.getMessage())));
    }
}
OAuth2FailureHandler를 만들고 SecurityConfig에
.failureHandler(oAuth2FailureHandler)를 추가해주었다.
근데도 정상적으로 응답하지 않아서
private User saveOrLoad(OAuthAttributes authAttributes) {
    Optional<UserSocialAccount> socialAccount = userSocialAccountRepository.findByProviderAndProviderId(
    authAttributes.getProvider(), authAttributes.getProviderId());

    if (socialAccount.isPresent()) {
    	return userRepository.findByIdAndDeletedFalse(socialAccount.get().getUserId()).orElseThrow(
        		() -> new OAuth2AuthenticationException(new OAuth2Error(
                            UserErrorEnum.USER_NOT_FOUND.getStatus().name()),
                            UserErrorEnum.USER_NOT_FOUND.getMessage()));
    }

    if (userRepository.existsByEmail(authAttributes.getEmail())) {
    	throw new OAuth2AuthenticationException(new OAuth2Error(
        		AuthErrorEnum.SOCIAL_LOGIN_EMAIL_CONFLICT.getStatus().name()),
                AuthErrorEnum.SOCIAL_LOGIN_EMAIL_CONFLICT.getMessage());
 	}

    try {
    	User newUser = User.ofSocial(authAttributes.getEmail(), UserRole.USER);
        userRepository.save(newUser);

        UserSocialAccount newSocialAccount = UserSocialAccount.of(newUser.getId(), authAttributes.getProvider(), authAttributes.getProviderId());
        userSocialAccountRepository.save(newSocialAccount);

        return newUser;
    } catch (DataIntegrityViolationException e) {
    	Optional<UserSocialAccount> existing = userSocialAccountRepository.findByProviderAndProviderId(
        		authAttributes.getProvider(), authAttributes.getProviderId());

        if (existing.isPresent()) {
        	return userRepository.findByIdAndDeletedFalse(existing.get().getUserId()).orElseThrow(
            		() -> new OAuth2AuthenticationException(new OAuth2Error(
                            UserErrorEnum.USER_NOT_FOUND.getStatus().name()),
                            UserErrorEnum.USER_NOT_FOUND.getMessage()));
        }

        if (userRepository.existsByEmail(authAttributes.getEmail())) {
            throw new OAuth2AuthenticationException(new OAuth2Error(
                    AuthErrorEnum.SOCIAL_LOGIN_EMAIL_CONFLICT.getStatus().name()),
                    AuthErrorEnum.SOCIAL_LOGIN_EMAIL_CONFLICT.getMessage());
        }

        throw e;
    }
}
CustomOAuth2UserService에서 ServiceErrorException 대신 OAuth2AuthenticationException을 직접 던지도록 수정했다.