📢 Decorator Handler
- Decorator란?
- programming pattern 중 하나로 부가 기능을 의미한다.
- ex) 기본 기능이 있는 데이터를 보낸다고 할 때 데이터 사이즈를 줄이기 위해 압축을 해서 보낸다던가 데이터를 암호화해서 보낸다던가 등등 기본 기능 외에 기능을 추가해서 데이터를 보내는 것
- 사용하는 이유
- 부가 기능들은 대체로 잘 바뀌는 특성이 있다.
- 기본 기능과 부가 기능을 같이 하나의 데이터로 만들면 부가 기능이 변경될 때마다 기본 기능이 포함된 데이터를 변경해줘야 한다.(SOLID 원칙에 어긋남)
- 따라서 기본 기능과 부가 기능을 따로 만들면 그냥 부가 기능만 수정해서 보내면 된다.
- 어떻게 구현??
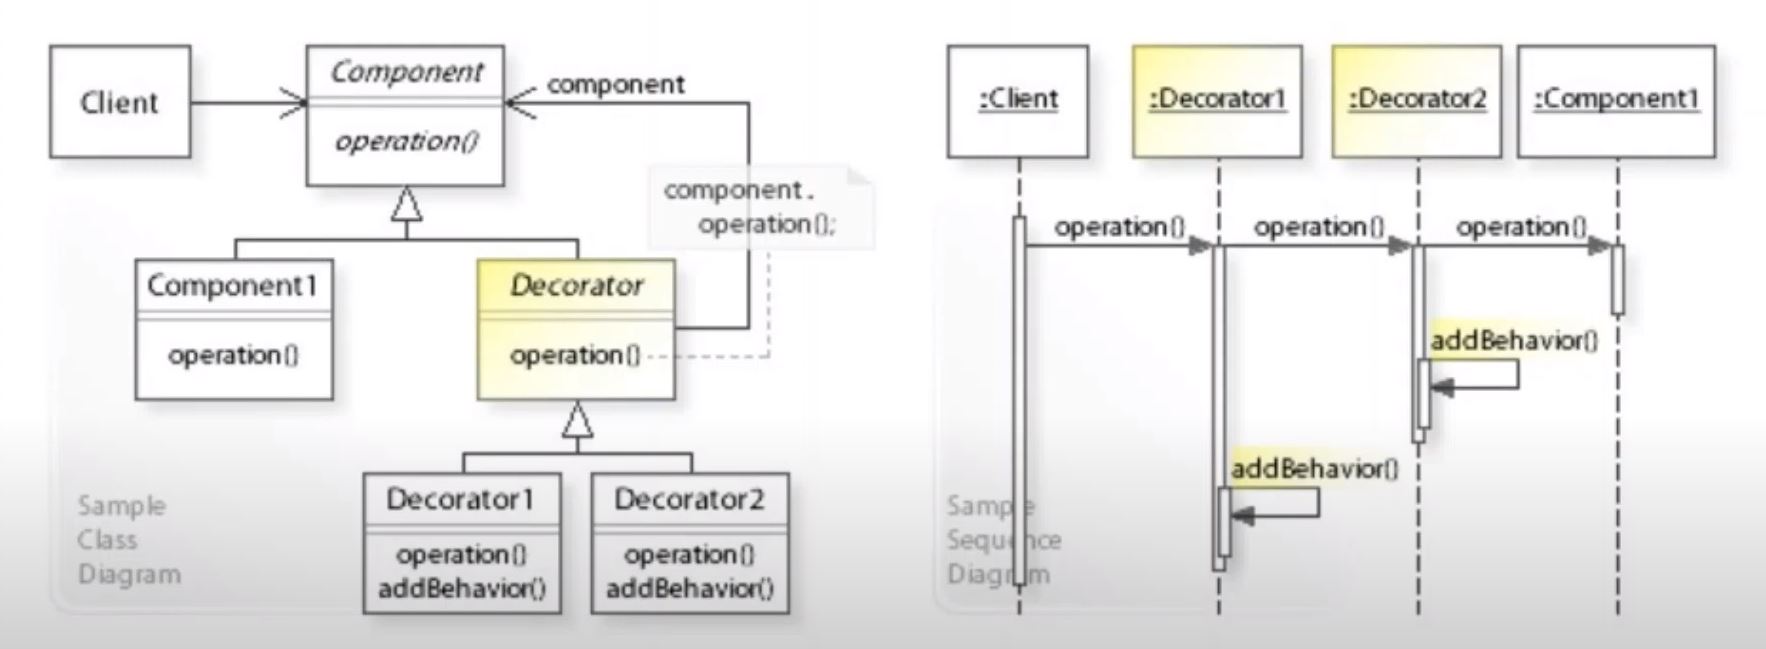
- Component1 : 기본 기능
- Decorator : 부가 기능
- Decorator1이 Decorator2의 instance를 가지고 있고 Decorator2는 Component1의 instance를 가지고 있다.
- 쭉 들어가서 기본 기능이 있는 Component1이 리턴되어 수행되고 그 다음 Decorator2가 리턴되어 수행된다. 다음으로 똑같이 Decorator1이 리턴되어 수행되고 최종적으로 끝난다.
📢 Decorator 구현해보기
이번 포스팅은 웹 관련 내용이 아닌 Decorator를 공부해보는 포스팅이다.
데이터를 전송할 때 암호화를 먼저하고 압축을 한 다음에 실제적으로 전송하는 예제를 만들어보겠다.
WEB6 폴더에 작성했다.
압축하는 코드와 암호화하는 코드는 github에서 다운 받아서 쓰자(여기서 중요한게 아니므로)
main.go
package main

import (
	"fmt"

	"github.com/tuckersGo/goWeb/web9/cipher"
	"github.com/tuckersGo/goWeb/web9/lzw"
)

type Component interface {
	Operator(string)
}

var sentData string

type SendComponent struct{}

func (self *SendComponent) Operator(data string) { // 기본 기능(실제적으로 데이터가 나가는 기능)
	// Send data
	// 여기서는 sentData에 저장하는 것으로 대체
	sentData = data
}

type ZipComponent struct { // Decorator이기 때문에 다른 component를 가지고 있다.
	com Component
}

func (self *ZipComponent) Operator(data string) { // 데이터를 압축
	zipData, err := lzw.Write([]byte(data)) // 데이터를 압축
	if err != nil {
		panic(err)
	}
	self.com.Operator(string(zipData)) // 압축한 데이터를 호출
}

type EncryptComponent struct { // Decorator이기 때문에 다른 component를 가지고 있다.
	key string
	com Component
}

func (self *EncryptComponent) Operator(data string) { // 데이터를 암호화
	encryptData, err := cipher.Encrypt([]byte(data), self.key)
	if err != nil {
		panic(err)
	}
	self.com.Operator(string(encryptData))
}

func main() {
	// 암호화하고 압축하고 send
	sender := &EncryptComponent{key: "abcde",
		com: &ZipComponent{
			com: &SendComponent{}}}

	// encryptcomponent의 Operator 함수가 호출되고 데이터가 암호화된다.
	// 그 다음 암호화된 데이터가 encryptcomponent가 가지고 있는 operator를 호출하는데 그것이 zipcomponent이다.
	// zipcomponent의 Operator 함수가 호출되고 데이터가 압축된다.
	// 그 데이터를 zipcomponent가 가지고 있는 operator를 호출하는데 그것이 sendcomponent이다.
	// sendcomponet의 Operator 함수가 호출되고 sentData에 데이터가 저장된다.

	sender.Operator("Hello World") // Hello World라는 데이터를 보낸다.

	fmt.Println(sentData) // 최종적으로sentData에 Hello World라는 데이터가 저장되어 있다.
}
결과값으로

가 나오는데 Hello World가 암호화되고 압축된 내용이다.
따라서 제대로 된 내용을 보려면 압축을 풀고 암호화를 풀어야 한다.
압축을 풀고 암호화를 푸는 코드를 작성해보자
main.go
...
var recvData string
...
type DecryptComponent struct { // encryptcomponent와 마찬가지
	key string
	com Component
}

func (self *DecryptComponent) Operator(data string) { // 암호화된 데이터 풀기
	decryptData, err := cipher.Decrypt([]byte(data), self.key)
	if err != nil {
		panic(err)
	}
	self.com.Operator(string(decryptData))
}

type UnzipComponent struct { // zipcomponent와 마찬가지
	com Component
}

func (self *UnzipComponent) Operator(data string) {
	unzipData, err := lzw.Read([]byte(data)) // 압축된 데이터를 풀기
	if err != nil {
		panic(err)
	}
	self.com.Operator(string(unzipData)) // 풀린 데이터를 호출
}

type ReadComponent struct {}

func (self *ReadComponent) Operator(data string) {
	recvData = data
}
...

func main() {
...
	// Hello World 데이터를 압축을 풀고 암호화를 풀기
	// 암호화하고 압축하고 send와 같은 매커니즘
	receiver := &UnzipComponent{
		com: &DecryptComponent{key: "abcde",
			com: &ReadComponent{},
		},
	}

	receiver.Operator(sentData) // 암호화하고 압축된 데이터를 풀고 recvData에 저장된
	fmt.Println(recvData)       // Hello World가 출력된다.
}
Hello World가 잘 출력된 것을 볼 수 있다.
decorator를 빼고 싶거나 다른 decorator를 넣고 싶으면
sender := &EncryptComponent{key: "abcde",
		com: &ZipComponent{
			com: &SendComponent{},
		},
	}
이 부분에서 componet를 빼거나 넣으면 되서 간단하게 부가 기능들을 수정하고 추가할 수 있다.(실무에서도 많이 쓰인다고 한다.)
이제 이런 패턴들을 이용해서 web decorator handler를 만들어보도록 하겠다!
📢 웹 서버에 Decorator를 만들기 위해 간단한 핸들러 만들기
WEB7 폴더에 작성했다.
main.go
package main

import (
	"net/http"

	"github.com/soosungp33/Golang_web/Golang_web/WEB7/myapp"
)

func NewHandler() http.Handler {
	mux := myapp.NewHandler()
	return mux
}

func main() {
	// Decorator하기 위한 간단한 웹 핸들러를 만든다.
	mux := NewHandler()

	http.ListenAndServe(":3000", mux)
}
main_test.go
package main

import (
	"io/ioutil"
	"net/http"
	"net/http/httptest"
	"testing"

	"github.com/stretchr/testify/assert"
)

func TestIndexPage(t *testing.T) {
	assert := assert.New(t)

	ts := httptest.NewServer(NewHandler())
	defer ts.Close()

	resp, err := http.Get(ts.URL)
	assert.NoError(err)
	assert.Equal(http.StatusOK, resp.StatusCode)
	data, _ := ioutil.ReadAll(resp.Body)
	assert.Equal("Hello World", string(data))
}
app.go
package myapp

import (
	"fmt"
	"net/http"
)

func indexHandler(w http.ResponseWriter, r *http.Request) {
	fmt.Fprint(w, "Hello World")
}

func NewHandler() http.Handler {
	mux := http.NewServeMux()
	mux.HandleFunc("/", indexHandler)
	return mux
}
이제 Decorator를 달아보자!
main_test.go
...
func TestDecoHandler(t *testing.T) { // 로그가 찍혀있는지 테스트
	assert := assert.New(t)

	ts := httptest.NewServer(NewHandler())
	defer ts.Close()

	buf := &bytes.Buffer{}
	log.SetOutput(buf) // 로그에 있는 내용을 standard out으로 출력인데 buffer에 출력하도록 변경

	resp, err := http.Get(ts.URL)
	assert.NoError(err)
	assert.Equal(http.StatusOK, resp.StatusCode)

	// 버퍼에 로그가 남아있는지 확인
	r := bufio.NewReader(buf)
	line, _, err := r.ReadLine() // 한 줄을 읽는다.
	assert.NoError(err)
	assert.Contains(string(line), "[LOGGER1] Started")

	line, _, err = r.ReadLine() // 한 줄을 읽는다.
	assert.NoError(err)
	assert.Contains(string(line), "[LOGGER1] Completed")
}
deco.go -> 핸들러가 불릴 때 로그를 찍어주는 코드
package decoHandler

import "net/http"

// main.go의 로그 함수 타입
type DecoratorFunc func(http.ResponseWriter, *http.Request, http.Handler)

type DecoHandler struct {
	fn DecoratorFunc
	h  http.Handler
}

func (self *DecoHandler) ServeHTTP(w http.ResponseWriter, r *http.Request) {
	self.fn(w, r, self.h)
}

func NewDecoHandler(h http.Handler, fn DecoratorFunc) http.Handler {
	return &DecoHandler{ // self.fn(~)이므로 Decorator 함수를 먼저 호출함 (logger 함수)
		fn: fn,
		h:  h,
	}
}
main.go
...
func logger(w http.ResponseWriter, r *http.Request, h http.Handler) {
	// 핸들러를 호출하기 전에 로그를 먼저 찍는다.
	start := time.Now()
	log.Println("[LOGGER1] Started")
	h.ServeHTTP(w, r)
	log.Println("[LOGGER1] Completed time : ", time.Since(start).Milliseconds())
}

func NewHandler() http.Handler {
	mux := myapp.NewHandler()
	h := decoHandler.NewDecoHandler(mux, logger) // mux는 기본 기능, logger는 부가 기능
	return h
}
...
로그가 잘 나오는 것을 확인할 수 있다!
Decorator를 하나 더 추가해 보자
main.go
...
func logger2(w http.ResponseWriter, r *http.Request, h http.Handler) {
	// 핸들러를 호출하기 전에 로그를 먼저 찍는다.
	start := time.Now()
	log.Println("[LOGGER2] Started")
	h.ServeHTTP(w, r)
	log.Println("[LOGGER2] Completed time : ", time.Since(start).Milliseconds())
}
...
func NewHandler() http.Handler {
	h := myapp.NewHandler()
	h = decoHandler.NewDecoHandler(h, logger) // mux는 기본 기능, logger는 부가 기능
	h = decoHandler.NewDecoHandler(h, logger2)
	return h
}
돌려보면
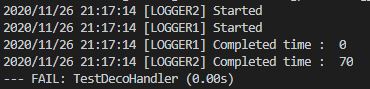
logger2에 들어가서 logger2 started 출력 후 h.ServeHTTP(w, r)이 호출되어서 logger로 들어간다. 따라서 logger1 started가 출력되고 핸들러가 실행된다.
핸들러가 리턴되고 다시 logger로 돌아가서 logger1 completed가 출력된 후 리턴되고 logger2로 돌아가서 logger2 completed가 출력되고 끝나는 패턴이다.
(logger2에 대한 테스트 코드는 처리해주지 않아서 출력 후 FAIL이 나오는 것이 맞다.)
이와 같이 다른 Decorator를 넣고 싶으면 이런 식으로 추가하면 된다.