config.properties에 인코드, 디코드 인증키 등록
# 공공데이터 포털 ServiceKey encode
my.public.data.service.key.encode=인코드값

# 공공데이터 포털 ServiceKey decode
my.public.data.service.key.decode=디코드값
mainController에서 키값 꺼내서 리턴
	@Value("${my.public.data.service.key.decode}")
	private String decodeServiceKey;


	/* 공공데이터 서비스키 리턴하기
	 */
	@GetMapping("/getServiceKey")
	@ResponseBody
	public String getServiceKey() {
		return decodeServiceKey;
	}
header.js
// 공공 데이터
// async & awiat : 비동기 처리 패턴
// 비동기를 마치 동기처럼(실행 순서를 지켜서) 사용하는 방법
// async : 비동기가 수행되는 함수 정의 부분 앞에 붙여 사용하는 키워드 (비동기 요청을 수행할 것이다.)
// await : promise를 리턴하는 비동기 요청 앞에 붙여 사용하는 키워드
// 오늘 날짜를 YYYYMMDD 형식으로 리턴하는 함수
function getCurrentDate() {
const today = new Date();
const year = today.getFullYear(); // 2024
const month = ('0' + (today.getMonth() + 1)).slice(-2);
const day = ('0' + today.getDate()).slice(-2);
return `${year}${month}${day}`;
}
// 비동기 요청 1번째 함수
// 서비스키 config.properties에서 얻어오기
async function getServiceKey() {
try {
const response = await fetch("/getServiceKey"); // 첫번째 then의 response(Promise) 객체 리턴
return response.text();
// const response = fetch("/getServiceKey");
// const result = response.text();
// fetch("/getServiceKey")
// .then(resp => resp.text())
// .then(result => {
// console.log(result);
// })
} catch(err) {
console.log("getServiceKey의 에러 : " + err);
}
}
// 공공데이터 날씨 API 정보를 얻어올 함수
async function fetchData() {
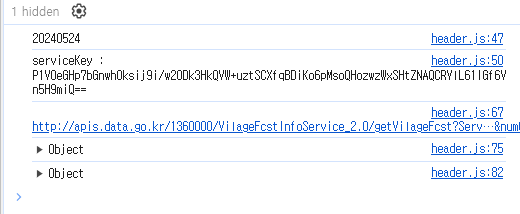
const currentDate = getCurrentDate(); // 20240524
console.log(currentDate);
const serviceKey = await getServiceKey(); // 비동기 요청 1번째의 응답이 올 때까지 기다림
console.log("serviceKey : ", serviceKey);
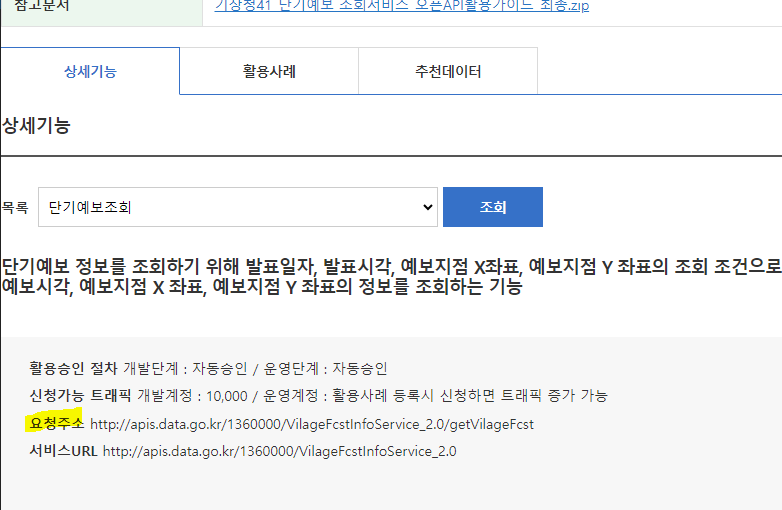
const url = 'http://apis.data.go.kr/1360000/VilageFcstInfoService_2.0/getVilageFcst';
// URLSearchParams : URL의 쿼리 문자열을 쉽게 다룰 수 있게 해주는 내장 객체
// 단, 사용 시 decode 서비스키 사용 -> URLSearchParams이 데이터를 인코딩하기 때문
const queryParams = new URLSearchParams({
ServiceKey : serviceKey,
pageNo : 1,
numOfRows : 10,
dataType : 'JSON',
base_date : currentDate,
base_time : '0500',
nx: 60,
ny: 127
});
console.log(`${url}?${queryParams}`);
// fetch 요청
try {
const response = await fetch(`${url}?${queryParams}`)
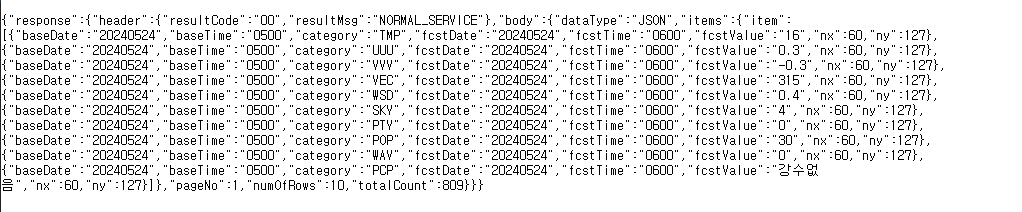
const result = await response.json();
console.log(result);
const obj = result.response.body.items.item.reduce((acc, data) => {
acc[data.category] = data.fcstValue;
return acc;
}, {});
console.log(obj);
const sky = {
"1" : "맑음",
"3" : "구름많음",
"4" : "흐림"
}
// 화면에 뿌리기..
const weatherInfo = document.querySelector(".weather-info");
// i 요소 생성 (아이콘)
const icon = document.createElement('i');
// span 요소 생성 (날씨 정보)
const span = document.createElement('span');
// 첫 번째 p 요소 생성 (기온 정보)
const p1 = document.createElement('p');
// 두 번째 p 요소 생성 (비 올 확률 정보)
const p2 = document.createElement('p');
// 강수형태(PTY) 코드 : 없음(0), 비(1), 비/눈(2), 눈(3), 소나기(4)
// 강수 형태에 따라 icon 지정
if( obj.PTY == 0 ) { // 강수 없음
switch(obj.SKY) { // SKY 상태에 따라 아이콘 지정
case "1" :
icon.className = 'fa-solid fa-sun'; break;
case "3" :
icon.className = 'fa-solid fa-cloud'; break;
case "4" :
icon.className = 'fa-solid fa-cloud-sun'; break;
}
} else if(obj.PTY == 3) { // 눈 올 때
icon.className = 'fa-solid fa-snowflake';
} else { // 그외 비올때
icon.className = 'fa-solid fa-cloud-rain';
}
// 하늘 정보
span.innerText = sky[obj.SKY];
// 기온
p1.innerText = `기온 : ${obj.TMP}℃`;
// 강수확률
p2.innerText = `강수 확률 : ${obj.POP}%`;
// div에 자식 요소들 추가
weatherInfo.appendChild(icon);
weatherInfo.appendChild(span);
weatherInfo.appendChild(p1);
weatherInfo.appendChild(p2);
} catch(err) {
console.log(err);
}
}
fetchData();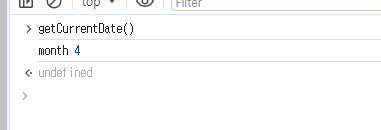
JS에서 날짜 구할 때 getMonth는 1달 전으로 나오고 1자리 수로 나옴
10보다 작으면 앞에 0 붙여서 나오게끔 처리
'0' + (today.getMonth() + 1) 의 경우 공백이 생기기 때문에 slice 처리