
[React] 감정일기장 만들기 - 기초1에서 리액트 기본 문법을 익히는 시간을 가졌다면,
이번엔 실전편이다.
🙃 리액트로 화면 그리는 방법이 기존 퍼블리싱 했던 방법과 많이 달라서 신기하고 재밌다.
😶 하지만 사이트 규모가 커지면 컴포넌트 구성 하기만도 쉽지 않을 것 같다는 생각이...
공통 컴포넌트 만들기
1. Header

// MyHeader.js

const MyHeader = ({ headText, leftChild, rightChild }) => {
    return (
        <header>
            <div className="head_btn_left">{leftChild}</div>
            <div className="head_text">{headText}</div>
            <div className="head_btn_right">{rightChild}</div>
        </header>
    );
};

export default MyHeader;

// App.js

 <MyHeader
	headText={"App"}
	leftChild={<MyButton text={'왼쪽 버튼'} onClick={()=>alert("왼쪽 클릭")}/>}
	rightChild={<MyButton text={'오른쪽 버튼'} onClick={()=>alert("오른쪽 클릭")}/>}
 />
🌼 체크포인트
{ headText, leftChild, rightChild }
코드를 유연하게 사용하기 위해 헤더 내부에 들어갈 요소들을 인자로 작성해주었다.
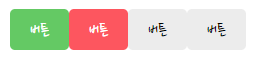
2. Button
// MyButton.js

const MyButton = ({text, type, onClick}) => {
    const btnType = ['positive', 'negative'].includes(type)? type:'default';
    return(                                                // 문자열로 변환
        <button className={["MyButton", `MyButton_${btnType}`].join(" ")} onClick={onClick}>
            {text}
        </button>
    )
}

MyButton.defaultProps = {
    type: "default",
}

export default MyButton;

// App.js

  <MyButton text={"버튼"} onClick={()=>alert("버튼 클릭")} type={"positive"} />
  <MyButton text={"버튼"} onClick={()=>alert("버튼 클릭")} type={"negative"} />
  <MyButton text={"버튼"} onClick={()=>alert("버튼 클릭")} type={"random"} />
  <MyButton text={"버튼"} onClick={()=>alert("버튼 클릭")} type={""} />
🌼 체크포인트

어떤 타입의 버튼들이 필요한지 정리하고 시작한다.
{ text, type, onClick }
코드를 유연하게 사용하기 위해 헤더 내부에 들어갈 요소들을 인자로 작성해주었다.
type에 지정해둔 매개변수 외의 변수가 와도 대응할 수 있도록 default값을 설정해준다.
 const btnType = ['positive', 'negative'].includes(type)? type:'default';
 MyButton.defaultProps = {
    type: "default",
}
join(" ")을 통해 배열을 공백을 포함한 문자열로 반환한다.
// 입력
className={["MyButton", `MyButton_${btnType}`].join(" ")
// 출력
MyButton MyButton_negative
MyButton MyButton_positive
// 입력 className={["MyButton", `MyButton_${btnType}`] // 출력 MyButton,MyButton_negative MyButton,MyButton_positive

개인공부