GIF 출처 : https://sigridjin.medium.com/spring-transaction-관리에-대한-메모-f391fd2885b4
그림 자료 출처 : 김영한 - Spring DB 1 / 2 강의 자료
🖥 Contents
1 ) JDBC 등장 배경
2 ) JDBC 표준 인터페이스
3 ) JDBC 기술 정리
4 ) JDBC 활용
1 ) JDBC 등장 배경
- 일반적인 DB , 클라이언트 , 애플리케이션 서버 관계
: 애플리케이션 개발에 있어 데이터베이스에 회원 정보 , 회원 로그 , 메시지 저장등 을 위해서 DB 의 존재는 필수적이다. 클라이언트가 애플리케이션 서버를 통해 데이터를 저장 , 조회 , 삭제하기 위해 DB에 접근하고 이를 통해 해당 동작을 수행하게 된다. 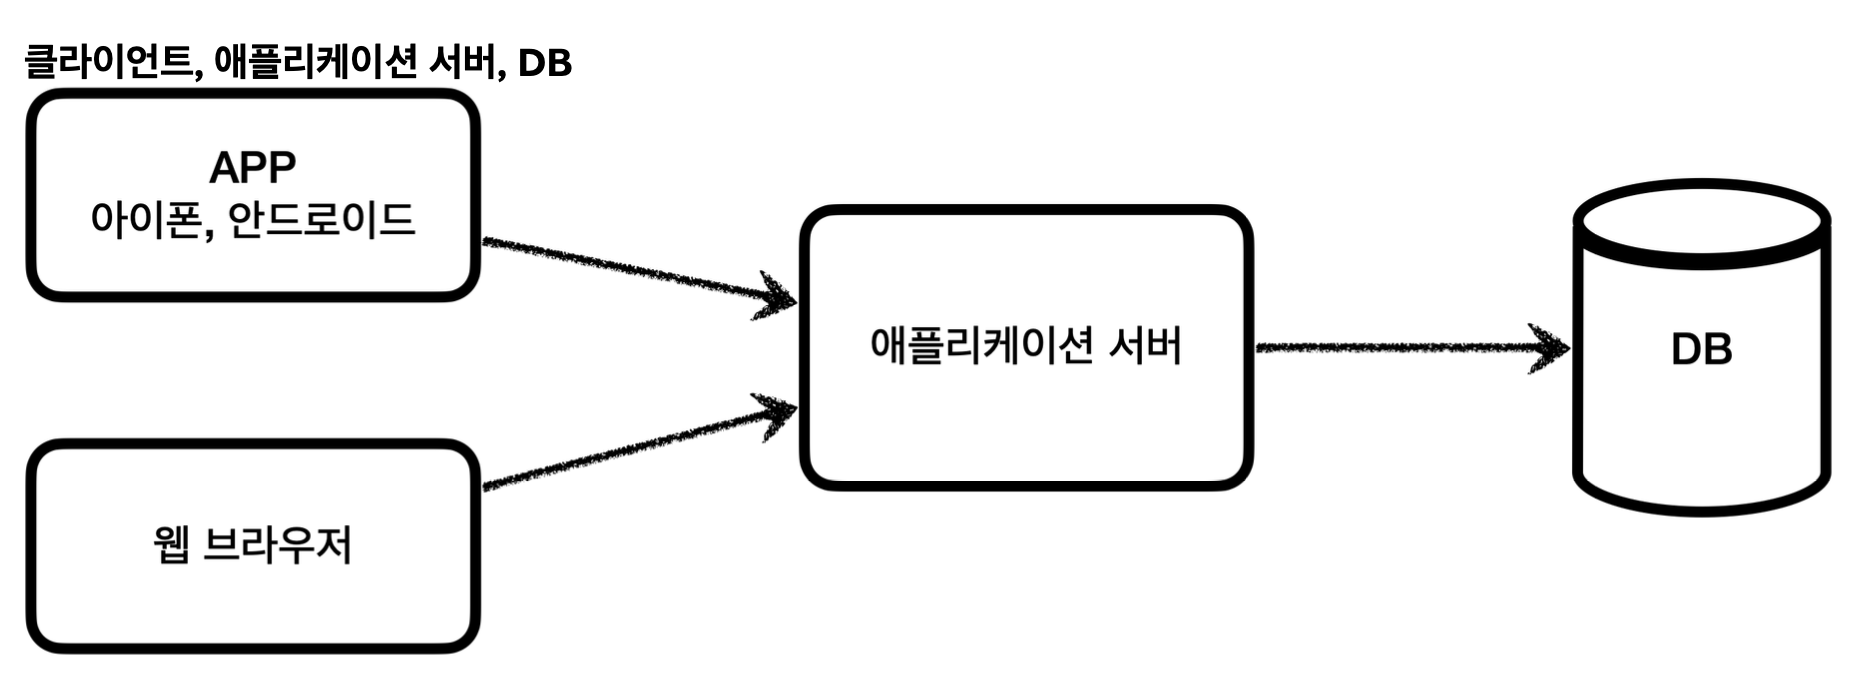
이때 , 애플리케이션 서버와 DB는 다음과 같은 과정을 통해 서로 관계를 맺는다. 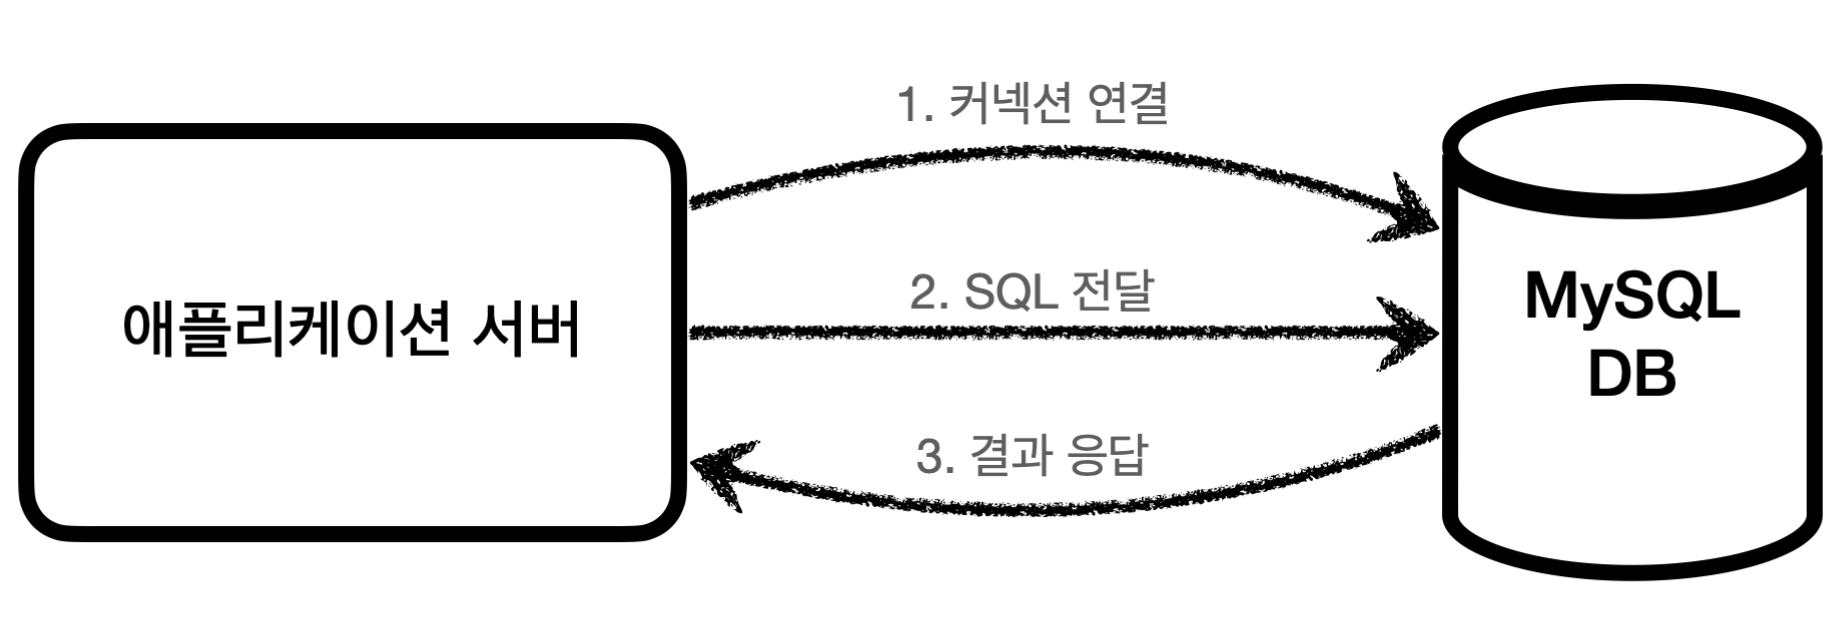
1st. 커넥션 연결
: 주로 TCP / IP를 사용해서 커넥션을 연결
2nd. SQL 전달 : 애플리케이션 서버는 사용자로부터 받은 행동 요청을 수행하기위해 DB에 SQL을 커넥션을 통해 전달한다.
3rd. 결과 응답 : SQL을 전달받은 DB는 그에 따라 업무를 수행하고 결과를 응답한다. 이러한 응답 결과를 애플리케이션 서버는 이를 활용한다.
이때 , DB의 경우 MySQL 뿐 아니라 Oracle , MongoDB , RabbitMQ 등 여러 종류의 DB중에 한개 이상 채택하게 된다. 문제는 각 DB마다 커넥션 연결 및 SQL전달 방식 등이 상이하다는 점이다. 이러한 문제들을 해결하기 위해서는 ' 표준화된 ' 하나의 인터페이스를 통해서 연결할 필요가 있다. 이를 위해서 ' JDBC 표준 인터페이스 ' 가 탄생하게 되었다.
2 ) JDBC 표준 인터페이스
- JDBC 란?
: JDBC ( Java Database Connectivity ) 는 자바에서 데이터베이스에 접속할 수 있도록 하는 자바 API이다. 이를 통해서 데이터베이스에 표준화된 SQL 전달을 도모할 수 있다.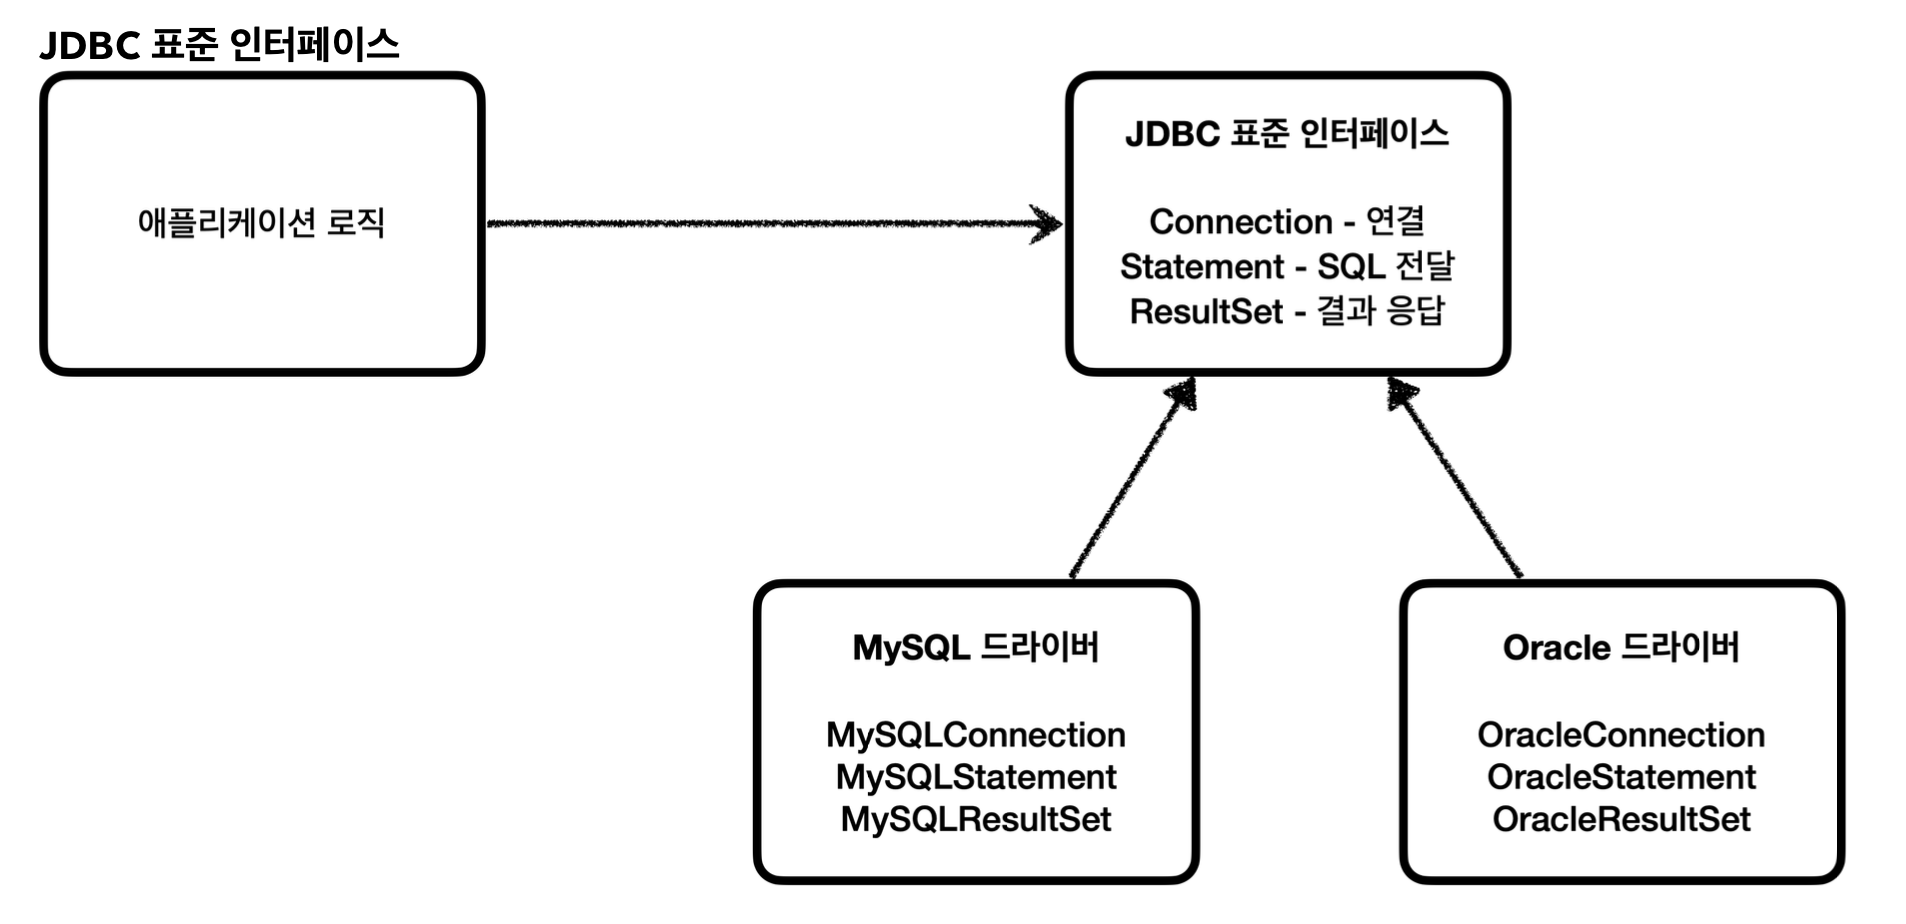
다음 그림을 보면 MySQL 과 Oracle 데이터베이스에 대하여 일관된 SQL전달을 위해 표준 인터페이스를 통해서 드라이버라는 클래스의 의존관계를 주입받고 있다.
JDBC가 선택한 데이터베이스의 드라이버를 의존하게 되고 이를 통해서 드라이버는 앞서 언급한 3가지 과정을 통해서 DB와의 상호작용을 행한다.
3 ) JDBC 기술 정리
-
JDBC 기술 종류
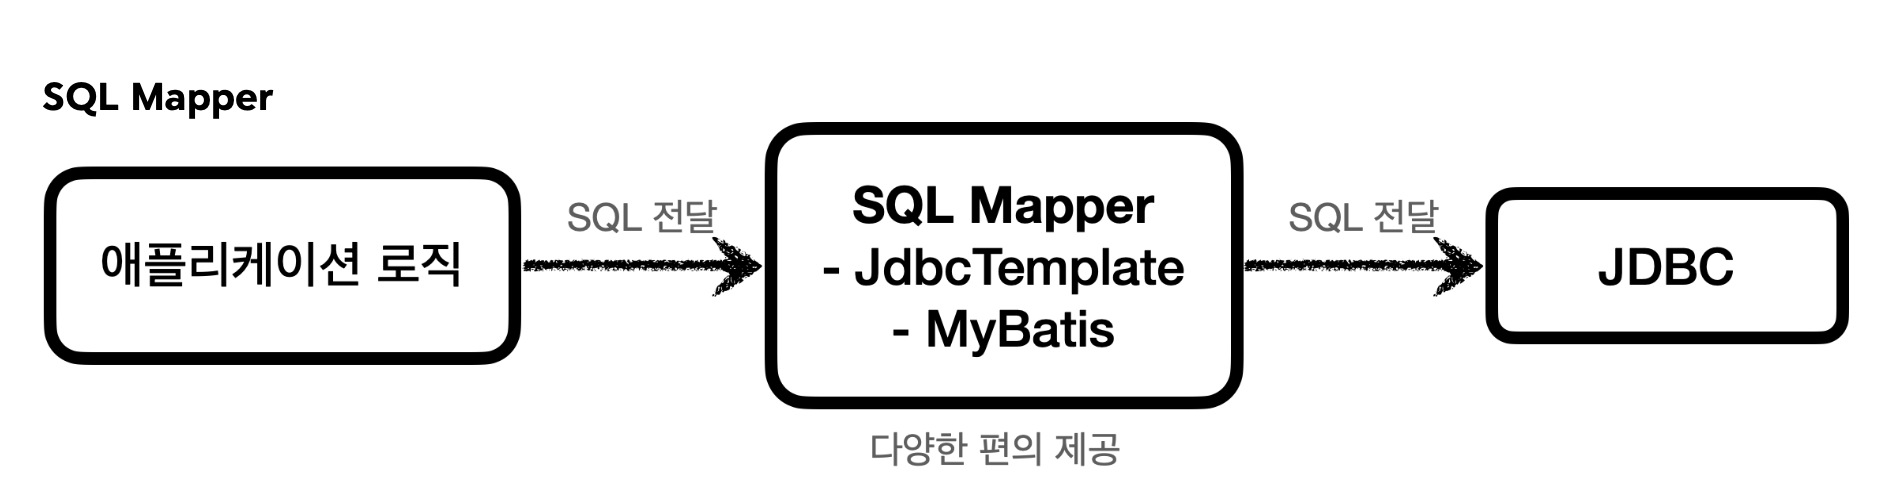
: JDBC는 1997년 출시된 이래로 이와 관련된 다양한 기술들이 탄생하고 발전해왔다. 이와 관련하여 대표적인 기술로 SQL Mapper 과 ORM 두 가지 방식이 존재한다.
① SQL Mapper
- 장점
- JDBC의 반복 코드를 제거함으로써 편리한 사용을 도모한다.
- SQL 응답 결과를 객체로 편리하게 변환해준다.
- 단점
- 개발자가 직접 SQL을 작성해야한다. -> 매우 큰 단점
- 대표 기술 : JdbcTemplate , MyBatis
- 개발자가 직접 SQL을 작성해야한다. -> 매우 큰 단점
② ORM ( Object Relational Mapping )
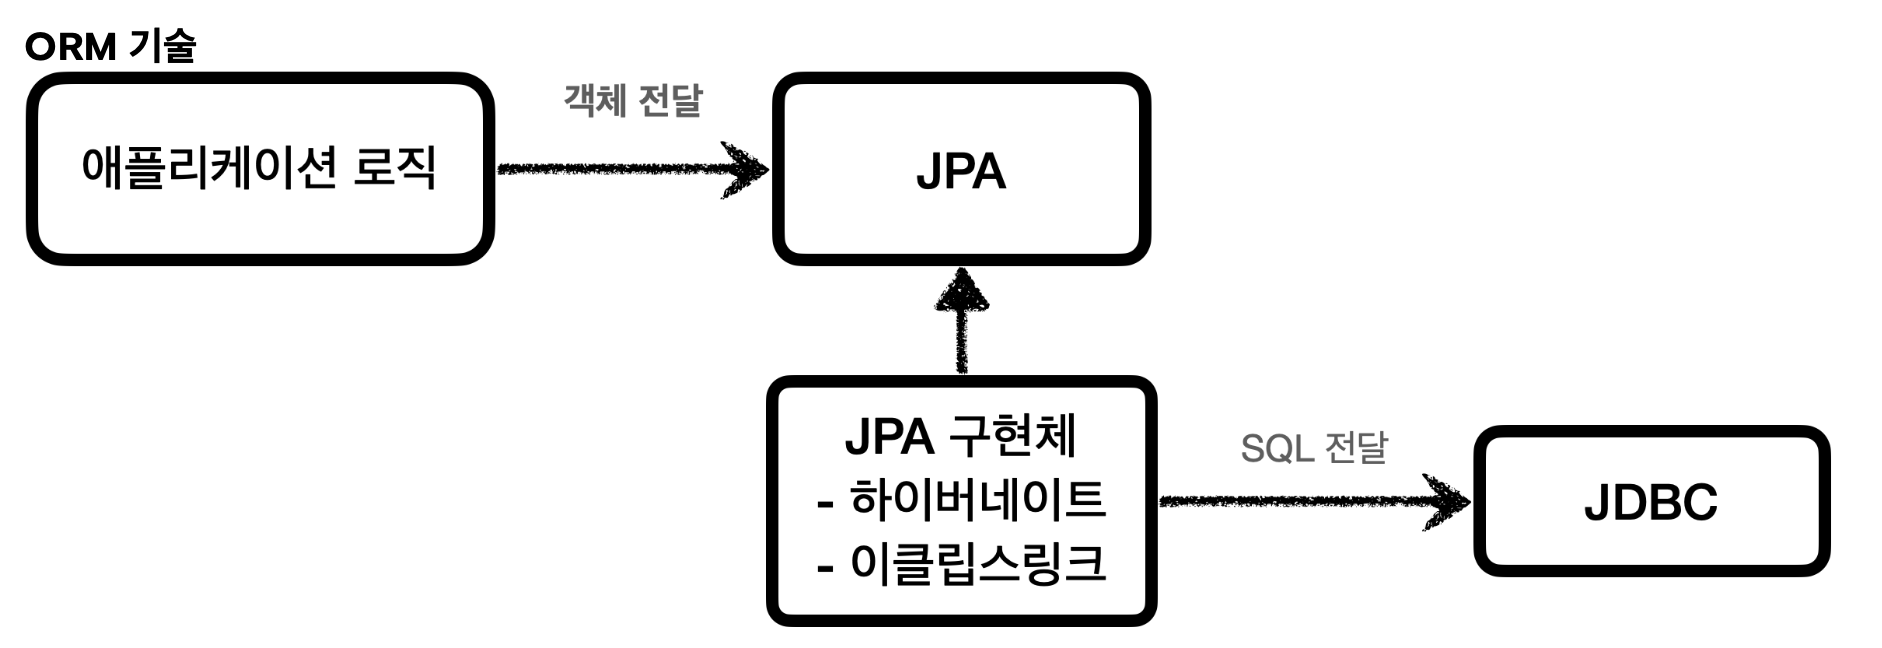
: ORM은 객체를 관계형 데이터베이스 테이블과 매핑해주는 기술이다. 이를 통해서 SQL Mapper와 달리 SQL 작성을 할 필요가 없이 SQL을 동적으로 만들어주어 실행해주는 방식이다.- 장점
- SQL 작성필요 X
- 개발 생산성 증가 ( 1번 이유로 )
- 단점
- 방대한 라이브러리 -> 깊이 있는 학습 필요
- 장점
4 ) JDBC 활용
이제 JDBC를 통해서 데이터베이스를 연결하고 서비스와 리포지토리를 만들어 활용해보자.
- 데이터베이스 연결
: 데이터베이스에는 URL , USERNAME , PASSWORD가 존재하기 때문에 이에 대한 정보를 상수로 치환하여 편하게 연결할 수 있도록 하는 작업이 필요하다.
package hello.jdbc.connection;
public abstract class ConnectionConst {
    public static final String URL = "jdbc:h2:tcp://localhost/~/test";
    public static final String USERNAME = "sa";
    public static final String PASSWORD = "";
}
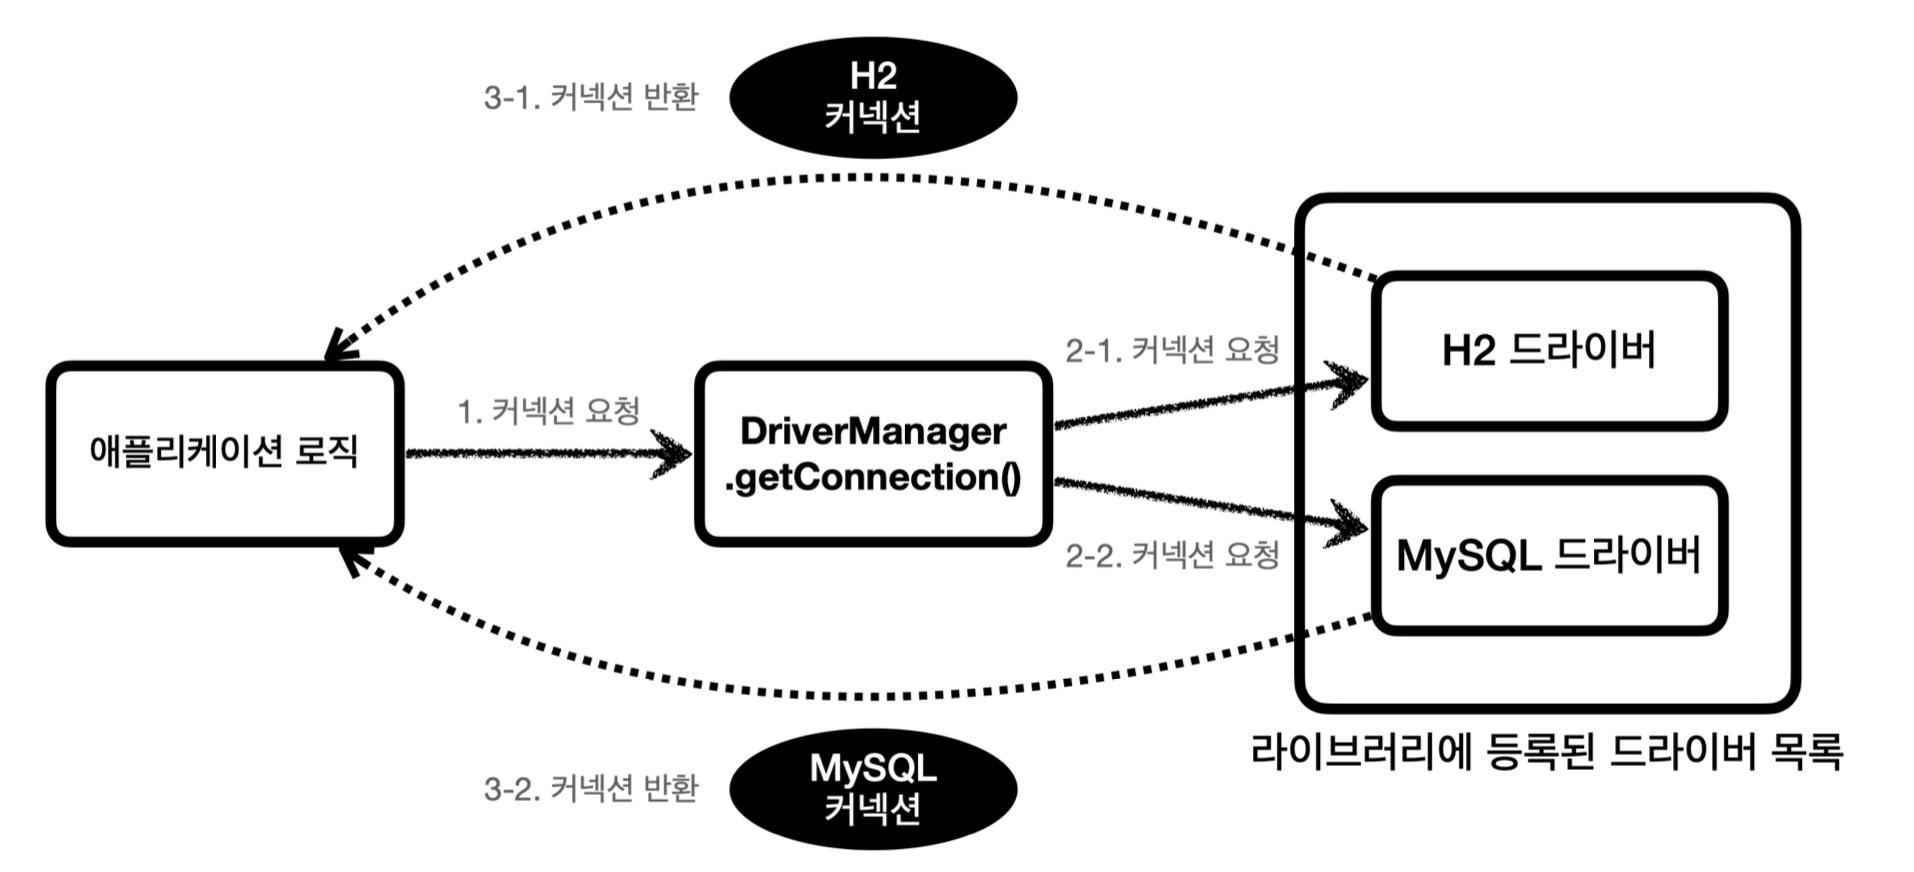
이제 JDBC가 제공하는 DriverManager 클래스 의 Connection 메소드 를 통해서 데이터 베이스를 연결한다. 해당 메소드는 라이브러리에 있는 데이터베이스 드라이버를 찾아서 해당 드라이버가 제공하는 커넥션을 반환해준다.
package hello.jdbc.connection;
 import lombok.extern.slf4j.Slf4j;
 import java.sql.Connection;
 import java.sql.DriverManager;
 import java.sql.SQLException;
 import static hello.jdbc.connection.ConnectionConst.*;
  @Slf4j
 public class DBConnectionUtil {
     public static Connection getConnection() {
        try {
            Connection connection = DriverManager.getConnection(URL, USERNAME,PASSWORD);
            log.info("get connection={}, class={}", connection,connection.getClass());
            return connection;
        } catch (SQLException e) {
            throw new IllegalStateException(e);
        }
     }
}
- 어플리케이션 등록
: 어플리케이션의 가장 기본인 회원 데이터를 만들어보자. 먼저 데이터베이스에 테이블을 생성한다. 다음 테이블은 두 가지 정보를 가지고 있다.- 회원의 ID : member_id - varchar(10)
- 예금액 : money - integer
drop table member if exists cascade;
 create table member (
     member_id varchar(10),
     money integer not null default 0,
     primary key (member_id)
);
다음으로 Entity 클래스를 생성하면 다음과 같다.
package hello.jdbc.domain;
 import lombok.Data;
 @Data
 public class Member {
     private String memberId;
     private int money;
     public Member() {
     }
     public Member(String memberId, int money) {
         this.memberId = memberId;
         this.money = money;
     }
}
Member 클래스를 바탕으로 Repository 클래스를 생성해보자.
package hello.jdbc.repository;

import hello.jdbc.connection.DBConnectionUtil;
import hello.jdbc.domain.Member;
import lombok.extern.slf4j.Slf4j;

import java.sql.*;
import java.util.NoSuchElementException;

import static hello.jdbc.connection.DBConnectionUtil.getConnection;

/**
* JDBC - DriverManager 사용하기
*/
@Slf4j
public class MemberRepositoryV0 {

   public Member save(Member member) throws SQLException{
       String sql = "insert into member(member_id,money) values (?, ?)"; // 넘겨줄 Query를 sql 에 작성
       // SQL Injection 공격을 피할 수 있는 방법 -> PrepareStatement으로 해결
       Connection con = null; // H2의 JDBC Connection 구현클래스의 객체
       PreparedStatement pstmt = null; // 데이터베이스에 전달할 SQL과 파라미터로 전달할 데이터들을 준비한다.

       try{
           con = getConnection(); // Connection 실행
           pstmt = con.prepareStatement(sql);
           pstmt.setString(1,member.getMemberId()); // 1번 파라미터에 넣을 것
           pstmt.setInt(2,member.getMoney()); // 2번 파라미터에 넣을 것
           pstmt.executeUpdate(); // 작성한 Query가 실행된다. -> 데이터 베이스에 저장
           return member;

       }catch (SQLException e) {
           log.error("DB Error",e);
           throw e;
       } finally{
           close(con,pstmt,null);
       }

   }

   public Member findById(String memberId) throws SQLException{
       String sql = "select * from member where member_id = ? ";

       Connection con = null;
       PreparedStatement pstmt = null;
       ResultSet rs = null;
       // 데이터베이스 내부 column의 셋 데이터가 저장됨.-> 순서대로 쿼리의 결과가 저장된다.

       try{
           con =getConnection();
           pstmt = con.prepareStatement(sql);
           pstmt.setString(1,memberId);

           rs = pstmt.executeQuery();
           //rs.next()를 실행하면 실제 데이터가 존재하는 곳 부터 시작
           if(rs.next()){
               Member member = new Member();
               member.setMemberId(rs.getString("member_id"));
               member.setMoney(rs.getInt("money"));
               return member;
           } else {
               throw new NoSuchElementException("member not found memberId = " + memberId);
           }

       } catch (SQLException e){
           log.error("DB Error",e);
           throw e;
       } finally {
           close(con,pstmt,rs);
       }
   }

   // 업데이트 기능
   public void update(String memberId,int money) throws SQLException {
       String sql = "update member set money=? where member_id=?";

       Connection con = null;
       PreparedStatement pstmt = null;

       try{
           con = getConnection(); // Connection 실행
           pstmt = con.prepareStatement(sql);
           pstmt.setInt(1,money);
           pstmt.setString(2,memberId);
           pstmt.executeUpdate(); // 작성한 Query가 실행된다. -> 데이터 베이스에 저장
           int resultSize = pstmt.executeUpdate();
           log.info("resultSize={}",resultSize);

       }catch (SQLException e) {
           log.error("DB Error",e);
           throw e;
       } finally{
           close(con,pstmt,null);
       }
   }

   // 삭제 기능
   public void delete(String memberId) throws SQLException {
       String sql = "delete from member where member_id=?";
       Connection con = null;
       PreparedStatement pstmt = null;

       try{
           con = getConnection(); // Connection 실행
           pstmt = con.prepareStatement(sql);
           pstmt.setString(1,memberId);
           pstmt.executeUpdate(); // 작성한 Query가 실행된다. -> 데이터 베이스에 저장

       }catch (SQLException e) {
           log.error("DB Error",e);
           throw e;
       } finally{
           close(con,pstmt,null);
       }

   }

   // 데이터베이스를 닫는 메소드
   private void close(Connection con, Statement stmt, ResultSet rs){

       if (rs != null){ // try- catch 문으로 rs 닫기
           try{
               rs.close();
           }catch (SQLException e){
               log.info("error",e);
           }
       }

       if(stmt !=null) { // try - catch 문으로 stmt 닫기
           try {
               stmt.close();

           } catch (SQLException e) {
               log.info("error", e);
           }

       }

       if (con != null){ // try - catch 문으로 con 닫기
           try{
               con.close();
           } catch ( SQLException e ){
               log.info("error",e);
           }
       }

   }
   private static void extracted() {
       getConnection();
   }
}
MemberRepository 클래스를 보면 중복 되는 코드 및 지저분한 코드들이 다수 등장한다. 이를 위해 책임을 분산하고 의존성 주입을 통해 클린 코드로 변경해볼 수 있다.