
GIF 출처 : https://sigridjin.medium.com/spring-transaction-관리에-대한-메모-f391fd2885b4
그림 자료 출처 : 김영한 - Spring DB 1 / 2 자료
🖥 Contents
2 . 1 ) 커넥션 풀 이란?
2 . 2 ) 데이터 소스 ( DataSource )
2 . 3 ) 커넥션 풀 활용
2 . 4 ) 데이터 소스 활용
1 ) 커넥션 풀 이란?
커넥션 풀에 대해 이야기 하기 앞서 전체적인 사용자와 어플리케이션 서버,DB의 관계를 되돌아보자. 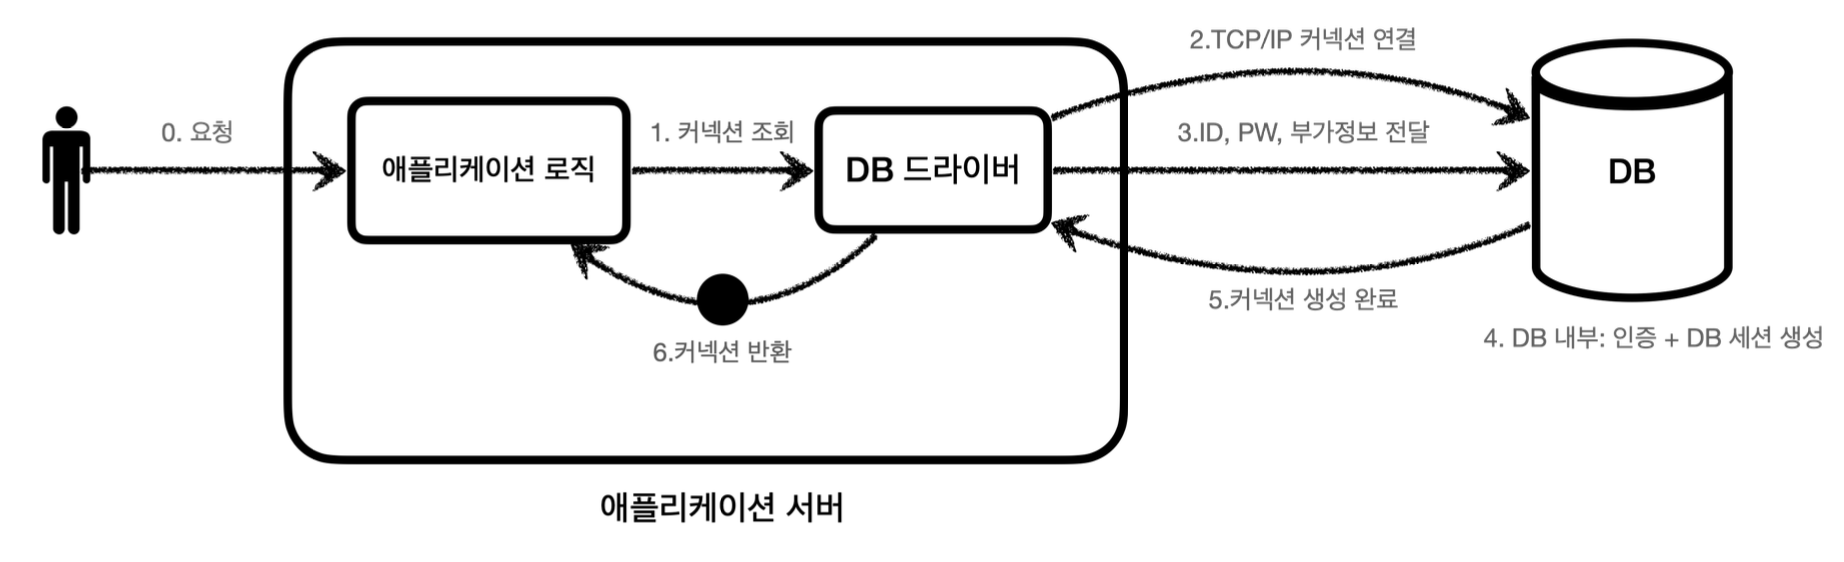
먼저 , 사용자는 애플리케이션 서버에 실행하고자 하는 행동을 요청한다. 그 후 어플리케이션 서버는 로직에 따라 커넥션을 조회하고 DB 드라이버에서 DB와 상호작용하는 3가지 과정을 수행하여 커넥션을 생성한 후 이를 반환하여 사용자가 원하는 행동을 수행한다.
이 과정에서 ' 커넥션 ' 이라는 것을 맺는다. 커넥션을 맺음으로써 데이터베이스에서 CRUD를 수행할 수 있는데 커넥션은 매번 새롭게 만든후 반환하는 방식을 사용해야한다.
여기서 리소스 낭비의 문제 및 응답 속도 영향 등 다양한 문제가 발생하게 된다. 이러한 문제들을 해결하기 위해서 ' 커넥션 풀 ' 이라는 하나의 저장소와 같은 풀을 생성한다. 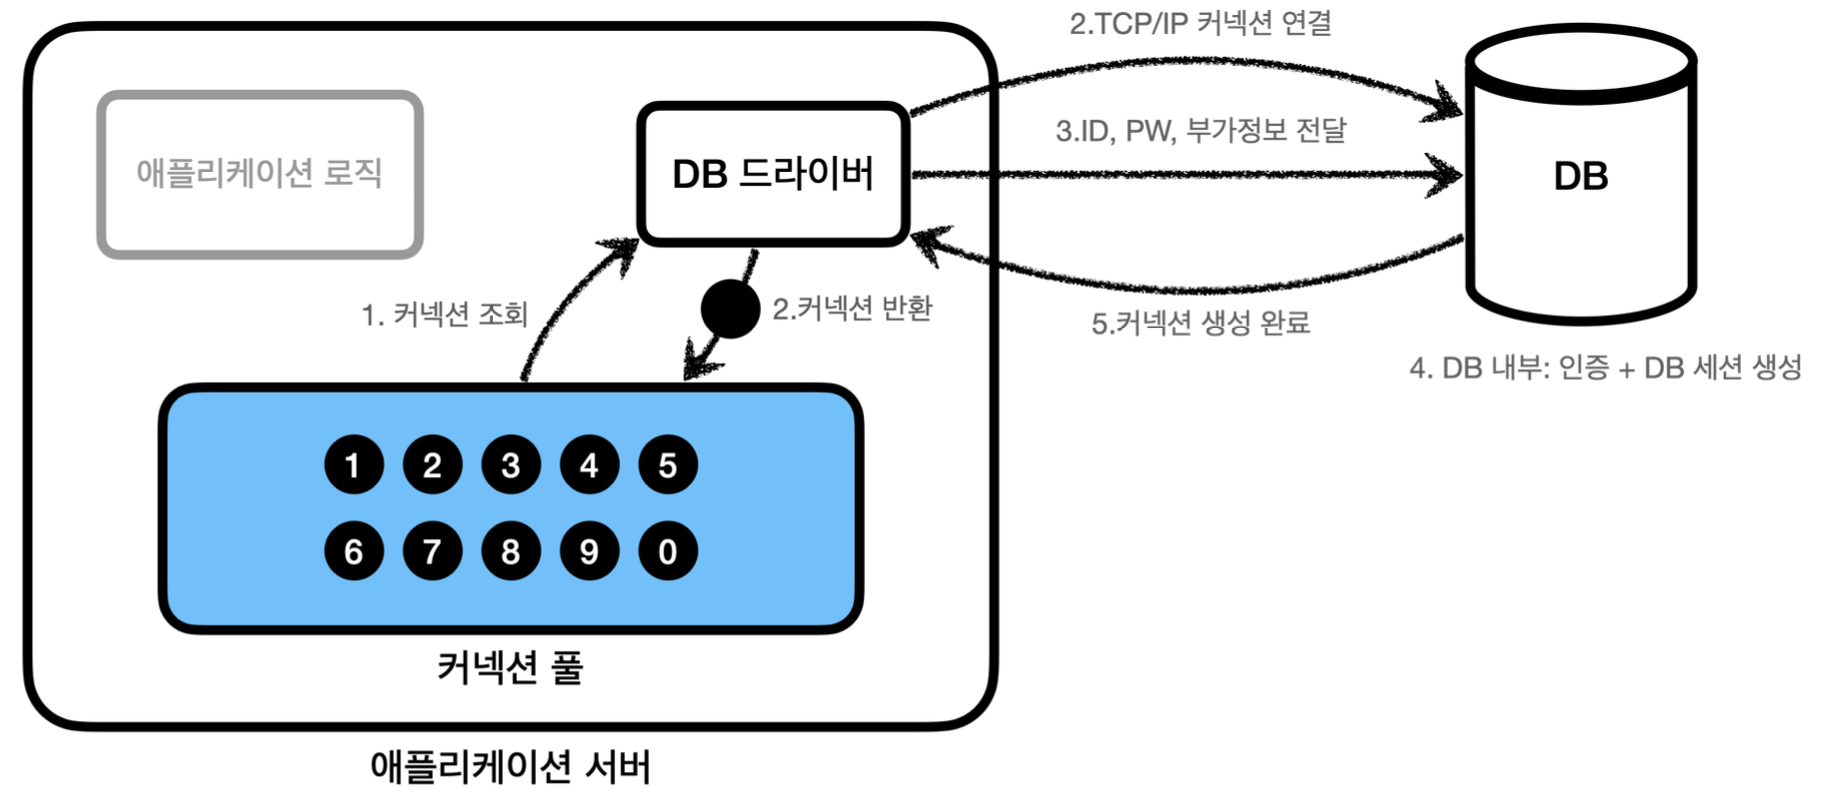
커넥션 풀의 경우 서비스의 특징과 서버 스팩에 따라 다르나 기본값으로 보통 10개의 커넥션을 가지고 있을 수 있다. 그럼 커넥션 풀을 가지고 있을 경우 이전의 생성 후 결과 반환을 하는 방식에 비해 매우 빠르고 리소스의 낭비가 줄어든다. 이때 , 중요한 것은 커넥션 풀에 반환하게 될 경우 커넥션을 종료하는 것이 아니라 살아있는 상태 의 커넥션을 풀에 반환해야 한다는 것이다.
이러한 커넥션 풀과 관련한 오픈소스로는 ' commons-dbcp2 ' , 'tomcat - jdbc pool ' , ' HikariCP ' 등이 있다.
2 ) 데이터 소스 ( DataSource )
앞선 포스팅에서 커넥션을 JDBC의 DriverManger을 통해서 직접 사용하는 방법을 기술하였다. 그럼 이러한 방식에서 커넥션 풀을 통해서 커넥션을 얻는 방법으로도 바꾸는 것이 앞서 언급한 장점들을 얻을 수 있는 방법이 될 것이다.
먼저 JDBC의 DriverManager을 통해서 커넥션을 획득한 경우에서 풀로 변경하게 될 경우에 큰 문제가 발생한다. 바로 기존의 애플리케이션 로직을 전부 풀로 받아들이는 변경을 해야한다는 것이다.
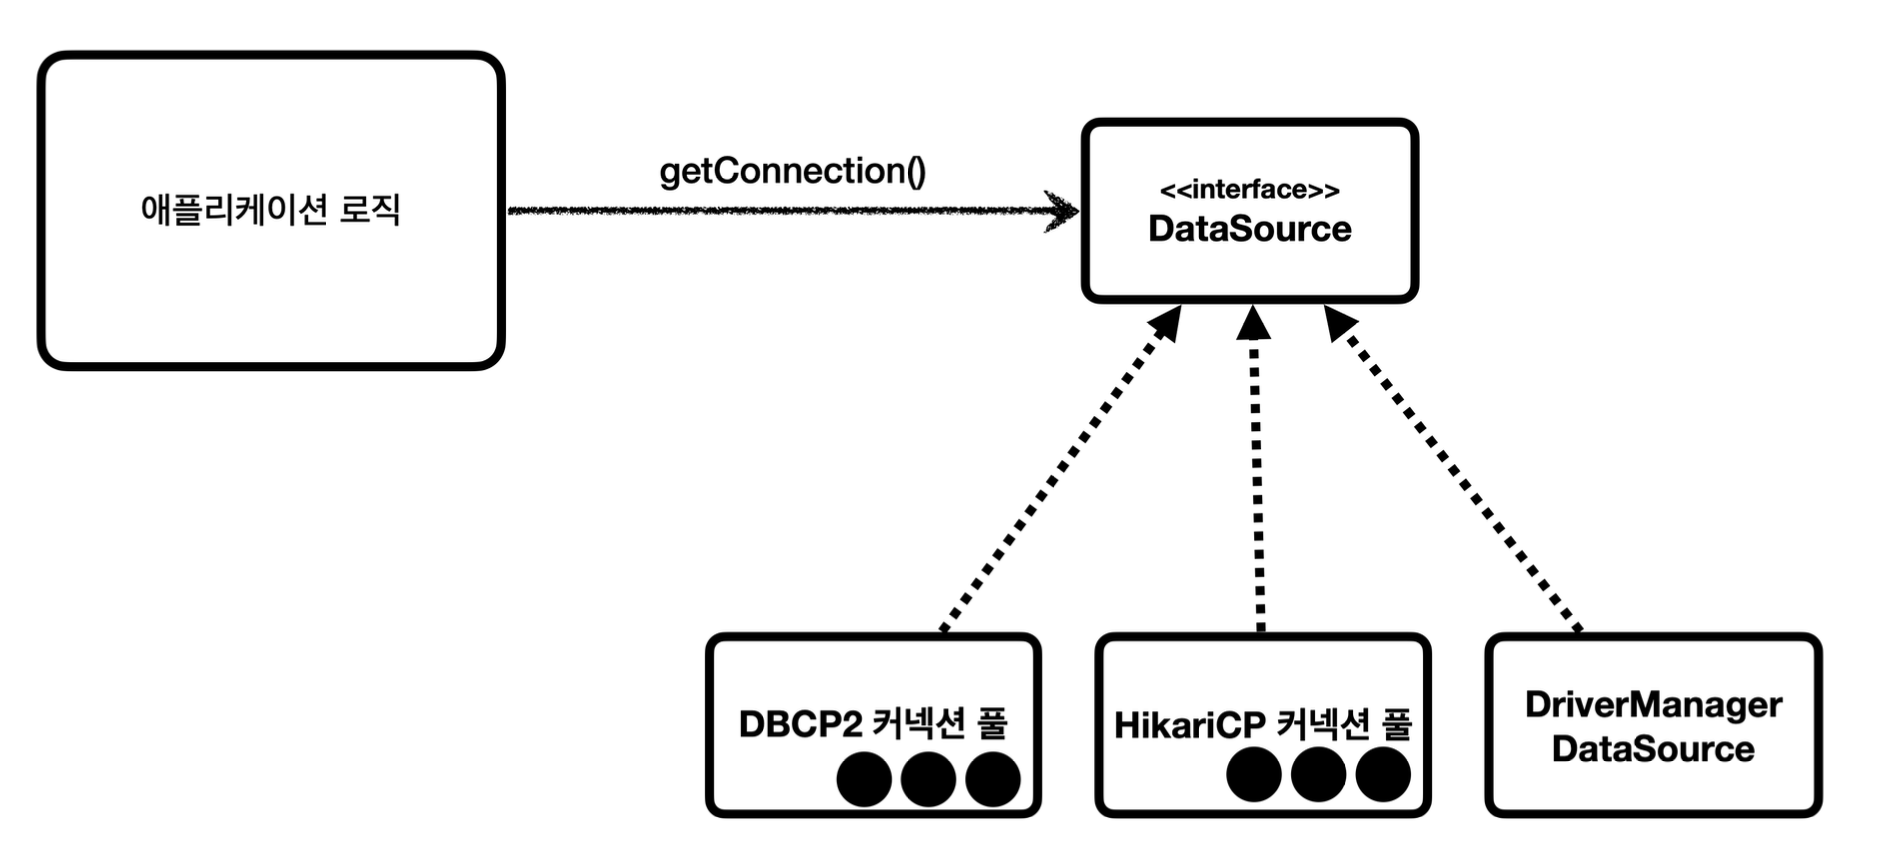
앞선 DriverManager 방식에서 언급하지 않은 부분이 바로 이러한 부분이다. 해당 코드를 자세히 살펴보면 여러 ' 구현체 ' 에 의존하고 있는데 이는 DIP 와 OCP를 지키지 못한 구현 방식이다.
그렇기에 구현체에 의존하는 방식이 아닌 ' 추상체 ' 즉, 인터페이스에 의존하므로써 두 원칙을 준수하는 것이 차후에 애플리케이션 유지 보수에 도움이 될 것이다. 이를 위해서 자바는 ' javax.sql.DataSoruce ' 라는 인터페이스를 제공한다.
또한 자바는 이러한 DataSource를 구현화한 DriverManagerDataSource 라는 클래스를 제공하므로 해당 클래스를 통해서 DriverManager를 사용하다가 커넥션 풀을 사용하도록 코드를 변경해도 " 애플리케이션 로직을 변경 하지 않아도 " 좋다.
이제 테스트 코드를 통해 DriverManagerDataSource 클래스를 사용해보자.
package hello.jdbc.connection;
 import lombok.extern.slf4j.Slf4j;
 import org.junit.jupiter.api.Test;
 import org.springframework.jdbc.datasource.DriverManagerDataSource;
 import javax.sql.DataSource;
 import java.sql.Connection;
 import java.sql.DriverManager;
 import java.sql.SQLException;
 import static hello.jdbc.connection.ConnectionConst.*;

 @Slf4j
 public class ConnectionTest {

    @Test
     void dataSourceDriverManager() throws SQLException {//DriverManagerDataSource - 항상 새로운 커넥션 획득
         DriverManagerDataSource dataSource = new DriverManagerDataSource(URL,USERNAME,PASSWORD);
         // 앞선 포스팅에서 생성한 ConnectionConst.class 를 import static 처리 하였다.
         useDataSource(dataSource);
     }
     private void useDataSource(DataSource dataSource) throws SQLException {

         Connection con1 = dataSource.getConnection();
         // dataSourceDriverManger 클래스의 getConnection() 을 통해 커넥션을 연결
         //

         Connection con2 = dataSource.getConnection();
         log.info("connection={}, class={}", con1, con1.getClass());
         log.info("connection={}, class={}", con2, con2.getClass());

        }
}
해당 코드의 결과는 다음과 같은 실행결과를 도출한다.
기존의 코드 ( DriverManager ) 을 통한 방법 과 DriverManagerDataSource 방식의 차이는 바로 한번의 연결에 대하여 추가적이고 반복적인 코드를 작성할 필요가 없다는 것이다.
DriverManager 방법의 경우 커넥션을 획득할때마다 3가지 요소 ( URL , USERNAME , PASSWORD ) 를 파라미터에 전달해줘야 하나 DataSource 방식의 경우 처음 객체를 생성할때만 필요한 파라미터를 넘겨주기 때문에 getConnection() 만 호출하면 된다.
3 ) 커넥션 풀 활용
앞서 언급한 DataSource를 통해서 직접 커넥션을 획득하는 방식이 아닌 커넥션 풀을 사용하는 방식을 활용해볼 수 있다.
@Test
    void dataSourceConnectionPool() throws SQLException, InterruptedException {
       //커넥션 풀링: HikariProxyConnection(Proxy) -> JdbcConnection(Target) HikariDataSource dataSource = new HikariDataSource(); dataSource.setJdbcUrl(URL);
       HikariDataSource dataSource = new HikariDataSource();
       // DataSource의 오픈소스중 Hikari 방식을 사용
       dataSource.setUsername(USERNAME);
       dataSource.setPassword(PASSWORD);
       dataSource.setMaximumPoolSize(10);
       dataSource.setPoolName("MyPool");
       // dataSource와 관련한 정보 세팅

       useDataSource(dataSource);
       Thread.sleep(1000); //커넥션 풀에서 커넥션 생성 시간 대기
       }
해당 테스트 코드의 실행결과는 다음과 같다.
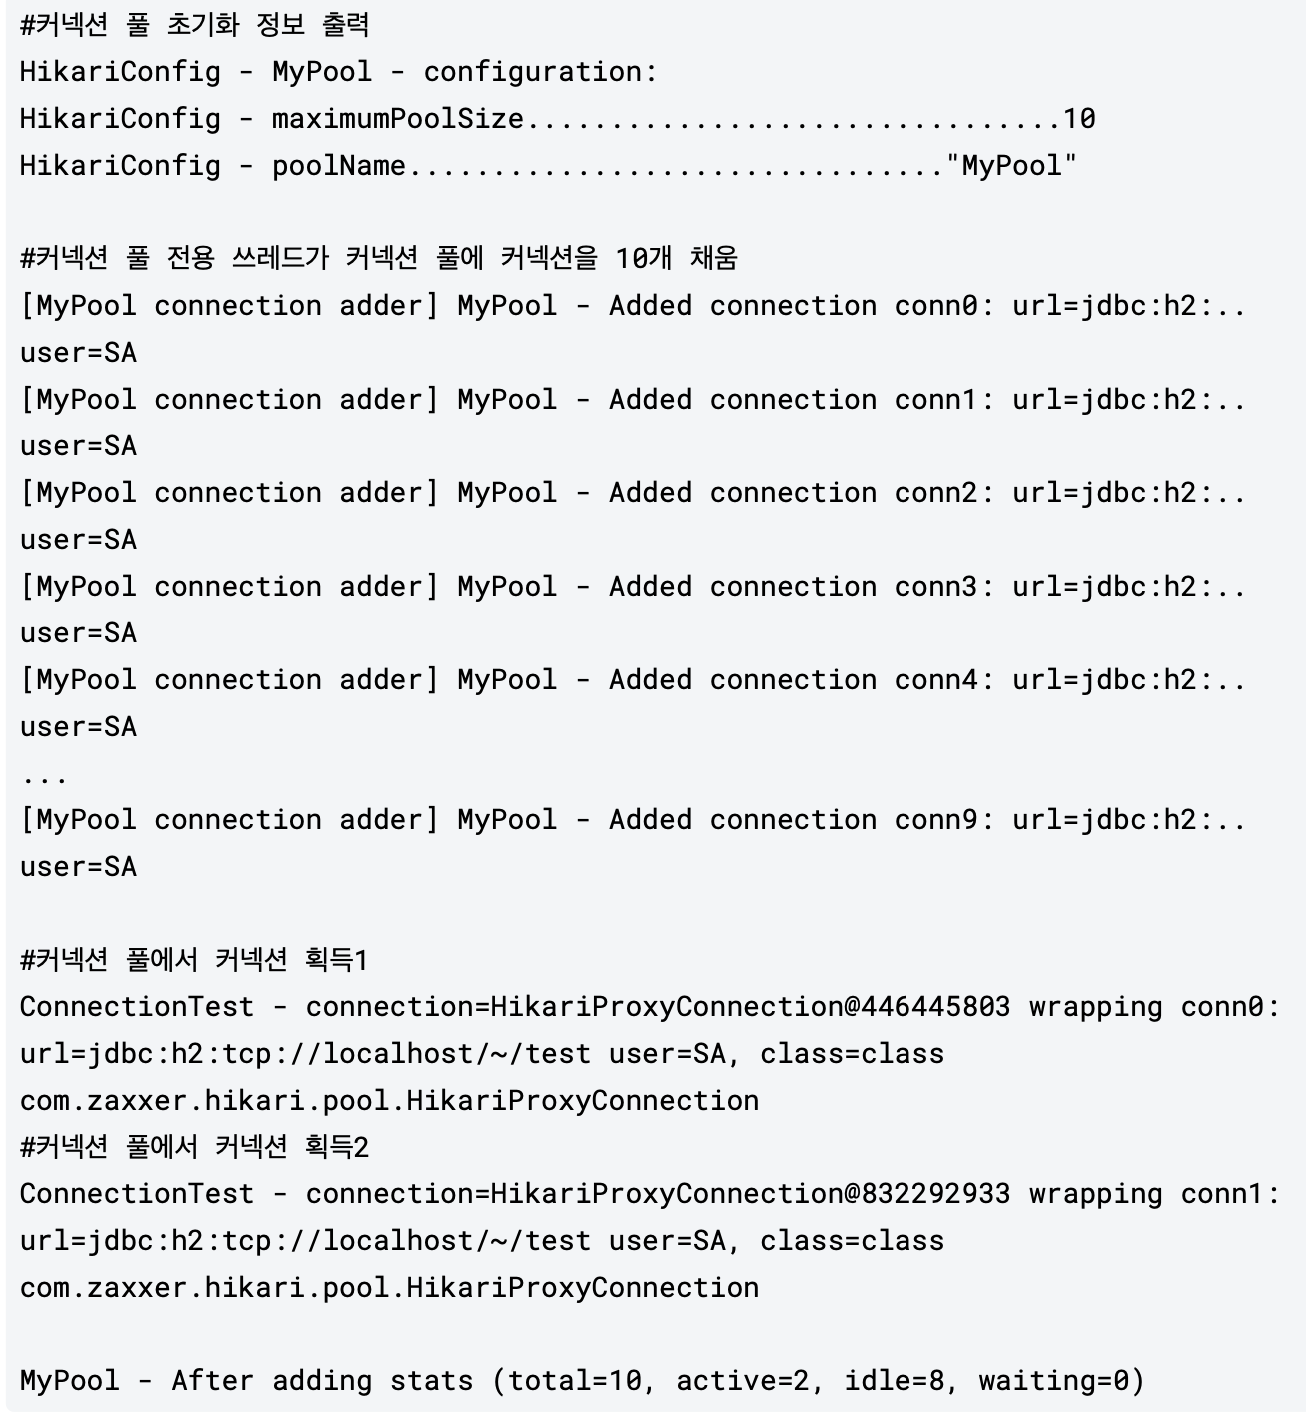
먼저 HikariCP의 경우 최대 풀 수가 10개 임을 확인할 수 있다. 또한 마지막 stats을 살펴보면 현재 idle 상태인 커넥션과 active 상태인 커넥션을 확인할 수 있다.
4 ) 데이터 소스 활용
기존에 Connection을 연결한 방식을 통해 구현한 Repository를 DataSource 방식으로 리팩토링 해볼 수 있다.
package hello.jdbc.repository;

import hello.jdbc.connection.DBConnectionUtil;
import hello.jdbc.domain.Member;
import lombok.extern.slf4j.Slf4j;
import org.springframework.jdbc.support.JdbcUtils;

import javax.sql.DataSource;
import java.sql.*;
import java.util.NoSuchElementException;

import static hello.jdbc.connection.DBConnectionUtil.getConnection;

/**
 * JDBC - DataSource 사용 , JdbcUtils 사용
 */
@Slf4j
public class MemberRepositoryV1 {

    private final DataSource dataSource;

    public MemberRepositoryV1(DataSource dataSource) {
        this.dataSource = dataSource;
    }

    public Member save(Member member) throws SQLException{
        String sql = "insert into member(member_id,money) values (?, ?)"; // 넘겨줄 Query를 sql 에 작성
        // SQL Injection 공격을 피할 수 있는 방법 -> PrepareStatement으로 해결
        Connection con = null; // H2의 JDBC Connection 구현클래스의 객체
        PreparedStatement pstmt = null;

        try{
            con = getConnection(); // Connection 실행
            pstmt = con.prepareStatement(sql);
            pstmt.setString(1,member.getMemberId());
            pstmt.setInt(2,member.getMoney());
            pstmt.executeUpdate(); // 작성한 Query가 실행된다. -> 데이터 베이스에 저장
            return member;

        }catch (SQLException e) {
            log.error("DB Error",e);
            throw e;
        } finally{
            close(con,pstmt,null);
        }

    }

    public Member findById(String memberId) throws SQLException{
        String sql = "select * from member where member_id = ? ";

        Connection con = null;
        PreparedStatement pstmt = null;
        ResultSet rs = null;

        try{
            con =getConnection();
            pstmt = con.prepareStatement(sql);
            pstmt.setString(1,memberId);

            rs = pstmt.executeQuery();
            //rs.next()를 실행하면 실제 데이터가 존재하는 곳 부터 시작
            if(rs.next()){
                Member member = new Member();
                member.setMemberId(rs.getString("member_id"));
                member.setMoney(rs.getInt("money"));
                return member;
            } else {
                throw new NoSuchElementException("member not found memberId = " + memberId);
            }

        } catch (SQLException e){
            log.error("DB Error",e);
            throw e;
        } finally {
            close(con,pstmt,rs);
        }
    }

    // 업데이트 기능
    public void update(String memberId,int money) throws SQLException {
        String sql = "update member set money=? where member_id=?";

        Connection con = null;
        PreparedStatement pstmt = null;

        try{
            con = getConnection(); // Connection 실행
            pstmt = con.prepareStatement(sql);
            pstmt.setInt(1,money);
            pstmt.setString(2,memberId);
            pstmt.executeUpdate(); // 작성한 Query가 실행된다. -> 데이터 베이스에 저장
            int resultSize = pstmt.executeUpdate();
            log.info("resultSize={}",resultSize);

        }catch (SQLException e) {
            log.error("DB Error",e);
            throw e;
        } finally{
            close(con,pstmt,null);
        }
    }

    // 삭제 기능
    public void delete(String memberId) throws SQLException {
        String sql = "delete from member where member_id=?";
        Connection con = null;
        PreparedStatement pstmt = null;

        try{
            con = getConnection(); // Connection 실행
            pstmt = con.prepareStatement(sql);
            pstmt.setString(1,memberId);
            pstmt.executeUpdate(); // 작성한 Query가 실행된다. -> 데이터 베이스에 저장

        }catch (SQLException e) {
            log.error("DB Error",e);
            throw e;
        } finally{
            close(con,pstmt,null);
        }

    }

    // 데이터베이스를 닫는 메소드
    private void close(Connection con, Statement stmt, ResultSet rs){

        JdbcUtils.closeResultSet(rs);
        JdbcUtils.closeStatement(stmt);
        JdbcUtils.closeConnection(con);
    }
    private Connection getConnection() throws SQLException {
        Connection con = dataSource.getConnection();
        log.info("get Connection={},class = {}",con,con.getClass());
        return con;
    }
}
해당 리펙토링에서 바뀐점은 기존에 직접 구현체에 의존하였던 점을 DataSource라는 추상체에 의존한 후 DI를 통해서 의존성을 주입받았다. 이를 통해서 OCP 원칙을 준수할 수 있게 되었다.
또한 JdbcUtils를 통해서 커넥션을 close 하는 방식을 편하게 사용할 수 있게 되었다.
이제 DrivermangerDataSource 방식에서 HikariCP로 변경하여도 생성자를 통해서 외부 DI 주입이 자동으로 실행되기 때문에 Repository의 코드는 변경하지 않아도 된다.