11 Securing Access to APIs
API 및 웹 페이지에 대한 액세스를 보호하려고 합니다. HTTPS를 사용하여 API에 대한 외부 액세스를 도청하지 못하도록 보호하는 방법과 OAuth 2.0 및 OpenID Connect를 사용하여 API에 액세스하도록 사용자 및 클라이언트 앱을 인증하고 권한을 부여합니다. 마지막으로 HTTP 기본 인증을 사용하여 검색 서버인 Netflix Eureka에 대한 액세스를 보호합니다.
이 장에서 다룰 주제는 다음과 같습니다.
OAuth 2.0및OpenID Connect- 시스템 전반의 보안
- HTTPS로 외부 통신 보호
Netflix Eureka접근 보안- 시스템 환경에 로컬 인증 서버 추가
OAuth 2.0및OpenID Connect의 API 인증 및 권한 부여- 로컬 인증 서버로 테스트
- 외부
OpenID Connect제공업체인Auth0로 테스트
11.1 OAuth 2.0 and OpenID Connect
인증은 사용자의 자격 증명을 확인하여 사용자를 식별하는 것입니다. 권한 부여는 API에 대한 액세스 권한을 인증된 사용자에게 부여하는 것입니다.
OAuth 2.0은 권한 위임을 위한 개방형 표준이며 OpenID Connect는 OAuth 2.0의 추가 기능으로 클라이언트 앱이 권한 서버에서 수행한 인증을 기반으로 사용자의 신원을 확인할 수 있도록 합니다.
OAuth 2.0
OAuth 2.0은 사용자가 제3자 클라이언트 앱이 사용자 이름으로 보호된 리소스에 액세스하는 데 동의할 수 있도록 하는 승인을 위해 널리 허용되는 공개 표준입니다. API 호출과 같이 타사 클라이언트 앱에 사용자 이름으로 작업할 수 있는 권한을 부여하는 것을 권한 위임이라고 합니다.
So, what does this mean?
Let's start by sorting out the concepts used:
- 리소스 소유자: 엔드 유저
- 클라이언트: 엔드 유저의 이름으로 보호된 API를 호출하려는 앱.
- 리소스 서버: 보호하려는 API를 노출한 서버
- 인증 서버: 리소스 소유자를 인증한 후에 클라이언트에게 토큰을 발행한다. 일반적으로 사용자 정보와 사용자 인증 관리는 인증 제공자에게 위임한다.
인증 서버에 클라이언트가 등록되면 client_id와 secret이 부여됩니다. 클라이언트는 또한 사용자 인증 후 클라이언트 앱에 다시 발행된 인증 코드와 토큰을 보낸 후 인증 서버가 사용할 허용된 리디렉션 URI에 등록됩니다.
예를 들어, 사용자가 타사 클라이언트 앱에 액세스하고 클라이언트 앱이 사용자에게 서비스를 제공하기 위해 보호된 API를 호출하려고 한다고 가정해 보겠습니다. 이러한 API에 액세스할 수 있으려면 클라이언트 앱이 사용자 이름으로 작동하고 있음을 API에 알리는 방법이 필요합니다. 사용자가 인증을 위해 자신의 자격 증명을 클라이언트 앱과 공유해야 하는 솔루션을 피하기 위해 클라이언트 앱에 사용자 이름으로 선택된 API에 대한 제한된 액세스 권한을 부여하는 권한 부여 서버에서 액세스 토큰을 발행합니다.
즉, 사용자는 클라이언트 앱에 자격 증명을 공개할 필요가 없습니다. 사용자는 사용자를 대신하여 특정 API에 액세스하기 위해 클라이언트 앱에 동의할 수도 있습니다.
- 액세스 토큰은 OAuth 2.0 용어의 범위로 표현되는 유효 기간이 있는 액세스 권한을 나타냅니다.
- 인증 서버에서 클라이언트 앱에 리프레시 토큰을 발급할 수도 있습니다. 이는 클라이언트 앱에서 사용자의 참여 없이 새 액세스 토큰을 얻는 데 사용할 수 있습니다.
The OAuth 2.0 specification defines four authorization grant flows for issuing access tokens, explained as follows:
인증 코드 부여 방식
This is the safest, but also the most complex, grant flow. This grant flow requires that the user interacts with the authorization server using a web browser for authentication and giving consent to the client application, as illustrated by the following diagram:
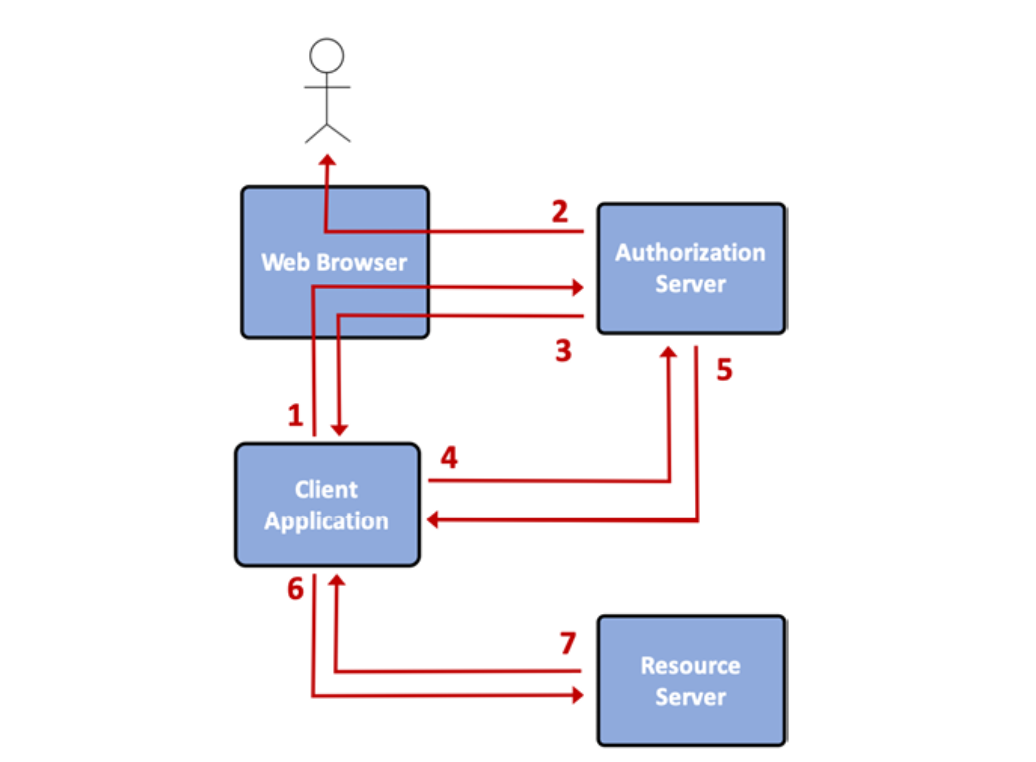
Figure 11.1: OAuth 2.0 – 인증코드 부여 방식
Here's what's going on in this diagram:
-
클라이언트 앱은 사용자를 웹 브라우저의 인증 서버로 보내 승인 흐름을 시작합니다.
-
인증 서버는 사용자를 인증하고 사용자의 동의를 요청합니다.
-
인증 서버는 인증 코드를 사용하여 사용자를 클라이언트 앱으로 다시 리디렉션합니다. 인증 서버는 1단계에서 클라이언트가 지정한 리디렉션 URI를 사용하여 인증 코드를 보낼 위치를 파악합니다. 인증 코드는 웹 브라우저를 통해 클라이언트 앱으로 다시 전달되기 때문에, 즉 악성 자바스크립트 코드가 잠재적으로 인증 코드를 받을 수 있는 비보안 환경으로 짧은 시간 동안 한 번만 사용할 수 있습니다.
-
액세스 토큰에 대한 인증 코드를 교환하기 위해 클라이언트 앱은 인증 서버를 다시 호출해야 합니다. 클라이언트 앱은 인증 서버에 대한 인증 코드와 함께 클라이언트 ID와 암호를 제시해야 합니다.
-
인증 서버는 액세스 토큰을 발행하고 이를 클라이언트 앱으로 다시 보냅니다. 권한 부여 서버는 선택적으로 리프레시 토큰을 발행하고 반환할 수도 있습니다.
-
클라이언트는 액세스 토큰을 사용하여 리소스 서버에서 노출된 보호된 API에 요청을 보낼 수 있습니다.
-
리소스 서버는 액세스 토큰의 유효성을 검사하여 처리합니다. 액세스 토큰이 유효한 한 6단계와 7단계를 반복할 수 있습니다. 토큰 수명이 만료되면 클라이언트는 리프레시 토큰을 사용하여 새 토큰을 얻을 수 있습니다.
클라이언트 자격증명 방식
특정 사용자와 관계없는 API를 호출하는 클라이언트가 있을 경우 client_id와 secret을 사용하여 액세스 토큰을 얻을 수 있습니다.
OAuth 2.1의 가장 중요한 개선은 다음과 같습니다.
-
보안을 개선하기 위해 퍼블릭 클라이언트는
PKCE를 사용해야 합니다. 인증 서버가 자신의 자격 증명을 확인할 수 있는 프라이빗 클라이언트의 경우PKCE를 사용할 필요가 없으며 권장됩니다. -
암시적 방식과 암호 방식은 더 이상 사용되지 않습니다.
앞으로 인증코드 방식과 클라이언트 자격증명 방식만 사용할 것입니다.
OAuth 2.0으로 보호되는 API에 대한 테스트 자동화와 관련하여 클라이언트 자격 증명 부여 흐름은 웹 브라우저를 사용한 수동 상호 작용이 필요하지 않기 때문에 매우 편리합니다. 이 장의 뒷부분에서 테스트 스크립트와 함께 이 승인 흐름을 사용할 것입니다. 테스트 스크립트 섹션의 변경 사항을 참조하십시오.
OpenID Connect
OpenID Connect는 클라이언트가 사용자의 신원을 확인할 수 있는 OAuth 2.0의 추가 기능입니다. OpenID Connect는 승인이 완료된 후 클라이언트가 인증 서버에서 받는 ID 토큰을 추가합니다.
ID 토큰은 JWT로 인코딩되며 사용자 ID, 이메일 주소 같은 클레임이 포함되며 JWS로 서명됩니다. 이렇게 하면 클라이언트는 인증 서버의 공개 키를 사용하여 서명의 유효성을 검사하여 토큰 정보를 신뢰할 수 있습니다.
- 액세스 토큰은
ID 토큰과 동일한 방식으로 인코딩 및 서명될 수 있습니다. OpenID Connect는 인증 코드 및 토큰 요청 또는 서명된 JWT를 확인하기 위한 공개 키 가져오기와 엔드포인트를 정의합니다.- 인증된 사용자에 대한 추가 정보를 얻는 엔드포인트도 정의합니다.
이 책에서는
OpenID Connect사양을 준수하는 인증 서버만 사용합니다. 이렇게 하면 검색 끝점을 사용하여 리소스 서버의 구성을 단순화할 수 있습니다. 또한 디지털 서명된 JWT 액세스 토큰에 대한 선택적 지원을 사용하여 리소스 서버가 액세스 토큰의 신뢰성을 확인할 수 있는 방법을 단순화합니다. 아래 Edge 서버 및Product-composite서비스 섹션의 변경 사항을 참조하십시오.
11.2 시스템 보호
시스템 환경을 보호하기 위해 다음 단계를 수행합니다.
-
HTTPS를 사용하여 외부 API에 대한 외부 요청 및 응답을 암호화
-
OAuth 2.0및OpenID Connect로 API에 액세스하는 사용자 및 클라이언트 인증 및 권한 부여 -
HTTP 기본 인증으로 Eureka에 대한 보안 액세스
시스템 내부에서는 HTTP를 사용하고 외부에 노출되는 에지 서버에는 HTTPS를 적용합니다.
"18장 서비스 Mesh를 사용하여 관찰 가능성 및 관리 개선"에서 서비스 Mesh 제품으로 HTTPS를 자동으로 프로비저닝하여 내부 통신을 보호하는 방법을 볼 수 있습니다.
테스트를 위해 시스템에 로컬 OAuth 2.0 인증 서버를 추가합니다. 인증 서버와의 모든 외부 통신은 에지 서버를 통해 라우팅됩니다. 에지 서버와 product-composite 서비스는 리소스 서버로 작동합니다.
액세스 토큰 유효성 검사의 오버헤드를 최소화하기 위해 액세스 토큰이 서명된 JWT로 인코딩되고 인증 서버는 리소스 서버가 서명을 확인하는데 필요한 공개 키를 액세스 할 엔드포인트를 노출합니다.
시스템 환경은 다음과 같습니다.

Figure 11.2: 시스템 환경에 인증서버 추가
From the preceding diagram, we can note that:
-
시스템 내부에서는 http를 사용합니다.
-
로컬
OAuth 2.0인증 서버는 에지 서버를 통해 액세스됩니다. -
리소스인 에지 서버와
product-composite서비스는 액세스 토큰을 서명된 JWT로 검증합니다. -
리소스 서비스는
jwk-set엔드포인트에서 인증 서버의 공개키를 가져와 액세스 토큰의 서명을 확인합니다.
11.3 HTTPS 보호
HTTPS를 사용하려면 다음을 수행해야 합니다.
- 인증서 생성: 개발 목적에 충분한 자체 서명 인증서를 생성합니다.
- 에지 서버 구성: 인증서를 사용하여 HTTPS 기반 외부 트래픽만 허용하도록 구성해야 합니다.
자체 서명된 인증서를 생성합니다.
keytool -genkeypair -alias localhost -keyalg RSA -keysize 2048 -storetype PKCS12 -keystore edge.p12 -validity 3650소스코드에 인증서 파일 샘플이 있으므로 다음의 예제를 실행하기 위해 이 명령을 실행할 필요는 없습니다.
The command will ask for a number of parameters. When asked for a password, I entered roouty. For the rest of the parameters, I simply entered an empty value to accept the default value.
인증서 edge.p12는 spring-cloud/gateway 프로로젝트의 /src/main/resources/keystore에 놓이므로 빌드 시 .jar 파일에 포함됩니다.
개발 중에는 클래스 경로를 사용하여 인증서를 제공해도 되지만 프로덕션 환경에서는 적용할 수 없습니다. 런타임 시 인증서를 외부 인증서로 교체하는 방법은 아래 런타임 시 자체 서명 인증서 교체 섹션을 참조하십시오!
에지 서버가 인증서와 https를 사용하도록 gateway 프로젝트의 application.yml에 다음과 같이 설정합니다.
server.port: 8443

server.ssl:
 key-store-type: PKCS12
 key-store: classpath:keystore/edge.p12
 key-store-password: roouty
 key-alias: localhost
다음 파일에서도 포트를 8443으로 수정합니다.
- 세 개의
docker-compose*.yml test-em-all.bash
런타임 환경에서 자체 서명 인증서를 교체하기
자체 서명 인증서를 .jar 파일에 배치하는 것은 개발 환경에서만 유용합니다. 테스트 또는 프로덕션과 같은 런타임 환경에서 작동하는 솔루션의 경우 인증된 CA에서 서명한 인증서를 사용할 수 있어야 합니다.
또한 .jar 파일을 다시 빌드할 필요 없이 런타임 중에 사용할 인증서를 지정할 수 있어야 하며 Docker를 사용할 때 .jar 파일이 포함된 Docker 이미지를 지정할 수 있어야 합니다. Compose를 사용하여 Docker 컨테이너를 관리할 때 Docker 컨테이너의 볼륨을 Docker 호스트에 있는 인증서에 매핑할 수 있습니다. Docker 볼륨의 외부 인증서를 가리키는 Docker 컨테이너에 대한 환경 변수를 설정할 수도 있습니다.
"15장, Kubernetes 소개"에서는 클러스터에서 Docker 컨테이너를 실행하는 데 적합한 인증서와 같은 시크릿을 처리하는 방법에 대한 보다 강력한 솔루션을 볼 수 있습니다. 즉, 컨테이너가 단일 Docker 호스트가 아닌 Docker 호스트 그룹에서 예약되는 경우입니다.
이 주제의 변경 사항은 git 소스에는 반영되지 않았으므로 직접 만들어야 합니다!
.jar 파일에 패키지된 인증서를 교체하려면 다음 단계를 수행하십시오.
- 인증서를 만들고 password를
testtest로 입력합니다:
mkdir keystore
keytool -genkeypair -alias localhost -keyalg RSA -keysize 2048 -storetype PKCS12 -keystore keystore/edge-test.p12 -validity 3650docker-compose.yml에 새 인증서가 저장된 폴더에 매핑하는 위치, 패스워드, 볼륨에 대한 환경 변수를 갱신합니다:
gateway:
  environment:
    - SPRING_PROFILES_ACTIVE=docker
    - SERVER_SSL_KEY_STORE=file:/keystore/edge-test.p12
    - SERVER_SSL_KEY_STORE_PASSWORD=testtest
  volumes:
    - $PWD/keystore:/keystore
  build: spring-cloud/gateway
  mem_limit: 512m
  ports:
    - "8443:8443"
에지 서버를 올리고 실행하면 다음 명령을 재시작이 필요합니다:
docker-compose up -d --scale gateway=0
docker-compose up -d --scale gateway=1
도커 서비스 재시작은
docker-compose restart명령이 합당해 보이지만 docker-compose.yml의 변경을 고려하지 않으므로 여기에 적당하지 않습니다.
이제 새 인증서를 사용합니다.
11.4 Eureka를 안전하게 액세스
이제는 http basic 인증을 사용하여 API 액세스와 Eureka 서버의 웹 페이지 접근을 제한합니다. 사용자는 username과 password를 제출하여야 액세스가 허용됩니다.
Eureka 서버의 수정 사항
SecurityConfig 클래스에 설정을 추가합니다:
사용자는 다음과 같이 정의합니다.
public void configure(AuthenticationManagerBuilder auth) {
  auth.inMemoryAuthentication()
   .passwordEncoder(NoOpPasswordEncoder.getInstance())
   .withUser(username).password(password)
   .authorities("USER");
}
SecurityConfig의 생성자에 username와 password를 주입합니다.
@Autowired
public SecurityConfig(
  @Value("${app.eureka-username}") String user,
  @Value("${app.eureka-password}") String passwd
) {
  this.username = user;
  this.password = passwd;
}
다음 정의에 의해 모든 API와 웹 페이지들은 HTTP 기본 인증으로 보호됩니다.
protected void configure(HttpSecurity http) throws Exception {
  http
    .authorizeRequests()
      .anyRequest().authenticated()
      .and()
      .httpBasic();
}
자격증명은 application.yml 파일에 기록합니다 :
app:
 eureka-username: user
 eureka-password: passwd
Finally, the test class, EurekaServerApplicationTests, uses the credentials from the configuration file when testing the APIs of the Eureka server:
@Value("${app.eureka-username}")
private String user;

@Value("${app.eureka-password}")
private String passwd;

@Autowired
public void setTestRestTemplate(TestRestTemplate temp) {
   this.template = temp.withBasicAuth(user, passwd);
}
Eureka 서버의 API 및 웹페이지 접근을 제한하기 위해 필요한 단계입니다.
마지막 단계는 Eureka 클라이언트를 설정하여 Eureka 서버를 액세스 할 때 자격증명을 건네도록 수정합니다.
Eureka 클라이언트의 수정 사항
Eureka 클라이언트에서 자격증명은 Eureka 서버에 대한 컨넥션 URL에서 지정할 수 있습니다. 클라이언트의 application.yml에서 지정합니다.
app:
  eureka-username: user
  eureka-password: passwd

eureka:
  client:
     serviceUrl:
       defaultZone: "http://${app.eureka-username}:${app.eureka-password}@${app.eureka-server}:8761/eureka/"
Eureka 서버 테스트 섹션에서 테스트를 실행하여 액세스가 보호되는지 확인합니다.
11.5 로컬 인증 서버
OAuth 2.0 및 OID Connect를 사용하여 보호되는 API를 사용하여 로컬에서 자동화된 테스트를 실행할 수 있도록 인증 서버를 시스템 환경에 추가합니다.
Spring Security는 불행히도 인증 서버를 즉시 제공하지 않습니다. 하지만 2020년 4월, Spring Security 팀이 주도하는 커뮤니티 주도 프로젝트인 Spring Authorization Server가 인증 서버 제공을 목표로 발표되었습니다.
Spring Authorization Server 는 OID Connect 디스커버리 엔드포인트의 사용과 액세스 토큰의 디지털 서명을 모두 지원합니다. 또한 토큰의 서명을 확인하기 위한 키를 얻기 위해 디스커버리 정보를 사용하여 액세스할 수 있는 엔드포인트를 제공합니다.
로컬 및 자동화 테스트에서 인증 서버로 사용할 수 있습니다.
샘플 프로젝트를 다음과 같이 수정하였습니다.
- 빌드 파일 업데이트
- 포트는
9999 - Dockerfile을 추가
- 인증 서버가 Eureka 서버와 통합
actuator의 엔드포인트의 공개 접근을 허용
WARNING: actuator의 엔드포인트에 대한 공개 액세스를 허용하는 것은 개발 중에 매우 유용하지만 프로덕션 시스템의 액츄에이터 엔드포인트에서 너무 많은 정보를 공개하는 것은 보안 문제가 될 수 있습니다. 따라서 생산 시 actuator 엔드포인트에서 노출되는 정보를 최소화하도록 계획하십시오!
-
OIDC 명세에 따라 주요 엔드포인트 액세스를 검증하는 단위 테스트가 추가됩니다.
-
한 사용자의
username과password는 "user" and "passwd"입니다. -
두 OAuth 클라이언트를 등록합니다.
reader클라이언트에게는product:readscope를 부여하고writer클라이언트는product:read와product:writescope를 부여합니다. 두 클라이언트 모두client secret이secret으로 지정합니다. -
클라이언트에게 허용된 리다이렉트 URIs는
https://my.redirect.uri와https://localhost:8443/webjars/swagger-ui/oauth2-redirect.html으로 지정합니다. 하나는 테스트 용이고 다른 하나는Swagger UI컴포넌트에서 사용합니다.
인증 서버를 시스템 환경에 붙이기 위해 다음 파일들이 수정됩니다.
settings.gradle에 인증 서버를 추가합니다docker-compose*.yml에 추가합니다
-spring-cloud/gateway에서HealthCheckConfiguration에 인증 서버 추가/oauth,/login,/error로 시작하는 인증 서버로 향하는 URI를application.yml에 추가SecurityConfig에서 모든 요청 허가로 설정합니다.
11.6 OAuth 2.1과 OpenID Connect
인증 서버로 에지 서버와 product-composite 서비스를 리소스 서버로 개선할 수 있으므로 유효한 액세스 토큰이 필요합니다. 에지 서버는 인증 서버에서 제공한 서명을 사용하여 확인할 수 있는 모든 액세스 토큰을 수락하도록 구성됩니다. product-composite 서비스에는 scope를 포함하는 액세스 토큰도 필요합니다.
product:readscope: read-only APIs 액세스product:writescope: create and delete APIs 액세스
product-composite 서비스는 Swagger UI 구성 요소가 인증 서버로부터 액세스 토큰을 발급할 수 있도록 하는 구성으로 개선됩니다.
test-em-all.bash를 개선하여 액세스 토큰을 획득하고 테스트를 수행할 때 사용할 수 있도록 해야 합니다.
에지 서버와 product-composite 서비스
The following changes have been applied in the source code to both the edge server and the product-composite service:
- 두 프로젝트 모두
SecurityConfig를 추가합니다.
@EnableWebFluxSecurity
public class SecurityConfig {

  @Bean
  SecurityWebFilterChain springSecurityFilterChain(
      ServerHttpSecurity http) {
    http
      .authorizeExchange()
        .pathMatchers("/actuator/**").permitAll()
        .anyExchange().authenticated()
        .and()
      .oauth2ResourceServer()
        .jwt();
    return http.build();
  }
}
Be careful about which URLs are exposed unprotected. For example, the
actuatorendpoints should be protected before going to production.
-
anyExchange().authenticated(): 나머지 모든 URL은 인증이 필요 -
oauth2ResourceServer().jwt(): 인증이 액세스 토큰 방식으로 이루어짐 -
인증 서버의 OIDC 디스커버리 엔드포인트는
application.yml에 등록합니다:
app.auth-server: localhost

spring.security.oauth2.resourceserver.jwt.issuer-uri: http://${app.auth-server}:9999

---
spring.config.activate.on-profile: docker
app.auth-server: auth-server
시스템 환경이 시작되면 디스커버리 엔드포인트를 테스트할 수 있습니다. 예를 들어 다음 명령을 사용하여 토큰의 서명을 확인하는 데 필요한 키를 반환하는 엔드포인트를 찾을 수 있습니다.
docker-compose exec auth-server curl localhost:9999/.well-known/openid-configuration -s | jq -r .jwks_uri응답은
http://auth-server:9999/oauth2/jwksproduct-composite 서비스만 수정할 사항
SecurityConfig 클래스의 보안 구성은 액세스를 허용하기 위해 액세스 토큰에 'OAuth 2.0' scope를 요구하여 개선되었습니다.
.pathMatchers(POST, "/product-composite/**")
  .hasAuthority("SCOPE_product:write")
.pathMatchers(DELETE, "/product-composite/**")
  .hasAuthority("SCOPE_product:write")
.pathMatchers(GET, "/product-composite/**")
  .hasAuthority("SCOPE_product:read")
Spring Security에서는 권한 앞에
SCOPE_를 붙여야 합니다.
Swagger UI가 액세스 토큰을 받도록 수정
To allow access to the protected APIs from the Swagger UI component, the following changes have been applied in the product-composite service:
Swagger UI컴포넌트가 노출하는 API 접근을 모두에게 허용합니다.
.pathMatchers("/openapi/**").permitAll()
.pathMatchers("/webjars/**").permitAll()- 시큐리티 스키마
security_auth가 적용되도록 API의 OAS를 개선합니다.
The following line has been added to the definition of the interface ProductCompositeService in the API project:
@SecurityRequirement(name = "security_auth")- 시큐리티 스키마
security_auth의 시멘틱을 정의하기 위해product-composite프로젝트에OpenApiConfig를 추가합니다.
@SecurityScheme(
  name = "security_auth", type = SecuritySchemeType.OAUTH2,
  flows = @OAuthFlows(
    authorizationCode = @OAuthFlow(
      authorizationUrl = "${springdoc.oAuthFlow.
        authorizationUrl}",
      tokenUrl = "${springdoc.oAuthFlow.tokenUrl}",
      scopes = {
        @OAuthScope(name = "product:read", description =
          "read scope"),
        @OAuthScope(name = "product:write", description =
          "write scope")
      }
)))
public class OpenApiConfig {}-
OAuth 2.0기반의 시큐리티 스키마 적용 -
인증 코드 부여 방식을 사용
-
인증 코드와 액세스 토큰을 받기 위한 URL을 설정 파일에서 제공
-
scope 목록(
product:readandproduct:write)끝으로
application.yml에 몇가지 설정을 추가합니다.swagger-ui: oauth2-redirect-url: https://localhost:8443/ webjars/swagger-ui/oauth2-redirect.html oauth: clientId: writer clientSecret: secret useBasicAuthenticationWithAccessCodeGrant: true oAuthFlow: authorizationUrl: https://localhost:8443/oauth2/authorize tokenUrl: https://localhost:8443/oauth2/token
1. Swagger UI가 인증 코드를 받는데 사용할 리다이렉트 URL
2. client ID and client secret.
3. 인증서버에 대해 자신을 인증할 때 기본 인증을 사용함.
4. 위에서 설명한 OpenApiConfig 클래스에서 사용하는 `authorizationUrl` 및 `tokenUrl` 파라미터의 값입니다. 이 URL은 product-composite 서비스 자체가 아니라 웹 브라우저에서 확인할 수 있어야 합니다.

Swagger UI' 웹 페이지에 대한 보호되지 않은 액세스를 허용하기 위해 Swagger UI 구성 요소로 라우팅되는 URL에 대한 무제한 액세스를 허용하도록 에지 서버도 구성되었습니다.

The following is added to the edge server's `SecurityConfig` class:

```java
.pathMatchers("/openapi/**").permitAll()
.pathMatchers("/webjars/**").permitAll()
이러한 변경 사항이 적용되면 에지 서버와 product-composite 서비스가 모두 'OAuth 2.0' 리소스 서버로 작동할 수 있고 Swagger UI 구성요소는 OAuth 클라이언트로 작동할 수 있습니다.
마지막 단계는 테스트 스크립트를 업데이트하는 것이므로 액세스 토큰을 획득하고 테스트를 실행할 때 사용합니다.
테스트 스크립트 수정
헬스 체크 API를 제외한 나머지 API를 호출하기 전에 액세스 토큰이 필요합니다. 클라이언트 자격증명을 사용하여 액세스 토큰을 획득합니다.
ACCESS_TOKEN=$(curl -k https://writer:secret@$HOST:$PORT/oauth2/token -d grant_type=client_credentials -s | jq .access_token -r)From the preceding command, we can see that it uses HTTP Basic authentication, passing its client ID and client secret as writer:secret@ before the hostname.
scope 기반 인증이 작동하는지 확인하는 두 개의 테스트를 추가합니다.
# Verify that a request without access token fails on 401, Unauthorized
assertCurl 401 "curl -k https://$HOST:$PORT/product-composite/$PROD_ID_REVS_RECS -s"

# Verify that the reader client with only read scope can call the read API but not delete API
READER_ACCESS_TOKEN=$(curl -k https://reader:secret@$HOST:$PORT/oauth2/token -d grant_type=client_credentials -s | jq .access_token -r)
READER_AUTH="-H \"Authorization: Bearer $READER_ACCESS_TOKEN\""

assertCurl 200 "curl -k https://$HOST:$PORT/product-composite/$PROD_ID_REVS_RECS $READER_AUTH -s"
assertCurl 403 "curl -k https://$HOST:$PORT/product-composite/$PROD_ID_REVS_RECS $READER_AUTH -X DELETE -s"
테스트 스크립트는 reader 클라이언트의 자격 증명을 사용하여 액세스 토큰을 획득합니다.
-
첫 번째 테스트는 액세스 토큰을 제공하지 않고 API를 호출합니다. API는 '401 Unauthorized' HTTP 상태를 반환합니다.
-
두 번째 테스트는 reader 클라이언트가 read-only API를 호출할 수 있는지 확인합니다.
-
마지막 테스트는 읽기 범위만 부여된 reader 클라이언트를 사용하여 업데이트 API를 호출합니다. 삭제 API로 전송된 요청은 '403 Forbidden' HTTP 상태를 반환할 것으로 예상됩니다.
For the full source code, see test-em-all.bash.
With the test script updated to acquire and use OAuth 2.0 access tokens, we are ready to try it out in the next section!
11.7 로컬 인증서버 테스트
모든 시큐리티 컴포넌트를 함께 테스트합니다. 로컬 인증서버를 사용하여 액세스 토큰을 발행합니다.
-
소스를 빌드하고 테스트 스크립트를 실행하여 모든 것을 함께 부합하는지 테스트 합니다.
-
보호된 디스커버리 서버의 API와 웹 페이지를 테스트 합니다
-
클라이언트 자격증명과 인증코드 부여 방식을 사용하여 액세스 토큰을 얻는 방법을 배웁니다.
-
발행한 토큰으로 API를 테스트 합니다. 또한 reader 클라이언트가 업데이트 API를 호출할 수 없는지는 태스트 합니다.
-
Verify that Swagger UI can issue access tokens and call the APIs.
자동 테스트를 빌드하고 실행
To build and run automated tests, we perform the following steps:
- 도커 이미지를 빌드합니다
cd $BOOK_HOME/Chapter11
./gradlew build && docker-compose build- 도커로 시스템을 시작하고 테스트를 실행합니다
./test-em-all.bash start네거티브 테스트 끝에서는 인증이 안된 경우 401 Unauthorized 코드를 받으며 권한이 없는 경우는 403 Forbidden 코드를 얻는지 확인합니다.
보호된 디스커버리 서버 테스트
보호된 서버인 Eureka가 실행 중이므로 API 및 웹 페이지에 액세스할 수 있도록 유효한 자격 증명을 제공해야 합니다.
예를 들어 Eureka 서버에게 등록된 인스턴스를 요청입니다. 여기서 URL에 username과 password를 직접 제공합니다.
curl -H "accept:application/json" https://u:p@localhost:8443/eureka/api/apps -ks | jq -r 응답은
{
  "applications": {
    "versions__delta": "1",
    "apps__hashcode": "UP_6_",
    "application": [
      {
        "name": "GATEWAY",
        "instance": [
          {
            "instanceId": "7299660fd99d:gateway:8443",
            "hostName": "7299660fd99d",
            "app": "GATEWAY",
            "ipAddr": "172.23.0.7",
            "status": "UP",
            "overriddenStatus": "UNKNOWN",
            "port": {
              "$": 8443,
              "@enabled": "true"
...https://localhost:8443/eureka/web의 웹 페이지에 액세스할 때 인증서가 자체 서명되어 있으므로 먼저 안전하지 않은 연결을 수락해야 하고 다음으로 지정된 대로 유효한 자격 증명을 제공해야 합니다.
액세스 토큰 얻기
클라이언트 자격증명 방식
writer에 대한 액세스 토큰을 얻어 옵니다:
curl -k https://writer:secret@localhost:8443/oauth2/token -d grant_type=client_credentials -s | jq .- The client identifies itself using HTTP Basic authentication, passing its
client ID,writer, and itsclient secret,secret.
{
  "access_token": "eyJraWQiOiI3Nj...",
  "scope": "product:write openid product:read",
  "token_type": "Bearer",
  "expires_in": "3599"
}
이번에는, reader를 위한 액세스 토큰을 받아옵니다.
curl -k https://reader:secret@localhost:8443/oauth2/token -d grant_type=client_credentials -s | jq .{
"access_token": "eyJraWQiOiI3NjAyYTFiN...",
"scope": "openid product:read",
"token_type": "Bearer",
"expires_in": "3599"
}인증 코드 부여 방식으로 액세스 토큰 얻어오기
인증코드 부여 방식은 웹 브라우저가 필요합니다.
첫 번째 안전하지 않은 단계에서는 웹 브라우저를 사용하여 액세스 토큰으로 교환할 수 있는 한 번만 사용할 수 있는 인증 코드를 획득합니다. 인증 코드는 웹 브라우저에서 보안 계층(예: 서버 측 코드)으로 전달되며, 이 계층은 인증 서버에 액세스 토큰에 대한 인증 코드를 교환하기 위해 새로운 요청을 할 수 있습니다. 이 보안 교환에서 서버는 해당 ID를 확인하기 위해 클라이언트 암호를 제공해야 합니다.
인증 코드 부여 흐름을 실행하려면 다음 단계를 수행하십시오.
- reader 클라이언트에 대한 인증 코드를 얻으려면 자체 서명된 인증서의 사용을 허용하는 웹 브라우저에서 다음 URL을 사용하십시오.
curl "https://localhost:8443/oauth2/authorize?response_type=code&client_id=reader&redirect_uri=https://my.redirect.uri&scope=product:read&state=35725"- 웹 브라우저에서 로그인하라는 메시지가 표시되면 인증 서버 구성에 지정된 자격 증명 'user' 및 'passwd'를 사용합니다.
그림 11.7: 인증 코드 부여 흐름 시도하기
-
다음으로 reader 클라이언트가 우리 이름으로 API를 호출하는 데 동의해야 합니다.
-
동의 제출 버튼을 클릭하면 다음과 같은 응답을 받게 됩니다.
-
언뜻 보기에는 다소 실망스러울 수 있습니다. 인증 서버가 웹 브라우저로 다시 보낸 URL은 초기 요청에서 클라이언트가 지정한 리디렉션 URI를 기반으로 합니다. URL을 텍스트 편집기에 복사하면 다음과 유사한 내용을 찾을 수 있습니다.
https://my.redirect.uri/?code=Yyr...X0Q&state=35725코드 요청 매개변수의 리디렉션 URL에서 인증 코드를 찾을 수 있습니다. code 파라미터에서 인증 코드를 추출하고 해당 값으로 환경 변수 CODE를 정의합니다.
CODE=Yyr...X0Q- Next, pretend you are the backend server that exchanges the authorization code with an access token using the following curl command:
curl -k https://reader:secret@localhost:8443/oauth2/token \
 -d grant_type=authorization_code \
 -d client_id=reader \
 -d redirect_uri=https://my.redirect.uri \
 -d code=$CODE -s | jq .
스크린샷에서 다음 예외를 제외하고 클라이언트 자격 증명 흐름에서 얻은 것과 유사한 정보가 응답에 있음을 알 수 있습니다.
더 안전한 승인 흐름을 사용했기 때문에 리프레시 토큰도 발급되었습니다.
reader 클라이언트에 대한 액세스 토큰을 요청했기 때문에 product:read 범위만 얻었습니다.
- writer 클라이언트에 대한 인증 코드를 얻으려면 다음 URL을 사용하십시오.
https://localhost:8443/oauth2/authorize?response_type=code&client_id=writer&redirect_uri=https://my.redirect.uri&scope=product:read+product :writer&state=72489.- To exchange the code for an access token for the writer client, run the following command:
curl -k https://writer:secret@localhost:8443/oauth2/token \
  -d grant_type=authorization_code \
  -d client_id=writer \
  -d redirect_uri=https://my.redirect.uri \
  -d code=$CODE -s | jq .
Verify that the response now also contains the product:write scope!
액세스 토큰으로 APIs 액세스
OAuth 2.0 액세스 토큰은 앞에 Bearer를 붙여 표준 HTTP authorization header로 보내집니다.
Run the following commands to call the protected APIs:
- First, call an API to retrieve a
composite productwithout a valid access token:
ACCESS_TOKEN=an-invalid-token
curl https://localhost:8443/product-composite/1 -k -H "Authorization: Bearer $ACCESS_TOKEN" -i
It should return the following response:
HTTP/1.1 401 UnauthorizedThe error message clearly states that the access token is invalid!
- Next, try using the API to retrieve a composite product using one of the access tokens acquired for the reader client from the previous section:
$ ACCESS_TOKEN={a-reader-access-token}

$ curl https://localhost:8443/product-composite/1 -k -H "Authorization: Bearer $ACCESS_TOKEN" -i
Now we will get the 200 OK status code and the expected response body will be returned:
HTTP/1.1 200 OKFigure 11.12: Valid access token results in a 200 OK response
- If we try to access an updating API, for example, the delete API, with an access token acquired for the
readerclient, the call will fail:
$ READER_ACCESS_TOKEN={a-reader-access-token}

$ curl https://localhost:8443/product-composite/999 -k -H "Authorization: Bearer $READER_ACCESS_TOKEN" -X DELETE -i
It will fail with a response similar to the following:
HTTP/1.1 403 Forbidden오류 응답에서 요청에 액세스 토큰이 부여된 것보다 더 높은 권한이 필요하기 때문에 API를 호출하는 것이 금지되어 있음이 분명합니다.
- delete API에 대한 호출을 반복하지만 writer 클라이언트에 대해 액세스 토큰을 획득한 경우 응답에서 200 OK로 호출이 성공합니다.
docker-compose logs -f product-composite 명령을 사용하여 로그 출력을 살펴보면 다음과 같은 인증 정보를 찾을 수 있습니다.
product-composite_1 Authorization info: Subject: reader, scopes: ["openid","product:read"], expires 2022-04-05T03:43:21Z: issuer: http://auth-server:9999, audience: [reader]이 정보는 JWT로 인코딩된 액세스 토큰에서 추출되었습니다. product-composite 서비스는 이 정보를 얻기 위해 인증 서버와 통신할 필요가 없습니다!
Swagger UI 테스팅
이 섹션에서는 Swagger UI 구성 요소를 사용하여 보호된 API에 액세스하는 방법을 배웁니다. 위의 '제품 복합' 서비스의 변경 사항만 해당 섹션에 설명된 구성을 통해 Swagger UI에 대한 액세스 토큰을 발급하고 Swagger UI에서 API를 호출할 때 이를 사용할 수 있습니다.
사용해 보려면 다음 단계를 수행하십시오.
-
웹 브라우저에서 https://localhost:8443/openapi/swagger-ui.html URL로 이동하여 Swagger UI 시작 페이지를 엽니다.
-
이제 시작 페이지에서 서버 드롭다운 목록 옆에 '승인'이라는 텍스트가 있는 새 버튼이 표시됩니다.
-
'Accept' 버튼을 클릭하여 승인 코드 부여 흐름을 시작합니다.
-
Swagger UI는 권한 부여 서버에 액세스 권한을 요청하는 범위 목록을 표시합니다. 모두 선택 텍스트가 있는 링크를 클릭한 다음 'Accept' 버튼을 클릭하여 모든 범위를 선택합니다.
그림 11.15: OAuth 범위를 요청하는 Swagger UI
그런 다음 인증 서버로 리디렉션됩니다. 사용하는 웹 브라우저에서 아직 로그인하지 않은 경우 인증 서버는 인증 코드 부여 흐름 섹션을 사용하여 액세스 토큰 획득에서와 같이 자격 증명을 요청합니다.
-
사용자 이름 'user'와 비밀번호 'passwd'로 로그인합니다.
-
다음으로 인증 서버가 귀하의 동의를 요청할 것입니다. 두 범위를 모두 선택하고 동의 제출 버튼을 클릭합니다.
-
Swagger UI는 완료된 권한 부여 흐름에 대한 정보를 표시하여 권한 부여 프로세스를 완료합니다. 시작 페이지로 돌아가려면 '닫기' 버튼을 클릭하세요.
그림 11.16: OAuth 승인 흐름을 요약한 Swagger UI
- 이제 5장, OpenAPI를 사용하여 API 설명 추가에서 설명한 것과 동일한 방식으로 API를 사용해 볼 수 있습니다. Swagger UI는 요청에 액세스 토큰을 추가합니다. Responses 헤더 아래에 보고된 curl 명령을 자세히 살펴보면 액세스 토큰을 찾을 수 있습니다.
다음 섹션에서는 이를 외부 OpenID Connect 호환 공급자로 교체합니다.
11.8 OIDC 제공자 테스트
인증 서버 대신 OIDC 제공업체로 Auth0를 사용합니다. Auth0를 사용하기 위해 다음 주제를 진행할 것입니다.
Auth0에서 reader, writer 클라이언트 계정 설정Auth0를 OID 제공자로 사용하기 위한 수정- 테스트 스크립트로 동작 확인
- 액세스 토큰 가져오기
- 클라이언트 자격증명 부여
- 인증 코드 부여 방식
- 액세스 토큰으로 API 호출
- 사용자 정보 가져오기
Auth0에 계정 설정
Auth0에 필요한 대부분의 구성은 Auth0의 관리 API를 사용하는 스크립트에 의해 처리됩니다. 그러나 Auth0이 관리 API에 액세스하는 데 사용할 수 있는 클라이언트 ID와 클라이언트 암호를 생성하는 지점까지 몇 가지 단계를 수행해야 합니다.
Auth0 서비스는 다중 테넌트이므로 클라이언트, 리소스 소유자 및 리소스 서버 측면에서 자체 OAuth 객체 도메인을 만들 수 있습니다.
다음 단계를 수행하여 Auth0에서 무료 계정에 가입하고 관리 API에 액세스하는 데 사용할 수 있는 클라이언트를 만듭니다.
- Open the URL
https://auth0.comin your browser. - Click on the
Sign upbutton:
- Sign up with an email of your choice.
- After a successful sign-up, you will be asked to create a tenant domain. Enter the name of the tenant of your choice, in my case:
dev-ml.eu.auth0.comordev-wemeetplace.us.auth0.com - Fill in information about your account as requested.
- Also, look in your mailbox for an email with the subject "Please Verify Your
Auth0Account and use the instructions in the email to verify your account".
-
Following sign-up, you will be directed to your dashboard with a "Getting Started" page.
-
In the menu to the left, click on
Applicationsto get it expanded, then click onAPIsto find the management API,Auth0 Management API. This API was created for you during the creation of your tenant. We will use this API to create the required definitions in the tenant. -
Click on
Auth0 Management APIand select theTesttab. -
A big button with the text
CREATE & AUTHORIZE TEST APPLICATIONwill appear. Click on it to get a client created that can be used to access the management API. -
Once created, a page is displayed with the header
Asking Auth0 for tokens from my application. As a final step, we need to give the created client permission to use the management APIs. -
Click on the tab
Machine to Machine Applications, next to the Test tab. -
Here we will find the test client,
Auth0 Management API (Test Application), and we can see that it is authorized to use the management API. If we click on the down arrow next to theAuthorizedtoggle button, a large number of available privileges are revealed. -
Click on the
Allchoice and then on theUPDATEbutton. The screen should look similar to the following screenshot:
Figure 11.17: Auth0 management API client permissions
-
Press on the
CONTINUEbutton after understanding that you now have a very powerful client with access to all management APIs within your tenant. -
Now, we just need to collect the
client IDandclient secretof the created client. The easiest way to do that is to selectApplicationsin the menu to the left (under the main menu choice Applications) and then select the application namedAuth0 Management API (Test Application). A screen similar to the following should be displayed:
Figure 11.18: Auth0 management API client application information
- Open the file
Chapter11/auth0/env.bashand copy the following values from the screen above:
- Domain into the value of the variable
TENANT - Client ID into the value of the variable
MGM_CLIENT_ID - Client Secret into the value of the variable
MGM_CLIENT_SECRET
- Complete the values required in the
env.bashfile by specifying an email address and password, in the variablesUSER_EMAILandUSER_PASSWORD, of a test user that the script will create for us.
Specifying a password for a user like this is not considered best practice from a security perspective.
Auth0supports enrolling users who will be able to set the password themselves, but it is more involved to set up. For more information, see https://auth0.com/docs/connections/database/password-change. Since this is only used for test purposes, specifying a password like this is OK.
We can now run the script that will create the following definitions for us:
- Two applications, reader and writer, clients in OAuth terminology
- The
product-composite API, a resource server in OAuth terminology, with the OAuth scopesproduct:readandproduct:write - A user, a resource owner in OAuth terminology, that we will use to test the authorization code grant flow
- Finally, we will grant the reader application the scope
product:read, and the writer application the scopesproduct:readandproduct:write
Run the following commands:
cd $BOOK_HOME/Chapter11/auth0
./setup-tenant.bash
Expect the following output (details removed from the output below):
Auth0 - OAuth2 settings:

export TENANT=dev-wemeetplace.us.auth0.com
export WRITER_CLIENT_ID=0C2IJVeswSuspJA6fbwBh5YyCnzgzmLz
export WRITER_CLIENT_SECRET=VuDoeZ_0HMYqACznyqRoig2yqE2jvHWwEFXToK4HP7qnNx8L4VkHlqLqflrZsOlX
export READER_CLIENT_ID=OorSAjMrLPlWWOQV4AWHEiYD1TpeKtZk
export READER_CLIENT_SECRET=dUbLg0ZZLefQPGce_u0PaNO5EjeWc9uyarscfFAYSd--2yTfrC_Tu3TmrnUgewHn
Figure 11.19: Output from setup-tenant.bash the first time it is executed
Save a copy of the export commands printed at the end of the output; we will use them multiple times later on in this chapter.
Also, look in your mailbox for the email specified for the test user. You will receive a mail with the subject Verify your email. Use the instructions in the email to verify the test user's email address.
Note that the script is idempotent, meaning it can be run multiple times without corrupting the configuration. If running the script again, it should respond with:
Figure 11.20: Output from setup-tenant.bash the next time it is executed
It can be very handy to be able to run the script again, for example, to get access to the reader's and writer's client ID and client secret.
If you need to remove the objects created by
setup-tenant.bashyou can run the scriptreset-tenant.bash.
With an Auth0 account created and configured, we can move on and apply the necessary configuration changes in the system landscape.
Auth0를 OpenID 제공자로 사용
인증서버를 Auth0로 바꾸기 위한 필요한 설정 변경을 다룹니다. OAuth 리소스 서버 역할인 product-composite과 gateway 서비스의 설정을 바꾸면 됩니다. 테스트 스크립트는 로컬 인증 서버 대신 Auth0에서 액세스 토큰을 가져오도록 수정하면 됩니다.
Git으로 제공된 소스는 이 사항이 반영되지 않았으므로 직접 수정해야 합니다.
OAuth 리소스 서버 설정
OpenID Connect 제공자를 사용하려면 OAuth 리소스 서버에서 표준 디스커버리 엔드포인트에 기본 URI를 설정만 하면 됩니다.
product-composite와 gateway 프로젝트의 application.yml에서 OIDC 디스커버리 엔드포인트를 로컬 인증서버 대신 Auth0로 변경합니다.
-
Locate the property
spring.security.oauth2.resourceserver.jwt.issuer-uri. -
Replace its value with
https://${TENANT}/, where ${TENANT}should be replaced with your tenant domain name; in my case, it isdev-wemeetplace.us.auth0.com. Do not forget the trailing/!
In my case, the configuration of the OIDC discovery endpoint will look like this:
spring.security.oauth2.resourceserver.jwt.issuer-uri: https://dev-wemeetplace.us.auth0.com/If you are curious, you can see what's in the discovery document by running the following command:
TENANT=dev-wemeetplace.us.auth0.com
curl https://${TENANT}/.well-known/openid-configuration -s | jq
Rebuild the
product-compositeandgatewayservices as follows:./gradlew build && docker-compose up -d --build product-composite gatewayWith the
product-compositeandgatewayservices updated, we can move on and also update the test script.
Auth0에서 액세스 토큰을 가져오도록 test-em-all.bash 수정
We also need to update the test script so it acquires access tokens from the Auth0 OIDC provider. This is done by performing the following changes in test-em-all.bash:
- Find the following command:
ACCESS_TOKEN=$(curl -k https://writer:secret@$HOST:$PORT/oauth2/token -d grant_type=client_credentials -s | jq .access_token -r)Replace it with these commands:
export TENANT=dev-wemeetplace.us.auth0.com
export WRITER_CLIENT_ID=0C2IJVeswSuspJA6fbwBh5YyCnzgzmLz
export WRITER_CLIENT_SECRET=VuDoeZ_0HMYqACznyqRoig2yqE2jvHWwEFXToK4HP7qnNx8L4VkHlqLqflrZsOlX

ACCESS_TOKEN=$(curl -X POST https://$TENANT/oauth/token \
  -d grant_type=client_credentials \
  -d audience=https://localhost:8443/product-composite \
  -d scope=product:read+product:write \
  -d client_id=$WRITER_CLIENT_ID \
  -d client_secret=$WRITER_CLIENT_SECRET -s | jq -r .access_token)
Note from the preceding command that Auth0 requires us to specify the intended audience of the requested access token, as an extra layer of security. The audience is the API we plan to call using the access token. Given that an API implementation verifies the audience field, this would prevent the situation where someone tries to use an access token issued for another purpose to get access to an API.
- Set the values for the environment variables
TENANT,WRITER_CLIENT_ID, andWRITER_CLIENT_SECRETin the preceding commands with the values returned by thesetup-tenant.bashscript.
As mentioned above, you can run the script again to acquire these values without risking any negative side effects!
- Next, find the following command:
READER_ACCESS_TOKEN=$(curl -k https://reader:secret@$HOST:$PORT/oauth2/token -d grant_type=client_credentials -s | jq .access_token -r)Replace it with this command:
export READER_CLIENT_ID=OorSAjMrLPlWWOQV4AWHEiYD1TpeKtZk
export READER_CLIENT_SECRET=dUbLg0ZZLefQPGce_u0PaNO5EjeWc9uyarscfFAYSd--2yTfrC_Tu3TmrnUgewHn

READER_ACCESS_TOKEN=$(curl -X POST https://$TENANT/oauth/token \
  -d grant_type=client_credentials \
  -d audience=https://localhost:8443/product-composite \
  -d scope=product:read \
  -d client_id=$READER_CLIENT_ID \
  -d client_secret=$READER_CLIENT_SECRET -s | jq -r .access_token)
Note that we only request the product:read scope and not the product:write scope here.
- Set the values for the environment variables
READER_CLIENT_IDandREADER_CLIENT_SECRETin the preceding commands with the values returned by thesetup-tenant.bashscript.
Now the access tokens are issued by Auth0 instead of our local authorization server, and our API implementations can verify the access tokens using information from Auth0's discovery service configured in the application.yml files. The API implementations can, as before, use the scopes in the access tokens to authorize the client to perform the call to the API, or not.
With this, we have all the required changes in place. Let's run some tests to verify that we can acquire access tokens from Auth0.
Auth0를 사용하여 테스트 스크립트 실행
Now, we are ready to give Auth0 a try!
Run the usual tests, but this time using Auth0 as the OpenID Connect provider, with the following command:
./test-em-all.bashIn the logs, you will be able to find authorization information from the access tokens issued by Auth0. Run the command:
docker-compose logs product-composite | grep "Authorization info"Expect the following outputs from the command:
- From calls using an access token with both the product:read and product:write scopes, we will see both scopes listed as follows:
Figure 11.21: Authorization information for the writer client from Auth0 in the log output
- From calls using an access token with only the product:read scope, we will see that only that scope is listed as follows:
Figure 11.22: Authorization information for the reader client from Auth0 in the log output
As we can see from the log output, we now also get information regarding the intended audience for this access token. To strengthen security, we could add a test to our service that verifies that its URL, https://localhost:8443/product-composite in this case, is part of the audience list. This would, as mentioned earlier, prevent the situation where someone tries to use an access token issued for another purpose than to get access to our API.
With the automated tests working together with Auth0, we can move on and learn how to acquire access tokens using the different types of grant flow. Let's start with the client credentials grant flow.
클라이언트 자격증명 부여방식으로 액세스 토큰 얻기
If you want to acquire an access token from Auth0 yourself, you can do so by running the following command, using the client credentials grant flow:
export TENANT=...
export WRITER_CLIENT_ID=...
export WRITER_CLIENT_SECRET=...
curl -X POST https://$TENANT/oauth/token \
  -d grant_type=client_credentials \
  -d audience=https://localhost:8443/product-composite \
  -d scope=product:read+product:write \
  -d client_id=$WRITER_CLIENT_ID \
  -d client_secret=$WRITER_CLIENT_SECRET
Set the values for the environment variables TENANT, WRITER_CLIENT_ID, and WRITER_CLIENT_SECRET in the preceding commands with the values returned by the setup-tenant.bash script.
Following the instructions in the Calling protected APIs using access tokens section, you should be able to call the APIs using the acquired access token.
Acquiring access tokens using the authorization code grant flow
In this section, we will learn how to acquire an access token from Auth0 using the authorization code grant flow. As already described above, we first need to acquire an authorization code using a web browser. Next, we can use server-side code to exchange the authorization code for an access token.
Perform the following steps to execute the authorization code grant flow with Auth0:
- To get an authorization code for the default app client, use the following URL in the web browser:
https://${TENANT}/authorize?audience=https://localhost:8443/product-composite&scope=openid email product:read product:write&response_type=code&client_id=${WRITER_CLIENT_ID}&redirect_uri=https://my.redirect.uri&state=845361.
Replace ${TENANT} and ${WRITER_CLIENT_ID} in the preceding URL with the tenant domain name and writer client ID returned by the setup-tenant.bash script.
Auth0 should present the following login screen:
Figure 11.23: Authorization code grant flow with Auth0, login screen
- Following a successful login, Auth0 will ask you to give the client application your consent:
Figure 11.24: Authorization code grant flow with Auth0, consent screen
The authorization code is now in the URL in the browser, just like when we tried out the authorization code grant flow with our local authorization server:
Figure 11.25: Authorization code grant flow with Auth0, access token
- Extract the code and run the following command to get the access token:
CODE=...
export TENANT=...
export WRITER_CLIENT_ID=...
export WRITER_CLIENT_SECRET=...
curl -X POST https://$TENANT/oauth/token \
 -d grant_type=authorization_code \
 -d client_id=$WRITER_CLIENT_ID \
 -d client_secret=$WRITER_CLIENT_SECRET  \
 -d code=$CODE \
 -d redirect_uri=https://my.redirect.uri -s | jq .
Set the values for the environment variables TENANT, WRITER_CLIENT_ID, and WRITER_CLIENT_SECRET in the preceding commands to the values returned by the setup-tenant.bash script.
Now that we have learned how to acquire access tokens using both grant flows, we are ready to try calling the external API using an access token acquired from Auth0 in the next section.
Auth0 액세스 토큰으로 API 호출
We can use access tokens issued by Auth0 to call our APIs, just like when we used access tokens issued by our local authorization server.
For a read-only API, execute the following command:
ACCESS_TOKEN=...
curl https://localhost:8443/product-composite/1 -k -H "Authorization: Bearer $ACCESS_TOKEN" -i
For an updating API, execute the following command:
ACCESS_TOKEN=...
curl https://localhost:8443/product-composite/999 -k -H "Authorization: Bearer $ACCESS_TOKEN" -X DELETE -i
Since we have requested both scopes, product:read and product:write, both the preceding API calls are expected to return 200 OK.
사용자 정보 얻기
From the log output in Figures 11.21 and 11.22 in the section Running the test script with Auth0 as the OpenID Connect provider, we could not see any information about the user that initiated the API request. If you want your API implementation to know a bit more about the user, it can call Auth0's userinfo_endpoint. The URL of the user-info endpoint can be found in the response of a request to the OIDC discovery endpoint as described in the section Changing the configuration in the OAuth resource servers. To get user info related to an access token, make the following request:
Export TENANT=...
curl -H "Authorization: Bearer $ACCESS_TOKEN" https://$TENANT/userinfo -s | jq
Set the values for the TENANT environment variable in the preceding commands to the values returned by the setup-tenant.bash script.
Note that this command only applies to access tokens issued using the authorization code grant flow. Access tokens issued using the client credentials grant flow don't contain any user information and will result in an error response if tried.
A sample response is as follows:
Figure 11.26: Requesting extra user information from Auth0
This endpoint can also be used to verify that the user hasn't revoked the access token in Auth0.
Wrap up the tests by shutting down the system landscape with the following command:
docker-compose downThis concludes the section where we have learned how to replace the local OAuth 2.0 authorization server with an external alternative. We have also seen how to reconfigure the microservice landscape to validate access tokens using an external OIDC provider.
Summary
이 장에서는 Spring Security를 사용하여 API를 보호하는 방법을 배웠습니다.
Spring Security를 사용하여 HTTPS를 활성화하는 것이 얼마나 쉬운지 보았습니다. Spring Security를 사용하면 HTTP 기본 인증을 사용하여 검색 서버인 Netflix Eureka에 대한 액세스를 제한하는 것이 간단하다는 것도 배웠습니다. 마지막으로 Spring Security를 사용하여 OAuth 2.0 및 OpenID Connect의 사용을 단순화하여 타사 클라이언트 애플리케이션이 사용자 이름으로 API에 액세스하도록 허용하지만 사용자가 클라이언트와 자격 증명을 공유하도록 요구하지 않는 방법을 보았습니다. 응용 프로그램. Spring Security를 기반으로 로컬 OAuth 2.0 인증 서버를 설정하는 방법과 외부 OpenID Connect 공급자인 Auth0을 대신 사용할 수 있도록 구성을 변경하는 방법을 모두 배웠습니다.
그러나 한 가지 문제는 필요한 구성을 관리하는 방법입니다. 각 마이크로서비스 인스턴스에는 자체 구성이 제공되어야 하므로 현재 구성에 대한 좋은 개요를 얻기가 어렵습니다. 여러 마이크로서비스와 관련된 구성 업데이트도 어려울 것입니다. 흩어진 구성에 추가된 사실은 지금까지 본 구성 중 일부에 자격 증명이나 인증서와 같은 민감한 정보가 포함되어 있다는 사실입니다. 여러 협력 마이크로서비스에 대한 구성을 처리하는 더 나은 방법과 구성의 민감한 부분을 처리하는 방법에 대한 솔루션이 필요한 것 같습니다.
다음 장에서는 Spring Cloud Config Server를 탐색하고 이러한 유형의 문제를 처리하는 데 사용할 수 있는 방법을 살펴보겠습니다..
Questions
What are the benefits and shortcomings of using self-signed certificates?
What is the purpose of OAuth 2.0 authorization codes?
What is the purpose of OAuth 2.0 scopes?
What does it mean when a token is a JWT?
How can we trust the information that is stored in a JWT?
Is it suitable to use the OAuth 2.0 authorization code grant flow with a native mobile app?
What does OpenID Connect add to OAuth 2.0?