13 탄력과 복원력 강화
이 장에서는 Resilience4j를 사용하여 마이크로서비스를 보다 탄력적으로 만드는 방법, 즉 오류를 완화하고 복구하는 방법을 배웁니다. 회로 차단기를 사용하여 느리거나 응답하지 않는 다운스트림 마이크로서비스는 마이크로서비스를 동기적으로 통신하는 대규모 시스템 환경에서 발생할 수 있습니다.
Resilience4j의 서킷 브레이커를 시간 제한기 및 재시도 메커니즘과 함께 사용하여 가장 일반적인 오류 상황을 방지하는 방법을 살펴보겠습니다.
- 느리게 반응하기 시작하거나 전혀 반응하지 않는 마이크로서비스
- 일시적인 네트워크 문제로 인해 때때로 무작위로 실패하는 요청
이 장에서 다룰 주제는 다음과 같습니다.
- Resilience4j: 서킷브레이커, 시간 제한기 및 재시도
- 소스 코드에 추가
- 시스템에 배포할 때 시도하기
Resilience4j 메커니즘
회로 차단기, 시간 제한기 및 재시도 메커니즘은 두 소프트웨어 구성 요소(예: 마이크로 서비스) 간의 동기 통신에 잠재적으로 유용합니다. 이 장에서는 제품 복합 서비스에서 제품 서비스로의 호출에서 이러한 메커니즘을 한 곳에서 적용합니다. 이것은 다음 그림에 설명되어 있습니다.
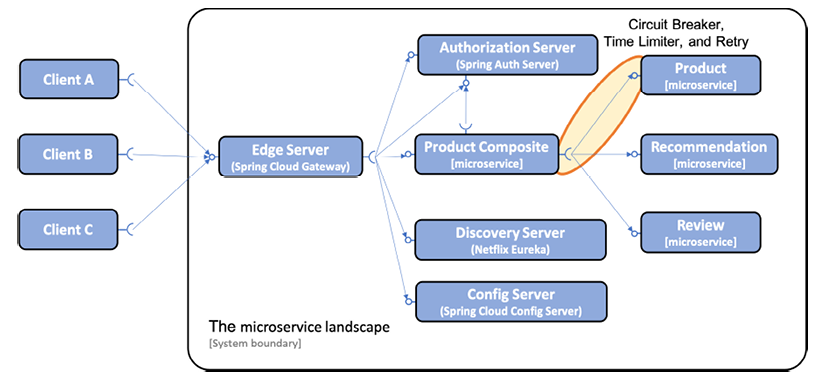
그림 13.1: 시스템 환경에 탄력성 기능 추가
다른 마이크로서비스에서 검색 및 구성 서버에 대한 동기 호출은 읽기 쉽도록 앞의 다이어그램에 표시되지 않습니다.
최근 Spring Cloud는 서킷 브레이커에 대한 추상화 계층을 제공하는 Spring Cloud Circuit Breaker 프로젝트를 추가했습니다. 이면에서 Resilience4j를 사용하도록 구성할 수 있습니다. 이 프로젝트는 Resilience4j 프로젝트처럼 통합된 방식으로 재시도, 시간 제한기, 격리 또는 속도 제한기와 같은 다른 복구 메커니즘을 제공하지 않습니다.
다른 많은 대안도 존재합니다. 예를 들어 Reactor 프로젝트에는 재시도 및 시간 초과에 대한 지원이 내장되어 있습니다.
그러나 어떤 대안도 Resilience4j가 제공하는 것처럼, 특히 종속성, 주석 및 구성이 우아하고 일관된 방식으로 사용되는 Spring Boot 환경에서 일련의 탄력성 메커니즘을 제공하는 응집력 있고 잘 통합된 접근 방식을 제공하지 않습니다.
서킷 브레이커
향상된 탄력성을 위해 Resilience4j 사용 섹션에서 8장, Spring Cloud 소개에서 서킷 브레이커의 상태 다이어그램을 다시 살펴보겠습니다.
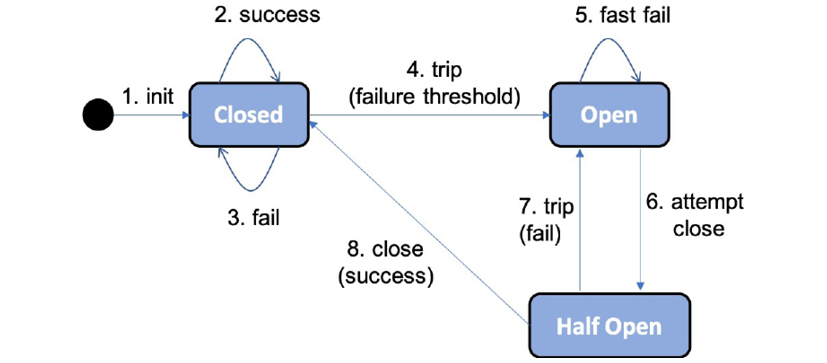
그림 13.2: 서킷 브레이커 상태 다이어그램
서킷 브레이커의 주요 기능은 다음과 같습니다.
-
서킷 브레이커가 너무 많은 결함을 감지하면 회로가 개방되어 새 호출이 허용되지 않습니다.
-
회로가 열리면 서킷 브레이커가 fail-fast 로직을 수행합니다. 이는 후속 호출에서 시간 초과와 같은 새로운 오류가 발생할 때까지 기다리지 않음을 의미합니다. 대신 호출을 대체 메서드로 직접 리디렉션합니다. 폴백 방법은 최선의 응답을 생성하기 위해 다양한 비즈니스 로직을 적용할 수 있습니다. 예를 들어, 대체 메서드는 로컬 캐시에서 데이터를 반환하거나 단순히 즉각적인 오류 메시지를 반환할 수 있습니다. 이렇게 하면 의존하는 서비스가 정상적으로 응답하지 않는 경우 마이크로서비스가 응답하지 않는 것을 방지할 수 있습니다. 이것은 특히 고부하에서 유용합니다.
-
잠시 후 서킷 브레이커가 반쯤 열려 새로운 호출이 실패를 일으킨 문제가 사라졌는지 확인할 수 있습니다. 서킷 브레이커에 의해 새로운 장애가 감지되면 회로가 다시 열리고 페일 패스트 로직으로 돌아갑니다. 그렇지 않으면 회로가 닫히고 정상 작동으로 돌아갑니다. 따라서 마이크로서비스는 서로 동기적으로 통신하는 마이크로서비스의 시스템 환경에서 필수 불가결한 기능인 오류 또는 자가 치유에 대한 복원력이 있습니다.
Resilience4j는 런타임 시 여러 가지 방법으로 서킷 브레이커에 대한 정보를 노출합니다.
-
서킷 브레이커의 현재 상태는 마이크로서비스의 actuator 상태 엔드포인트를 사용하여 모니터링할 수 있습니다.
-
서킷 브레이커는 actuator 엔드포인트에 대한 이벤트(예: 상태 전환, /actuator/circuitbreakerevents)도 게시합니다.
-
마지막으로, 서킷 브레이커는 Spring Boot의 메트릭 시스템과 통합되어 Prometheus와 같은 모니터링 도구에 메트릭을 게시하는 데 사용할 수 있습니다.
이 장에서는 상태 및 이벤트 끝점을 시험해 볼 것입니다. 20장, 마이크로서비스 모니터링에서 Prometheus가 작동하는 모습과 이것이 Spring Boot에 의해 노출되는 메트릭(예: 회로 차단기의 메트릭)을 수집하는 방법을 볼 것입니다.
서킷 브레이커의 로직을 제어하기 위해 표준 Spring Boot 구성 파일을 사용하여 Resilience4j를 구성할 수 있습니다. 다음 구성 매개변수를 사용합니다.
-
slidingWindowType: 서킷 브레이커를 열어야 하는지 결정하기 위해 Resilience4j는 슬라이딩 창을 사용하여 가장 최근 이벤트를 계산하여 결정을 내립니다. 슬라이딩 창은 고정된 호출 수 또는 고정 경과 시간을 기반으로 할 수 있습니다. 이 매개변수는 사용되는 슬라이딩 창 유형을 구성하는 데 사용됩니다. 카운트 기반 슬라이딩 윈도우를 사용하여 이 매개변수를 COUNT_BASED로 설정합니다. -
slidingWindowSize: 회로를 열어야 하는지 여부를 결정하는 데 사용되는 닫힌 상태의 호출 수입니다. -
failureRateThreshold: 회로가 열리도록 하는 실패한 호출에 대한 임계값(퍼센트)입니다. 이 설정은slidingWindowSize가 5로 설정된 경우 마지막 5개 호출 중 3개 이상이 오류인 경우 회로가 열립니다. -
automaticTransitionFromOpenToHalfOpenEnabled: 대기 기간이 끝나면 서킷 브레이커가 자동으로 반개방 상태로 전환되는지 여부를 결정합니다. 그렇지 않으면 대기 기간이 끝난 후 반개방 상태로 전환될 때까지 첫 번째 호출을 기다립니다. -
waitDurationInOpenState: 회로가 개방 상태, 즉 반 개방 상태로 전환되기 전에 얼마나 오랫동안 회로를 유지하는지 지정합니다. 이 설정은 이전 매개변수로 설정된 반개방 상태로의 자동 전환 활성화와 함께 서킷 브레이커가 10초 동안 회로를 열린 상태로 유지한 다음 반개방 상태로 전환함을 의미합니다. -
permittedNumberOfCallsInHalfOpenState: 회로가 다시 열릴지 또는 정상 폐쇄 상태로 돌아갈지를 결정하는 데 사용되는 반개방 상태의 호출 수입니다. 회로 차단기가 회로가 반개방 상태로 전환된 후 처음 세 번의 호출을 기반으로 회로를 열거나 닫을지 여부를 결정합니다.failureRateThreshold매개변수가 50%로 설정되어 있으므로 두 개 또는 세 개의 호출이 모두 실패하면 회로가 다시 열립니다. 그렇지 않으면 회로가 닫힙니다. -
ignoreExceptions: 이것은 결함으로 간주되어서는 안 되는 예외를 지정하는 데 사용할 수 있습니다. 찾을 수 없거나 잘못된 입력과 같은 예상되는 비즈니스 예외는 회로 차단기가 무시해야 하는 일반적인 예외입니다. 존재하지 않는 데이터를 검색하거나 잘못된 입력을 입력하는 사용자는 회로를 열지 않아야 합니다.
이 매개변수를NotFoundException및InvalidInputException예외를 포함하는 목록으로 설정합니다.
마지막으로 Resilience4j가 액추에이터 상태 엔드포인트의 서킷 브레이커 상태를 올바른 방식으로 보고하도록 구성하려면 다음 매개변수가 설정됩니다.
-
registerHealthIndicator= true는 Resilience4j가 회로 차단기의 상태에 관한 정보로 상태 끝점을 채울 수 있도록 합니다. -
allowHealthIndicatorToFail = false는 Resilience4j가 상태 엔드포인트의 상태에 영향을 미치지 않도록 지시합니다. 이는 구성 요소의 서킷 브레이커 중 하나가 개방 또는 반 개방 상태인 경우에도 상태 엔드포인트가 여전히 "UP"을 보고함을 의미합니다. 서킷 브레이커 중 하나가 닫힌 상태가 아니기 때문에 구성 요소의 상태가 "DOWN"으로 보고되지 않는 것이 매우 중요합니다. 이것은 구성 요소가 의존하는 구성 요소 중 하나가 정상이 아니더라도 구성 요소가 여전히 정상으로 간주된다는 것을 의미합니다.
이것은 실제로 서킷 브레이커의 핵심 값이므로 이 값을 true로 설정하면 서킷 브레이커를 가져오는 값이 다소 손상될 수 있습니다. 이전 버전의 Resilience4j에서는 실제로 이것이 동작이었습니다. 최신 버전에서는 이 문제가 수정되었으며 false가 실제로 이 매개변수의 기본값입니다. 그러나 구성 요소의 상태와 서킷 브레이커의 상태 사이의 관계를 이해하는 것이 매우 중요하다고 생각하여 구성에 추가했습니다.
- 마지막으로 Resilience4j가 상태 엔드포인트에 대한 요청에 대한 응답으로 생성하는 서킷 브레이커 상태 정보를 추가하도록 Spring Boot Actuator도 구성해야 합니다.
management.health.circuitbreakers.enabled: trueFor a full list of available configuration parameters, see https://resilience4j.readme.io/docs/circuitbreaker#create-and-configure-a-circuitbreaker.
시간 제한 장치
회로 차단기가 느리거나 응답하지 않는 서비스를 처리하는 데 도움이 되도록 시간 초과 메커니즘이 도움이 될 수 있습니다. TimeLimiter라고 하는 Resilience4j의 시간 초과 메커니즘은 표준 Spring Boot 구성 파일을 사용하여 구성할 수 있습니다. 다음 구성 매개변수를 사용합니다.
timeoutDuration: TimeLimiter 인스턴스가 시간 초과 예외를 throw하기 전에 호출이 완료될 때까지 기다리는 시간을 지정합니다. 2s로 설정하겠습니다.
재시도 메커니즘 소개
재시도 메커니즘은 일시적인 네트워크 결함과 같은 무작위 및 간헐적 오류에 매우 유용합니다. 재시도 메커니즘은 실패한 요청을 시도 사이에 구성 가능한 지연으로 여러 번 재시도할 수 있습니다. 재시도 메커니즘 사용에 대한 한 가지 매우 중요한 제한은 재시도하는 서비스가 멱등적이어야 한다는 것입니다. 즉, 동일한 요청 매개변수를 사용하여 서비스를 한 번 이상 호출하면 동일한 결과를 얻을 수 있습니다. 예를 들어 정보 읽기는 멱등하지만 정보 생성은 일반적으로 그렇지 않습니다. 첫 번째 주문 생성의 응답이 네트워크에서 손실되었기 때문에 재시도 메커니즘이 실수로 두 개의 주문을 생성하는 것을 원하지 않습니다.
Resilience4j는 이벤트 및 메트릭과 관련하여 서킷 브레이커와 동일한 방식으로 재시도 정보를 노출하지만 상태 정보는 제공하지 않습니다. 재시도 이벤트는 액추에이터 끝점인 /actuator/retryevents에서 액세스할 수 있습니다. 재시도 로직을 제어하기 위해 표준 Spring Boot 구성 파일을 사용하여 Resilience4j를 구성할 수 있습니다. 다음 구성 매개변수를 사용합니다.
-
maxAttempts: 첫 번째 호출을 포함하여 포기하기 전에 시도한 횟수입니다. 이 매개변수를 3으로 설정하여 초기 호출 실패 후 최대 2번의 재시도를 허용합니다. -
waitDuration: 다음 재시도까지의 대기 시간입니다. 이 값을 1000ms로 설정하여 재시도 사이에 1초를 기다립니다. -
retryExceptions: 재시도를 트리거할 예외 목록입니다. InternalServerError 예외, 즉 HTTP 요청이 500 상태 코드로 응답할 때만 재시도를 트리거합니다.
예를 들어 의도한 재시도 횟수가 완료되기 전에 회로 차단기가 회로를 열지 않도록 재시도 및 회로 차단기 설정을 구성할 때 주의하십시오!
사용 가능한 구성 매개변수의 전체 목록은 https://resilience4j.readme.io/docs/retry#create-and-configure-retry를 참조하십시오.
이 소개를 통해 제품 복합 서비스의 소스 코드에 이러한 탄력성 메커니즘을 추가하는 방법을 볼 준비가 되었습니다.
탄력성 메커니즘 추가
소스 코드에 탄력성 메커니즘을 추가하기 전에 지연 및/또는 무작위 오류로 오류를 강제로 발생시킬 수 있는 코드를 추가합니다. 다음으로, 느리거나 응답하지 않는 API를 처리하는 시간 제한기와 함께 회로 차단기를 추가하고 무작위로 발생하는 오류를 처리할 수 있는 재시도 메커니즘을 추가합니다. Resilience4j에서 이러한 기능을 추가하는 것은 이전 장에서 사용한 Spring Boot 방식을 따릅니다.
- 빌드 파일에서 Resilience4j에 대한 스타터 종속성을 추가합니다.
- 복원력 메커니즘이 적용될 소스 코드에 주석 추가
- 복원 메커니즘의 동작을 제어하는 구성 추가
복원력 문제를 처리하는 것은 통합 계층의 책임입니다. 따라서 탄력성 메커니즘은 ProductCompositeIntegration 클래스에 배치됩니다. ProductCompositeServiceImpl 클래스에 구현된 비즈니스 논리의 소스 코드는 복원 메커니즘의 존재를 인식하지 못합니다.
메커니즘이 준비되면 시스템 환경에 배포할 때 회로 차단기가 예상대로 작동하는지 자동으로 확인하는 테스트를 통해 테스트 스크립트인 test-em-all.bash를 마침내 확장할 것입니다.
프로그래밍 가능한 지연 및 임의 오류 추가
복원력 메커니즘을 테스트하려면 오류가 발생하는 시기를 제어할 수 있는 방법이 필요합니다. 이를 달성하는 간단한 방법은 제품 및 복합 제품을 검색하는 데 사용되는 API에 선택적 쿼리 매개변수를 추가하는 것입니다.
지연 및 오류가 발생하도록 이 섹션에 추가된 코드 및 API 매개변수는 프로덕션이 아닌 개발 및 테스트 중에만 사용해야 합니다. 18장, 서비스 메시를 사용하여 관찰 가능성 및 관리 개선에서 서비스 메시의 개념에 대해 배울 때 프로덕션에서 제어된 방식으로 지연과 오류를 도입하는 데 사용할 수 있는 더 나은 방법에 대해 배울 것입니다. 서비스 메시를 사용하면 일반적으로 마이크로서비스의 소스 코드에 영향을 미치지 않으면서 탄력성 기능을 확인하는 데 사용되는 지연 및 오류를 도입할 수 있습니다.
복합 제품 API는 단순히 매개변수를 제품 API에 전달합니다. 다음 쿼리 매개변수가 두 API에 추가되었습니다.
-
delay: Causes the getProduct API on the product microservice to delay its response. The parameter is specified in seconds. For example, if the parameter is set to 3, it will cause a delay of three seconds before the response is returned. -
faultPercentage: Causes the getProduct API on the product microservice to throw an exception randomly with the probability specified by the query parameter, from 0 to 100%. For example, if the parameter is set to 25, it will cause every fourth call to the API, on average, to fail with an exception. It will return an HTTP error 500 (Internal Server Error) in these cases.
Changes in the API definitions
The two query parameters that we introduced above, delay and faultPercentage, have been defined in the api project in the following two Java interfaces:
- ProductCompositeService:
Mono<ProductAggregate> getProduct(
    @PathVariable int productId,
    @RequestParam(value = "delay", required = false, defaultValue =
    "0") int delay,
    @RequestParam(value = "faultPercent", required = false,
    defaultValue = "0") int faultPercent
);- ProductService:
Mono<Product> getProduct(
     @PathVariable int productId,
     @RequestParam(value = "delay", required = false, defaultValue
     = "0") int delay,
     @RequestParam(value = "faultPercent", required = false,
     defaultValue = "0") int faultPercent
);
The query parameters are declared optional with default values that disable the use of the error mechanisms. This means that if none of the query parameters are used in a request, neither a delay will be applied nor an error thrown.
Changes in the product-composite microservice
The product-composite microservice simply passes the parameters to the product API. The service implementation receives the API request and passes on the parameters to the integration component that makes the call to the product API:
- The call from the ProductCompositeServiceImpl class to the integration component looks like this:
public Mono<ProductAggregate> getProduct(int productId,
  int delay, int faultPercent) {
    return Mono.zip(
        ...
        integration.getProduct(productId, delay, faultPercent),
        ....
The call from the ProductCompositeIntegration class to the product API looks like this:
public Mono<Product> getProduct(int productId, int delay,
  int faultPercent) {

    URI url = UriComponentsBuilder.fromUriString(
      PRODUCT_SERVICE_URL + "/product/{productId}?delay={delay}"
      + "&faultPercent={faultPercent}")
      .build(productId, delay, faultPercent);
  return webClient.get().uri(url).retrieve()...
Changes in the product microservice
The product microservice implements the actual delay and random error generator in the ProductServiceImpl class by extending the existing stream used to read product information from the MongoDB database. It looks like this:
public Mono<Product> getProduct(int productId, int delay,
  int faultPercent) {

  ...
  return repository.findByProductId(productId)
    .map(e -> throwErrorIfBadLuck(e, faultPercent))
    .delayElement(Duration.ofSeconds(delay))
    ...
}
When the stream returns a response from the Spring Data repository, it first applies the throwErrorIfBadLuck method to see whether an exception needs to be thrown. Next, it applies a delay using the delayElement function in the Mono class.
The random error generator, throwErrorIfBadLuck(), creates a random number between 1 and 100 and throws an exception if it is higher than, or equal to, the specified fault percentage. If no exception is thrown, the product entity is passed on in the stream. The source code looks like this:
private ProductEntity throwErrorIfBadLuck(
  ProductEntity entity, int faultPercent) {

  if (faultPercent == 0) {
    return entity;
  }

  int randomThreshold = getRandomNumber(1, 100);

  if (faultPercent < randomThreshold) {
    LOG.debug("We got lucky, no error occurred, {} < {}",
      faultPercent, randomThreshold);

  } else {
    LOG.debug("Bad luck, an error occurred, {} >= {}",
      faultPercent, randomThreshold);

    throw new RuntimeException("Something went wrong...");
  }

  return entity;
}

private final Random randomNumberGenerator = new Random();

private int getRandomNumber(int min, int max) {

  if (max < min) {
    throw new IllegalArgumentException("Max must be greater than min");
  }

  return randomNumberGenerator.nextInt((max - min) + 1) + min;
}
With the programmable delays and random error functions in place, we are ready to start adding the resilience mechanisms to the code. We will start with the circuit breaker and the time limiter.
Adding a circuit breaker and a time limiter
As we mentioned previously, we need to add dependencies, annotations, and configuration. We also need to add some code for implementing fallback logic for fail-fast scenarios. We will see how to do this in the following sections.
Adding dependencies to the build file
To add a circuit breaker and a time limiter, we have to add dependencies to the appropriate Resilience4j libraries in the build file, build.gradle. From the product documentation (https://resilience4j.readme.io/docs/getting-started-3#setup), we can learn that the following three dependencies need to be added. We will use the latest available version, v1.7.0, when this chapter was written:
ext {
   resilience4jVersion = "1.7.0"
}
dependencies {
    implementation "io.github.resilience4j:resilience4j-spring-
boot2:${resilience4jVersion}"
    implementation "io.github.resilience4j:resilience4j-reactor:${resilience4jVersion}"
    implementation 'org.springframework.boot:spring-boot-starter-aop'
    ...
To avoid Spring Cloud overriding the version used with the older version of Resilience4j that it bundles, we have to list all the sub-projects we also want to use and specify which version to use. We add this extra dependency in the dependencyManagement section to highlight that this is a workaround caused by the Spring Cloud dependency management:
dependencyManagement {
    imports {
        mavenBom "org.springframework.cloud:spring-cloud-dependencies:${springCloudVersion}"
    }
    dependencies {
        dependency "io.github.resilience4j:resilience4j-spring:${resilience4jVersion}"
        ...
    }
}
Adding annotations in the source code
The circuit breaker can be applied by annotating the method it is expected to protect with @CircuitBreaker(...), which in this case is the getProduct() method in the ProductCompositeIntegration class. The circuit breaker is triggered by an exception, not by a timeout itself. To be able to trigger the circuit breaker after a timeout, we will add a time limiter that can be applied with the annotation @TimeLimiter(...). The source code looks as follows:
@TimeLimiter(name = "product")
@CircuitBreaker(
     name = "product", fallbackMethod = "getProductFallbackValue")

public Mono<Product> getProduct(
  int productId, int delay, int faultPercent) {
  ...
}
The name of the circuit breaker and the time limiter annotation, "product", is used to identify the configuration that will be applied. The fallbackMethod parameter in the circuit breaker annotation is used to specify what fallback method to call, getProductFallbackValue in this case, when the circuit breaker is open; see below for information on how it is used.
To activate the circuit breaker, the annotated method must be invoked as a Spring bean. In our case, it's the integration class that's injected by Spring into the service implementation class, ProductCompositeServiceImpl, and therefore used as a Spring bean:
private final ProductCompositeIntegration integration;

@Autowired
public ProductCompositeServiceImpl(... ProductCompositeIntegration integration) {
  this.integration = integration;
}

public Mono<ProductAggregate> getProduct(int productId, int delay, int faultPercent) {
  return Mono.zip(
    ...,
    integration.getProduct(productId, delay, faultPercent),
    ...
Adding fail-fast fallback logic
To be able to apply fallback logic when the circuit breaker is open, that is, when a request fails fast, we can specify a fallback method on the CircuitBreaker annotation as seen in the previous source code. The method must follow the signature of the method the circuit breaker is applied for and also have an extra last argument used for passing the exception that triggered the circuit breaker. In our case, the method signature for the fallback method looks like this:
private Mono<Product> getProductFallbackValue(int productId,
  int delay, int faultPercent, CallNotPermittedException ex) {
The last parameter specifies that we want to be able to handle exceptions of type CallNotPermittedException. We are only interested in exceptions that are thrown when the circuit breaker is in its open state, so that we can apply fail-fast logic. When the circuit breaker is open, it will not permit calls to the underlying method; instead, it will immediately throw a CallNotPermittedException exception. Therefore, we are only interested in catching CallNotPermittedException exceptions.
The fallback logic can look up information based on the productId from alternative sources, for example, an internal cache. In our case, we will return hardcoded values based on the productId, to simulate a hit in a cache. To simulate a miss in the cache, we will throw a not found exception in the case where the productId is 13. The implementation of the fallback method looks like this:
private Mono<Product> getProductFallbackValue(int productId,
  int delay, int faultPercent, CallNotPermittedException ex) {

  if (productId == 13) {
    String errMsg = "Product Id: " + productId
      + " not found in fallback cache!";
    throw new NotFoundException(errMsg);
  }

  return Mono.just(new Product(productId, "Fallback product"
    + productId, productId, serviceUtil.getServiceAddress()));
}
Adding configuration
Finally, the configuration of the circuit breaker and time limiter is added to the product-composite.yml file in the config repository, as follows:
resilience4j.timelimiter:
  instances:
    product:
      timeoutDuration: 2s

management.health.circuitbreakers.enabled: true

resilience4j.circuitbreaker:
  instances:
    product:
      allowHealthIndicatorToFail: false
      registerHealthIndicator: true
      slidingWindowType: COUNT_BASED
      slidingWindowSize: 5
      failureRateThreshold: 50
      waitDurationInOpenState: 10000
      permittedNumberOfCallsInHalfOpenState: 3
      automaticTransitionFromOpenToHalfOpenEnabled: true
      ignoreExceptions:
        - se.magnus.api.exceptions.InvalidInputException
        - se.magnus.api.exceptions.NotFoundException
The values in the configuration have already been described in the previous sections, Introducing the circuit breaker and Introducing the time limiter.
Adding a retry mechanism
In the same way as for the circuit breaker, a retry mechanism is set up by adding dependencies, annotations, and configuration. The dependencies were added previously in the Adding dependencies to the build file section, so we only need to add the annotation and set up the configuration.
Adding the retry annotation
The retry mechanism can be applied to a method by annotating it with @Retry(name="nnn"), where nnn is the name of the configuration entry to be used for this method. See the following Adding configuration section for details on the configuration. The method, in our case, is the same as it is for the circuit breaker and time limiter, getProduct() in the ProductCompositeIntegration class:
  @Retry(name = "product")
  @TimeLimiter(name = "product")
  @CircuitBreaker(name = "product", fallbackMethod =
    "getProductFallbackValue")
  public Mono<Product> getProduct(int productId, int delay,
    int faultPercent) {
Adding configuration
Configuration for the retry mechanism is added in the same way as for the circuit breaker and time limiter in the product-composite.yml file in the config repository, like so:
resilience4j.retry:
  instances:
    product:
      maxAttempts: 3
      waitDuration: 1000
      retryExceptions:
      - org.springframework.web.reactive.function.client.WebClientResponseException$InternalServerError
The actual values were discussed in the Introducing the retry mechanism section above.
That is all the dependencies, annotations, source code, and configuration required. Let's wrap up by extending the test script with tests that verify that the circuit breaker works as expected in a deployed system landscape.
Adding automated tests
Automated tests for the circuit breaker have been added to the test-em-all.bash test script in a separate function, testCircuitBreaker():
...
function testCircuitBreaker() {
    echo "Start Circuit Breaker tests!"
    ...
}
...
testCircuitBreaker
...
echo "End, all tests OK:" `date`
To be able to perform some of the required verifications, we need to have access to the actuator endpoints of the product-composite microservice, which are not exposed through the edge server. Therefore, we will access the actuator endpoints by running a command in the product-composite microservice using the Docker Compose exec command. The base image used by the microservices, adoptopenjdk, bundles curl, so we can simply run a curl command in the product-composite container to get the information required. The command looks like this:
docker-compose exec -T product-composite curl -s http://product-composite:8080/actuator/healthThe -T argument is used to disable the use of a terminal for the exec command. This is important to make it possible to run the test-em-all.bash test script in an environment where no terminals exist, for example, in an automated build pipeline used for CI/CD.
To be able to extract the information we need for our tests, we can pipe the output to the jq tool. For example, to extract the actual state of the circuit breaker, we can run the following command:
docker-compose exec -T product-composite curl -s http://product-composite:8080/actuator/health | jq -r .components.circuitBreakers.details.product.details.stateIt will return either CLOSED, OPEN, or HALF_OPEN, depending on the actual state.
The test starts by doing exactly this, that is, verifying that the circuit breaker is closed before the tests are executed:
assertEqual "CLOSED" "$(docker-compose exec -T product-composite curl -s http://product-composite:8080/actuator/health | jq -r .components.circuitBreakers.details.product.details.state)"
Next, the test will force the circuit breaker to open up by running three commands in a row, all of which will fail on a timeout caused by a slow response from the product service (the delay parameter is set to 3 seconds):

for ((n=0; n<3; n++))
do
    assertCurl 500 "curl -k https://$HOST:$PORT/product-composite/$PROD_ID_REVS_RECS?delay=3 $AUTH -s"
    message=$(echo $RESPONSE | jq -r .message)
    assertEqual "Did not observe any item or terminal signal within 2000ms" "${message:0:57}"
done
A quick reminder of the configuration: The timeout of the product service is set to two seconds so that a delay of three seconds will cause a timeout. The circuit breaker is configured to evaluate the last five calls when closed. The tests in the script that precede the circuit breaker-specific tests have already performed a couple of successful calls. The failure threshold is set to 50%; three calls with a three-second delay are enough to open the circuit.
With the circuit open, we expect a fail-fast behavior, that is, we won't need to wait for the timeout before we get a response. We also expect the fallback method to be called to return a best-effort response. This should also apply for a normal call, that is, without requesting a delay. This is verified with the following code:
assertEqual "OPEN" "$(docker-compose exec -T product-composite curl -s http://product-composite:8080/actuator/health | jq -r .components.circuitBreakers.details.product.details.state)"

assertCurl 200 "curl -k https://$HOST:$PORT/product-composite/$PROD_ID_REVS_RECS?delay=3 $AUTH -s"
assertEqual "Fallback product$PROD_ID_REVS_RECS" "$(echo "$RESPONSE" | jq -r .name)"

assertCurl 200 "curl -k https://$HOST:$PORT/product-composite/$PROD_ID_REVS_RECS $AUTH -s"
assertEqual "Fallback product$PROD_ID_REVS_RECS" "$(echo "$RESPONSE" | jq -r .name)"
The product ID 1 is stored in a variable, $PROD_ID_REVS_RECS, to make it easier to modify the script if required.
We can also verify that the simulated not found error logic works as expected in the fallback method, that is, the fallback method returns 404, NOT_FOUND for product ID 13:
assertCurl 404 "curl -k https://$HOST:$PORT/product-composite/$PROD_ID_NOT_FOUND $AUTH -s"
assertEqual "Product Id: $PROD_ID_NOT_FOUND not found in fallback cache!" "$(echo $RESPONSE | jq -r .message)"
The product ID 13 is stored in a variable,
$PROD_ID_NOT_FOUND.
As configured, the circuit breaker will change its state to half-open after 10 seconds. To be able to verify that, the test waits for 10 seconds:
echo "Will sleep for 10 sec waiting for the CB to go Half Open..."
sleep 10
After verifying the expected state (half-open), the test runs three normal requests to make the circuit breaker go back to its normal state, which is also verified:
assertEqual "HALF_OPEN" "$(docker-compose exec -T product-composite curl -s http://product-composite:8080/actuator/health | jq -r .components.circuitBreakers.details.product.details.state)"

for ((n=0; n<3; n++))
do
    assertCurl 200 "curl -k https://$HOST:$PORT/product-composite/$PROD_ID_REVS_RECS $AUTH -s"
    assertEqual "product name C" "$(echo "$RESPONSE" | jq -r .name)"
done

assertEqual "CLOSED" "$(docker-compose exec -T product-composite curl -s http://product-composite:8080/actuator/health | jq -r .components.circuitBreakers.details.product.details.state)"
The test code also verifies that it got a response with data from the underlying database. It does that by comparing the returned product name with the value stored in the database. For the product with product ID 1, the name is "product name C".
A quick reminder of the configuration: The circuit breaker is configured to evaluate the first three calls when in the half-open state. Therefore, we need to run three requests where more than 50% are successful before the circuit is closed.
The test wraps up by using the /actuator/circuitbreakerevents actuator API, which is exposed by the circuit breaker to reveal internal events. It is used to find out what state transitions the circuit breaker has performed. We expect the last three state transitions to be as follows:
- First state transition: Closed to open
- Next state transition: Open to half-open
- Last state transition: Half-open to closed
This is verified by the following code:
assertEqual "CLOSED_TO_OPEN"      "$(docker-compose exec -T product-composite curl -s http://product-composite:8080/actuator/circuitbreakerevents/product/STATE_TRANSITION | jq -r
.circuitBreakerEvents[-3].stateTransition)"

assertEqual "OPEN_TO_HALF_OPEN"   "$(docker-compose exec -T product-composite curl -s http://product-composite:8080/actuator/circuitbreakerevents/product/STATE_TRANSITION | jq -r .circuitBreakerEvents[-2].stateTransition)"

assertEqual "HALF_OPEN_TO_CLOSED" "$(docker-compose exec -T product-composite curl -s http://product-composite:8080/actuator/circuitbreakerevents/product/STATE_TRANSITION | jq -r .circuitBreakerEvents[-1].stateTransition)"
The jq expression, circuitBreakerEvents[-1], means the last entry in the array of circuit breaker events, [-2] is the second to last event, while [-3] is the third to last event. Together, they are the three latest events, the ones we are interested in.
We added quite a lot of steps to the test script, but with this, we can automatically verify that the expected basic behavior of our circuit breaker is in place. In the next section, we will try it out. We will run tests both automatically by running the test script and manually by running the commands in the test script by hand.
Trying out the circuit breaker and retry mechanism
Now, it's time to try out the circuit breaker and retry mechanism. We will start, as usual, by building the Docker images and running the test script, test-em-all.bash. After that, we will manually run through the tests we described previously to ensure that we understand what's going on! We will perform the following manual tests:
-
Happy days tests of the circuit breaker, to verify that the circuit is closed under normal operations
-
Negative tests of the circuit breaker, to verify that the circuit opens up when things start to go wrong
-
Going back to normal operation, to verify that the circuit goes back to its closed state once the problems are resolved
-
Trying out the retry mechanism with random errors
Building and running the automated tests
To build and run the automated tests, we need to do the following:
First, build the Docker images with the following commands:
cd $BOOK_HOME/Chapter13
./gradlew build && docker-compose build
Next, start the system landscape in Docker and run the usual tests with the following command:
./test-em-all.bash startWhen the test script prints out Start Circuit Breaker tests!, the tests we described previously have been executed!
Verifying that the circuit is closed under normal operations
Before we can call the API, we need an access token. Run the following commands to acquire an access token:
unset ACCESS_TOKEN
ACCESS_TOKEN=$(curl -k https://writer:secret@localhost:8443/oauth2/token -d grant_type=client_credentials -s | jq -r .access_token)
echo $ACCESS_TOKEN
An access token issued by the authorization server is valid for 1 hour. So, if you start to get 401 – Unauthorized errors after a while, it is probably time to acquire a new access token.
Try a normal request and verify that it returns the HTTP response code 200:
curl -H "Authorization: Bearer $ACCESS_TOKEN" -k https://localhost:8443/product-composite/1 -w "%{http_code}\n" -o /dev/null -sThe -w "%{http_code}\n" switch is used to print the HTTP return status. As long as the command returns 200, we are not interested in the response body, so we suppress it with the switch -o /dev/null.
Verify that the circuit breaker is closed using the health API:
docker-compose exec product-composite curl -s http://product-composite:8080/actuator/health | jq -r .components.circuitBreakers.details.product.details.stateWe expect it to respond with CLOSED.
Forcing the circuit breaker to open when things go wrong
Now, it's time to make things go wrong! By that, I mean it's time to try out some negative tests to verify that the circuit opens up when things start to go wrong. Call the API three times and direct the product service to cause a timeout on every call, that is, delay the response by 3 seconds. This should be enough to trip the circuit breaker:
curl -H "Authorization: Bearer $ACCESS_TOKEN" -k https://localhost:8443/product-composite/1?delay=3 -s | jq .We expect a response such as the following each time:
Figure 13.3: Response after a timeout
이제 서킷브레이커가 열려 있으므로 4번째 시도(waitInterval 내, 즉 10초 이내)를 하면 페일-패스트 동작과 폴백 방법이 작동하는 것을 볼 수 있습니다. 시간 제한이 2초 후에 시작되면 오류 메시지 대신 즉시 응답을 받게 됩니다.
그림 13.4: 서킷브레이커가 열려 있을 때의 응답
응답은 대체 방법에서 나옵니다. 이는 이름 필드 Fallback product1의 값을 보면 알 수 있습니다.
Fail-fast 및 fallback 방법은 서킷브레이커의 핵심 기능입니다. 열린 상태에서 대기 시간이 10초로 설정된 구성에서는 작동 중인 페일-패스트 로직 및 폴백 방법을 볼 수 있으려면 다소 신속해야 합니다! 반개방 상태가 되면 항상 시간 초과를 유발하는 세 개의 새 요청을 제출하여 회로 차단기를 다시 열린 상태로 만든 다음 빠르게 네 번째 요청을 시도할 수 있습니다. 그런 다음 fallback 메서드에서 빠른 응답을 받아야 합니다. 대기 시간을 1~2분으로 늘릴 수도 있지만 회로가 반 개방 상태로 전환되기 전에 그 시간을 기다리는 것은 다소 지루할 수 있습니다.
서킷브레이커가 반개방 상태로 전환될 때까지 10초간 기다린 후 다음 명령을 실행하여 회로가 이제 반개방 상태인지 확인하십시오.
docker-compose exec product-composite curl -s http://product-composite:8080/actuator/health | jq -r .components.circuitBreakers.details.product.details.stateExpect it to respond with HALF_OPEN.
Closing the circuit breaker again
Once the circuit breaker is in a half-open state, it waits for three calls to see whether it should open the circuit again or go back to normal by closing it.
Let's submit three normal requests to close the circuit breaker:
curl -H "Authorization: Bearer $ACCESS_TOKEN" -k https://localhost:8443/product-composite/1 -w "%{http_code}\n" -o /dev/null -sThey should all respond with 200. Verify that the circuit is closed again by using the health API:
docker-compose exec product-composite curl -s http://product-composite:8080/actuator/health | jq -r .components.circuitBreakers.details.product.details.stateWe expect it to respond with CLOSED.
Wrap this up by listing the last three state transitions using the following command:
docker-compose exec product-composite curl -s http://product-composite:8080/actuator/circuitbreakerevents/product/STATE_TRANSITION | jq -r '.circuitBreakerEvents[-3].stateTransition, .circuitBreakerEvents[-2].stateTransition, .circuitBreakerEvents[-1].stateTransition'Expect it to respond with the following:
Figure 13.5: Circuit breaker state changes
This response tells us that we have taken our circuit breaker through a full lap of its state diagram:
- From closed to open when the timeout errors start to prevent requests from succeeding
- From open to half-open to see whether the error is gone
- From half-open to closed when the error is gone, that is, when we are back to normal operation
With that, we are done with testing the circuit breaker; let's move on and see the retry mechanism in play.
Trying out retries caused by random errors
Let's simulate that there is a – hopefully temporary – random issue with our product service or the communication with it.
We can do this by using the faultPercent parameter. If we set it to 25, we expect every fourth request on average to fail. We hope that the retry mechanism will kick in to help us by automatically retrying failed requests. One way of noticing that the retry mechanism has kicked in is to measure the response time of the curl command. A normal response should take around 100 ms. Since we have configured the retry mechanism to wait 1 second (see the waitDuration parameter in the section on the configuration of the retry mechanism), we expect the response time to increase by 1 second per retry attempt. To force a random error to occur, run the following command a couple of times:
time curl -H "Authorization: Bearer $ACCESS_TOKEN" -k https://localhost:8443/product-composite/1?faultPercent=25 -w "%{http_code}\n" -o /dev/null -sThe command should respond with 200, indicating that the request succeeded. A response time prefixed with real, for example, real 0m0.078s, means that the response time was 0.078 s, or 78 ms. A normal response, that is, without any retries, should report a response time of around 100 ms as follows:
Figure 13.6: Elapsed time for a request without a retry
A response after one retry should take a little over 1 second and look as follows:
Figure 13.7: Elapsed time for a request with one retry
The HTTP status code 200 indicates that the request has succeeded, even though it required one retry before succeeding!
After you have noticed a response time of 1 second, indicating that the request required one retry to succeed, run the following command to see the last two retry events:
docker-compose exec product-composite curl -s http://product-composite:8080/actuator/retryevents | jq '.retryEvents[-2], .retryEvents[-1]'You should be able to see the failed request and the next successful attempt. The creationTime timestamps are expected to differ by 1 second. Expect a response such as the following:
Figure 13.8: Retry events captured after a request with one retry
If you are really unlucky, you will get two faults in a row, and then you will get a response time of 2 seconds instead of 1. If you repeat the preceding command, you will be able to see that the numberOfAttempts field is counted for each retry attempt, which is set to 1 in this case: "numberOfAttempts": 1. If calls continue to fail, the circuit breaker will kick in and open its circuit, that is, subsequent calls will apply fail-fast logic and the fallback method will be applied!
This concludes the chapter. Feel free to experiment with the parameters in the configuration to learn the resilience mechanisms better.
Don't forget to shut down the system landscape:
docker-compose downSummary
In this chapter, we have seen Resilience4j and its circuit breaker, time limiter, and retry mechanism in action.
A circuit breaker can, using fail-fast logic and fallback methods when it is open, prevent a microservice from becoming unresponsive if the synchronous services it depends on stop responding normally. A circuit breaker can also make a microservice resilient by allowing requests when it is half-open to see whether the failing service is operating normally again, and close the circuit if so. To support a circuit breaker in handling unresponsive services, a time limiter can be used to maximize the time a circuit breaker waits before it kicks in.
A retry mechanism can retry requests that randomly fail from time to time, for example, due to temporary network problems. It is very important to only apply retry requests on idempotent services, that is, services that can handle the same request being sent two or more times.
Circuit breakers and retry mechanisms are implemented by following Spring Boot conventions: declaring dependencies and adding annotations and configuration. Resilience4j exposes information about its circuit breakers and retry mechanisms at runtime, using actuator endpoints. For circuit breakers, information regarding health, events, and metrics is available. For retries, information regarding events and metrics is available.
We have seen the usage of both endpoints for health and events in this chapter, but we will have to wait until Chapter 20, Monitoring Microservices, before we use any of the metrics.
In the next chapter, we will cover the last part of using Spring Cloud, where we will learn how to trace call chains through a set of cooperating microservices using Spring Cloud Sleuth and Zipkin. Head over to Chapter 14, Understanding Distributed Tracing, to get started!
Questions
What are the states of a circuit breaker and how are they used?
How can we handle timeout errors in the circuit breaker?
How can we apply fallback logic when a circuit breaker fails fast?
How can a retry mechanism and a circuit breaker interfere with each other?
Provide an example of a service that you can't apply a retry mechanism to