웹 애플리케이션에서 데이터 요청과 처리
일반적으로 데이터는 우리가 실습을 하는 것 처럼 하드코딩된 상태로 있는 경우는 거의 없다.
대부분의 데이터는 데이터베이스에 저장되어 있고, 클라이언트(프론트엔드)가 서버에 요청하여 가져오는 방식이다.
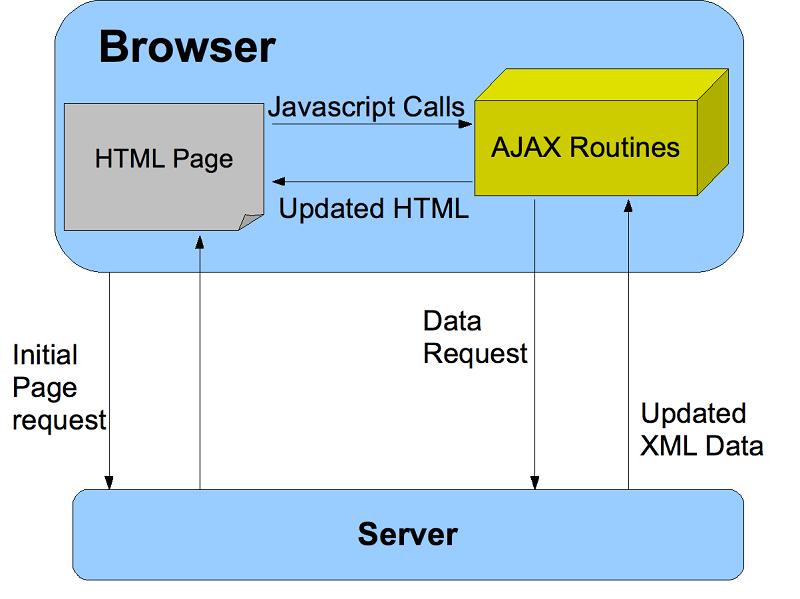
- 서버 사이드 (Backend)
클라이언트의 요청에 따라 데이터베이스에서 정보를 가져와 REST API로 응답(정보 제공자 역할) - 프론트엔드 (Frontend)
HTTP 요청을 통해 서버에 데이터를 요청하고, 응답 데이터를 받아 화면에 표시하거나 추가 처리를 수행
REST API
웹에서 데이터를 주고받기 위한 표준화된 방식
-> HTTP 요청 방식(GET,POST,PUT,DELETE),JSON 데이터 교환
데이터를 주고 받을 때, 브라우저는 비동기적으로 서버와 데이터를 주고 받는데 이 기술을 AJAX(Asynchronous JavaScript And XML)라고 한다.
서버에서 응답을 받은 데이터는 일반적으로 문자열 형태로 전달된다. 데이터가 문자열 형식이면 가독성도 떨어지고 데이터를 파악하기 어렵기 때문에 JSON 형식으로 포맷팅하는데 이것을 JSON Formatter가 담당한다.
JSON Formatter란?
JSON Formatter는 JSON 데이터를 사람이 읽기 쉽게 포맷팅(정리)해 주는 도구이다.
포맷팅되지 않은 JSON은 구조를 파악하기 어려운데 JSON Formatter는 들여쓰기, 줄 바꿈 등을 추가하여 데이터의 구조를 명확히 보여준다.
포맷팅되지 않은 JSON
{"name":"John","age":30,"address":{"city":"New York","zipcode":10001},"hobbies":["reading","gaming","coding"]}포맷팅된 JSON (JSON Formatter 사용 후)
{
    "name": "John",
    "age": 30,
    "address": {
        "city": "New York",
        "zipcode": 10001
    },
    "hobbies": [
        "reading",
        "gaming",
        "coding"
    ]
}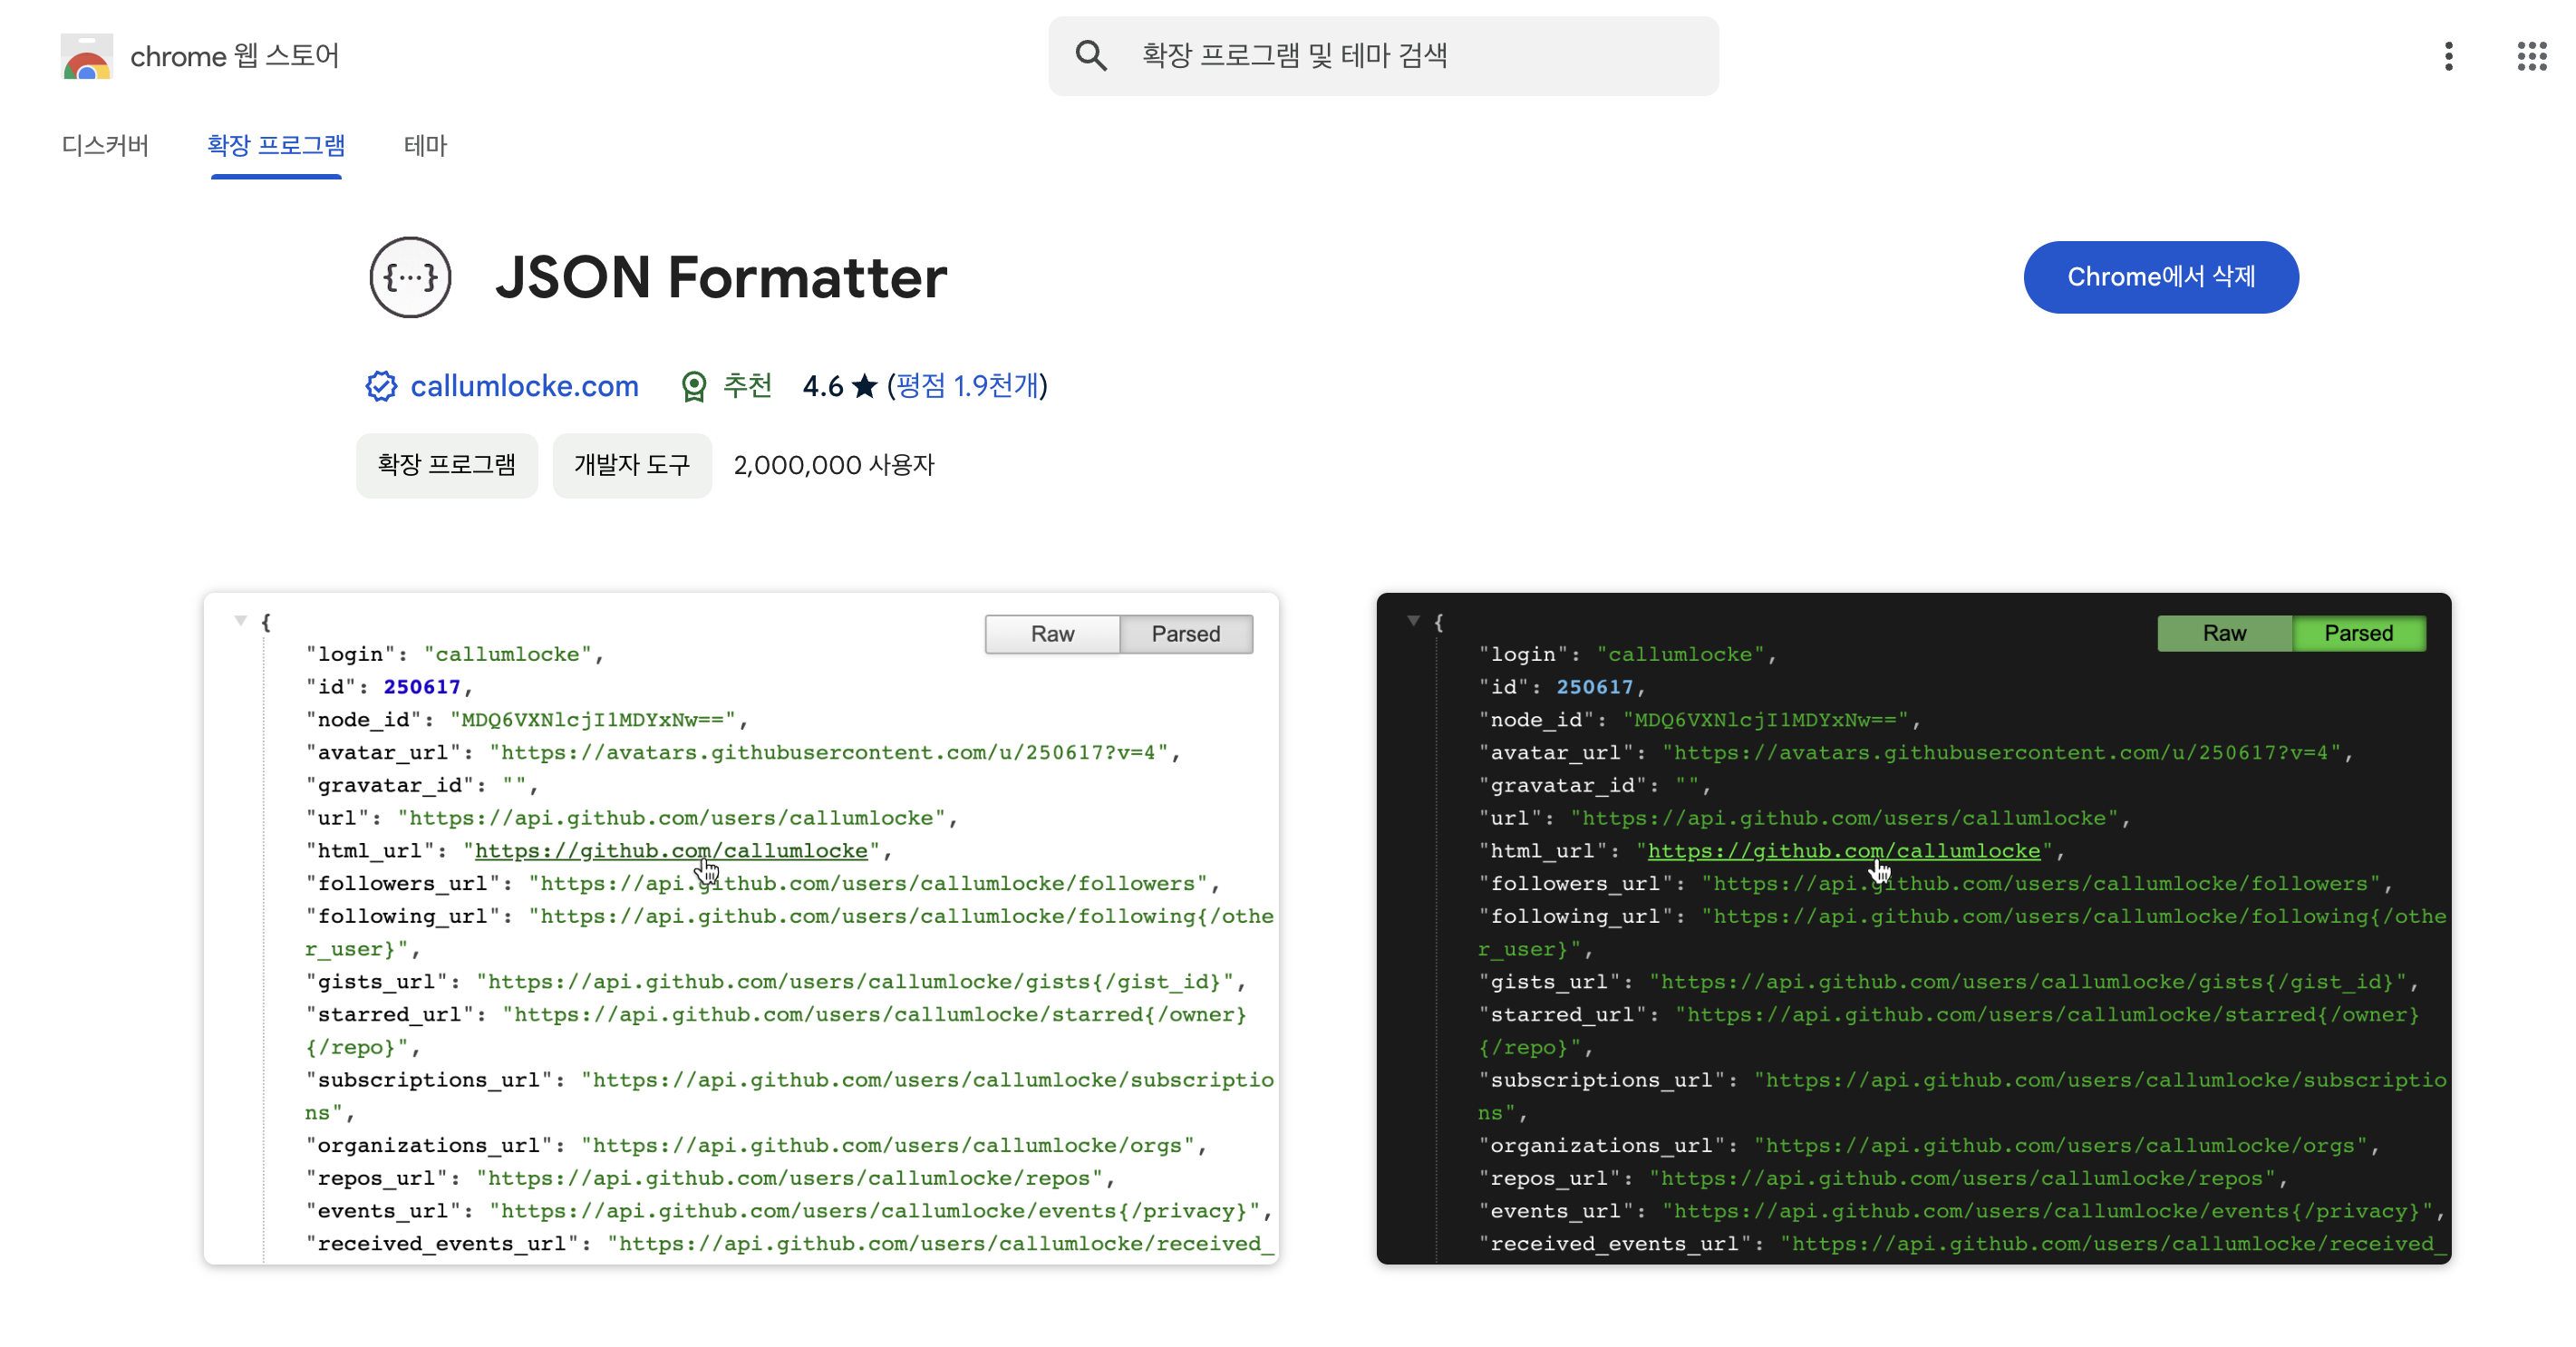
이렇게 브라우저 확장프로그램을 이용하면 JSON 데이터를 브라우저에서 바로 포맷팅하여 보여준다.
Axios란?
Axios는 Promise 기반의 HTTP 클라이언트 라이브러리로, JavaScript 환경에서 HTTP 요청(GET, POST, PUT, DELETE 등)을 간단하게 처리하고, 서버 응답을 쉽게 다룰 수 있다.
HTTP 클라이언트란?
프론트엔드에서 REST API와 통신할 때, 데이터를 쉽게 요청하고 응답을 처리하도록 도와주는 라이브러리.
대표적인 HTTP 클라이언트: Axios, Fetch API.
- 요청 데이터를 JSON으로 직렬화하거나, 응답 데이터를 JSON으로 자동 파싱
- 간단한 사용법과 강력한 기능을 제공하여 RESTful API와의 상호작용에 널리 활용
- 인터셉터 기능 -> HTTP 통신의 전후 과정에서 추가적인 작업을 수행 가능
Axios를 활용한 HTTP 요청
1) GET 요청
우선 axios 라이브러리를 설치해야하는데 CDN을 통한 설치,npm을 통한 설치 두가지 방식이 있다.
우리는 별도의 설치 없이 바로 axios를 사용할 수 있는 HTML 파일의 태그 내에 추가하는 CDN 방식으로 진행했다.
- get 요청 성공 시 then -> 콜백함수 요청
실패 시 catch -> 에러
<!DOCTYPE html>
<html lang="en">
<head>
    <meta charset="UTF-8">
    <meta name="viewport" content="width=device-width, initial-scale=1.0">
    <title>Document</title>
    <script src="https://cdn.jsdelivr.net/npm/axios/dist/axios.min.js"></script> // axios 라이브러리 추가
    <script>
        axios
        .get("https://jsonplaceholder.typicode.com/posts") // 요청을 보낼 곳
        .then(res => {
            console.log(res.data); 						  // 전체 데이터(응답 데이터를 JSON으로 자동 파싱)
            // title만 콘솔에 출력
            console.log("---------------------");
            res.data.forEach(d => console.log(d.title));
            console.log("---------------------");
            res.data.map(d => console.log(d.title));
        })
        .catch(err => {
            console.log(err);
        });
    </script>
</head>
<body>
2) POST 요청
- 요청 본문을 통해서 서버로 정보(요청 파라미터)를 전달
- 요청 본문은 객체 형태로 정의하면 axios가 자동으로 직렬화함
<!DOCTYPE html>
<html lang="en">
<head>
    <meta charset="UTF-8">
    <meta name="viewport" content="width=device-width, initial-scale=1.0">
    <title>Document</title>
    <script src="https://cdn.jsdelivr.net/npm/axios/dist/axios.min.js"></script>
    <script>
        axios
        .post("https://jsonplaceholder.typicode.com/posts", {
            title: "axios post test",                 // 요청 본문
            body: "axios is fun!!!",
            userName: "홍길동"
        })
        .then(res => {
            console.log(res.data);
        })
        .catch(err => {
            console.log(err);
        });
    </script>
</head>
<body>

</body>
</html>
Axios 인터셉터
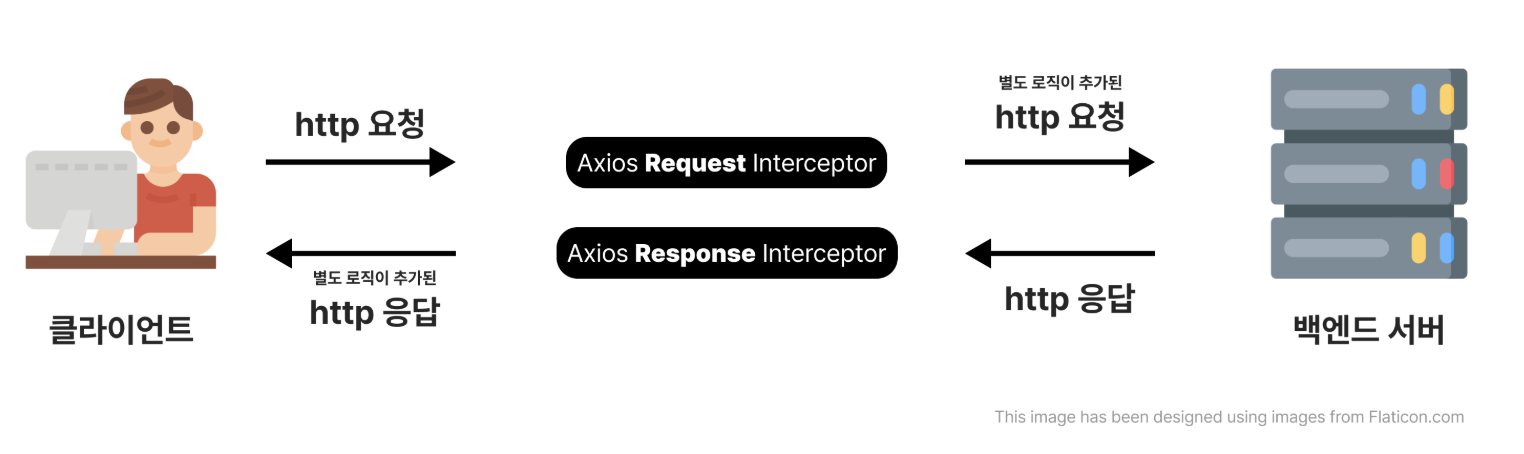
요청 인터셉터(Request Interceptor)
실질적으로 요청이 일어나기 전에 먼저 실행되는 것으로 주로 모든 요소에 공통으로 적용되는 것을 적용하기 위해 사용한다.
예를 들어 Authorization 헤더는 클라이언트가 API 요청 시 자신의 권한을 증명하기 위해 사용한다.
서버는 Authorization 헤더를 확인하여 요청의 적합성을 판단한다. 헤더 내 Bearer 토근과 같은 인증 방식을 활용해서 요청을 인증하는데, 반복적인 Authorization 헤더 설정 작업은 Axios 인터셉터로 자동화 가능하다.
<!DOCTYPE html>
<html lang="en">
<head>
    <meta charset="UTF-8">
    <meta name="viewport" content="width=device-width, initial-scale=1.0">
    <title>Document</title>
    <script src="https://cdn.jsdelivr.net/npm/axios/dist/axios.min.js"></script>
    <script>
        axios.interceptors.request.use(config => {
            config.headers.Authorization = `Bearer MY_ACCESS_TOKEN`;
            return config;
        }, error => {
            return Promise.reject(error);
        });

        axios
        .post("https://jsonplaceholder.typicode.com/posts", {
            title: "axios post test",
            body: "axios is fun!!!",
            userName: "홍길동"
        })
        .then(res => {
            console.log(res.data);
        })
        .catch(err => {
            console.log(err);
        });
    </script>
</head>
<body>

</body>
</html>
응답 인터셉터 (Response Interceptor)
응답 인터셉터는 서버로부터 응답을 받은 후, .then이나 .catch로 처리되기 전에 실행된다.
주로 응답 데이터를 표준화하거나 필요한 부분만 추출하여 반환할 때,
응답에서 발생하는 오류를 중앙에서 관리하거나, 특정 상태 코드에 따른 공통 처리를 수행할 때 사용 한다.
<!DOCTYPE html>
<html lang="en">
<head>
    <meta charset="UTF-8">
    <meta name="viewport" content="width=device-width, initial-scale=1.0">
    <title>Document</title>
    <script src="https://cdn.jsdelivr.net/npm/axios/dist/axios.min.js"></script>
    <script>
        axios.interceptors.request.use(config => {
            config.headers.Authorization = `Bearer MY_ACCESS_TOKEN`;
            return config;
        }, error => {
            return Promise.reject(error);
        });


        axios.interceptors.response.use(response => {
            console.log('Interceptor response data', response.data);
            return Promise.resolve(response);
        }, error => {
            return Promise.reject(error);
        });


        axios
        .post("https://jsonplaceholder.typicode.com/posts", {
            title: "axios post test",
            body: "axios is fun!!!",
            userName: "홍길동"
        })
        .then(res => {
            console.log(res.data);
        })
        .catch(err => {
            console.log(err);
        });


        axios
        .get("https://jsonplaceholder.typicode.com/posts")
        .then(res => {
            console.log(res.data);
        })
        .catch(err => {
            console.log(err);
        });
    </script>
</head>
<body>

</body>
</html>
글 잘봤습니다
정리하실 때 내용을 깊게 공부하시는거 같아요
그런데 혹시 마크다운 코드 첨부 하는 공간에서 언어를 지정해보시는건 어떠신가요
ex)
```html
(html 코드)
```