
오전문제
어제 풀었던 자바의 정석 문제
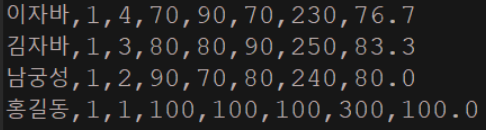
- 실행결과가 다음과 같이 나오도록 코드를 구현하시오.
package com.test.memo;

import java.util.ArrayList;
import java.util.Collections;
import java.util.Comparator;
import java.util.Iterator;

class Student {
    String name;
    int ban;
    int no;
    int kor;
    int eng;
    int math;

    Student(String name, int ban, int no, int kor, int eng, int math) {
        this.name = name;
        this.ban = ban;
        this.no = no;
        this.kor = kor;
        this.eng = eng;
        this.math = math;
    }

    int getTotal() {
        return kor + eng + math;
    }

    float getAverage() {
        return (int) ((getTotal() / 3f) * 10 + 0.5) / 10f;
        // 10 곱하고 0.5더해서 반올림 수행 다시 10으로 나눠서 소수점 첫째 자리까지 값 얻음
    }

    @Override
    public String toString() {
        return name + "," + ban + "," + no + "," + kor + "," + eng + "," + math + "," + getTotal() + "," + getAverage();
    }

    int getBan() {
        return ban;
    }

    int getNo() {
        return no;
    }
}

class Organize {
    public static void main(String[] args) {
        ArrayList<Student> list = new ArrayList<>();
        list.add(new Student("이자바", 1, 4, 70, 90, 70));
        list.add(new Student("남궁성", 1, 2, 90, 70, 80));
        list.add(new Student("김자바", 1, 3, 80, 80, 90));
        list.add(new Student("홍길동", 1, 1, 100, 100, 100));

        Collections.sort(list, new Comparator<Student>() {

            @Override
            public int compare(Student o1, Student o2) {
                if (o1.getBan() == o2.getBan()) {
                    return o2.getNo() - o1.getNo();
                } else {
                    return o1.getBan() - o2.getBan();
                }
            }
        });

        Iterator<Student> it = list.iterator();
        while (it.hasNext()) {
            System.out.println(it.next());
        }
    }
}- 실행 결과가 다음과 같이 나올 수 있도록 코딩하시오.
package com.test.memo;

import java.util.ArrayList;
import java.util.Collections;
import java.util.Comparator;
import java.util.Iterator;
import java.util.List;

class Student implements Comparable<Student> {
    String name;
    int ban;
    int no;
    int kor;
    int eng;
    int math;
    int schoolRank;
    int classRank;

    Student(String name, int ban, int no, int kor, int eng, int math) {
        this.name = name;
        this.ban = ban;
        this.no = no;
        this.kor = kor;
        this.eng = eng;
        this.math = math;
    }

    int getTotal() {
        return kor + eng + math;
    }

    float getAverage() {
        return (int) ((getTotal() / 3f) * 10 + 0.5) / 10f;
        // 10 곱하고 0.5더해서 반올림 수행 다시 10으로 나눠서 소수점 첫째 자리까지 값 얻음
    }

    @Override
    public String toString() {
        return name + "," + ban + "," + no + "," + kor + "," + eng + "," + math + "," + getTotal() + "," + getAverage()
                + "," + schoolRank + "," + classRank;
    }

    int getBan() {
        return ban;
    }

    int getNo() {
        return no;
    }

    @Override
    public int compareTo(Student o) {
        return o.getTotal() - getTotal();
    }

}

class ClassTotalComparator implements Comparator<Student> {

    @Override
    public int compare(Student o1, Student o2) {
        // 먼저 반을 기준으로 비교
        int banComparison = Integer.compare(o1.ban, o2.ban);
        if (banComparison != 0) {
            return banComparison;
        }
        // 반이 같으면 총점을 기준으로 비교
        return Integer.compare(o2.getTotal(), o1.getTotal());
    }
}

class Organize {

    static void calculateSchoolRank(List<Student> list) {
        Collections.sort(list, new ClassTotalComparator());

        int prevRank = -1; // 이전 전교등수
        int prevTotal = -1; // 이전 총점
        int rank = 1;
        for (Student stu : list) {
            // if(stu.ban != 1)
            if (stu.getTotal() == prevTotal)
                stu.schoolRank = prevRank;
            else
                stu.schoolRank = rank;
            rank++;
            prevRank = stu.schoolRank;
            prevTotal = stu.getTotal();
        }
    }

    static void calculateClassRank(List<Student> list) {

        Collections.sort(list);
        int prevBan = -1;
        int prevRank = -1;
        int prevTotal = -1;
        int length = list.size();

        for (int i = 0, n = 0; i < length; i++, n++) {
            Student s = list.get(i);// 학생 객체를 가져온다.

            if (s.ban != prevBan) {
                prevRank = -1;
                prevTotal = -1;
                n = 0;
            }
            if (s.getTotal() == prevTotal) {
                s.classRank = prevRank;
            } else
                s.classRank = n + 1;

            prevBan = s.ban;
            prevRank = s.classRank;
            prevTotal = s.getTotal();

        }
    }

    public static void main(String[] args) {
        ArrayList<Student> list = new ArrayList<Student>();
        list.add(new Student("이자바", 2, 1, 70, 90, 70));
        // 이름, 반, 번호, 국어, 영어, 수학
        list.add(new Student("안자바", 2, 2, 60, 100, 80));
        list.add(new Student("홍길동", 1, 3, 100, 100, 100));
        list.add(new Student("남궁성", 1, 1, 90, 70, 80));
        list.add(new Student("김자바", 1, 2, 80, 80, 90));
        calculateSchoolRank(list);
        calculateClassRank(list);
        Iterator<Student> it = list.iterator();
        while (it.hasNext())
            System.out.println(it.next());
    }
}
-
calculateClassRank메소드에서 for문에 i로 반등수를 정하려했는데, 그러다보니 0으로 초기화할수 없어서 반 상관없이 등수가 나뉘어졌다. n을 추가해 반이다르면 0으로 초기화해서 등수를 정해준다.
- i로 초기화해서하니까 무한루프에 빠진다.
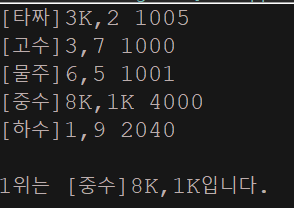
- 각 Player들의 점수를 계산하고, 점수가 제일 높은 사람을 출력하는 코드이다. TreeMap의 정렬기준을 점수가 제일 높은 사람 부터 내림차순이 되도록 아래의 메인 메소드를 참고하여 나머지 코드들을 완성하시오. 단, 동점자 처리는 하지 않는다.
[실행결과][타짜] 7,2 1009
[고수] 2,5 1007
[물주] 1,7 1008
[중수] 10,4 2020
[하수] 9,6 1005
1위는 [중수] 10, 4입니다.
package com.test.memo;

import java.util.Comparator;
import java.util.HashMap;
import java.util.TreeMap;

class Player{
    String name;
    SutdaCard c1;
    SutdaCard c2;

    int point; //카드의 등급에 따른 점수

    Player(String name, SutdaCard c1, SutdaCard c2) {
        this.name = name;
        this.c1 = c1;
        this.c2 = c2;
    }

    @Override
    public String toString() {
        return "[" + name + "]" + c1.toString() + "," + c2.toString();
    }
}
class SutdaCard{
    int num;
    boolean isKwang;

    SutdaCard() {
        this(1, true);
    }
    SutdaCard(int num, boolean isKwang) {
        this.num = num;
        this.isKwang = isKwang;
    }
    @Override
    public String toString() {
        return num + (isKwang ? "K" : "");
    }
}
class SutdaDeck{
    SutdaCard[] cards = new SutdaCard[20];
    int pos = 0; //다음에 가져올 카드 위치

    HashMap<String, Integer> jokbo = new HashMap<>();

    SutdaDeck() {
        for(int i = 0; i < cards.length; i++) {
            int num = i % 10 + 1;
            boolean isKwang = i < 10 && (num == 1 || num == 3 || num == 8);
            cards[i] = new SutdaCard(num, isKwang);
        }
        registerJokbo();
    }
    void registerJokbo() {
        jokbo.put("KK", 4000);
        jokbo.put("1010",3100); jokbo.put("12", 2060);
        jokbo.put("99", 3090); jokbo.put("21", 2060);
        jokbo.put("88", 3080); jokbo.put("14", 2050);
        jokbo.put("77", 3070); jokbo.put("41", 2050);
        jokbo.put("66", 3060); jokbo.put("19", 2040);
        jokbo.put("55", 3050); jokbo.put("91", 2040);
        jokbo.put("44", 3040); jokbo.put("110", 2030);
        jokbo.put("33", 3030); jokbo.put("101", 2030);
        jokbo.put("22", 3020); jokbo.put("104", 2020);
        jokbo.put("11", 3010); jokbo.put("410", 2020);
        jokbo.put("46", 2010);
        jokbo.put("64", 2010);
    }
    void shuffle() {
        for(int i = 0; i < cards.length; i++) {
            int j = (int)(Math.random()* cards.length);
            SutdaCard tmp = cards[i];
            cards[i] = cards[j];
            cards[j] = tmp;
        }
    }
    int getPoint(Player p) {
        if(p == null) return 0;
        SutdaCard c1 = p.c1;
        SutdaCard c2 = p.c2;
        Integer result = 0;
        if(c1.isKwang && c2.isKwang) {
            result = jokbo.get("KK");
        }else {
            result = jokbo.get("" + c1.num + c2.num);
            if(result == null) {
                result = (c1.num + c2.num) % 10 + 1000;
            }
        }
        p.point = result.intValue();//객체를 정수형으로 저장(int)
        return result.intValue();
    }
    SutdaCard pick() throws Exception {
        SutdaCard c = null;
        if(0 <= pos && pos < cards.length) {
            c = cards[pos];
            cards[pos++] = null;
        }else {
            throw new Exception("남아있는 카드가 없습니다.");
        }
        return c;
    }

}
public class Organize {

    public static void main(String[] args) throws Exception {
        SutdaDeck deck = new SutdaDeck();
        deck.shuffle();
        Player[] pArr = {
                new Player("타짜", deck.pick(), deck.pick()),
                new Player("고수", deck.pick(), deck.pick()),
                new Player("물주", deck.pick(), deck.pick()),
                new Player("중수", deck.pick(), deck.pick()),
                new Player("하수", deck.pick(), deck.pick()) };

        TreeMap<Player, Integer> rank = new TreeMap<>(new Comparator<Player>() {

            @Override
            public int compare(Player o1, Player o2) {
                return o2.point - o1.point;
            }
        });
        for(int i = 0; i < pArr.length; i++) {
            Player p = pArr[i];
            rank.put(p, deck.getPoint(p));
            System.out.println(p + " " + deck.getPoint(p));
        }
        System.out.println();
        System.out.println("1위는 " + rank.firstKey() + "입니다.");
    }
}
람다 문제
아래 코드를 모두 람다식으로 바꾸시오
-
interface MyFunction{
    int max(int a, int b);
}

public class LambdaTest {

    public static void main(String[] args) {
        MyFunction f = new MyFunction() {
            public int max(int a, int b) {
                return a > b ? a : b;
            }
        };
        int big = f.max(5, 3);    // 익명 객체의 메소드 호출
        System.out.println(big);
    }
}
-
package com.test.memo;

interface MyFunction {
    int max(int a, int b);
}

public class Practice1 {
    public static void main(String[] args) throws Exception {
        MyFunction f = (a, b) -> a > b ? a : b;

        int big = f.max(5, 3); // 익명 객체의 메소드 호출
        System.out.println(big);
    }
}
-
interface MyFunction2{
    void printVar(String name, int i);
}

public class LambdaTest2 {

    public static void main(String[] args) {
        MyFunction2 f = new MyFunction2() {
            public void printVar(String name, int i) {
                System.out.println(name + "=" + i);
            }
        };
        f.printVar("Hong", 100);    // 익명 객체의 메소드 호출
    }
}
-
package com.test.memo;

interface MyFunction2 {
    void printVar(String name, int i);
}

public class Practice1 {
    public static void main(String[] args) throws Exception {
        MyFunction2 f = (name, i) -> System.out.println(name + "=" + i);

        f.printVar("Hong", 100); // 익명 객체의 메소드 호출
    }
}
-
interface MyFunction3{
    int square(int x);
}

public class LambdaTest3 {

    public static void main(String[] args) {
        MyFunction3 f = new MyFunction3() {
            public int square(int x) {
                return x * x;
            }
        };
        int num = f.square(5);    // 익명 객체의 메소드 호출
        System.out.println(num);
    }
}
-
package com.test.memo;

interface MyFunction3 {
    int square(int x);
}

public class Practice1 {
    public static void main(String[] args) throws Exception {
        MyFunction3 f = x -> x * x;

        int num = f.square(5); // 익명 객체의 메소드 호출
        System.out.println(num);
    }
}
-
interface MyFunction4{
    int roll();
}

public class LambdaTest4 {

    public static void main(String[] args) {
        MyFunction4 f = new MyFunction4() {
            public int roll() {
                return (int) (Math.random() * 6);
            }
        };
        int num = f.roll();    // 익명 객체의 메소드 호출
        System.out.println(num);
    }
}
-
package com.test.memo;

interface MyFunction4 {
    int roll();
}

public class Practice1 {
    public static void main(String[] args) throws Exception {
        MyFunction4 f = () -> (int) (Math.random() * 6);

        int num = f.roll(); // 익명 객체의 메소드 호출
        System.out.println(num);
    }
}
-
interface MyFunction5{
    int sumArr(int[] arr);
}

public class LambdaTest5 {

    public static void main(String[] args) {
        MyFunction5 f = new MyFunction5() {
            public int sumArr(int[] arr) {
                int sum = 0;
                for(int i : arr)
                    sum += i;
                return sum;
            }
        };
        int num = f.sumArr(new int[] {1,2,3,4,5});    // 익명 객체의 메소드 호출
        System.out.println(num);
    }
}
-
package com.test.memo;

interface MyFunction5 {
    int sumArr(int[] arr);
}

public class Practice1 {
    public static void main(String[] args) throws Exception {
        MyFunction5 f = arr -> {
            int sum = 0;
            for (int i : arr)
                sum += i;
            return sum;
        };
        int num = f.sumArr(new int[] { 1, 2, 3, 4, 5 }); // 익명 객체의 메소드 호출
        System.out.println(num);
    }
}
한 문장 이상이면 중괄호 사용 > 마지막 세미콜론까지
-
import java.util.Arrays;
import java.util.Collections;
import java.util.Comparator;
import java.util.List;

public class LambdaTest6 {

    public static void main(String[] args) {
        List<String> list = Arrays.asList("abc", "aaa", "bbb", "ccc");
        Collections.sort(list, new Comparator<String>() {
            public int compare(String s1, String s2) {
                return s2.compareTo(s1);
            }
        });
        System.out.println(list);
    }
}
-
package com.test.memo;

import java.util.Arrays;
import java.util.Collections;
import java.util.List;

public class Practice1 {
    public static void main(String[] args) throws Exception {
        List<String> list = Arrays.asList("abc", "aaa", "bbb", "ccc");
        Collections.sort(list, (s1, s2) -> s2.compareTo(s1));
        System.out.println(list);
    }
}
nested클래스와 람다
- 익명클래스로 바꿔보시오.
interface Printable {
void print(String s);
}
class Printer implements Printable {
public void print(String s) {
System.out.println(s);
}
}
class Lambda1 {
public static void main(String[] args) {
Printable prn = new Printer();
prn.print("What is Lambda?");
}
}
/
What is Lambda?
/
package com.test.memo;

interface Printable {
    void print(String s);
}

public class Practice1 {
    public static void main(String[] args) throws Exception {
        Printable prn = new Printable() {

            public void print(String s) {
                System.out.println(s);
            }
        };
        prn.print("What is Lambda?");
    }
}- 위 예제를 람다식으로 바꿔 보시오.
package com.test.memo;

interface Printable {
    void print(String s);
}

public class Practice2 {
    public static void main(String[] args) throws Exception {
        Printable prn = s -> System.out.println(s);
        prn.print("What is Lambda?");
    }
}- 익명 클래스로 바꿔 보시오.
import java.util.List;
import java.util.ArrayList;
import java.util.Comparator;
import java.util.Collections;
class StrComp implements Comparator {
@Override
public int compare(String s1, String s2) {
return s1.length() - s2.length();
}
}
class SortComparator {
public static void main(String[] args) {
List list = new ArrayList<>();
list.add("ROBOT");
list.add("APPLE");
list.add("BOX");
Collections.sort(list, new StrComp()); // 정렬
System.out.println(list);
}
}
/
[BOX, ROBOT, APPLE]
/
package com.test.memo;

import java.util.ArrayList;
import java.util.Collections;
import java.util.Comparator;
import java.util.List;

public class Practice1 {
    public static void main(String[] args) throws Exception {
        List<String> list = new ArrayList<>();
        list.add("ROBOT");
        list.add("APPLE");
        list.add("BOX");

        Collections.sort(list, new Comparator<String>() {

            @Override
            public int compare(String o1, String o2) {
                return o1.length() - o2.length();
            }

        }); // 정렬
        System.out.println(list);
    }
}- 익명클래스로 바꿔보시오.
interface Printable {
void print();
}
class Papers {
private String con;
public Papers(String s) { con = s; }
public Printable getPrinter() {
class Printer implements Printable {
public void print() { System.out.println(con); }
}
return new Printer();
}
}
class UseLocalInner {
public static void main(String[] args) {
Papers p = new Papers("서류 내용: 행복합니다.");
Printable prn = p.getPrinter();
prn.print();
}
}
/
서류 내용: 행복합니다.
/
/
이렇듯 메소드 내에 클래스를 정의하면 해당 메소드 내에서만
인스턴스 생성이 가능하다. (따라서 클래스에 대한 private 선언은
의미가 없다. 어차피 메소드 내에서만 인스턴스 생성이 가능하므로)
즉 멤버 클래스보다도 클래스를 더 깊이, 특정 블록 안으로 감추는
효과가 있다.
/
package com.test.memo;

interface Printable {
    void print();
}

class Papers {
    private String con;

    public Papers(String s) {
        con = s;
    }

    public Printable getPrinter() {
        return new Printable() {

            @Override
            public void print() {
                System.out.println(con);
            }
        };
    }
}

public class Practice1 {
    public static void main(String[] args) throws Exception {
        Papers p = new Papers("서류 내용: 행복합니다.");
        Printable prn = p.getPrinter();
        prn.print();
    }
}-
출력 결과가 다음과 같이 나오도록 ShowString에 적절한 인자를 전달하시오.
What is Lambda?
interface Printable {
void print(String s);
}
class Lambda4 {public static void ShowString(Printable p, String s) {
p.print(s);
}
public static void main(String[] args) {ShowString(/ 코드 완성 /);
}
}
interface Printable {
    void print(String s);
  }

class Lambda4 {
     public static void ShowString(Printable p, String s) {
         p.print(s);
     }

    public static void main(String[] args) {
         ShowString((String message) -> System.out.println(message), "What is Lambda?");
     }   }
파일 입출력 문제3
class MyInfo
{
String info;
public MyInfo(String info) { this.info = info; }
public String toString() { return info; }
}
class PrintlnPrintf
{
public static void main(String[] args)
{
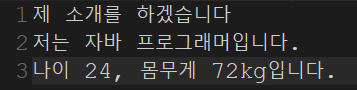
MyInfo mInfo = new MyInfo("저는 자바 프로그래머입니다.");
System.out.println("제 소개를 하겠습니다.");
System.out.println(mInfo);
System.out.printf("나이 %d, 몸무게 %dkg입니다.", 24, 72);
}
}
- 위 예제에서 보이는 출력결과가 파일 println.txt에 문자열의 형태로 저장되도록 예제를 변경해 보자. 그리고 문자열의 형태로 저장이 되었다면, 메모장(notepad)을 통해서 확인이 가능하니 반드시 확인하기
package com.test.memo;

import java.io.FileNotFoundException;
import java.io.FileOutputStream;
import java.io.IOException;
import java.io.OutputStream;
import java.io.PrintStream;

class MyInfo {
    String info;

    public MyInfo(String info) {
        this.info = info;
    }

    public String toString() {
        return info;
    }
}

public class Practice1 {
    public static void main(String[] args) throws Exception {
        MyInfo mInfo = new MyInfo("저는 자바 프로그래머입니다.");
        String fileName = "println.txt";

        try (OutputStream o = new FileOutputStream("println.txt");
            PrintStream out = new PrintStream(o)
            out.println("제 소개를 하겠습니다");
            out.println(mInfo);
            out.printf("나이 %d, 몸무게 %dkg입니다.", 24, 72);

        } catch (FileNotFoundException e) {
            e.printStackTrace();

        } catch (IOException e) {
            e.printStackTrace();
        }
//        try (PrintWriter writer = new PrintWriter(new BufferedWriter(new FileWriter(fileName)))) {
//            System.out.println("제 소개를 하겠습니다.");
//            System.out.println(mInfo);
//            System.out.printf("나이 %d, 몸무게 %dkg입니다.", 24, 72);
//
//        } catch (IOException e) {
//            e.printStackTrace();
//        }
//        System.out.println("파일에 출력이 완료되었습니다.");
    }
}
주석처리는 현재 화면에 출력되고 println.txt로 복사는 안됌
-
FileOutputStream: 파일에 바이트 데이터를 쓰기 위한 FileOutputStream을 생성합니다. -
try-with-resources: 자바 7부터 도입된 기능으로, 괄호 안에 선언된 리소스(여기서는 FileOutputStream)를 사용한 후 자동으로 닫히도록 합니다. 이렇게 함으로써 명시적으로 close() 메서드를 호출하지 않아도 됩니다.
ctrl + , > 오류난 문장으로 이동 (아래로)
ctrl + . > 오류난 문장으로 이동 (위로)
ctrl + shift + a > 원하는 범위 수정 가능
println.txt에 이렇게 복사된것을 볼 수 있다.
두번째 방법
package com.test.memo;

import java.io.FileNotFoundException;
import java.io.FileOutputStream;
import java.io.IOException;
import java.io.PrintStream;

class MyInfo {
    String info;

    public MyInfo(String info) {
        this.info = info;
    }

    public String toString() {
        return info;
    }
}

public class Organize {

    public static void main(String[] args) {
        MyInfo mInfo = new MyInfo("저는 자바 프로그래머입니다.");
        try (PrintStream out = new PrintStream(new FileOutputStream("println.txt"))) {
            out.println("제 소개를 하겠습니다.");
            out.println(mInfo);
            out.printf("나이 %d, 몸무게 %dkg입니다.", 24, 72);

        } catch (FileNotFoundException e) {
            e.printStackTrace();
        } catch (IOException e) {
            e.printStackTrace();
        }
    }
}-
FileOutputStream: "println.txt" 파일에 데이터를 쓰기 위한 FileOutputStream을 생성합니다. -
try-with-resources: 자바 7부터 도입된 기능으로, 괄호 안에 선언된 리소스(여기서는 FileOutputStream과 PrintStream)를 사용한 후 자동으로 닫히도록 합니다. 이렇게 함으로써 명시적으로 close() 메서드를 호출하지 않아도 됩니다. -
PrintStream: 생성된 FileOutputStream을 래핑하여 파일에 출력할 수 있도록 합니다. 여기서는 PrintStream을 사용하여 데이터를 파일에 출력합니다.
파일 입출력 문제 4
- 자바는 ( )를 기반으로 문자를 표현한다. 이렇듯 정해진 규칙을 기준으로 문자를 수(number)의 형태로 표현하는 것을 가리켜 '인코딩(encoding)'이라 한다. 예를 들어서 다음의 문장도 일종의 인코딩이다. 문자 A와 문자 B를 2바이트 유니코드 값으로 변환해서(인코딩 해서), 각각ch1과 ch2에 저장하기 때문이다.
char ch1='A';
char ch2='B';
- 유니코드
Windows는 문자의 종류에 따라서 다음과 같이 인코딩 한다.
- 영문과 특수문자 1바이트 데이터로 인코딩
- 한글 2바이트 데이터로 인코딩
public static void main(String[] args) throws IOException
{
    OutputStream out = new FileOutputStream("hyper.txt");
    out.write(65);
    out.write(66);
    out.close();
}- 파일의 출력 스트림에 정수 65와 66을 저장하고 있다. OutputStream의 write메소드는 1바이트로 표현이 가능한 숫자다.
-
[문자 스트림이 별도로 존재하는 이유]
- 운영체제의 기본 인코딩 방식으로의 인코딩을 자동화하기 위해서!
-
문자 입력 스트림과 문자 출력 스트림의 최상위 클래스는?
- Reader, Writer
-
문자 단위 파일 입력 스트림과 출력 스트림은 각각 다음과 같다.
- FileReader, FileWriter
-
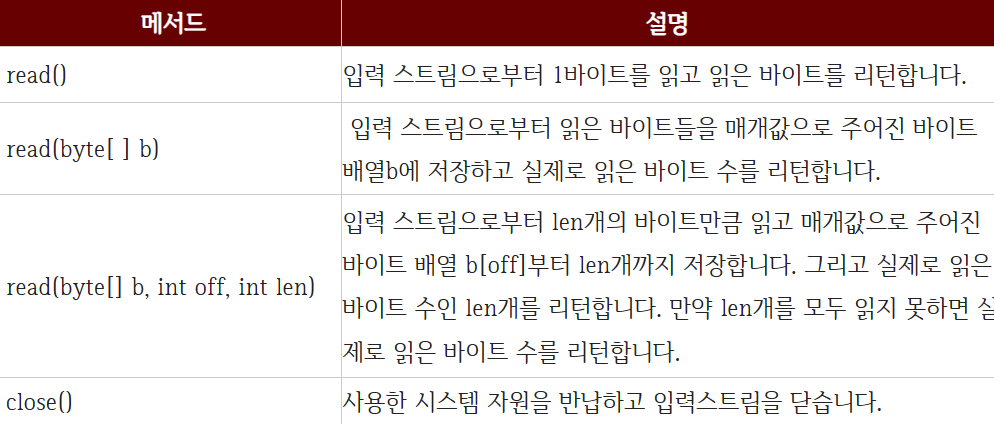
Reader의 대표적인 메소드는?
-
public int read() throws IOException- 파일로부터 읽어들인 문자 하나를 반환한다.
-
public abstract int read(char[] cbuf, int off, int len) throws IOException- len의 개수만큼 문자를 통해 읽어 들여서, cbuf로 전달된 배열의 인덱스 위치 off에서부터 문자를 저장한다. 그리고 읽어들인 문자의 수를 반환한다. 더 이상 읽어 들일 문자가 존재하지 않다면 두 메소드 모두 -1을 반환한다.
-
-
Writer의 대표적인 메소드는?
-
public void write(int c) throws IOException- 파일에 하나의 문자를 저장한다.
-
public abstract void write (char[] cbuf, int off, int len) throws IOException-
문자가 2바이트로 표현되므로, 인자로 전달된 4바이트 데이터 중에서(매개변수 형이 int이므로) 상위 2바이트는 무시된다.
-
cbuf로 전달된 배열의 인덱스 위치 off에서부터 len개의 문자를(최대 len개가 아닌, 그냥 len개이다) 파일에 저장한다.
-
-
- hyper.txt라는 파일에 문자 'A'와 문자 'B'를 저장하자.
문자 스트림으로
import java.io.*;

class FileWriterStream
{
    public static void main(String[] args) throws IOException
    {
        char ch1='A';
        char ch2='B';

        Writer out=new FileWriter("hyper.txt");
        out.write(ch1);
        out.write(ch2);
        out.close();
    }
}
바이트 스트림으로
import java.io.FileOutputStream;
import java.io.IOException;
import java.io.OutputStream;

public class JavaIO24 {
    public static void main(String[] args) throws IOException
    {
        OutputStream out = new FileOutputStream("hyper.txt");
        out.write('A');
        out.write('B');
        out.close();
    }
}
위 hyper.txt파일을 읽어들여서 모니터에 출력
import java.io.*;

class FileReaderStream
{
    public static void main(String[] args) throws IOException
    {
        char[] cbuf=new char[10];
        int readCnt;

        Reader in=new FileReader("hyper.txt");
        readCnt=in.read(cbuf, 0, cbuf.length);
        for(int i=0; i<readCnt; i++)
            System.out.println(cbuf[i]);

        in.close();
    }
}-
문자 스트림의 입출력 버퍼 필터 스트림은?
- BufferedReader, BufferedWriter
-
버퍼 필터 스트림의 문자열 입출력 기능을 담당하는 클래스와 메소드는?
-
문자열의 입력
-
BufferedReader 클래스의 메소드
-
public String readLine() throws IOException
-
-
문자열의 출력
-
Writer 클래스의 메소드
-
public void write(String str) throws IOException
-
-
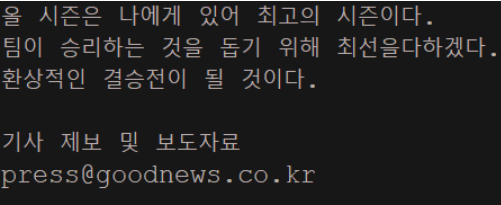
- String.txt에 다가 다음 내용을 출력하시오.
박지성 - 메시 멈추게 하는데 집중하겠다.
올 시즌은 나에게 있어 최고의 시즌이다.
팀이 승리하는 것을 돕기 위해 최선을다하겠다.
환상적인 결승전이 될 것이다.
기사 제보 및 보도자료
press@goodnews.co.kr
package com.test.memo;

import java.io.BufferedWriter;
import java.io.FileNotFoundException;
import java.io.FileWriter;
import java.io.IOException;

public class Organize {

    public static void main(String[] args) {
        try (BufferedWriter out = new BufferedWriter(new FileWriter("String.txt"))) {
            out.write("박지성 - 메시 멈추게 하는데 집중하겠다.");
            out.newLine();
            out.write("올 시즌은 나에게 있어 최고의 시즌이다.");
            out.newLine();
            out.write("팀이 승리하는 것을 돕기 위해 최선을다하겠다.");
            out.newLine();
            out.write("환상적인 결승전이 될 것이다.");
            out.newLine();
            out.newLine();
            out.write("기사 제보 및 보도자료");
            out.newLine();
            out.write("press@goodnews.co.kr");

        //} catch (FileNotFoundException e) { 파일을 생성해서 입력하는 거기때문에 필요 x
            //e.printStackTrace();
        } catch (IOException e) {
            e.printStackTrace();
        }

    }
}
위 파일을 읽어들여서 모니터에 출력
package com.test.memo;

import java.io.BufferedReader;
import java.io.BufferedWriter;
import java.io.FileNotFoundException;
import java.io.FileReader;
import java.io.FileWriter;
import java.io.IOException;

public class Organize {

    public static void main(String[] args) {
        try (BufferedWriter out = new BufferedWriter(new FileWriter("String.txt"))) {
            out.write("박지성 - 메시 멈추게 하는데 집중하겠다.");
            out.newLine();
            out.write("올 시즌은 나에게 있어 최고의 시즌이다.");
            out.newLine();
            out.write("팀이 승리하는 것을 돕기 위해 최선을다하겠다.");
            out.newLine();
            out.write("환상적인 결승전이 될 것이다.");
            out.newLine();
            out.newLine();
            out.write("기사 제보 및 보도자료");
            out.newLine();
            out.write("press@goodnews.co.kr");

        } catch (FileNotFoundException e) {
            e.printStackTrace();
        } catch (IOException e) {
            e.printStackTrace();
        }

        try (BufferedReader in = new BufferedReader(new FileReader("String.txt"))) {

            String str = null;
            while ((str = in.readLine()) != null) { // 더 이상 읽을 문장이 없으면 null을 반환
                System.out.println(str);

            }
        } catch (FileNotFoundException e) {
            e.printStackTrace();
        } catch (IOException e) {
            e.printStackTrace();
        }

    }
}
-
문자 필터 스트림 (PrintWriter)이 제공하는 기능
-
다양한 형태의 데이터를 문자열의 형태로 출력하거나(println), 문자열의 형태로 조합하여 출력한다(printf)
-
PrintStream 은 바이트 스트림이다. 그럼에도 불구하고 문자 단위로(문자열 단위로) 데이터를 출력한다이후의 자바 버전에서는 PrintStream를 개선시켜 PrintWriter라는 클래스를 정의하였고, 이는 Writer 클래스를 상속하는 문자 필터 스트림으로 정의하였다.
System.out이 PrintStream임을 기억하고, 이 이상으로 PrintStream을 활용하지 않는다.
printf, println등 문자열 단위의 출력이 필요하다면 반드시 PrintWriter를 사용한다.
-
-
PrintWriter를 이용하여 다음 내용을 "printf.txt"에 출력하자
제 나이는 %d살 입니다. 24
저는 자바가 좋습니다.
특히 I/O 부분에서 많은 매력을 느낍니다.
package com.test.memo;

import java.io.FileWriter;
import java.io.IOException;
import java.io.PrintWriter;

public class Organize {

    public static void main(String[] args) {
        try (PrintWriter out = new PrintWriter(new FileWriter("printf.txt"))) {
            out.printf("제 나이는 %d살 입니다.", 24);
            out.println("");
            out.println("저는 자바가 좋습니다.");
            out.print("특히 I/O 부분에서 많은 매력을 느낍니다.");
        } catch (IOException e) {
            e.printStackTrace();
        }
    }
}
파일 입출력 문제 5
package com.test.memo;
import java.io.FileWriter;
import java.io.IOException;
import java.io.PrintWriter;
public class Organize {
public static void main(String[] args) {
try (PrintWriter out = new PrintWriter(new FileWriter("printf.txt"))) {
out.printf("제 나이는 %d살 입니다.", 24);
out.println("");
out.println("저는 자바가 좋습니다.");
out.print("특히 I/O 부분에서 많은 매력을 느낍니다.");
} catch (IOException e) {
e.printStackTrace();
}
}
}
위 예제를 BufferedWriter에 의한 버퍼링 기능을 추가해보자. 그리고 더불어서 파일에 문자열 저장 이후에, 파일에 저장된 문자열을 전부를 다시 출력하는형태로 예제를 확장해보자.
package com.test.memo;

import java.io.BufferedReader;
import java.io.BufferedWriter;
import java.io.FileReader;
import java.io.FileWriter;
import java.io.IOException;
import java.io.PrintWriter;

public class Practice1 {
    public static void main(String[] args) throws Exception {
        String fileName = "printf.txt";
        try (PrintWriter writer = new PrintWriter(new BufferedWriter(new FileWriter(fileName)))) {
            writer.printf("제 나이는 %d살 입니다.", 24);
            writer.println("");

            writer.println("저는 자바가 좋습니다.");
            writer.print("특히 I/O 부분에서 많은 매력을 느낍니다.");
        } catch (IOException e) {
            e.printStackTrace();
        }
        try (BufferedReader reader = new BufferedReader(new FileReader(fileName))) {
            String str = null;
            while ((str = reader.readLine()) != null) { // readLine() - 줄 단위로 가져옴
                System.out.println(str);
            }
        } catch (Exception e) {
            e.printStackTrace();
        }
    }
}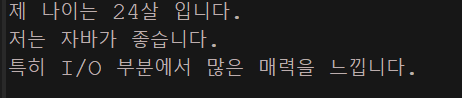
- printf.txt에도 위와같이 문장들이 들어갔다.
- FileWriter(fileName)을 이용하여 파일을 엽니다. 이때 BufferedWriter로 감싸져 있습니다.
- BufferedWriter는 FileWriter를 보조하여 버퍼링 기능을 제공합니다.
- PrintWriter는 BufferedWriter를 보조하여 텍스트를 쓰는 기능을 제공합니다. - read(), readLine(), println(), printf()
FileWriter는 파일에 문자를 쓰기 위한 클래스입니다. 따라서 파일을 여는 기능을 가진 클래스입니다.
그러므로 FileWriter가 가장 위에 있는 클래스이며, 이를 통해 파일을 열고 텍스트를 쓸 수 있습니다. BufferedWriter는 FileWriter를 보조하여 버퍼링 기능을 제공하고, PrintWriter는 BufferedWriter를 보조하여 텍스트를 쓰는 기능을 제공합니다.
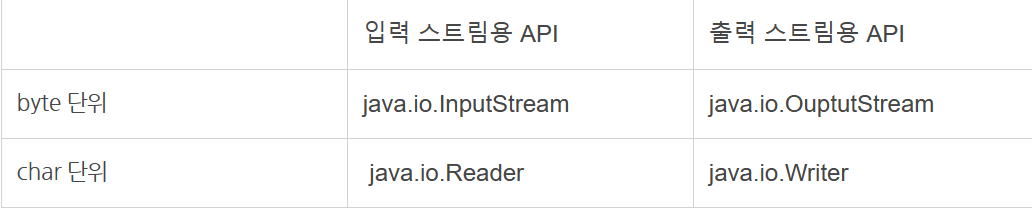
입출력 과 스트림
프로그램이 데이터를 입력받을 때 : 입력(InputStream) : 키보드, 파일, 네트워크상의 프로그램
프로그램에서 데이터를 다른 시스템으로 보낼 때 : 출력(OutputStream) : 모니터, 파일, 네트워크상의 프로그램
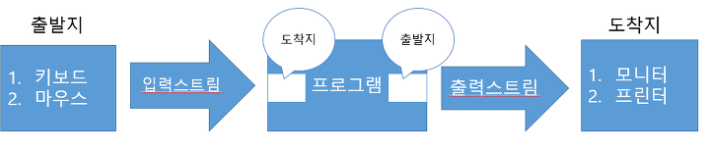
프로그램끼리의 데이터 입출력
프로그램을 기준으로 데이터가 들어오면 InputStream이고,
데이터가 나가면 OutputStream
-
프로그램이 네트워크상의 다른 프로그램과 데이터를 교환하기 위해서는 양쪽 모두 입력 스트림과 출력 스트림이 따로 필요하다.
- 스트림은 단방향 통신을 한다는 특성이 있으므로 하나의 스트림으로 입출력을 동시에 할 수 없다.

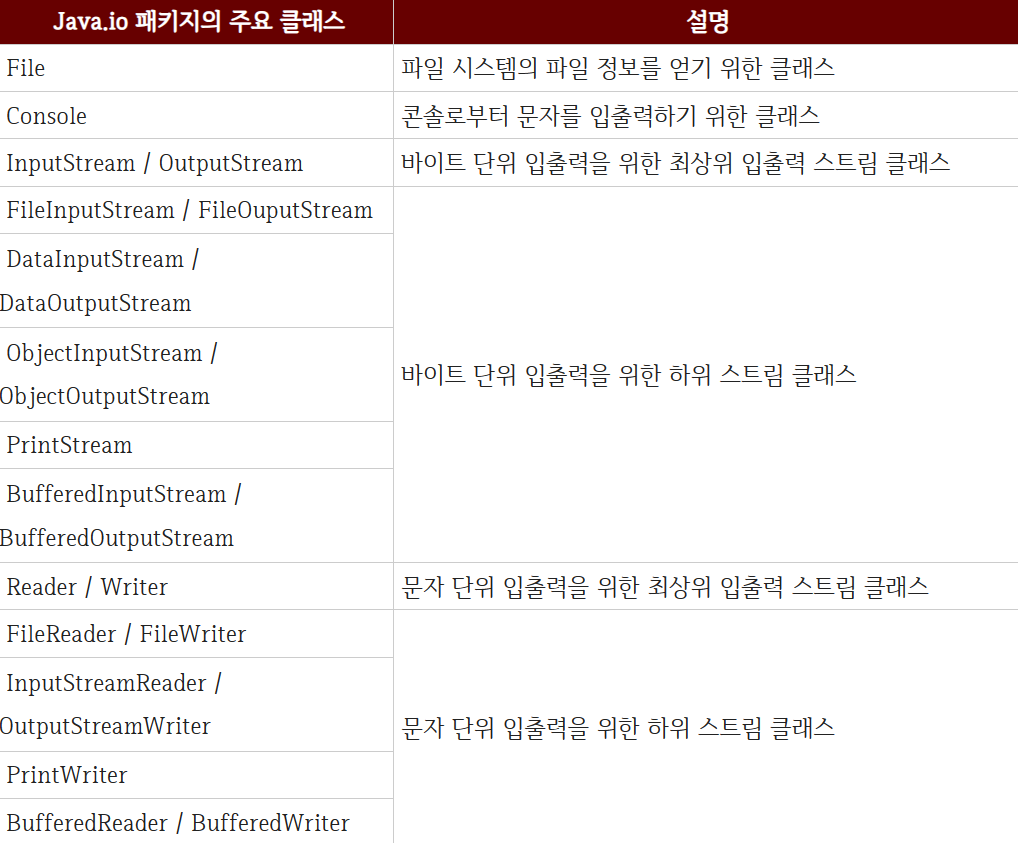
Java.io 패키지
자바의 기본적인 데이터 입출력은 Java.io패키지에서 제공
-
파일 시스템의 정보를 얻기 위한 File클래스
-
데이터를 입출력하기 위한 Stream클래스
주요 클래스
Byte Stream
데이터를 바이트 단위로 읽고 쓰는 스트림이다. > 이진 형식으로 처리하거나, 텍스트가 아닌 데이터를 다룰 때 사용된다.
주로 이미지, 오디오, 비디오 파일과 같은 이진 데이터를 처리할 때 사용된다.
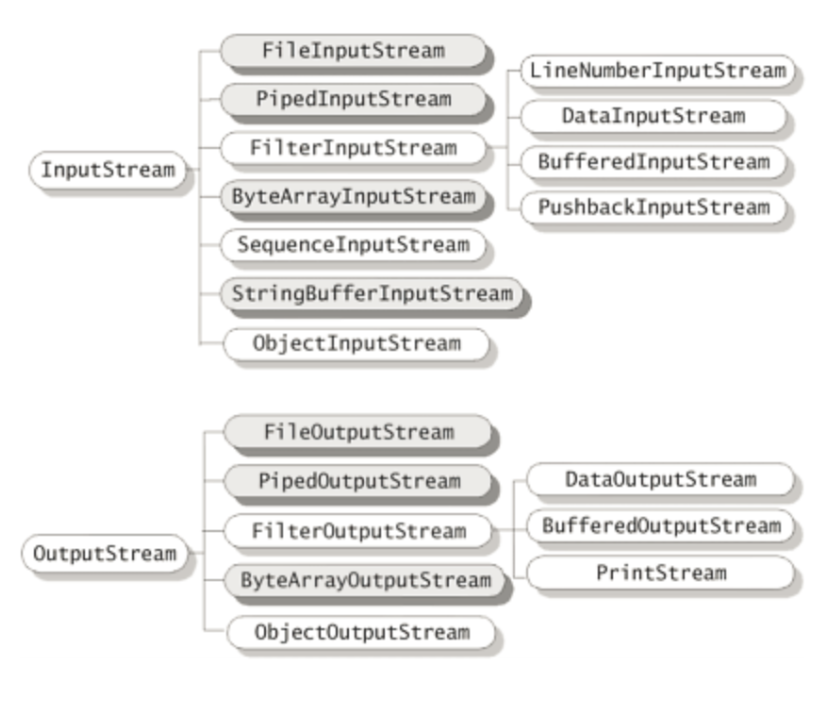
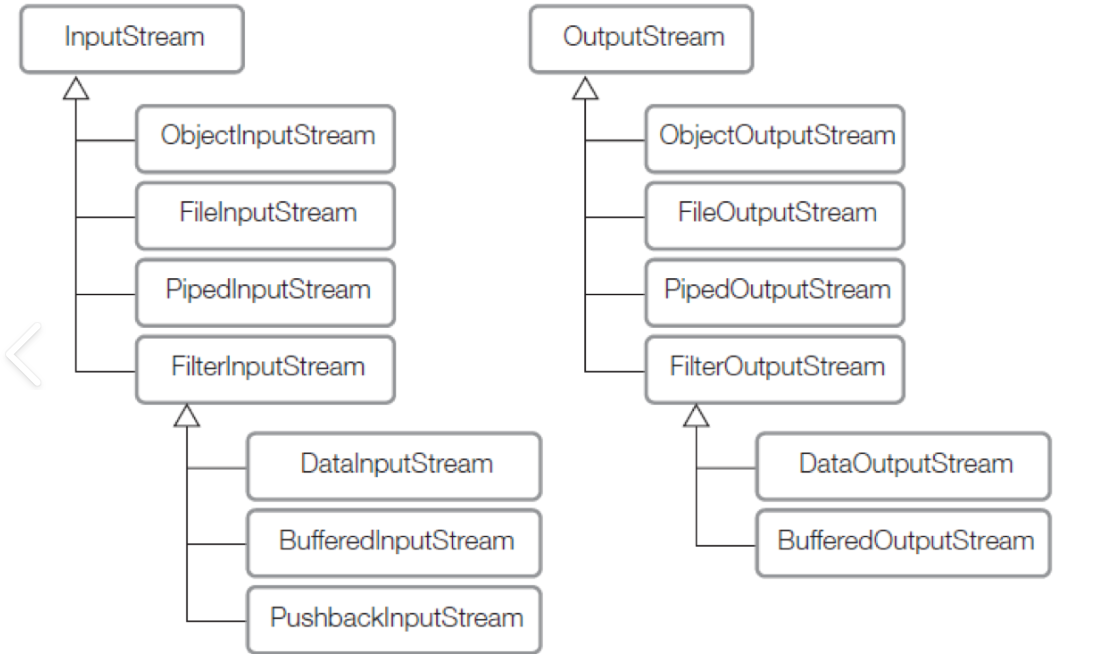
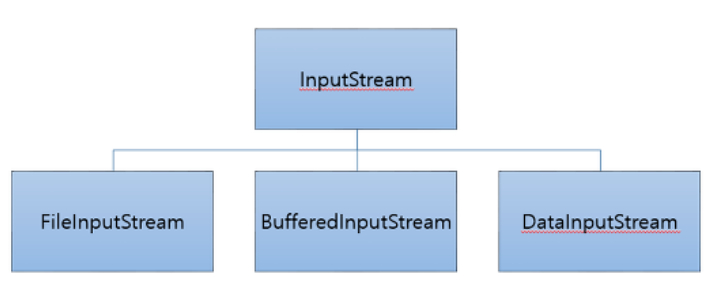
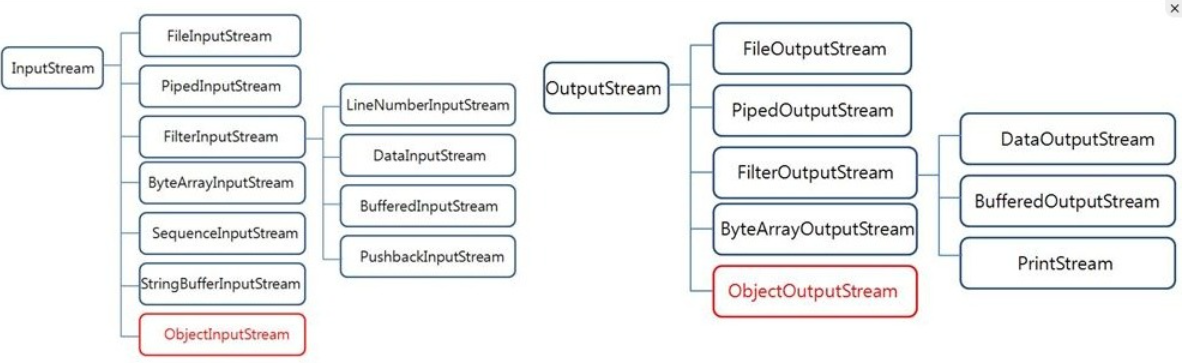
InputStream
바이트 입력기반 입력 스트림의 최상위 클래스 > 추상 클래스다. > 바이트 기반 입력 스트림이 기본적으로 가져야 할 메소드들이 정의 되어 있다.
자바 프로그램은 객체를 생성하고 객체와 바이트 스트림과 연결함으로써 파일을 연다 .
System.in객체는 키보드로 바이트를 입력할 수 있는 InputStream객체다.
-
FileInputStream : 파일에서 데이터를 읽기 위한 스트림 > 파일에서 바이트를 읽어오는 기본 스트림
-
BufferdInputStream : 기본 스트림(FileInputStream, DataInputStream) 과 함꼐 사용되어 입출력 기능을 보완하거나 성능을 개선하는 데 사용된다
-
ex) FileInputStream을 BufferednInputStream 으로 감싸서 한 번에 여러 바이트를 읽어오는 버퍼링을 할 수 있다.
-
ex) FileWriter를 기본스트림으로 사용하고 이를 BufferdInputStream으로 감싸서 텍스트 데이터를 더 효율적으로 출력할 수 있다.
-
-
SequenceInputStream : 여러 개의 입력 스트림을 연속적으로 연결해서 하나의 스트림으로부터 데이터를 읽는 것과 같이 처리할 수 있도록 도와준다. > 하나의 파일로 합칠 떄 사용 -
-
//Vector Vector files = new Vector(); files.add(new FileInputStream("f.001"); files.add(new FileInputStrea("f.002"); SequenceInputStream in = new SequenceInputStream(files.elements()); -
FileInputStream f1 = new FIleInputStream("f.001");
FileInputStream f2 = new FileInputStream("f.001");
SequenceInpuStream in = new SequenceInputStream(f1, f2);
-
-
DataStream : 데이터를 이진 형식으로 읽고 쓰는데 사용되어, 데이터 타입 별로 읽기를 제공한다. > 기본 자료형과 객체를 바이트 형식으로 변환해 파일이나 네트워크같은 외부 장치에 데이터를 저장하거나 읽어 올 수 있다.
- readInt(), readDouble, wrterInt(), writeDouble과 같은 메서드를 사용한다.
이러한 데이터 스트림은 자바의 객체를 직렬화하고 역직렬화할 때 유용하다.
- ex)ObjectInputStream, ObjectOutputStream 클래스는 데이터 스트림을 사용해 객체를 파일에 저장하고 읽어올 수 있다.
import java.io.*; public class DataStreamExample { public static void main(String[] args) { // 데이터를 파일에 쓰기 try (DataOutputStream dos = new DataOutputStream(new FileOutputStream("data.bin"))) { dos.writeInt(123); // 정수 쓰기 dos.writeDouble(3.14); // 실수 쓰기 dos.writeUTF("Hello, Java!"); // 문자열 쓰기 } catch (IOException e) { System.out.println("파일 쓰기 오류: " + e.getMessage()); } // 파일에서 데이터 읽기 try (DataInputStream dis = new DataInputStream(new FileInputStream("data.bin"))) { int intValue = dis.readInt(); // 정수 읽기 double doubleValue = dis.readDouble(); // 실수 읽기 String stringValue = dis.readUTF(); // 문자열 읽기 System.out.println("정수: " + intValue); System.out.println("실수: " + doubleValue); System.out.println("문자열: " + stringValue); } catch (IOException e) { System.out.println("파일 읽기 오류: " + e.getMessage()); } } } //정수: 123 //실수: 3.14 //문자열: Hello, Java!-
data.bin이라는 파일에 정수, 실수, 문자열을 이진 형식으로 쓰고 다시 읽어온다.
- 쓸 때는 writeInt()와 같이 사용하고, 읽을 때 는 readInt() 와 같은 메서드를 사용한다.
Buffered, Data, Object, Print스트림 등은 모두 Filter스트림에 속한다.
메소드
read > 파일로부터 데이터를 한 문자씩 읽어서 int형의 유니코드로 반환해주는 메서드
available() : 파일 내 있는 문자들을 byte로 바꿔서 int형으로 반환해주는 메서드(글자 수 체크와 비슷한 개념?)
String형 데이터를 byte[]배열형으로 변환
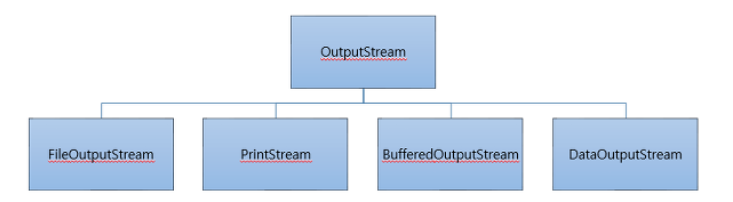
OutputStream
바이트 기반 출력 스트림의 최상위 클래스 > 추상 클래스 > 바이트 기반 출력 스트림이 기본적으로 가져야 할 메소드 정의
-
FileOutputStream : 파일에 데이터를 쓰는 스트림으로, 주어진 파일에 바이트 단위로 데이터를 출력하는데 사용
-
PrintStream : 다양한 데이터 유형을 형식화된 텍스트로 출력하는 스트림으로 표준 출력 스트림에 데이터를 출력하는데에 사용되며, 파일이나 다른 출력 스트림에도 데이터를 출력할 수 있다.
PrinWrtier도 같은 기능을 가지고 있지만 PrintWriter가 더 다양한 언어의 문자를 처리하는데 적합하기 때문에 가능한 PrintWriter를 사용하는 것이 좋다.
-
newLine() : 새로운 줄 추가
-
println()
-
printf()
-
print()
-
-
BufferdOutputStream : 출력 속도를 향상시키기 위해 데이터를 버퍼에 임시로 저장하는데 사용되는 스트림으로, 다른 출력 스트림에 데이터를 출력할때 사용되며, 출력 버퍼링을 통해 성능을 향상시킨다.(안전하고 빠르게)
-
DataOutputStream : 기본 자료형 데이터를 바이트 스트림으로 출력하는 스트림으로, 다른 출력 스트림에 정수, 실수, 문자열 등의 데이터를 출력할 수 있다.
Buffered, Data, Object, Print스트림 등은 모두 Filter스트림에 속한다.
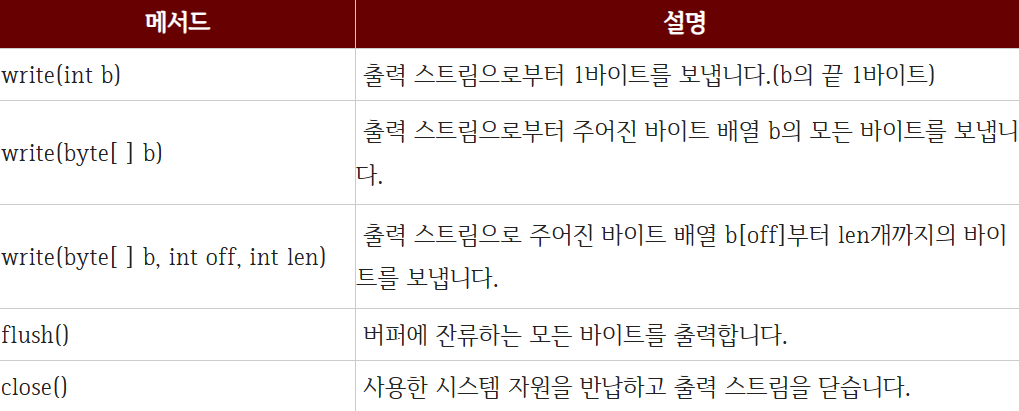
메서드
write > 파일에 내욜을 출력한다.
인자로는 정수형 데이터 혹은 배열이 들어갈 수 있다.
-
flush()
-
버퍼링된 출력 스트림을 사용할 때 : 호출하여 버퍼에 있는 데이터를 즉시 내보낼 수 있다.
-
네트워크 통신 : 네트워크 소켓에서 데이터를 보낼 때, 모든 데이터를 한 번에 보내는 것이 아니라 일정량이나 특정 조건에 따라 버퍼링되는데, 이때 flush()를 호출하여 버퍼에 있는 데이터를 파일에 즉시 쓸 수 있다.
-
파일 쓰기 : 프로그램이 강제로 종료되거나, 예기치 않게 종료될 때, flush()를 호출해 버퍼에 있는 데이터를 파일에 즉시 쓸 수 있다.
일반적으로 프로그램의 특정 지점에서 데이터를 강제로 내보내야할 때 사용된다. > 너무 자주 호출하면 성능에 부담
-
-
getBytes()
-
String 클래스 내 메서드
-
String형 데이터를 byte[]배열형으로 변환
-
Input,Output 예제
File 클래스 바이트 스트림
파일에 데이터를 출력하는 예제
import java.io.FileNotFoundException;
import java.io.FileOutputStream;
import java.io.PrintStream;

public class PrintStreamExample {
    public static void main(String[] args) {
        try (PrintStream ps = new PrintStream(new FileOutputStream("output.txt"))) {
            ps.println("PrintStream을 사용하여 파일에 데이터를 출력하는 예제입니다.");
            ps.println("데이터를 출력할 때 자동으로 개행 문자가 추가됩니다.");
            System.out.println("파일에 데이터를 쓰는데 성공했습니다.");
        } catch (FileNotFoundException e) {
            System.err.println("파일을 찾을 수 없습니다: " + e.getMessage());
        }
    }
}- output.txt파일에 ps.println()으로 적은 문장이 들어가있고, 마지막 이클립스 콘솔에는 성공적으로 데이터를 썼다는 문구가 출력된다.
File 클래스 바이트 스트림
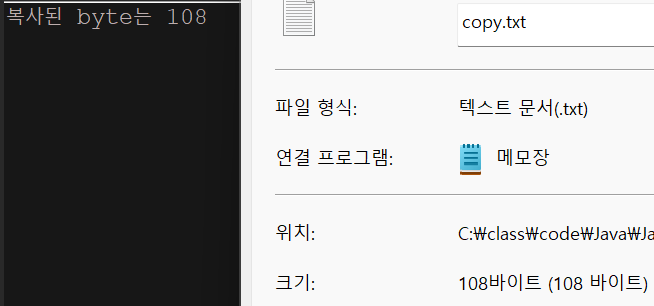
기존에 존재하던 파일을 바이트단위로 복사하여 새로운 파일에 저장하는 예제
  package com.test.memo;

import java.io.BufferedInputStream;
import java.io.BufferedOutputStream;
import java.io.FileInputStream;
import java.io.FileNotFoundException;
import java.io.FileOutputStream;
import java.io.IOException;

class Practice {
    public static void main(String[] args) {
        try (BufferedInputStream in = new BufferedInputStream(new FileInputStream("println.txt"));
                BufferedOutputStream out = new BufferedOutputStream(new FileOutputStream("copy.txt"))) {
            int r = 0, cnt = 0;

            while ((r = in.read()) != -1) {
                cnt++;
                out.write(r);
            }
            System.out.println("복사된 byte는 " + cnt);
        } catch (FileNotFoundException e) {// IOException이 더 위로 올라와있으면 FileNotFound예외는 에러
            e.printStackTrace();
        } catch (IOException e) {
            e.printStackTrace();
        }
    }
}
File 클래스 바이트 스트림
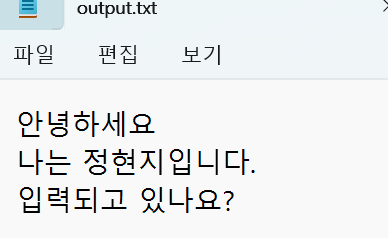
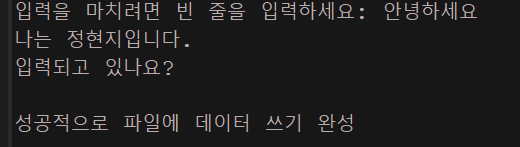
콘솔에서 데이터를 입력받아 파일에 쓰는 예제
package com.test.memo;

import java.io.FileNotFoundException;
import java.io.FileOutputStream;
import java.io.IOException;
import java.io.PrintStream;
import java.util.Scanner;

public class Practice1 {
    public static void main(String[] args) throws Exception {
        try (Scanner sc = new Scanner(System.in);
                PrintStream ps = new PrintStream(new FileOutputStream("output.txt"))) {
            System.out.print("입력을 마치려면 빈 줄을 입력하세요: ");
            String input;
            while (!(input = sc.nextLine()).isEmpty()) {// 빈줄이면 시스템 종료
                ps.println(input);
            }
            System.out.println("성공적으로 파일에 데이터 쓰기 완성");
        } catch (FileNotFoundException e) {
            e.getMessage();
        } catch (IOException e) {
            e.getMessage();
        }
    }
}

Print클래스 바이트 스트림
printf메서드를 사용해 형식화된 데이터를 출력한다.
import java.io.FileNotFoundException;
import java.io.PrintStream;

public class PrintStreamExample {
    public static void main(String[] args) {
        try (PrintStream ps = new PrintStream("output.txt")) {
            String name = "홍길동";
            int age = 30;
            double weight = 72.5;

            // 형식화된 데이터 출력
            ps.printf("이름: %s, 나이: %d세, 몸무게: %.1fkg%n", name, age, weight);

            System.out.println("파일에 데이터를 성공적으로 출력했습니다.");
        } catch (FileNotFoundException e) {
            System.err.println("파일을 찾을 수 없습니다: " + e.getMessage());
        }
    }
}
//output.txt에이름: 홍길동, 나이: 30세, 몸무게: 72.5kg
//이클립스 콘솔에는 "파일에 데이터를 성공적으로 출력했습니"
Buffered클래스 바이트 스트림
파일을 읽고, 다른 파일에 복사하기
 import java.io.BufferedInputStream;
import java.io.BufferedOutputStream;
import java.io.FileInputStream;
import java.io.FileOutputStream;
import java.io.IOException;

public class FileCopyExample {
    public static void main(String[] args) {
        String sourceFile = "source.txt";
        String targetFile = "target.txt";

        try (BufferedInputStream in = new BufferedInputStream(new FileInputStream(sourceFile));
             BufferedOutputStream out = new BufferedOutputStream(new FileOutputStream(targetFile))) {
            byte[] buffer = new byte[8192]; //8KB의 버퍼크기를 사용 > 8KB씩 데이터를 읽고있는것
            int bytesRead;
            while ((bytesRead = in.read(buffer)) != -1) {//파일의 끝에 도달하면 -1
                out.write(buffer, 0, bytesRead); // Buffer : 읽은 데이터 저장 , 0 : 배열에서 읽기 시작할 위치 , bytesRead : 실제로 읽은 바이트 수 > 이전에 read()메서드로 읽은 바이트 수를 나타낸다.
            }
            System.out.println("파일이 복사되었습니다.");
        } catch (IOException e) {
            e.printStackTrace();
        }
    }
}- BufferedInputStream은 내부적으로 설정된 버퍼 크기만큼의 데이터를 한 번에 읽어와 메모리에 저장한 후에 데이터를 읽어 제공한다.
Buffered 클래스 바이트 스트림
파일을 새로 만들어 정수와 실수를 저장하고, 저장한 것을 다시 읽어들이자 > 버퍼링 기능 사용
import java.io.BufferedInputStream;
import java.io.BufferedOutputStream;
import java.io.DataInputStream;
import java.io.DataOutputStream;
import java.io.FileInputStream;
import java.io.FileNotFoundException;
import java.io.FileOutputStream;
import java.io.IOException;

public class JavaIO21 {

    public static void main(String[] args) {
        String fileName="fbdTest.txt";

        try(FileOutputStream out = new FileOutputStream(fileName);//파일에 쓰기
            BufferedOutputStream bOut = new BufferedOutputStream(out);//더 빠르게
            DataOutputStream dataOut = new DataOutputStream(bOut)) //기본 자료
        {
            dataOut.writeInt(275);
            dataOut.writeDouble(45.79);
        } catch (FileNotFoundException e) {
            e.printStackTrace();
        } catch (IOException e) {
            e.printStackTrace();
        }

        try(FileInputStream in = new FileInputStream(fileName);
            BufferedInputStream bIn = new BufferedInputStream(in);
            DataInputStream dataIn = new DataInputStream(bIn))
        {
            int intData = 0;
            double dblData = 0;
            intData = dataIn.readInt();
            dblData = dataIn.readDouble();
            System.out.println(intData + " " + dblData);
        } catch (FileNotFoundException e) {
            e.printStackTrace();
        } catch (IOException e) {
            e.printStackTrace();
        }
    }
}
Data클래스 바이트 스트림
  import java.io.*;

public class DataStreamExample {
    public static void main(String[] args) {
        String fileName = "data.txt";

        // 데이터를 파일에 쓰는 예제
        try (DataOutputStream out = new DataOutputStream(new BufferedOutputStream(new FileOutputStream(fileName)))) {
            // 데이터 쓰기
            out.writeInt(100); // 정수 쓰기
            out.writeDouble(3.14); // 실수 쓰기
            out.writeUTF("자바 데이터 스트림 예제"); // 문자열 쓰기
        } catch (IOException e) {
            e.printStackTrace();
        }

        // 파일에서 데이터를 읽는 예제
        try (DataInputStream in = new DataInputStream(new BufferedInputStream(new FileInputStream(fileName)))) {
            // 데이터 읽기
            int intValue = in.readInt(); // 정수 읽기
            double doubleValue = in.readDouble(); // 실수 읽기
            String stringValue = in.readUTF(); // 문자열 읽기

            // 읽은 데이터 출력
            System.out.println("정수: " + intValue);
            System.out.println("실수: " + doubleValue);
            System.out.println("문자열: " + stringValue);
        } catch (IOException e) {
            e.printStackTrace();
        }
    }
}
//정수: 100
//실수: 3.14
//문자열: 자바 데이터 스트림 예제- 위 출력값이 data.txt파일에 이진형식으로 저장되어 있기때문에, 읽거나 다시 쓰려면 프로그래밍 방식을 사용해야 한다.
기본 예제
-
파일을 읽어 입력을 받을 때, 바이트 단위로 입력 받기 위해 FileOutputStream을 사용할 수 있었는데, 1바이트가 아닌 여러 바이트 씩 읽을 수도 있다.
- write() 메서드에 인자를 넘겨주면 되는데, 크기가 1024인 byte 배열을 넣으면 1kb씩 읽어 속도도 좀 더 빨라지는 것을 볼 수 있을 것이다.
int readCnt; // 바이트 수
            byte[] bArr = new byte[1024];
            fis.read(bArr);

            while ((readCnt = fis.read(bArr)) != -1) {
                fos.write(bArr, 0, readCnt);
            }
Character Stream
2바이트를 입출력할 수 있는 문자 기반 스트림 > 세계 모든언어로 구성된 파일 입출력
문자 스트림이 별도로 존재하는 이유는 "운영체제의 기본 인코딩 방식으로의 인코딩을 자동화하기 위해서!"다.
-
Reader/Writer 와 그 자손들은 여러 종류의 인코딩과 자바에서 사용하는 유니코드간의 변환을 자동적으로 처리해준다.
- Reader는 특정 인코딩을 읽어서 유니코드로 변환하고, Writer는 유니코드를 특정 인코딩으로 변환하여 저장한다.
byteSteam은 입출력 단위가 바이트고, CharacterStream은 입출력 단위가 문자다.
- 바이트 스트림은 byte[]을 사용했지만 문자 스트림은 char[]을 사용한다.
-
문자 입력 스트림 - Reader
-
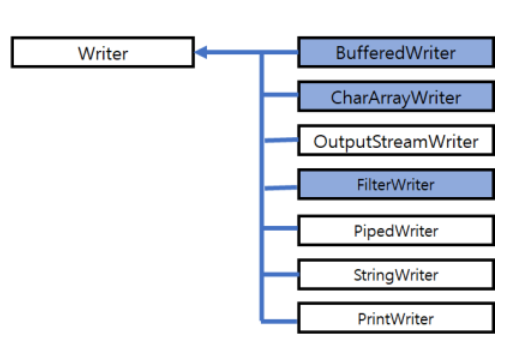
문자 출력 스트림 - Writer
문자 입력 스트림과 문자 출력 스트림의 [최상위 클래스]
Reader와 Writer는 InputStream이나 OutputStream 클래스와 마찬가지로 추상 클래스 이므로 프로그램에서 객체를 생성할 때는 서브 클래스를 이용한다.

+ Writer - PrintWriter 존재 (reader는 존재x)
Reader
문자 기반 입력 스트림의 최상위 클래스로 추상 클래스다.
모든 문자 기반 입력 스트림은 Reader 클래스를 상속받아 만들어진다.
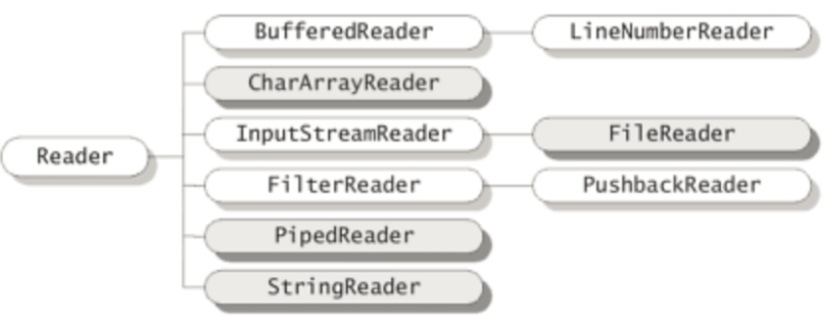
+ FileReader : Reader클래스를 직접 상속받지 않고, InputStreamReader를 확장한다. 그러나 InputStreamReader가 Reader를 상속받고 있으므로, 사실상 Reader의 하위 클래스다.
메서드

-
read 메소드의 경우 더 이상 읽어들일 메소드가 없으면 -1 반환
-
abstract read 메소드의 경우 length개의 개수만큼 문자를 읽어 들여서, b의 배열의 인덱스 위치 start에서 부터 문자를 저장한다. 그리고 실제로 읽어 들인 문자의 수를 반환한다. > 더 이상 읽어 들일 문자가 존재하지 않으면 두 메소드 모두 -1을 반환한다.
CharArrayReader
- 문자 배열로부터 문자를 읽는 입력 스트림이다.
StringReader
-
charArrayReader와 같이 입출력 대상이 메모리인 스트림이다.
-
StringWriter에 출력되는 데이터는 내부의 StringBuffer에 저장되어 아래와 같은 메서드를 이용해 저장된 데이터를 얻을 수 있다.
-
StringBuffer getBuffer() : StringWirter에 출력한 데이터가 저장된 StringBuffer를 반환한다.
-
String toString() : StringWriter에 출력된(StringBuffer에 저장된) 문자열을 반환한다.
package com.test.memo; import java.io.IOException; import java.io.StringReader; import java.io.StringWriter; public class Organize { public static void main(String[] args) { String input = "ABCD"; StringReader in = new StringReader(input); StringWriter out = new StringWriter(); try { int data = 0; while ((data = in.read()) != -1) { out.write(data); } } catch (IOException e) { e.printStackTrace(); } System.out.println("in " + input); System.out.println("out " + out.toString()); } } //in ABCD //out ABCD -
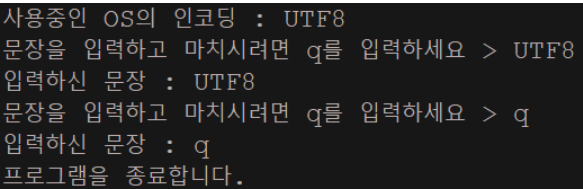
InputStreamReader
-
바이트 입력 스트림을 문자 입력 스트림으로 변환한다. 주로 다른 바이트 기반 입력 스트림 (FileInputStream, ByteArrayInputStream) 을 문자 기반으로 읽을 때 사용된다.
package com.test.memo;

import java.io.BufferedReader;
import java.io.IOException;
import java.io.InputStreamReader;

public class Organize {

    public static void main(String[] args) {
        String line = null;
        try {
            InputStreamReader isr = new InputStreamReader(System.in);//Scanner와 같은 기능
            BufferedReader br = new BufferedReader(isr);
            System.out.println("사용중인 OS의 인코딩 : " + isr.getEncoding());

            do {
                System.out.print("문장을 입력하고 마치시려면 q를 입력하세요 > ");
                line = br.readLine();
                System.out.println("입력하신 문장 : " + line);
            } while (!line.equalsIgnoreCase("q"));
            System.out.println("프로그램을 종료합니다.");
        } catch (IOException e) {
            e.printStackTrace();
        }
    }
}
FileReader
InputStreamReader상속
- 파일로부터 텍스트 데이터를 읽고, 파일에 쓰는데 사용된다.
package com.test.memo;

import java.io.BufferedWriter;
import java.io.FileInputStream;
import java.io.FileReader;
import java.io.FileWriter;
import java.io.IOException;

public class Organize {

    public static void main(String[] args) {
        String fileName = "test.txt";

        try (BufferedWriter out = new BufferedWriter(new FileWriter(fileName))) {
            out.write("hello");
            out.write("안녕하세요");
        } catch (IOException e) {
            e.printStackTrace();
        }
        try (FileInputStream f1 = new FileInputStream(fileName); FileReader f2 = new FileReader(fileName)) {
            int data = 0;
            while ((data = f1.read()) != -1) {
                System.out.print((char) data);
            }
            System.out.println();
            while ((data = f2.read()) != -1) {
                System.out.print((char) data);
            }
        } catch (IOException e) {
            e.printStackTrace();
        }

    }
}//FIleInputStream(바이트기반) 을 사용했을 때 한글이 깨져서 출력되는 것을 알 수 있다. 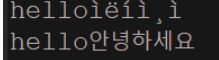
FilterReader
- 다른 리더에서 읽은 데이터를 변환하거나 필터링 하는 데 사용되는 추상클래스다.
BufferedReader
FilterReader를 상속받는 클래스
-
버퍼링된 문자 입력 스트림으로, 파일, 문자열, 입력스트림 등에서 텍스트를 라인 단위로 읽기 위해 사용된다.
- String readLine() 메서드 : 라인 단위로 데이터 읽기 가능 > 없으면 -1
- int read() : 하나의 문자를 읽기 가능 > 없으면 -1
- int read(char[] cbuf) : 문자 배열에 데이터를 읽고 읽은 문자의 수를 반환 > 없으면 -1
- long skip(long n) : 입력 스트림에서 'n'개의 문자를 건너뛰고 실제 건너뛴 문자 수 반환
Buffered 클래스
source.txt파일을 생성하고 문장을 넣은 후 destination.txt파일에 source.txt파일을 복사하고, destination.txt파일을 읽어와 콘솔에 출력한다.
package com.test.memo;
import java.io.BufferedReader;
import java.io.BufferedWriter;
import java.io.FileReader;
import java.io.FileWriter;
import java.io.IOException;
class Practice {
public static void main(String[] args) {
// 입력할 파일 생성 및 내용 입력
String inputFileName = "source.txt";
String outputFileName = "destination.txt";
String text = "한글 문장을 입력합니다.";
try (BufferedWriter writer = new BufferedWriter(new FileWriter(inputFileName))) { // 새로운 파일 생성
writer.write(text); // 파일에 문장 넣기
} catch (IOException e) {
e.printStackTrace();
}
// 파일 복사 및 붙여넣기
try (BufferedReader reader = new BufferedReader(new FileReader(inputFileName)); // 복사해올 파일
BufferedWriter writer = new BufferedWriter(new FileWriter(outputFileName))) { // 복사하 ㄹ파일 생성
String line; // 문장이니까 String
while ((line = reader.readLine()) != null) {// BufferedReader - readLine() : 한 문장씩 읽어오는 메서드 > 더 이상 읽을 줄이 없으면
// null반환
writer.write(line);
writer.newLine(); // 새로운 라인 추가
}
} catch (IOException e) {
e.printStackTrace();
}
// 새로운 파일의 내용 읽어오기
try (BufferedReader reader = new BufferedReader(new FileReader(outputFileName))) {
String line;
while ((line = reader.readLine()) != null) {
System.out.println(line);// 읽어와서 콘솔에 출력
}
} catch (IOException e) {
e.printStackTrace();
}
}
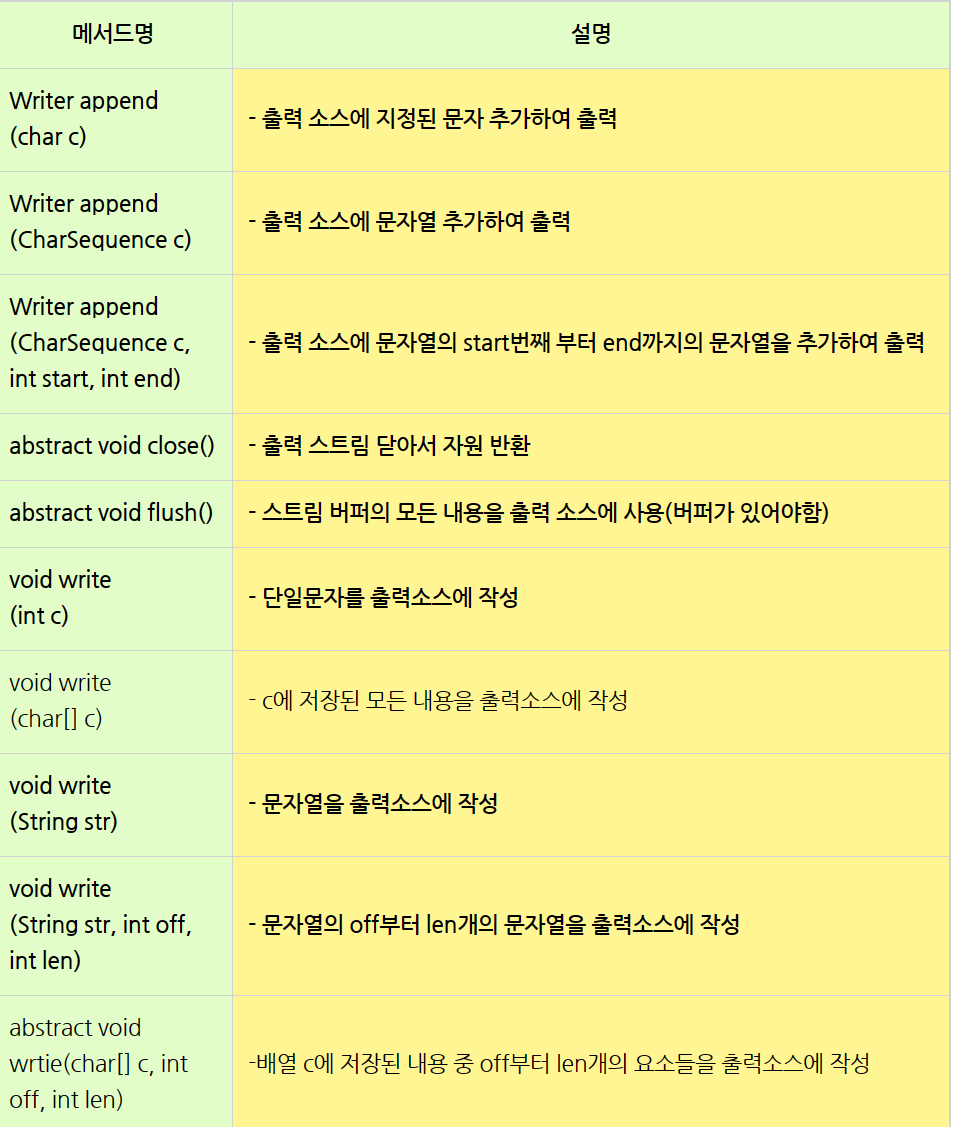
} Writer
writer의 주요 메서드
-
BufferedWriter 클래스:
java.io.BufferedWriter클래스는Writer클래스를 상속하며, 버퍼링된 문자 출력 스트림을 제공합니다. 이 클래스는 데이터를 버퍼에 쓴 후 일정 크기 이상이거나 명시적인 플러시를 호출할 때까지 데이터를 보내지 않습니다. 이는 출력 작업의 성능을 향상시킨다.
-
PrintWriter 클래스:
java.io.PrintWriter클래스는Writer클래스를 상속하며, 형식화된 텍스트를 출력하는 데 사용됩니다. 이 클래스는println(),printf()와 같은 다양한 편의 메서드를 제공하여 텍스트를 형식화하여 출력할 수 있습니다. 또한,PrintWriter는Writer클래스의 하위 클래스로서 텍스트 출력 스트림을 다루는 데 사용됩니다.
-
FileWriter 클래스:
java.io.FileWriter클래스는 파일에 문자를 출력하는 데 사용됩니다. 이 클래스는 텍스트 파일을 생성 하거나 기존 파일에 텍스트를 추가할 수 있습니다.
-
OutputStreamWriter 클래스:
java.io.OutputStreamWriter클래스는 바이트 출력 스트림을 문자 출력 스트림으로 변환하는 데 사용됩니다. 이 클래스는 문자 인코딩을 지정하여 문자를 바이트로 변환합니다. 일반적으로OutputStreamWriter는FileOutputStream과 함께 사용하여 파일에 텍스트를 쓸 때 사용됩니다.
-
CharArrayReader
- 문자 배열로부터 문자를 읽는 입력 스트림이다.
-
StringReader
Char배열보다 String으로 처리하는게 더 편리
-
charArrayReader와 같이 입출력 대상이 메모리인 스트림이다.
-
StringWriter에 출력되는 데이터는 내부의 StringBuffer에 저장되어 아래와 같은 메서드를 이용해 저장된 데이터를 얻을 수 있다.
-
StringBuffer getBuffer() : StringWirter에 출력한 데이터가 저장된 StringBuffer를 반환한다.
-
String toString() : StringWriter에 출력된(StringBuffer에 저장된) 문자열을 반환한다.
-
-
BufferedReader/ BufferedWriter
import java.io.BufferedReader;
import java.io.BufferedWriter;
import java.io.FileReader;
import java.io.FileWriter;
import java.io.IOException;

public class FileCopyExample {
    public static void main(String[] args) {
        String sourceFile = "source.txt";
        String targetFile = "target.txt";

        try (BufferedReader reader = new BufferedReader(new FileReader(sourceFile));
             BufferedWriter writer = new BufferedWriter(new FileWriter(targetFile))) {

            String line;
            // 파일에서 한 줄씩 읽어들여 다른 파일에 씀
            while ((line = reader.readLine()) != null) {
                writer.write(line);
                writer.newLine(); // 새로운 줄 추가
            }

            System.out.println("File copied successfully.");
        } catch (IOException e) {
            e.printStackTrace();
        }
    }
}BufferedReader를 사용하여source.txt파일에서 텍스트를 읽어들입니다.BufferedWriter를 사용하여target.txt파일에 텍스트를 씁니다.BufferedReader의readLine()메서드를 사용하여 파일에서 한 줄씩 읽어들입니다. 읽은 내용을BufferedWriter의write()메서드를 사용하여 다른 파일에 씁니다.BufferedWriter의newLine()메서드를 사용하여 새로운 줄을 추가합니다.
이를 통해 source.txt 파일의 내용이 target.txt 파일로 복사되며, 버퍼링 기능을 사용하여 입출력 작업의 성능이 향상됩니다.
File 클래스
File은 기본적이면서도 가장 많이 사용되는 입출력 대상이다.
-
파일을 제어하기 위한 클래스
-
파일 클래스 자체에서는 입출력 기능을 제공하지 않는다.
-
파일 입출력은 스트림 클래스를 사용해야 한다.
-
주의사항 : 파일 클래스로부터 생성된 객체는 변경할 수 없다. (즉, 경로를 변경하는 것이 불가능)
-
File클래스의 변수는 모두 static이다.
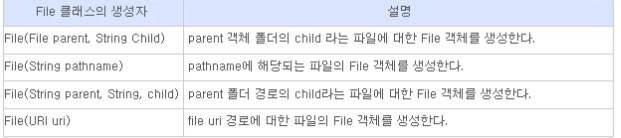
File 클래스의 생성자
파일을 나타내는 객체를 생성하려면, 아래와 같은 File클래스의 생성자 함수를 이용
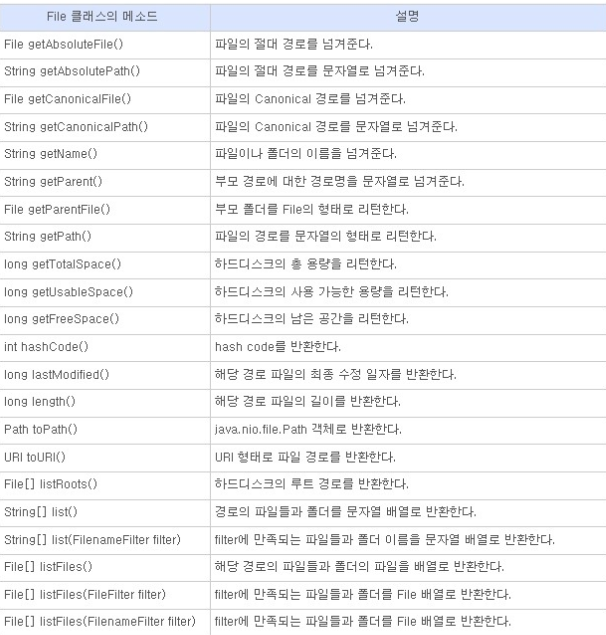
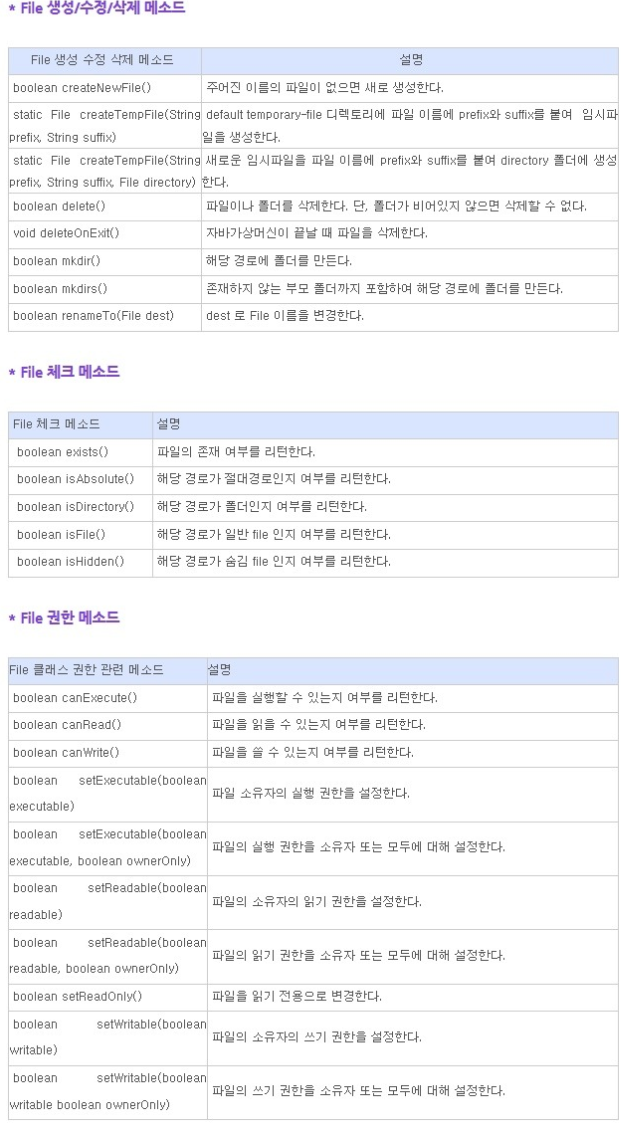
File 클래스의 메소드
그 외 메소드
File 클래스 생성
- 이미 존재하는 파일을 참조할 때
- File f = new File("c:\jdk\work\ch14", "File1.java");
- 기존에는 없는 파일을 새로 생성할 때
-
File f = new File("c:\jdk\work\ch14", "File2.java");
-
f. createNewFile(); //새로운 파일이 생성된다.
새로운 파일을 생성하기 위해서는 FIle인스턴스를 생성한 다음, 출력스트림을 생성하거나,
createNewFile()메소드를 호출해야한다.
File file = new File("파일 경로");위와 같이 객체를 생성했다고 해서 없던 파일이 파로 생기거나, 바로 작업을 할 수 있는 것은 아니다.
exists()메소드를 통해서 지정한 파일이 존재하고 있는지 아닌지를 판별하고 그 결과에 따라서 추가적인 작업을 수행하게 된다.
file.exists() == false
파일이 존재하지 않다면?
file.exists() == false의 경우에는 다음 메소드들을 통해 파일, 디렉토리를 생성할 수 있습니다.
| 메소드 | 설명 |
|---|---|
boolean createNewFile() | 새 파일 생성 |
boolean mkdir() | 새 디렉토리 생성 |
boolean mkdirs() | 지정된 경로의 모든 존재하지 않는 디렉토리 생성 |
file.exists() == true
파일이 존재한다면?
file.exists() == true의 경우에는 다음 메소드들을 통해 파일, 디렉토리를 조작할 수 있습니다.
| 메소드 | 설명 |
|---|---|
boolean delete() | 파일 또는 디렉토리 삭제 |
boolean canExecute() | 실행 가능한 파일인지 여부 반환 |
boolean canRead() | 읽을 수 있는 파일인지 여부 반환 |
boolean canWrite() | 쓸 수 있는(저장, 수정) 파일인지 여부 반환 |
String getName() | 파일 이름 취득 |
String getParent() | 부모 디렉토리 취득 |
File getParentFile() | 부모 디렉토리를 File 객체로 반환 |
String getPath() | 전체 경로 취득 |
boolean isDirectory() | File 객체가 디렉토리인지 판별 |
boolean isFile() | File 객체가 파일인지 판별 |
boolean isHidden() | File 객체가 숨겨진 파일인지 판별 |
long lastModified() | 최근 수정 날짜, 시간 반환 |
long length() | 파일 크기 취득 |
String[] list() | 디렉토리 내의 파일, 하위 디렉토리들을 String 배열로 반환 인수로 filter를 전달해서 필터링으로 조건부 반환 가능 |
File[] listFiles() | 디렉토리 내의 파일, 하위 디렉토리들을 File 배열로 반환 인수로 filter를 전달해서 필터링으로 조건부 반환 가능 |
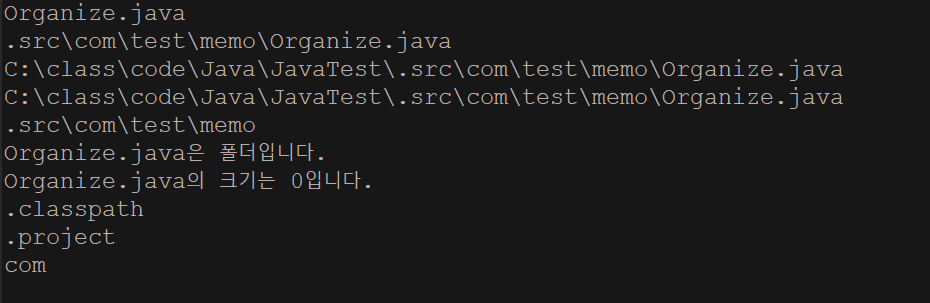
파일 객체 사용 예제
package com.test.memo;

import java.io.File;
import java.io.IOException;

public class Organize {

    public static void main(String[] args) {
        File file = new File(".src\\com\\test\\memo\\Organize.java"); // 현재 작업중인 java파일을 가리키는 File 객체 생성.
        String fileName = file.getName();
        // 파일의 이름을 fileName에 저장. fileName = "FileTest.java"
        // File 객체의 메서드는 IOException이 발생할 수 있으므로 예외처리를 해주어야 한다.
        try {
            System.out.println(fileName); // Organize.java
            System.out.println(file.getPath()); // .src\com\test\memo\Organize.java
            System.out.println(file.getAbsolutePath()); // C:\class\code\Java\JavaTest\.src\com\test\memo\Organize.java
            System.out.println(file.getCanonicalPath());
            System.out.println(file.getParent()); // .src\com\test\memo
            if (file.canWrite()) // 파일에 Write할 수 있는지 확인
                System.out.println(fileName + "은 쓸 수 있는 파일입니다.");
            if (file.canRead()) // 해당 파일을 읽을 수 있는지 확인
                System.out.println(fileName + "은 읽을 수 있는 파일입니다.");
            if (file.isFile()) // 해당 파일이 file인지 directory인지 확인
                System.out.println(fileName + "은 파일입니다.");
            // file이 아니면 directory임.
            else
                System.out.println(fileName + "은 폴더입니다.");
            System.out.println(fileName + "의 크기는 " + file.length() + "입니다."); // 파일의 길이를 바이트 단위로 반환.
        } catch (IOException e) {
            System.err.println(e);
        }

        // 파일 객체가 Directory를 가리키는 경우
        File dir = new File("./src");
        if (dir.isDirectory()) {
            // 폴더 내에 존재하는 모든 file의 이름을 저장하는 코드
            String fileList[] = dir.list(); // dir.list()는 폴더 내의 모든 파일 이름을 String[] 형태로 반환한다.
            for (int i = 0; i < fileList.length; i++)
                System.out.println(fileList[i]);
        } else {
            System.out.println("dir 객체는 file 입니다.");
        }
    }
}
직렬화(serialize) <> 역직렬화(Deserialize)
직렬화는 바이트 스트림 형태로 연속적인 데이터로 변환하는 포맥 변환 기술
역직렬화는 바이트로 변환된 데이터를 원래대로 자바 시스템의 Object, Data로 변환하는 기술
- JVM의 힙(heap) 혹은 스택(Stack) 메모리에 상주하고 있는 객체 데이터를 직렬화를 통해 바이트 형태로 변환하여 DB나, 파일과 같은 외부 저장소에 저장해두고, 다른 컴퓨터에서 이 파일을 가져와 역질렬화를 통해 자바 객체로 변환해서 JVM 메모리에 적재하는 것으로 보면 된다.
직렬화
-
객체를 데이터 스트림으로 만드는 것 > 객체에 저장된 데이터를 스트림에 쓰기 위해 연속적인 데이터로 변환
- ex) 객체를 컴퓨터에 저장했다가 꺼내 쓰기, 네트워크를 통한 컴퓨터 간의 객체 전송
역직렬화
- 스트림으로부터 데이터를 읽어서 객체를 만드는 것
객체는 오직 인스턴스변수들로만 구성되어 있고, 메서드는 포함되지 않는다.(변하는 것이 아니라서)
객체를 저장한다는 것은 객체의 모든 인스턴스변수의 값을 저장한다는 의미
ObjectInputStream(직렬화) / ObjectOutputStream(역직렬화)
-
직렬화(스트림에 객체 출력)에는
ObjectInputStream을 사용하고, 역직렬화(스트림으로부터 객체를 입력)에는ObjectOutputStream을 사용한다.InputStream / OutputStream을 직접 상속받지만 기반스트림을 필요로하는 보조스트림이다.
그래서 객체를 생성할 때 입출력(직렬화/역직렬화)할 스트림을 지정해주어야 한다.
UserInfo객체를 직렬화하여 저장
FileOutputStream fos = new FileOutputStream("objectfile.ser");
  ObjectOutputStream out = new ObjectOutputStream(fos);
out.writeObject(new UserInfo());-
"objectfile.ser" 파일을 생성해 UserInfo객체를 직렬화하여 사용한다.
-
출력할 스트림(FileOutputStream)을 생성해서 이를 기반 스트림으로 하는
ObjectOutputStream을 생성한다. -
ObjectOutputStream의
writeObject()를 사용해 객체를 출력하면, 객체가 파일에 직렬화되어 저장된다.
-
UserInfo객체를 역직렬화하여 저장
FileInputStream fis = new FileInputStream("objectfile.ser");
  ObjectInputStream in = new ObjectInputStream(fis);
UserInfo Info = (UserInfo)in.readObject();-
"objectfile.ser" 파일을 읽어와,
ObjectInputStream()을 사용해readObject()를 사용해 저장된 데이터를 읽으면 객체로 역직렬화 된다.주의할 점
readObject()의 반환타입이 Object이기 때문에 객체 원래의 타입으로 형변환 해주어야한다.
생성자
| 생성자 | 설명 |
|---|---|
ObjectInputStream(InputStream in) | in으로부터의 전달된 바이트를 원래의 객체로 복구하기위한 ObjectInputStream객체를 생성한다. |
ObjectOutputStream(OutputStream out) | out으로부터의 전달된 바이트를 원래의 객체로 복구하기위한 ObjectOutputStream객체를 생성한다. |
ObjectInputSream 메소드
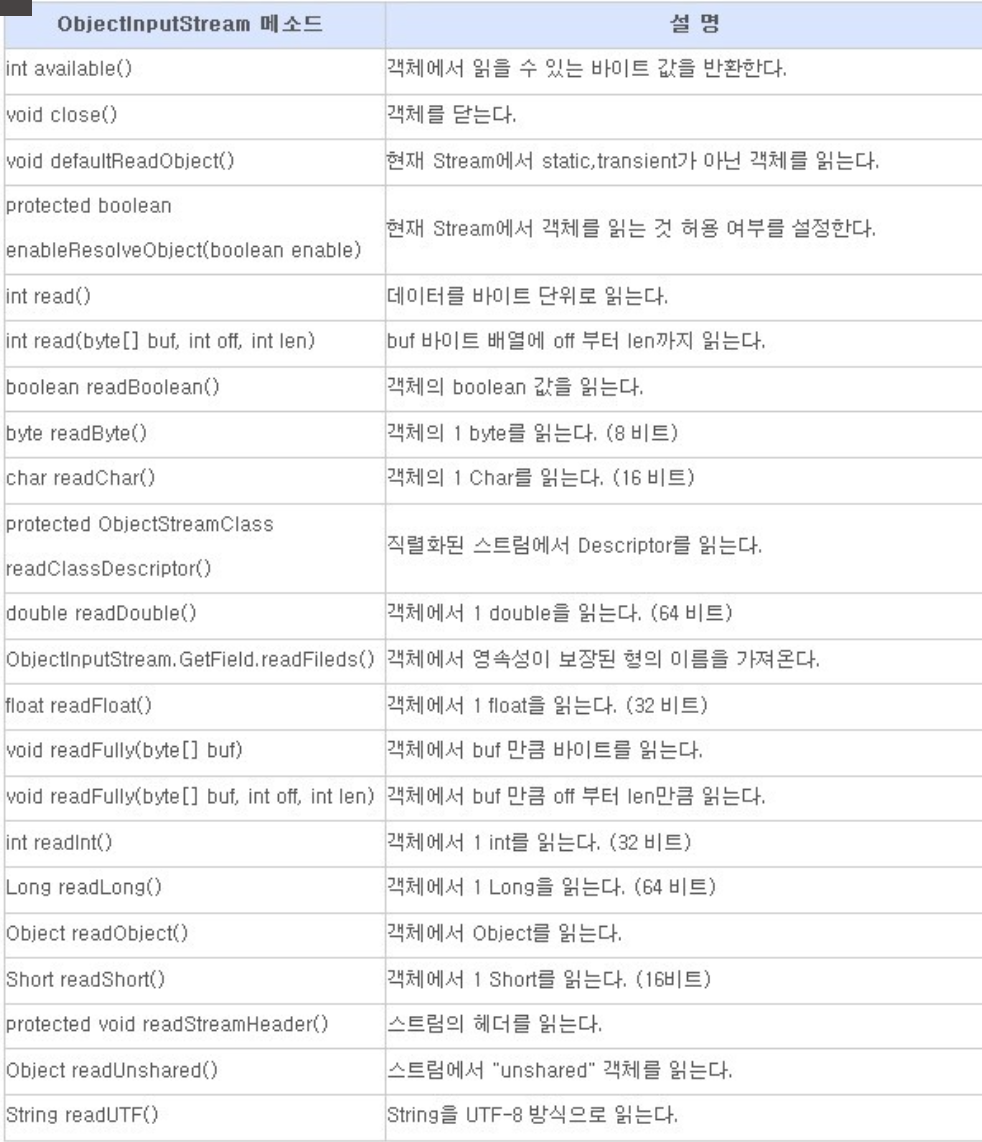
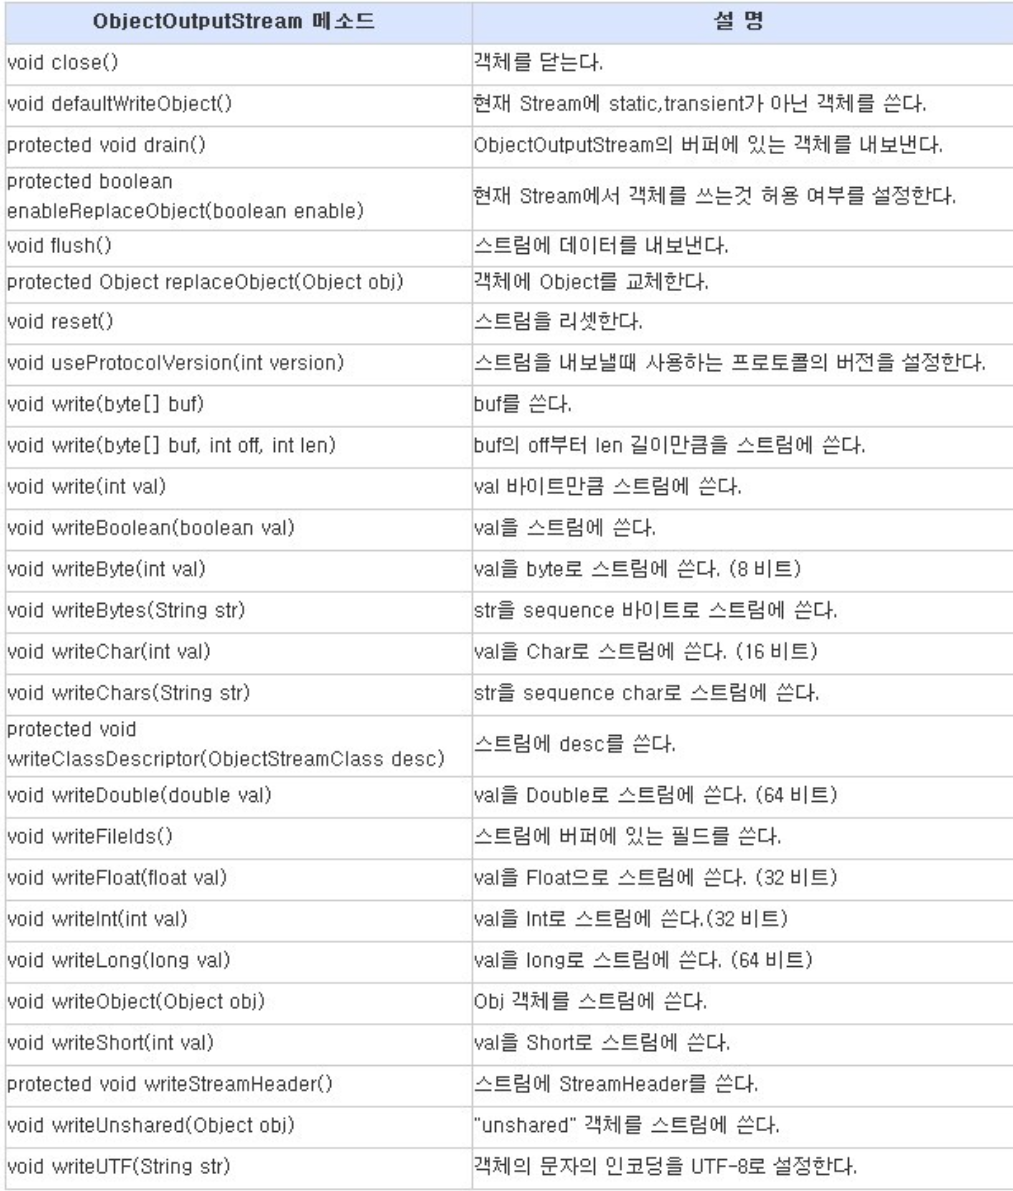
ObjectOutputStream 메소드
Serializable 과 transient
직렬화가 가능한 객체의 조건
① 기본형 타입(boolean, char, byte, short, int, long, float, double)은 직렬화가 가능
② Serializable 인터페이스를 구현한 객체여야 한다. (Vector 클래스는 Serializable 인터페이스구현)
③ 해당 객체의 멤버들 중에 Serializable 인터페이스가 구현되지 않은게 존재하면 안된다.
④ transient 가 사용된 멤버는 전송되지 않는다. (보안 변수 : null 전송)
Serializable
-
데이터를 파일에 쓰거나, 네트워크를 타고 다른 곳에 전송할 때는 데이터를 바이트 단위로 분해하여 순차적으로 보내야 한다. > 직렬화
-
기본 자료형(boolean, char, byte, short, int ,long, float, double)은 정해진 바이트의 변수이기 때문에 바이트 단위로 분해하여 전송한 후 다시 조립하는데 문제가 없다.
- 그러나 객체의 크기는 가변적이며, 객체를 구성하는 자료형들의 종류와 수에 따라 객체의 크기는 다양하게 바뀔 수 있다. 이런 객체를 직렬화 하기 위해서 Serializable 인터페이스를 구현해야 한다.
transient
- 그러나 객체의 크기는 가변적이며, 객체를 구성하는 자료형들의 종류와 수에 따라 객체의 크기는 다양하게 바뀔 수 있다. 이런 객체를 직렬화 하기 위해서 Serializable 인터페이스를 구현해야 한다.
-
패스워드 같은 보안은 전송을 하고 싶지 않을 수 있따. 이러한 변수는 직렬화에서 제외해야 하며, 그러기 위해서 변수에
transient를 선언해야 한다.직렬화하고자 하는 객체의 클래스에 직렬화가 안되는 객체에 대한 참조를 포함하고 있다면 제어자
transient를 붙여서 직렬화 대상에서 제외되도록 할 수 있다.
package com.test.memo;

import java.io.FileInputStream;
import java.io.FileOutputStream;
import java.io.IOException;
import java.io.ObjectInputStream;
import java.io.ObjectOutputStream;
import java.io.Serializable;

class UserClass implements Serializable { // 구현해주지 않아서 에러가 났던것
    private String name;
    private transient int age; // transient() > 직렬화 대상에서 제외시키기 > 나이를 알려주고 싶지 않다.

    UserClass(String name, int age) {
        this.name = name;
        this.age = age;
    }

    @Override
    public String toString() {
        return "UserClass{" + "name='" + name + '\'' + ", age=" + age + '}';
    }
}

public class Practice {
    public static void main(String[] args) {
        FileOutputStream fos = null;
        ObjectOutputStream out = null;
        UserClass us1 = new UserClass("하이언", 30);
        UserClass us2 = new UserClass("스티브", 33);
        UserClass us3 = new UserClass("제이슨", 27);

        try {
            fos = new FileOutputStream("object.dat");
            out = new ObjectOutputStream(fos);

            out.writeObject(us1);
            out.writeObject(us2);
            out.writeObject(us3);

            System.out.println("저장 완료");

        } catch (Exception e) {
            e.printStackTrace();
        } finally {
            if (fos != null)
                try {
                    fos.close();
                } catch (IOException e2) {
                    e2.printStackTrace();
                }
            if (out != null) {
                try {
                    out.close();
                } catch (IOException e) {
                    e.printStackTrace();
                }
            }
        }

        FileInputStream fi = null;
        ObjectInputStream in = null;

        try {
            fi = new FileInputStream("object.dat");
            in = new ObjectInputStream(fi);

            System.out.println((UserClass) in.readObject());
            System.out.println((UserClass) in.readObject());
            System.out.println((UserClass) in.readObject());
        } catch (Exception e) {
            e.printStackTrace();
        } finally {
            try {
                fi.close();
                out.close();
            } catch (IOException e) {
                e.printStackTrace();
            } catch (Exception e2) {
                e2.printStackTrace();
            }
        }
    }
}
//저장 완료
//UserClass{name='하이언', age=null}
//UserClass{name='스티브', age=null}
//UserClass{name='제이슨', age=null}