기트허브 링크1(Github link1)(Basics about Layout)

06-01 화면을 구성하는 방법
액티비티-뷰 구조
- 안드로이드 앱의 기본 구조는 컴포넌트 기반으로 한다
○ 즉, 안드로이드 앱은 액티비티, 서비스, 브로드캐스트 리시버, Content Provider와 같은 컴포넌트를 조합해서 만든다
§ 이중에서 화면을 출혁하는 컴포넌트는 액티비티 (Activity) 뿐이다
§ Activity는 화면을 출력하는 component이다 (화면 자체가 아님)
§ 화면에 내용을 표시하려면 뷰(View) 클래스를 이용해야함
- 뷰에는…
	○ TextView, ImageView 등과 같은 뷰 클래스가 있다
액티비티 코드로 화면 구성하기
- Activity에서 뷰 화면을 구성하는 두가지 방법
1. Activity 코드로 작성
i. Activity로 한다면 구성하는 뷰 클래스를 Acitivity code 에서 생성
2. 레이아웃 XML 파일로 작성
Activity 출력 예시)
class MainActivity : AppCompatActivity() {
override fun onCreate(savedInstanceState: Bundle?) {
super.onCreate(savedInstanceState)
//이름 문자열 출력 TextView 생성
val name = TextView(this).apply{
typeface = Typeface.DEFAULT_BOLD
text = "Lake Stef"
}
    //이미지 출력 ImageView 생성
    val image = ImageView(this).also{
        it.setImageDrawable(ContextCompat.getDrawable(this,R.drawable.lake_1))
    }

    val address = TextView(this).apply{
        typeface = Typeface.DEFAULT_BOLD
        text = "Address of Lake Stef"
    }

    val layout = LinearLayout(this).apply{
        orientation = LinearLayout.VERTICAL
        gravity = Gravity.CENTER
        //LinearLayout 객체에 TextView, ImageView, TextView 객체 추가
        addView(name, WRAP_CONTENT,WRAP_CONTENT)
        addView(image, WRAP_CONTENT,WRAP_CONTENT)
        addView(address, WRAP_CONTENT,WRAP_CONTENT)
    }

    setContentView(layout)
}
}
- 위 코드를 보면 TextView 2개와 ImageView 1개를 추가한 LinearLayout 객체를 Activity Component 함수인 setContentView() 로 전달해서 출력참고사항
- 자세히 보면 .apply { } 이거이다. 보통 자바에서는 ( ) 로 쓰지만….. 코틀린은 { } 이다
▪ 자세하게 설명하면 호출하려는 함수가 고치 함수(high order function)이고 마지막 전달 인자가 함다 함수이면 소괄호 생략 가능
▪ .apply 함수를 apply({ }) 해도 문제 없다
레이아웃 XML 화면 구성하기
- XML 예시)
    <TextView
        android:layout_width="wrap_content"
        android:layout_height="wrap_content"
        android:textStyle="bold"
        android:text="Lake Stef"
        />
    <TextView
        android:layout_width="wrap_content"
        android:layout_height="wrap_content"
        android:textStyle="bold"
        android:text="AddressLake Stef"
        />


    <!--
    <TextView
        android:layout_width="wrap_content"
        android:layout_height="wrap_content"
        android:text="Hello World!"
        app:layout_constraintBottom_toBottomOf="parent"
        app:layout_constraintLeft_toLeftOf="parent"
        app:layout_constraintRight_toRightOf="parent"
        app:layout_constraintTop_toTopOf="parent" />
    -->

</LinearLayout>

- 만약 XML 로 한다면 반드시 Activity Code에 명시해야한다
//화면 출략 XML 명시
setContentView(R.layout.activity_main)
06-02 뷰 클래스
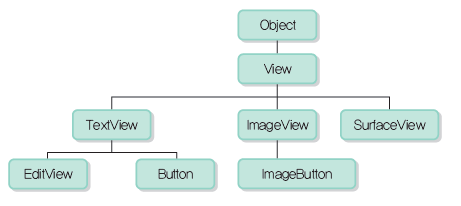
뷰 클래스의 기본 구조
- 안드로이드는 TextView, ImageView, EditText, Button, Spinner, ListView 등 뷰 클래스 제공한다
뷰 객체의 계층 구조
- Activity 화면을 구성할 때 사용하는 클래스는 모두 View의 하위 클래스 입니다
	▪ 화면 구성과 관련한 클래스를 통칭하여 뷰 클래스라고 한다
	▪ View: 모든 View Class의 최상위 Class. Activity는 View의 sub Class 만 화면에 출혁한다
	▪ ViewGroup: View의 하위 클래스이지만 자체 UI는 없어서 화면에 출력해도 아무것도 없음.
		○ 다른 뷰 여러 개를 묶어서 제어하는 목적으로 사용됨
		○ 쉽게 생각하면 클래스랑 비슷하고 일반적으로 컨데테이너 기능을 담당
		○ ViewGroup의 sub class인 layout class 를 사용한다
	▪ TextView: 문자열을 출력하는 view

- 객체의 계층 구조에서 주요한 역할은 하는 것은 레이아웃 클래스이다
예시)
- 위에서 말했지만 ViewGroup은 다른 뷰(TextView,ImageView,etc) 객체 여러 개를 담아서 제어하는 목적이 더 크다예시2)
<LinearLayout xmlns:android="http://schemas.android.com/apk/res/android"
생랴….
tools:context=".MainActivity">
<TextView생략….
<Button
레이아웃 중첩
- 뷰의 게층 구조는 레이아웃 객체를 중첩해서 복잡하게 구성 가능
예시) 레이아웃 중첩
<Button
    android:layout_width="wrap_content"
    android:layout_height="wrap_content"
    android:text="Button1"/>
<Button
    android:layout_width="wrap_content"
    android:layout_height="wrap_content"
    android:text="Button2"/>
<LinearLayout
    android:layout_width="match_parent"
    android:layout_height="wrap_content"
    android:orientation="horizontal">
    <Button
        android:layout_width="wrap_content"
        android:layout_height="wrap_content"
        android:text="Button3"/>
    <Button
        android:layout_width="wrap_content"
        android:layout_height="wrap_content"
        android:text="Button4"/>
</LinearLayout>
- 위 코드는 LinearLayout 객체에 또 다른 LinearLayout 객체를 포함하여 화면을 구성한 거다
- 이처럼 객체를 계층 구조로 만들어 이용하는 패턴을 컴포지트 패턴(Composite Pattern) 아니면 문서체 모델(document object model)이라고도 한다레이아웃 XML의 뷰를 코드에서 사용하기
- Activity 코드에서 setContentView()함수로 XML 파일을 지정하면서 출력한다
- 물론 지금까지 id 없이 출력 했지만 보통 식별자를 부여해야한다
- 안드로이드에서는 속성 id 를 사용한다
▪ 꼭 지정해야하는 거는 아니지만,
예시)
<Button
android:id="@+id/button1"
- 여기서는 button1이 id 값이다
- XML에 id 속을 추가하면 자동으로 R.java 파일에 상수 변수도 추가됨
- 'id 속성 값은 "@+id/button1" 형태호 추가하는데 XML 속성값이 @로 시작하면 R.java 파일을 의미한다
▪ => 그 말은 R.java 파일에 button1 이라는 상수 변수를 추가하라는 의미
- 코드에서 findViewById() 함수를 이용해서 R.java 파일의 상수 변수 객체를 얻을 수 있음
예시)
//XML 화면 출력, 뷰 겍체 생성 완료
setContentView(R.layout.activity_main)
//id 값으로 뷰 객체 확등
val buttonView1 = findViewById(R.id.text1)
뷰의 크기를 지정하는 방법
- 뷰를 레리아웃 XML에 등록하여 화면을 구성할때 생략이 불가능한건 크기이다
▪ layout_width, layout_height
- layout_width, layout_height으로 크기를 나태내는 속성값은 다음 3가지이다
1. 수치
i. Ex: 100px, 160dpi
2. match_parent
3. wrap_content
- 참고로 수치 보다 match_parent랑 wrap_content를 더욱 많이 사용하는 이유는 다른 기기 호혼성을 고려해 화면을 구성해야하기 때문