hx-confirm
무언가 삭제 요청할때, 쓰기 좋다.

hx-swap시 특정 행동 지정
    attributes["hx-swap"] = "innerHTML scroll:#chatArea:bottom"
    attributes["hx-on--after-swap"] = "this.scrollTop = this.scrollHeight"
Loading 표시
<body>
  <h1>HTMX Tutorial</h1>
  <button hx-get="/greeting" hx-target="#here" hx-indicator="#indicator">
    Click
  </button>
  <span class="htmx-indicator" id="indicator">Loading...</span>
  <h2 id="here">Here</h2>
</body>
페이지가 열리자마자 실행되는 코드 작성하기
hx-trigger='load'예시
toggle button using htmx
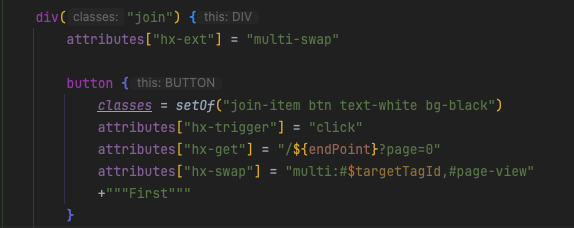
HTMX multi-swap Extension
<script src="https://unpkg.com/htmx.org@1.9.12/dist/ext/multi-swap.js"></script>hx-swap-oob 와의 차이점이라면 변경할 내역을 클라이언트 쪽에서 정한다라는 것
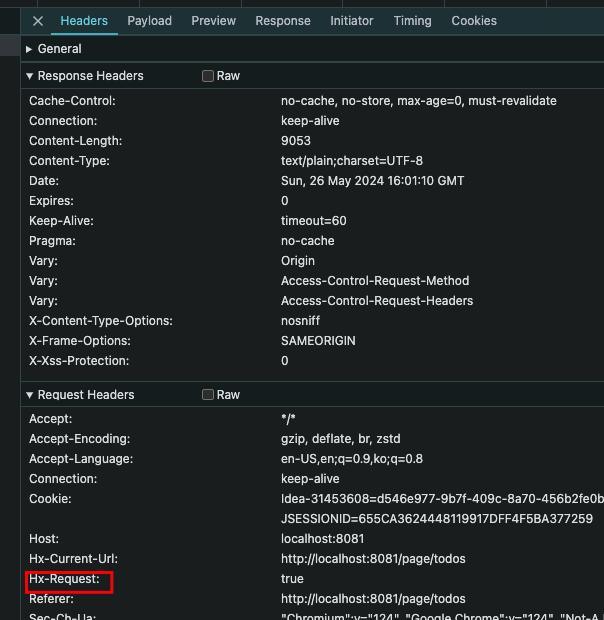
HTMX Request인지 일반 Request인지 구분방법
Hx-Retarget, HX-Reswap
서버에서 요청에 대해 성공인지 exception인지 따라 다른 ui 조각을 던져줄 때, 이 옵션을 사용할 수 있겠다.
아니면 아래와 같은 extension도 있다.
https://htmx.org/extensions/response-targets/만약 400~500 Http status를 그대로 유지하면서 에러 응답을 던져주고 싶다면, custom event listner를 활용할 수도 있다.
document.addEventListener('htmx:afterRequest', e => {
    if (!e.detail.xhr.status.toString().startsWith('2')) {
        let errorBanner = document.getElementById("toast");
        errorBanner.innerHTML = e.detail.xhr.responseText;
        errorBanner.style.display = 'block';
    }
});
HTMX on 이벤트 필터링
https://github.com/bigskysoftware/htmx/issues/1519
안 된다. 명시적으로 코드 작성해줘야 됨.
        attributes["hx-on--after-request"] = "javascript:document.getElementById('converter-input').value='';"


          hx-on--after-request="if(event.detail.successful) {
                            location.reload()
                        }"
여러가지 간단한 자바스크립트 인라인 수행할 때 쓰기 좋다.
HTMX TAB
공식 사이트에서는 아래 2가지 방법을 제안하고 있다.
https://htmx.org/examples/tabs-javascript/
https://htmx.org/examples/tabs-hateoas/
나는 JS를 활용하는 방법을 선호한다.
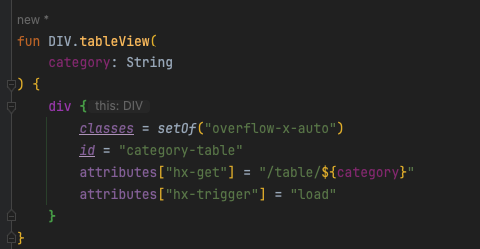
fun DIV.tabView(
    category: String,
    activeCategory: String
) {
    val categoryTabId = "#category-tab-${category.removeSpecialCharacters()}"
    val activeCategoryTabId = "#category-tab-${activeCategory.removeSpecialCharacters()}"

    div {
        a {
            id = "$categoryTabId"
            classes = setOf("cursor-pointer", "tab", "tab-lifted", "m-tab")
            attributes["hx-get"] = "/table/${category}"
            attributes["hx-target"] = "#category-table"
            //attributes["onclick"] = "showActive('${category.removeSpecialCharacters()}')"
            if (categoryTabId == activeCategoryTabId) {
                classes += "tab-active"
            }
            attributes["hx-on:htmx-after-on-load"] =
                """
                   let currentTab = document.querySelector('.tab-active');
                   currentTab.classList.remove('tab-active')
                   let newTab = event.target
                   newTab.classList.add('tab-active')
                """.trimIndent()

            +"$category"
        }
    }
}
HTMX POST 요청을 JSON으로 보내면서 HTML로 응답받고 싶을 때
<script>
   const email = "htmxceo@x.com";
  const password = "htmxrocks";
</script>

...

<button hx-post="http://localhost:1330/login"
        hx-vals='js:{
        "userEmail": email
        "userPassword": password
    }'>
    Submit
</button>
Global Interceptor
document.addEventListener('htmx:configRequest', function(evt) {
    //evt.detail.headers['Authentication'] = "전달자: " + getJWT()
    evt.detail.headers['testHeader'] = "test"
});
Multiple hx-include
hx-include="[name='message'], [name='model']"hx-swap-oob
서버가 아래와 같이 여러 개의 OOB 요소를 응답으로 내려주면, htmx는 각 대상 요소를 찾아 업데이트합니다.
<!-- 서버 응답 예시 -->
<input id="input1" type="text" value="새 값 1" hx-swap-oob="true">
<input id="input2" type="text" value="새 값 2" hx-swap-oob="true">
또는 각 요소에 대상 선택자를 명시적으로 지정할 수도 있습니다:
<!-- 서버 응답 예시 -->
<input id="input1" type="text" value="새 값 1" hx-swap-oob="outerHTML:#input1">
<input id="input2" type="text" value="새 값 2" hx-swap-oob="outerHTML:#input2">
여러군데 퍼져 있는 html 태그들을 한번에 원하는 만큼 바꿔치고 싶을때,
서버 응답이나 클라이언트 둘 중 한군데에서만 존재해야된다. 둘 다 존재하면 충돌
hx-swap-oob가 작동할려면 반드시 태그에 id 가 있어야 된다. 까먹지 말자..
간단한 유용한 패턴
@param isOOB:String = ""

        <tbody id="spots-tbody" hx-swap-oob="${isOOB}">

----


      model.addAttribute("isOOB", "true")

        return FragmentsRendering
            .fragment("components/smokingspot/SmokeSpotTable")
            .fragment("components/smokingspot/spotPage")
            .build()
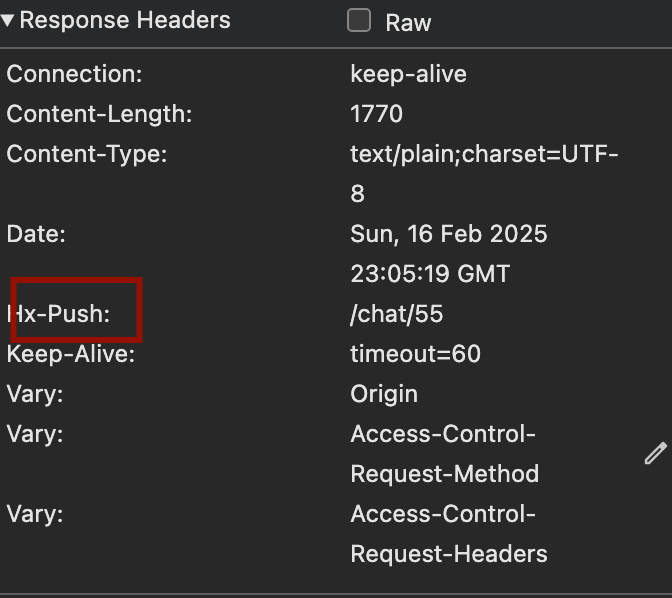
hx-push-url
요청시 url을 바꾸고 싶다면,
hx-push-url
만약 서버에서 작업을 한 이후에 url을 응답받아야 된다면, 응답헤더에 Hx-push 키 원하는 url value를 넣어주면 된다.
특정 htmx 요청 후 다른 htmx 요청을 연쇄적으로 트리거시키고 싶을때
headers.add("HX-Trigger", "chatsEvent") //이미 클라이언트에서 아래와 같은 조각이 있을 때
headers.add("HX-Trigger-After-Swap", "chatsEvent") //서버에서 아래와 같은 조각을 만들어서 응답에 포함시킬때는

===

<div class="mt-5" hx-get="/chats" hx-trigger="load, chatsEvent from:body"><div>
자바스크립트 이벤트 초기화가 필요한 경우
htmx로 html 조각을 리턴해주었고, 이 html 조각이 어떤 이벤트를 발생시키는 자바스크립트 함수와 연결돼 있다면 이벤트리스너를 등록해주는 과정이 필요한데, html 조각을 리턴해주는 것만으로 이벤트리스너를 등록시키는 과정이 자동으로 이루어지지 않는다. 이와 같은 상황에서 강제로 초기화를 해줘야 된다.
예를 들어, Flowbite는 페이지가 처음 로드될 때 DOM에 있는 드롭다운 요소들에 대해 이벤트 핸들러를 등록한다. 그런데 htmx 같은 도구로 서버 응답을 통해 동적으로 삽입된 콘텐츠는 초기 로드 시점에 존재하지 않으므로 Flowbite의 초기화 로직에 포함되지 않는다. 해결 방법은 동적으로 삽입된 콘텐츠가 완전히 로드된 후, Flowbite의 드롭다운 초기화 코드를 다시 실행하는 것이다.
https://github.com/themesberg/flowbite/issues/596
https://stackoverflow.com/questions/76051980/flowbite-component-not-working-when-loaded-via-htmx-django-project
htmx.onLoad(function () {
    initFlowbite();
});
이와 같은 특수한 상황에서 라이브러리를 다룰 때는 해당 함수를 초기화 해주는 코드를 삽입해주자
동적인 값 hx-val로 전달
attributes["hx-vals"] = """js:{"lastPath": window.location.pathname.split("/").pop()}"""HTMX 부모요소의 속성 상속 방지
https://htmx.org/attributes/hx-disinherit/
https://htmx.org/attributes/hx-inherit/
htmx.config.disableInheritance = true이벤트 버블링을 막지는 못한다.(자식 태그 요청이 부모태그 hx-on--after-request 속성을 트리거하는 경우 ) 그럴 경우 명시적으로 자식태그에..
hx-on--after-request="event.stopPropagation(); console.log('이벤트 버블링 방지');"
Server에서 보낸 변수를 client 사이드에서 받고 싶을 때
htmx tip이라기보다 서버측 템플릿을 쓸 시 일반적인 서버와 클라이언트 간의 데이터 교환방법에 대한 TIP. 나 같은 경우 주로 아래와 같은 방법 씀.
// 서버 쯕 템플릿
        input {
            type = InputType.hidden
            value = "${post?.id ?: 0}"
            name = "postId"
        }
// 클라이언트 사이드
let postId = document.querySelector('input[name=postId]').value;
Htmx Custom Extension
    htmx.defineExtension('hx-dataset-include', {
        encodeParameters: function (xhr, parameters, elt) {
            Object
                .keys(elt.dataset)
                .forEach(k => parameters.append(k, elt.dataset[k]))
        }
    })
    htmx.config.extensions['hx-dataset-include'] = true


<div class="text-sm text-gray-700 cursor-pointer"
     hx-post="/resend-code"
     hx-target="#resend-result"
     hx-ext="hx-dataset-include"
     data-email="${email}"
     data-token="${token}"
     hx-include="this"
>
    <p class="text-blue-600">
        Resend Code
    </p>

    <p id="resend-result" class="text-gray-500">

    </p>

</div>디바운스/쓰로틀 적용
디바운스 사용 (연속 클릭 중 마지막 클릭만 처리)
<button hx-post="/api/action"
        hx-trigger="click delay:300ms">
  처리하기
</button>
쓰로틀 사용 (일정 간격으로만 요청 처리)
<button hx-post="/api/action"
        hx-trigger="click throttle:500ms">
  처리하기
</button>
hx-disable-elt
HTMX는 중복 요청 방지를 위한 내장 속성을 제공합니다.
hx-disable-elt과 hx-indicator 조합 사용
<button hx-post="/api/action"
        hx-trigger="click"
        hx-indicator="#spinner"
        hx-disable-elt="this">
  처리하기
</button>
<span id="spinner" class="htmx-indicator">
  <img src="/img/spinner.gif"/> 처리 중...
</span>
작동 방식:
hx-disable-elt="this": 요청 중 버튼을 비활성화합니다
hx-indicator: 요청 중임을 시각적으로 표시합니다
참고
htmx에는 JavaScript API가 있습니다. btw
HTMX, Thymeleaf 및 Spring Boot를 사용한 Toast