01. 스프링 조금 더 들여다 보기
Spring
🦜 2004년 출시
🦜 20년간 자바 엔터프라이즈 어플리케이션 개발의 최고의 자리 차지
🦜 스프링 프렘임워크의 구성은 20여가지로 구성
🦜 현재 단일 아키텍처(모놀리스)에서 마이크로서비스아키텍처로 변환 중 여기에 맞춰서 스프링도 진화
🦜 여러 가지 모듈이 있지만 그 중에서 단연 스프링 부트, 클라우드, 데이터, 배치, 시큐리티에 중점을 많이 둔다.
🦜 테스트의 용이성,느슨한 결합에 중점을 두고 개발
특징 삼각형
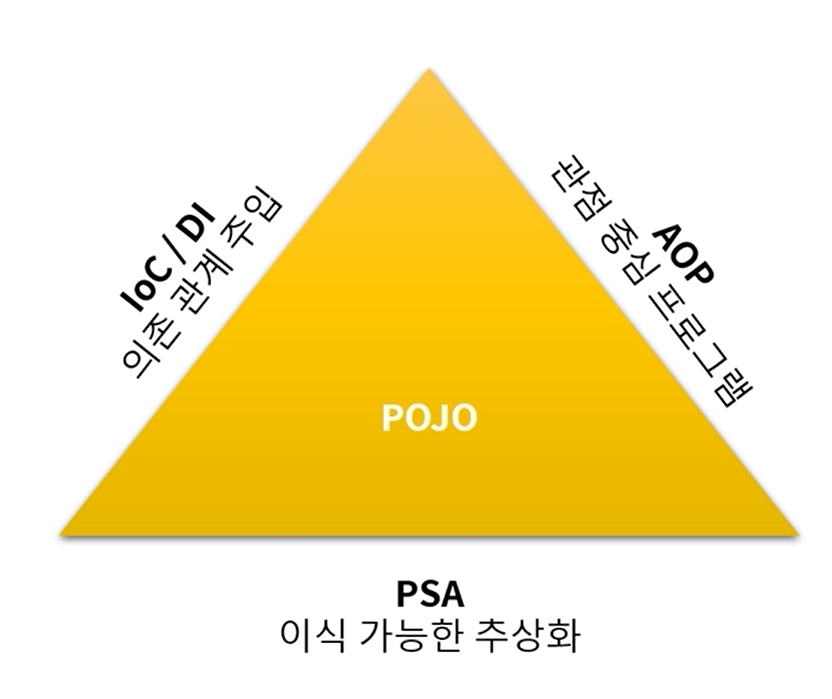
- 의존 관계 주입
- 관점 중심 프로그램
- 이식 가능한 추상화
IoC/DI
🦜IoC(Inversion Of Control)
스프링에서는 일반적인 자바 객체를 새로 생성하여 개발자가 관리 하는 것이 아닌 Spring Container에 모두 맡긴다.
즉, 개발자에서 -> 프레임워크로 제어의 객체 관리의 권한이 넘어갔음 으로 "제어의 역전 이라고 합니다.
🦜DI(Dependency Injection)
그럼 내가 객체를 관리안하면? 어떻게 꺼내쓰냐?
의존성 주입으로 한다!!!
- 의존성으로 부터 격리시켜 코드 테스트에 용이
- DI를 통하여, 불가능한 상황을 Mock와 같은 기술을 통하여, 안정적으로 테스트 가능하다.
- 코드를 확장하거나 변경 할 때 영향을 최소화 한다.(추상화)
- 순환참조를 막을 수 있다.
🦜 Bean 객체
이놈은 Spring컨테이너에 관리되고있는 객체
🦜이놈들은 책 보고 더 공부해라
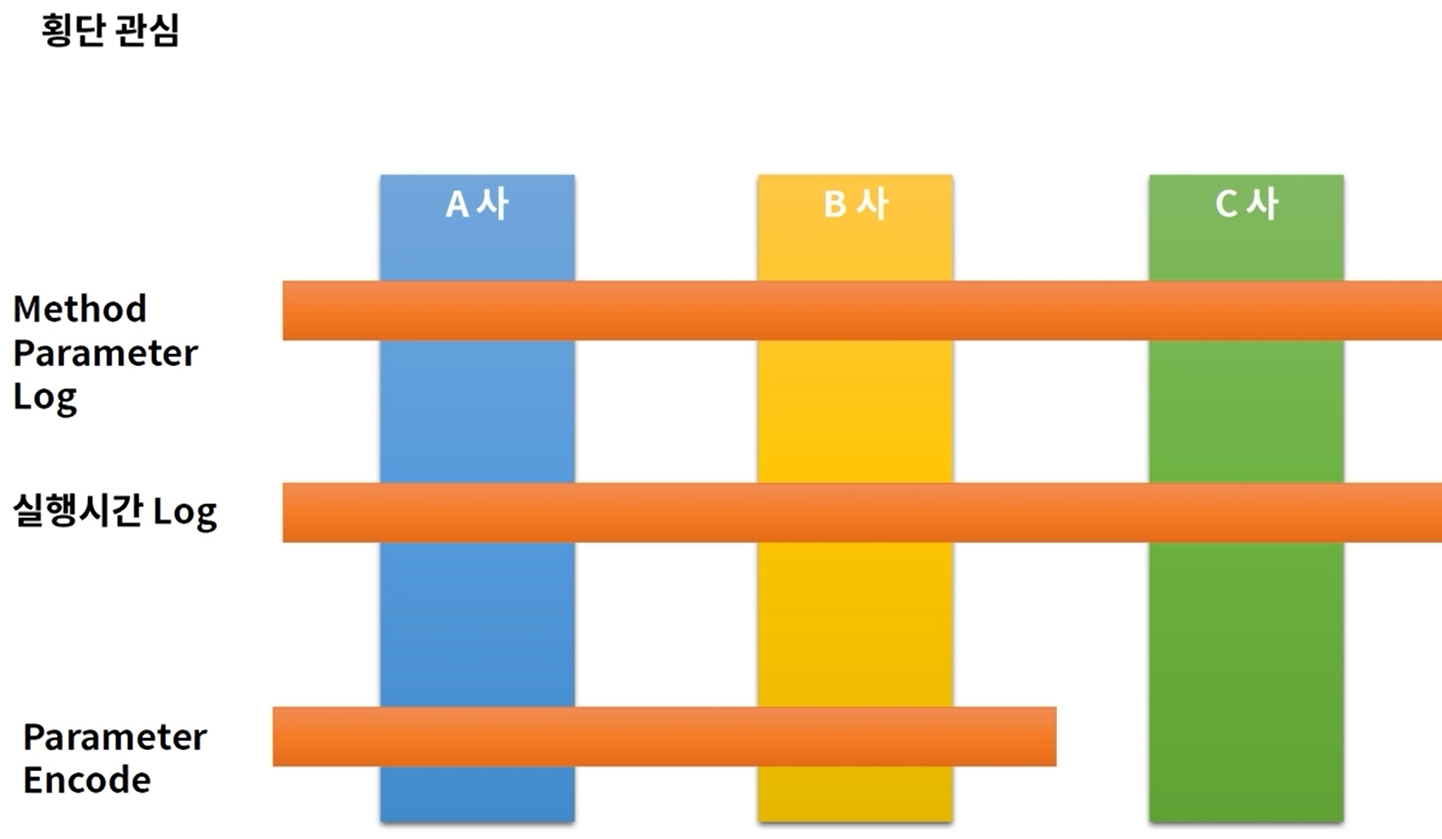
AOP
관점지향 프로그램
스프링 어플리케이션은 대부분 MVC 웹 어플리케이션에서는 Web Layer, Business Layer, Data Layer 로 정의
- Web Layer: REST API를 제공 ,Client 중심로직
- Business Layer : 내부 정책에 따른 logic를 개발하며 , 주로 해당 부분을 개발
- Data Layer: 데이터 베이스 및 외부와의 연동을 처리
입력 출력 Data확인 AOP
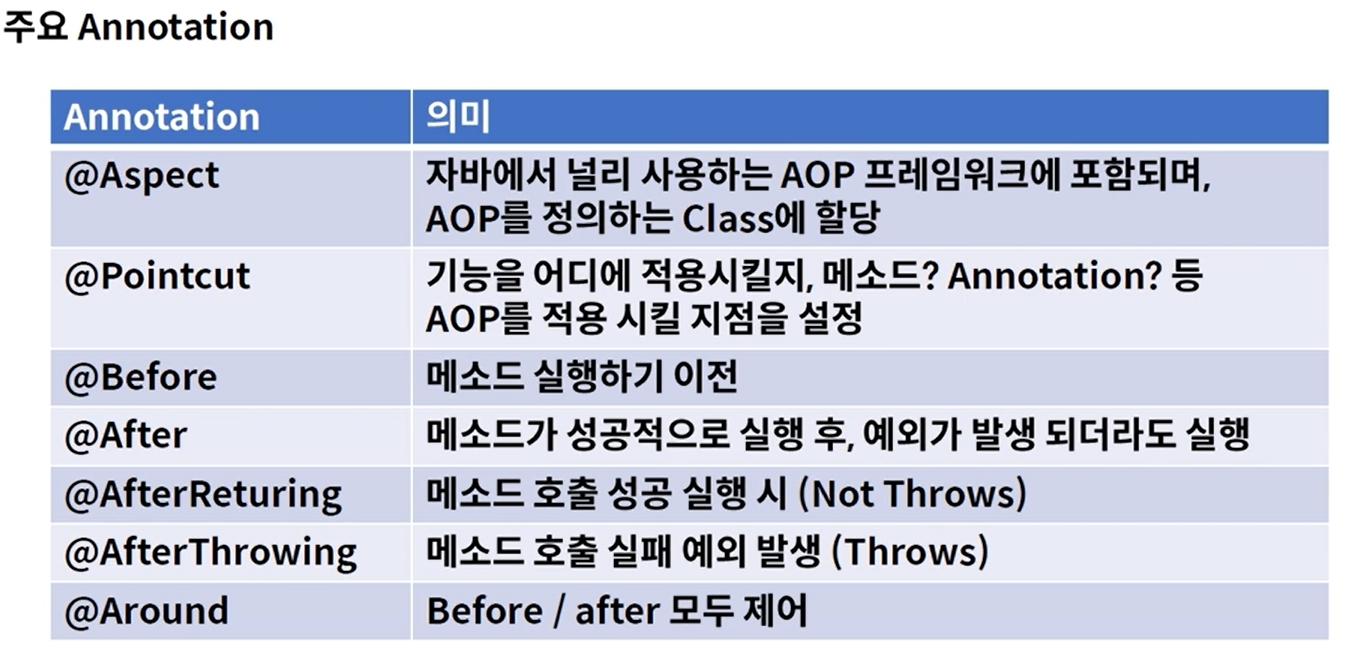
@Aspect
@Component
public class ParametterAop {
@Pointcut("execution(* com.example.aop.contorller..*.*(..))")
private void pointCut() {
}
@Before("pointCut()")
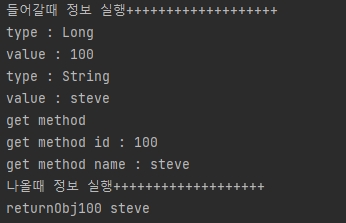
public void before(JoinPoint joinPoint) {
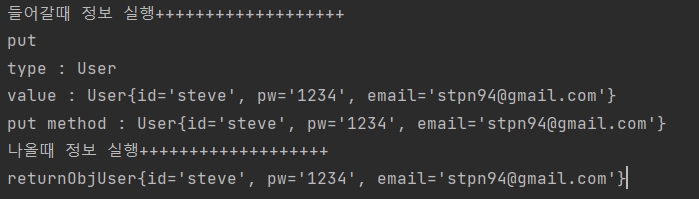
System.out.println("들어갈때 정보 실행+++++++++++++++++++");
MethodSignature methodSignature = (MethodSignature) joinPoint.getSignature();
Method method = methodSignature.getMethod();
System.out.println("method 이름 : "method.getName());
Object[] args = joinPoint.getArgs();
for (Object obj : args) {
System.out.println("type : " + obj.getClass().getSimpleName());
System.out.println("value : " + obj);
}
}
@AfterReturning(value = "pointCut()", returning = "returnObj")
public void afterReturn(JoinPoint joinPoint, Object returnObj) {
System.out.println("나올때 정보 실행+++++++++++++++++++");
System.out.println("returnObj" + returnObj);
}
}
TimerAop
🎈Timer 어노테이션 만들고
@Target({ElementType.TYPE, ElementType.METHOD})
@Retention(RetentionPolicy.RUNTIME)
public @interface Timer {

}
🎈TimerAop 만들고
@Aspect
@Component
public class TimerAop {
    @Pointcut("execution(* com.example.aop.contorller..*.*(..))")
    private void pointCut() {
    }

    @Pointcut("@annotation(com.example.aop.annotation.Timer)")
    private void enableTimer() {
    }
    @Around("pointCut() && enableTimer()")
    public void around(ProceedingJoinPoint joinPoint) throws Throwable {
        StopWatch stopWatch= new StopWatch();
        stopWatch.start();
        Object result = joinPoint.proceed();
        stopWatch.stop();
        System.out.println("총 시간 : "+stopWatch.getTotalTimeSeconds());
    }
}
🎈Controller에 Timer 측정하고 싶은 메서드위에 @Timer달고 thread.sleep 은 2초 잠재울려고 하는거임.
@Timer
    @DeleteMapping("/delete")
    public void delete() throws InterruptedException {
        // db logic
        Thread.sleep(1000 * 2);
    }
Decoder AOP
🎈 먼저 Decode 어노테이션 만들어주고
@Target({ElementType.TYPE, ElementType.METHOD})
@Retention(RetentionPolicy.RUNTIME)
public @interface Decode {
}
🎈 DecodeAop 만들어준다.
@Aspect
@Component
public class DecodeAop {
    @Pointcut("execution(* com.example.aop.contorller..*.*(..))")
    private void pointCut() {
    }

    @Pointcut("@annotation(com.example.aop.annotation.Decode)")
    private void enableDecode() {
    }

    // before 는 디코딩해서 볼꺼고
    @Before("pointCut() && enableDecode()")
    public void before(JoinPoint joinPoint) throws UnsupportedEncodingException {
        Object[] args = joinPoint.getArgs(); //메서드가 실행될때 args=파라미터들 중에
        for (Object arg : args) {
            if (arg instanceof User) {  // 내가 원하는 User라는 클래스가 있으면
                User user = User.class.cast(arg); // User라는 클래스로 형변환
                String base64Email = user.getEmail(); //인코딩 되어있던 이메일을 꺼낸다.
                String email = new String(Base64.getDecoder().decode(base64Email), "UTF-8"); //디코딩해서 다시 set 해준다.
                user.setEmail(email);
                // 그러면 실질적인 컨트롤러에서는 디코딩할 필요없다.

            }
        }
    }

    // after 는 인코딩해서 보낼꺼임
    @AfterReturning(value = "pointCut()&&enableDecode()", returning = "returnObj")
    public void afterReturn(JoinPoint joinPoint, Object returnObj) {
        if(returnObj instanceof User){ //오브젝트에서 유저를 찾아서
            User user = User.class.cast(returnObj);
            String email = user.getEmail(); // 평문 이메일을
            String base64Email = Base64.getEncoder().encodeToString(email.getBytes()); //다시 인코딩 해주고
            user.setEmail(base64Email); //다시 셋해준다.
        }

    }
}
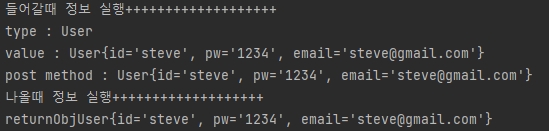
🎈 Controller에 @Decode 사용한 메서드에 붙여주고
 @Decode
    @PutMapping("/put")
    public User put(@RequestBody User user) {
        //들어온 값 바꿔서 내보내 줄꺼임. 디코더AOP 가
        System.out.println("put method : " + user);
        return user;
    }
🎈 AopApplication에서 Test하기위에 인코딩이메일을하나 출력해본다.
@SpringBootApplication
public class AopApplication {

    public static void main(String[] args) {
        SpringApplication.run(AopApplication.class, args);
        System.out.println(Base64.getEncoder().encodeToString("stpn94@gmail.com".getBytes()));
    }
}
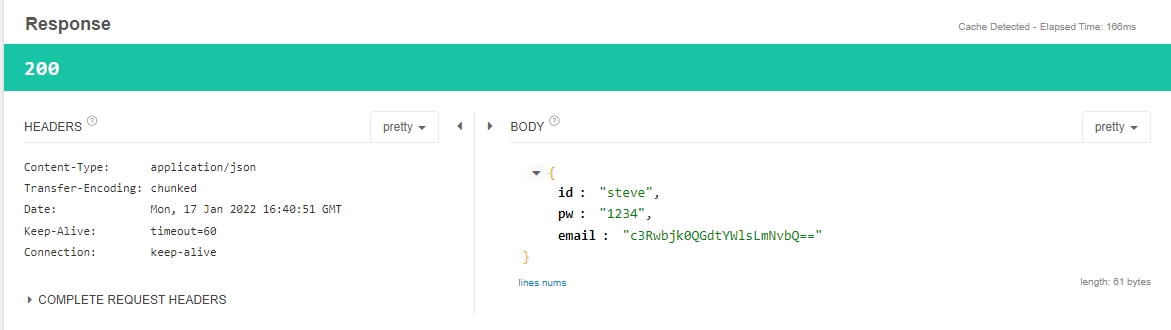
🎈 디코딩 된 코드로 put 한번 해보자
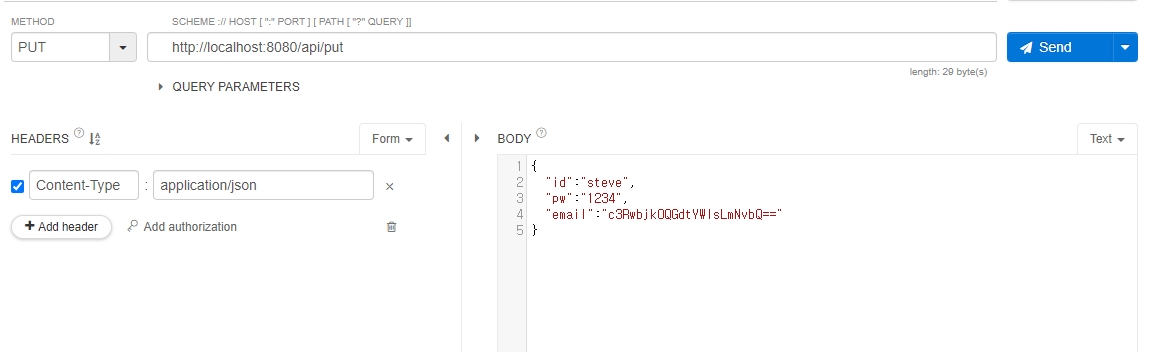
디코딩된 코드를 디코더가 읽고 다시 내보낼때 디코딩해서 보낸다.
Object Mapper
- 특정 객체가 있으면 Json 형태로 변환
- Text 객체가 있으면 Object Mapper로 객체로 변환
🎈 Json내부 node 부분을 컨트롤 할 수 있어야 한다. for 상태변경, 값 확인
dependencies {
...
...
// https://mvnrepository.com/artifact/com.fasterxml.jackson.core/jackson-databind
    implementation group: 'com.fasterxml.jackson.core', name: 'jackson-databind', version: '2.12.1'
...
}
👉 dependencies에 jackson.core dependencies를 넣어준다.
public class Car {
    private String name;
    @JsonProperty("car_number")
    private String carNumber;
    @JsonProperty("TYPE")
    private String type;

...getter setter
}
+@JsonProperty("car_number") 는 카멜을 스네이크 케이스로 변경하기위해
public class User {
    private String name;
    private int age;
    private List<Car> cars;
...getter setter
}
사용할 Class만들어주고
public class Main {
    public static void main(String[] args) throws JsonProcessingException {
        System.out.println("main test");
        ObjectMapper objectMapper = new ObjectMapper();

        User user = new User();
        user.setName("홍길동");
        user.setAge(10);

        Car car1 = new Car();
        car1.setName("K5");
        car1.setCarNumber("11가 1111");
        car1.setType("sadan");
        Car car2 = new Car();
        car2.setName("Q5");
        car2.setCarNumber("22가 2222");
        car2.setType("SUV");

        List<Car> carList = Arrays.asList(car1, car2);
        user.setCars(carList);

        System.out.println(user);
        String json = objectMapper.writeValueAsString(user);
        System.out.println(json);

    }
}
값을 넣어 objectMapper를 사용해 본다.
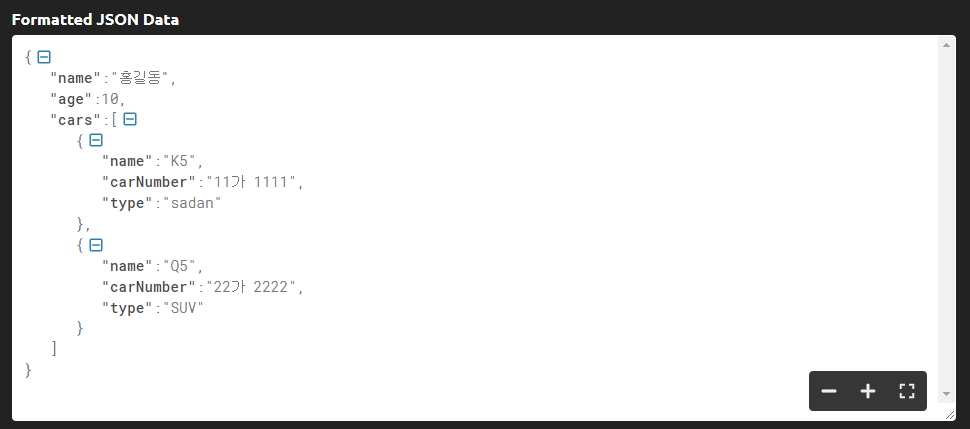
🎈 이렇게 하면 그냥 objectMapper를 사용한거다. 이제 노드에 접근해보자.
...
...
...
	JsonNode jsonNode = objectMapper.readTree(json);
        //하나식 파싱
        String _name = jsonNode.get("name").asText();
        int _age = jsonNode.get("age").asInt();
        System.out.println("노드에 접근해 하나씩 파싱하기");
        System.out.println("name : " + _name);
        System.out.println("age : " + _age);

        String _list = jsonNode.get("cars").asText();
        System.out.println(_list);
        // cars 같은 경우 Json 배열을 가져와야 하는데 일반 String type으로 못 불러온다.
        // 그래서 아래와 같은 방법으로 한다.

        JsonNode cars = jsonNode.get("cars"); //cars 배열을 일단 가져오고
        ArrayNode arrayNode = (ArrayNode) cars; //ArrayNode클래스로 변환시켜준다.
        List<Car> _cars = objectMapper.convertValue(arrayNode, new TypeReference<List<Car>>() {
        }); //objectMapper에 값을 변경시키는 convertValue함수를 사용하여 (노드, new TypeReference<List<Car>>새로운 타입참조(){})
        System.out.println("배열객체노드에 접근해 파싱하기");
        System.out.println(_cars);
🎈 위와같이 오브젝트맵퍼를 사용하여 사용자가 원하는 타입으로 파싱하여 json객체로 출력할수 있다. 이걸 왜 할까? 객체에 접근해서 변경할수 있기 때문이다.
        ObjectNode objectNode = (ObjectNode) jsonNode;
        objectNode.put("name","steve"); //이름을 스티브로
        objectNode.put("age",20);//나이를 20살로

        System.out.println(objectNode.toPrettyString()); //Json을 이쁘게 출력하기
{
  "name" : "steve",
  "age" : 20,
  "cars" : [ {
    "name" : "K5",
    "car_number" : "11가 1111",
    "TYPE" : "sadan"
  }, {
    "name" : "Q5",
    "car_number" : "22가 2222",
    "TYPE" : "SUV"
  } ]
}
🎈 그럼 스프링에서 어디서쓰일까?
🎈🎈 AOP 혹은 filter를 사용할때 들어오는 객체에 접근하여 data 수정 후 Spring으로 전달가능하다!! 꿀팁!!!
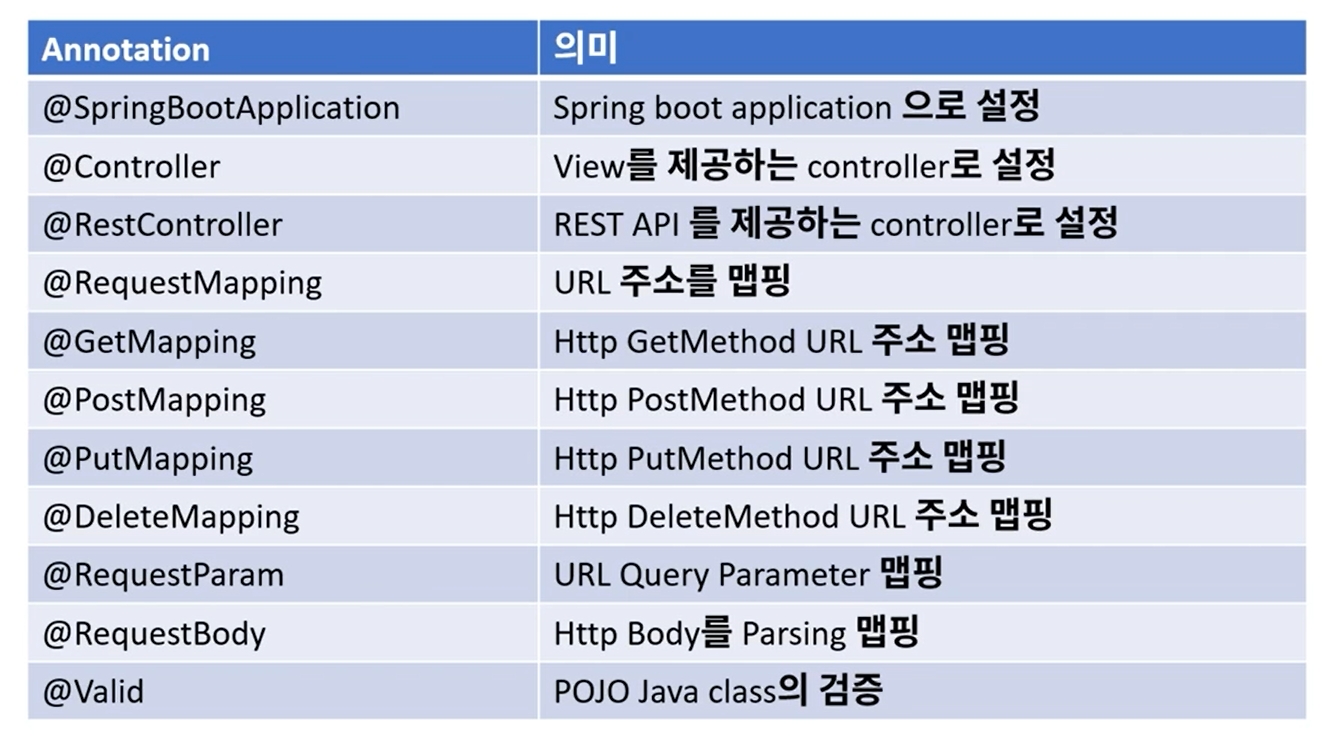
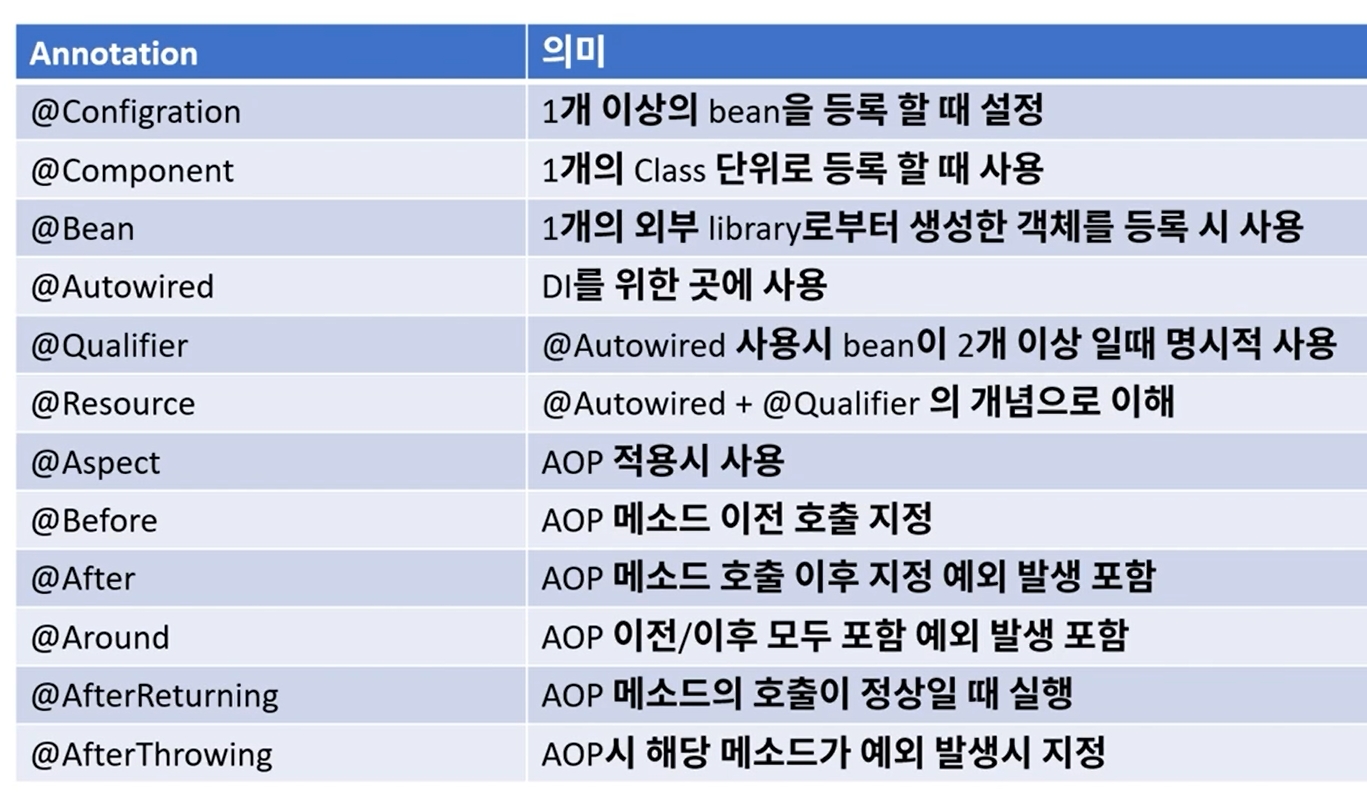
스프링 @어노테이션 살펴보기