
📌프로젝트 진행 방법
❶ 완성 모습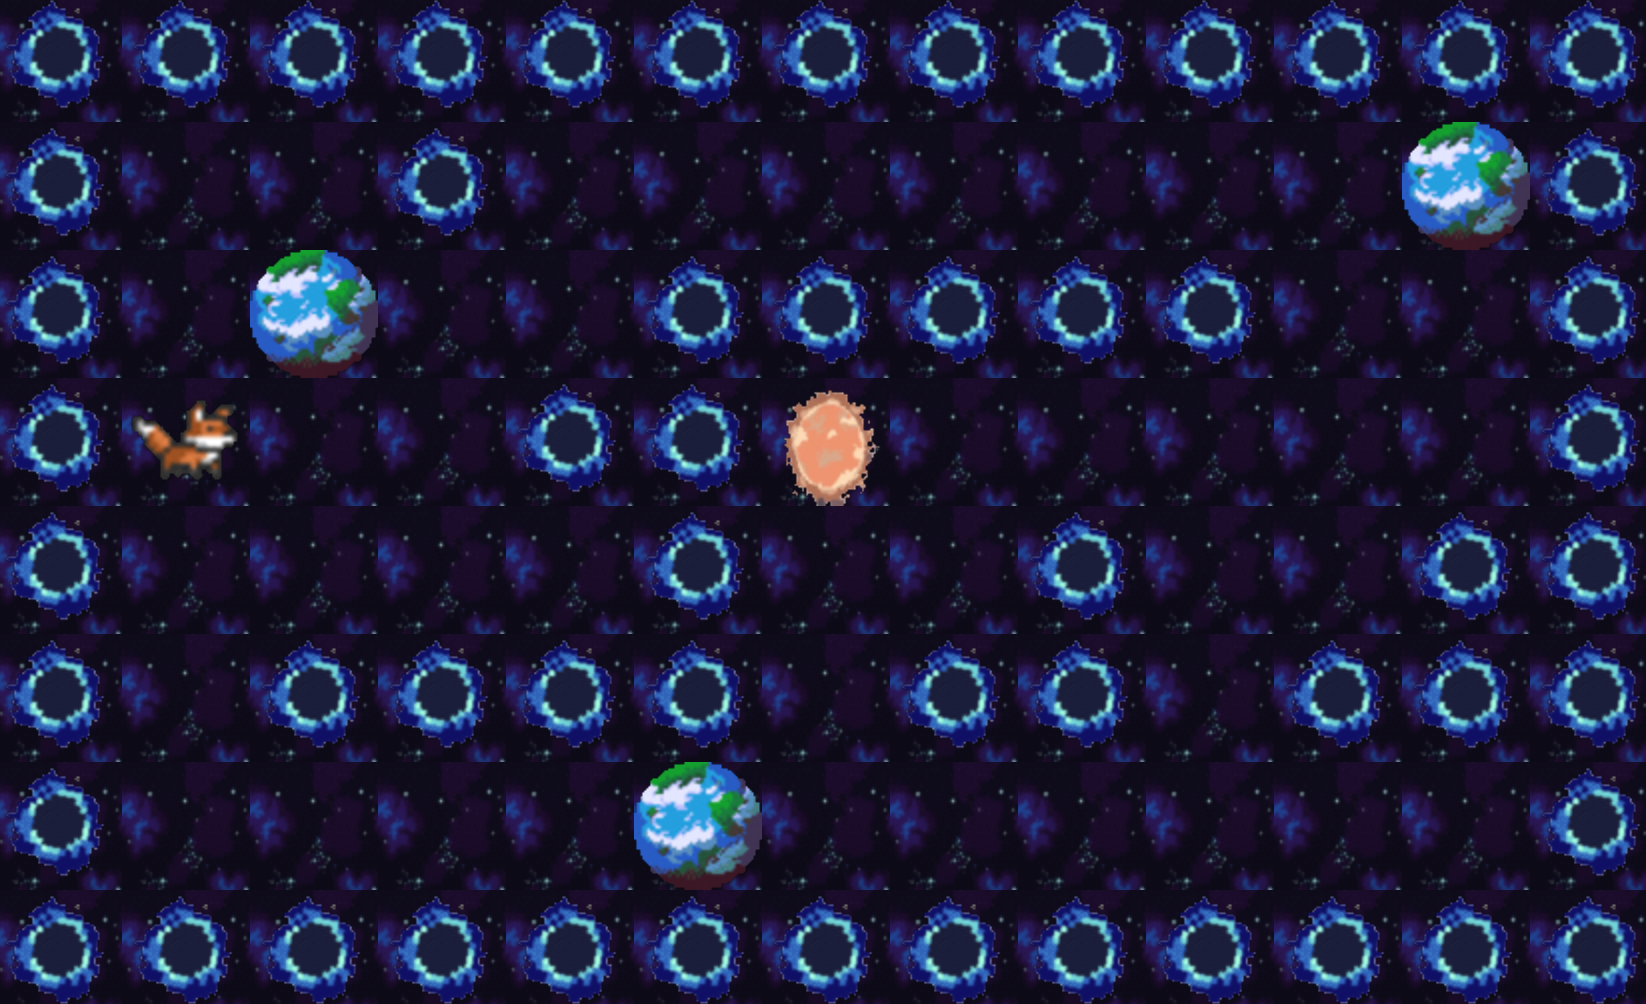
0, 1, C, P, E만으로 구성된 ber파일을 받아 xpm이미지들을 활용해 위와 같이 간단한 게임을 만드는 프로젝트이다. 지구를 잡아먹는 강아지를 만들고 싶었으나 맘에 드는 강아지 그림이 없었다.(누가 뭐래도 저건 강아지다..ㅎ)
❷ main함수
#include "so_long.h"

int	main(int argc, char *argv[])
{
	t_inform	map;

	if (argc != 2)
		print_error("Missing arugument\n");
	map_init(&map, argv[1]);
	mlx_hook(map.win_ptr, X_EVENT_KEY_PRESS, 0, &key_press, &map);
	mlx_hook(map.win_ptr, X_EVENT_KEY_EXIT, 0, &good_bye, &map);
	mlx_loop(map.mlx_ptr);
}
argv[1]로 ber파일의 경로를 받아온다.
❸ ber파일 확인 및 mlx초기화
처음에 ber로 들어온 파일이 과제 pdf에 명시한 사항들을 잘 지켰는지 확인하고, 알맞다면 mlx 게임 화면을 띄울 수 있도록 mlx의 설정들을 해줘야 한다.
(miniLibx에 관한 내용은 아래 📌프로젝트에 사용된 함수들 파트의 링크들을 참조하면 더욱 자세히 알 수 있다.)
void	map_init(t_inform *map, char *filename)
{
	int	wid;
	int	hei;

	map_as_sentences(map, get_fd(filename));
	map_rec_check(map);
	map_component_check(map);
	filename_check(filename);
	map->mlx_ptr = mlx_init();
	map->img_eat = mlx_xpm_file_to_image(map->mlx_ptr, "./img/eat.xpm", &wid, &hei);
	map->img_exit = mlx_xpm_file_to_image(map->mlx_ptr, "./img/exit.xpm", &wid, &hei);
	map->img_player = mlx_xpm_file_to_image(map->mlx_ptr, "./img/player.xpm", &wid, &hei);
	map->img_tile = mlx_xpm_file_to_image(map->mlx_ptr, "./img/tile.xpm", &wid, &hei);
	map->img_wall = mlx_xpm_file_to_image(map->mlx_ptr, "./img/wall.xpm", &wid, &hei);
	map->win_ptr = mlx_new_window(map->mlx_ptr, map->wid * 64, map->height * 64, "so_long");
	set_map_img(map);
	set_map_numbers(map);
}
- map_as_sentences : 받아온 ber파일의 내용들을 이차원 포인터배열로 만들어 준다.
- map_rec_check : ber파일의 내용이 직사각형의 모양인지 확인한다.
- map_component: ber파일의 내용이 0, 1, E, C, P만으로 구성되어 있고 P, E, C가 하나씩 들어왔으며, 위 5가지 문자를 제외한 다른 문자가 들어오지 않았는지 확인한다.
- filename_check : 파일 확장자가 ber인지 확인한다.
- set_map_img : 0, 1, E, C, P에 맞춰서 알마는 xpm 그림을 할당해준다. 예로 Player의 줄임말인 P가 들어오면 해당 위치에 강아지 그림을 연결해준다.
각 함수에 대한 코드는 생략 (git에 있음)
❹ 이벤트 핸들
main함수에서
mlx_hook(map.win_ptr, X_EVENT_KEY_PRESS, 0, &key_press, &map);
mlx_hook(map.win_ptr, X_EVENT_KEY_EXIT, 0, &good_bye, &map);
mlx_loop(map.mlx_ptr);
위 함수를 통해 후킹이 발생해 키보드로부터 이벤트를 받을 것이다. 수신하는 키보드에 따라 동작을 수행해야 한다. W, A, S, D에 따라 위, 왼, 아래, 오른쪽으로 강아지를 이동해야 한다. 그리고 강아지가 이동하며 C(지구)를 만나면 지구를 먹는다.
#include "so_long.h"

void	move_player(t_inform *map, int x, int y)
{
	if ((map->str[x][y] == '1') || (map->items && map->str[x][y] == 'E'))
		return ;
	if (!map->items && map->str[x][y] == 'E')
		good_bye(map);
	if (map->str[x][y] == 'C')
	{
		map->items--;
		map->str[x][y] = 0;
		mlx_put_image_to_window(map->mlx_ptr, map->win_ptr, map->img_tile, \
				y * 64, x * 64);
	}
	map->walks++;
	printf("%d\n", map->walks);
	mlx_put_image_to_window(map->mlx_ptr, map->win_ptr, map->img_tile, map->y_locate * 64, map->x_locate * 64);
	mlx_put_image_to_window(map->mlx_ptr, map->win_ptr, map->img_player, y * 64, x * 64);
	map->x_locate = x;
	map->y_locate = y;
}

int	key_press(int keycode, t_inform *map)
{
	if (keycode == KEY_W)
		move_player(map, map->x_locate - 1, map->y_locate);
	else if (keycode == KEY_A)
		move_player(map, map->x_locate, map->y_locate - 1);
	else if (keycode == KEY_S)
		move_player(map, map->x_locate + 1, map->y_locate);
	else if (keycode == KEY_D)
		move_player(map, map->x_locate, map->y_locate + 1);
	else if (keycode == KEY_ESC)
		good_bye(map);
	return (0);
}
📌 프로젝트에 사용된 함수들
miniLibx
MiniLibX is a tiny graphics library which allows you to do the most basic things for rendering something in screens without any knowledge of X-Window and Cocoa. It provides so-called simple window creation
macOS는 화면에 대한 그래픽 액세스를 처리하지만, 이에 액세스하려면 화면, 윈도우 시스템, 키보드 및 마우스를 처리하는 기본 macOS 그래픽 프레임워크에 애플리케이션을 등록해야 합니다. = 우리가 만드는 프로그램과 display를 연결해야 한다.
mlx_init()
you need to initialize the connection between your software and the display.
Once this connection is established, you’ll be able to use other MiniLibX functions to send the graphical orders. The mlx_init() function will create this connection.
If mlx_init() fails to set up the connection to the graphical system, it will return NULL, otherwise a non-null pointer is returned as a connection identifier.
mlx_new_window()
The mlx_new_window() function creates a new window on the screen, using the size_x and size_y parameters to determine its size, and title as the text that should be displayed in the window’s title bar.
The mlx_ptr parameter is the connection identifier returned by mlx_init() (see the mlx man page). mlx_new_window() returns a void * window identifier that can be used by other MiniLibX calls.
mlx_xpm_file_to_image()
mlx_xpm_file_to_image() functions will create a new image in memory. It returns a void * identifier needed to manipulate this image later.
GPU is the unit in the graphics card that performs the actual processing of the images and graphics while the graphics card is an expansion card in the device that generates images to display on the output device.
간단하게 말해 GPU가 프로세서(CPU인듯)에서 데이터를 받아와서 그래픽 카드가 스크린 어디에 픽셀을 놓을지 운영체제와 함께 결정함
- display file memory: The Display File Memory identifies the different graphics objects or entities. All the pixel values that are to be showed on the screen are there in the display File memory.
- Display Processor is the interpreter or a hardware that converts display processor code into picture
- The display processor is what was used before GPUs were developed. (음...블로그들 말이 다 달라서 확인이 더 필요함 둘이 동일하게 봐도 되는건지)
mlx_hook()
mlx_hook(void *win_ptr, int event, int mask, int (*f)(), void *param);- hooking
후킹(영어: hooking)은 소프트웨어 공학 용어로, 운영 체제나 응용 소프트웨어 등의 각종 컴퓨터 프로그램에서 소프트웨어 구성 요소 간에 발생하는 함수 호출, 메시지, 이벤트 등을 중간에서 바꾸거나 가로채는 명령, 방법, 기술이나 행위를 말한다.
두 번째 parameter에 발생하고 싶은 이벤트를 넣어주면 된다. 해당 과제에서는 키보드로부터 값을 받아오는 것이다. 이에 대한 자세한 설명은 이곳
mlx_loop()
그랙픽 시스템은 양방향이다. 한 쪽에서는 스크린에 디스플레이할 픽셀, 이미지 등을 명령하고, 한 쪽에서는 키보드나 마우스로부터 이벤트를 받는다.
이때 이벤트를 수신하는 함수가 mlx_loop()이다. 이벤트를 기다린 다음, 이 이벤트와 관련된 사용자 함수를 호출하는 무한 루프이다.
이벤트 및 마스크 값은 X11에서 가져온다.