
파일 업로드 및 다운로드
웹 서버에 파일을 업로드하기 위해서
HTML <form> 태그 내 <input type='file'> 태그를 사용한다.
일반적으로 다른 input 태그를 추가하여, 파일 외 여러 종류의 데이터도 같이 전송하게 된다.
이를 처리하기 위하여 multipart라는 형식을 이용한다.
form 태그 속성으로 enctype="multipart/form-data"을 명시하면,
HTTP Request Header에서 Context-type: multipart/form-data를 확인할 수 있고,
이는 HTTP Request Body에 여러 종류의 데이터를 구분하여 넣었음을 의미한다.
업로드한 파일을 HTTP 요청으로 받은 후 복사하여 웹 서버에 저장해놓고,
다운로드 시에도 파일을 복사하여 HTTP 응답으로 보내게 된다.
File upload
1. 백엔드 서버의 Controller 작성
@RestController // = Controller + ResponseBody
public class HelloController {
@PostMapping(value = "/uploadfile")
public String uploadfile(HumanDto human, // dto객체
@RequestParam("uploadFile") // 파일
MultipartFile uploadFile,
HttpServletRequest req) {
// 로깅
System.out.println("fileupload " + new Date());
System.out.println(human.toString());
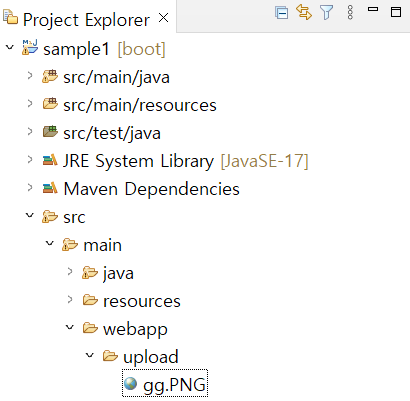
// 파일 저장 경로 설정(main에 webapp/upload 생성)
String path = req.getServletContext().getRealPath("/upload");
String filename = uploadFile.getOriginalFilename();
String filepath = path + "/" + filename;
// 파일 생성 및 복사
File file = new File(filepath);
try {
BufferedOutputStream bos = new BufferedOutputStream(new FileOutputStream(file));
bos.write(uploadFile.getBytes());
bos.close();
} catch (Exception e) {
return "File upload failed";
}
return "File upload successful";
}
}
2. 프론트엔드 서버의 HTML, JS 작성
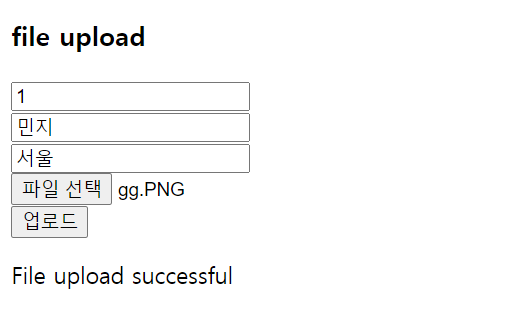
<h3>file upload</h3>
<form id="uploadFileForm">
    <input type="text" name="number" value="1002"><br>
    <input type="text" name="name" value="춘향"><br>
    <input type="text" name="address" value="화성"><br>
    <input type="file" name="uploadFile"><br>
    <button type="button" id="uploadBtn">업로드</button>
</form>
<p id="result">...</p>

<script type="text/javascript">
    $(document).ready(function() {
        $("#uploadBtn").click(function() {
            $.ajax({
                url:"http://localhost:3000/uploadfile",
                type:"post",
                data:new FormData($("#uploadFileForm")[0]),
                enctype:'multipart/form-data',
                processData:false,
                contentType:false,
                cache:false,
                success:function(str) {
                    $("#result").text(str);
                },
                error:function() {
                    alert('error');
                }
            });
        });
    });
</script>
3. 실행
서버를 실행하고 파일을 업로드하면, 서버에 파일이 저장되었음을 확인할 수 있다.
File download
1. 백엔드 서버의 Controller 작성
@RestController
public class HelloController {

	@Autowired
	ServletContext servletContext;

	@GetMapping(value = "/downloadfile")
	public ResponseEntity<InputStreamResource> downloadfile(String filename,
    							HttpServletRequest req) throws Exception {
		// 로깅
		System.out.println("downloadfile " + new Date());

		// 다운로드할 파일 경로 설정
		String path = req.getServletContext().getRealPath("/upload");

        String filepath = path + "/" + filename

        // 파일 생성 및 복사
		File file = new File(filepath);

		InputStreamResource isr = new InputStreamResource(new FileInputStream(file));

        // 파일 정보 넣어서 응답
        MediaType mediaType = MediaTypeUtiles.getMediaTypeForFileName(this.servletContext, filename);

		return ResponseEntity.ok()
				.header(HttpHeaders.CONTENT_DISPOSITION, "attachment;filename=" + file.getName())
				.contentType(mediaType)
				.contentLength(file.length())
				.body(isr);
	}
}
2. 프론트엔드 서버의 HTML, JS 작성
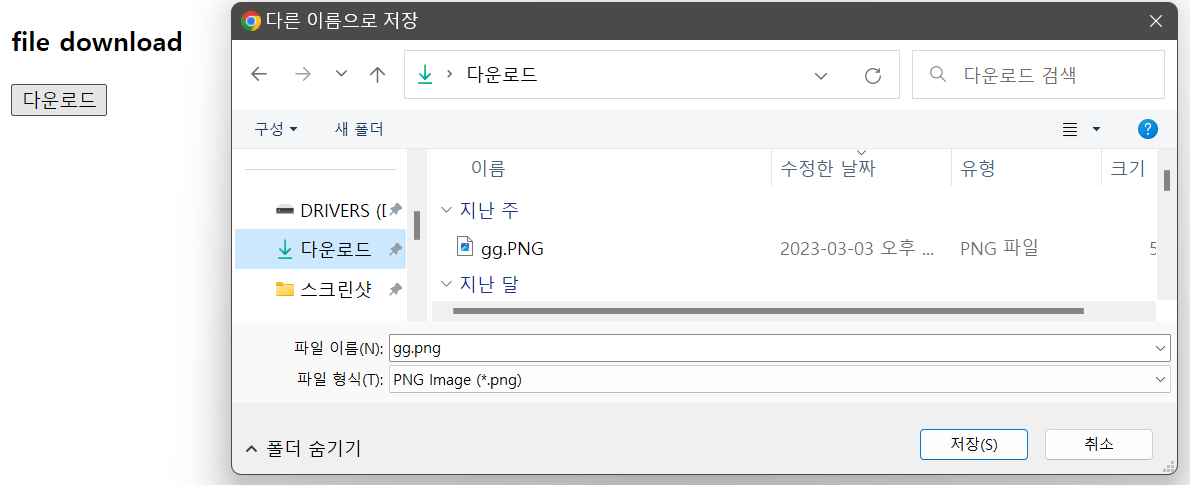
<h3>file download</h3>
<button type="button" id="downloadBtn">다운로드</button>

<script type="text/javascript">
    $(document).ready(function() {
        $("#downloadBtn").click(function() {
            location.href = "http://localhost:3000/downloadfile?filename="
            				+ "gg.png";
        });
    });
</script>
3. 실행
서버를 실행하고 다운로드 버튼을 클릭하면, 파일 저장 창이 뜨는 것을 확인할 수 있다.

해보자구