0. 개요
회원 가입 Form을 작성하다가 알게 된 개념, Debounce와 Throttle.
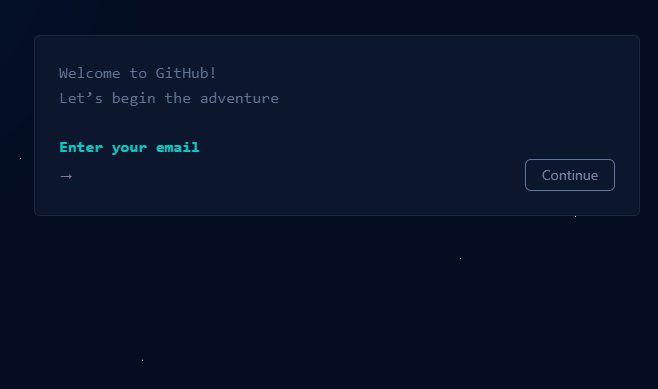
input 창에 입력 이 마치면 중복 체크를 진행해 Continue 버튼이 활성화 된 것을 확인 할 수 있습니다.
이는 바로 debounce를 이용 한 부분인데요.
이번에 Sign up Form 부분을 진행하게 되었는데, 이를 참고하여 적용을 했었고, 진행 하면서 debounce 와 함께 throttle 의 개념 을 정리 하였습니다.
💡
debounce와throttle는 자주 사용 되는 이벤트나 함수 들 의 실행되는 빈도를 줄여서 성능 상의 이점을 가져오기 위한 개념 입니다.
keyup을 통해 api 를 불러오게 되면, 사용자의 의도와 무관한 요청이 자주 발생 되어집니다.
이를 줄이기 위해, 입력이 끝난 후나, 입력 중간 중간 마다 api 값을 가져오면 성능 상 이점을 취할 수 있기 때문에 만들어진 방법 이 바로 debounce 와 throttle 입니다.
해당 글은 lodash 라이브러리를 이용 하였습니다. 개념 부분에 대해 이해를 하는 것에 집중 하였습니다.
1. Debounce
💡 Debounce 는 여러 순차적 호출을 하나의 그룹으로 묶을 수 있습니다.
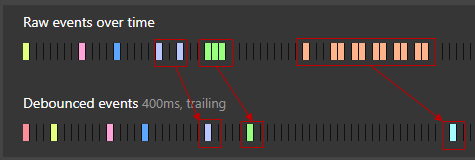
해당 예시를 통해 알 수 있는 것은, 사용자가 여러 이벤트를 발생 시키는 행동을 하지만 debounce 를 이용하면 그 행동들을 하나의 그룹으로 묶어 마지막 이벤트만을 발생 시키게 합니다.
또한, 마지막 이벤트에서 일정 시간 동안 이벤트가 발생한다면, 또 일정 시간을 기다린다는 점이 있습니다.
해당 예시를 통해 연속적이고 빠른 이벤트가 발생한다면 하나의 debounce 이벤트가 발생한다는 것을 확실히 확인 하실 수 있습니다. 하지만 트리거 되는 이벤트 사이에 큰 간격이 있다면, 동일한 debounce 는 일어나지 않습니다.
Leading Edge ( immediate )
여러 이벤트가 발생한 후에 하나의 이벤트로 묶는 debounce 는 또 다른 옵션을 가지고 있습니다.
leadingEdge 옵션 을 이용하면 역으로 이벤트의 발생 시점에 debounce이벤트가 발생 합니다.
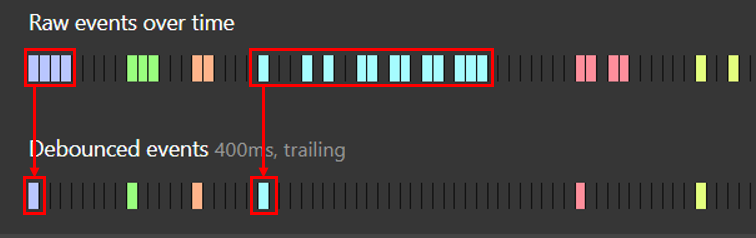
즉, 여러 이벤트가 발생 한 후 일정 시간 뒤에 debounce 이벤트가 발생 하는 것이 아닌 여러 이벤트가 발생 하는 첫 시점에 이벤트가 발생하는 것을 확인 할 수 있습니다.
leadingEdge 옵션을 이용한 예시 입니다.
코드 살펴보기
💡
debounce(func, wait, options)
lodash 를 통해 debounce 를 이용하려고 할 때는, 먼저 콜백 함수, 시간, 그리고 leading 과 trailing 옵션을 넣어줄 수 있습니다.
내부 코드를 잠깐 살펴보자면,
function debounced(...args) {
    const time = Date.now()
    const isInvoking = shouldInvoke(time) //(1)

    lastArgs = args
    lastThis = this
    lastCallTime = time

    if (isInvoking) {
      if (timerId === undefined) {
        return leadingEdge(lastCallTime) //(2)
      }
      if (maxing) {
        // Handle invocations in a tight loop.
        timerId = startTimer(timerExpired, wait)
        return invokeFunc(lastCallTime)
      }
    }
    if (timerId === undefined) {
      timerId = startTimer(timerExpired, wait)
    }
    return result
  }
전체 debounce 코드 중 마지막 debounced 함수를 가져왔는데요.
//(1)
function shouldInvoke(time) {
    const timeSinceLastCall = time - lastCallTime
    const timeSinceLastInvoke = time - lastInvokeTime

    // Either this is the first call, activity has stopped and we're at the
    // trailing edge, the system time has gone backwards and we're treating
    // it as the trailing edge, or we've hit the `maxWait` limit.
    return (lastCallTime === undefined || (timeSinceLastCall >= wait) ||
      (timeSinceLastCall < 0) || (maxing && timeSinceLastInvoke >= maxWait))
  }
(1) : 입력이 들어오면 현재 시간, 마지막 호출 시간 을 확인 합니다. 해당 코드에서는 여러 이벤트 들을 하나로 묶을지 말지 를 결정합니다.
// (2)
function leadingEdge(time) {
    // Reset any `maxWait` timer.
    lastInvokeTime = time
    // Start the timer for the trailing edge.
    timerId = startTimer(timerExpired, wait)
    // Invoke the leading edge.
    return leading ? invokeFunc(time) : result
  }
(2) : 만약 isInvoking 이 true 인 상태에서 timerId 가 세팅 되어 있지 않다면, 해당 leadingEdge 에서 startTimer 를 통해 timerId를 세팅 해줍니다.
function timerExpired() {
    const time = Date.now()
    if (shouldInvoke(time)) {
      return trailingEdge(time)
    }
    // Restart the timer.
    timerId = startTimer(timerExpired, remainingWait(time))
  }
timerExpired 로 마지막 입력 시간을 비교하여, 만약 입력이 계속 들어오고 있다고 판단되면, timerId = startTimer(timerExpired, remainingWait(time)) 반복합니다.
function trailingEdge(time) {
    timerId = undefined

    // Only invoke if we have `lastArgs` which means `func` has been
    // debounced at least once.
    if (trailing && lastArgs) {
      return invokeFunc(time)
    }
    lastArgs = lastThis = undefined
    return result
  }
입력 시간이 끝났다고 판단 되면 trailingEdge 를 호출하게 됩니다.
function invokeFunc(time) {
    const args = lastArgs
    const thisArg = lastThis

    lastArgs = lastThis = undefined
    lastInvokeTime = time
    result = func.apply(thisArg, args)
    return result
  }
invokeFunc 를 통해 func.apply(thisArg, args 로 callback 전달 해줍니다.
💡
trailing은 기본 값이true인 상태이며,true라면 연속된 이벤트의 마지막 이벤트가 발생 후wait으로 대입된 밀리세컨드 만큼이 지난 후 마지막 이벤트 하나가 반영됩니다.
💡 완전한 코드를 확인하고 싶으시다면 아래 링크에서 확인 해 주세요! →
debounce함수는 클로저 개념 또한 이용했다는 점이 재미 있습니다. 😊
lodash/debounce.js at master · lodash/lodash
2. Throttle
💡 Throttle 은 여러번 발생하는 이벤트를 일정 시간 동안 한번만 실행 하도록 합니다.
throttle 과 debounce 의 큰 차이점은 이벤트가 언제 발생하는가 인데요.
debounce 는 기본적으로 입력 시간이 끝난 후 이벤트를 실행하게 되지만, throttle 은 적어도 지정한 시간 동안은 한번만 이벤트를 실행하게 만듭니다.
예를 들어, 무한 스크롤을 생각해보면 좀 더 이해가 잘 될 겁니다.
( 300ms 마다 callback 호출 )
이 예제에 debounce 를 입혔다면, 스크롤을 내린 후 기다려야 컨텐츠가 나오겠지만, throttle 을 입혔기 때문에 사용자 측면에서는 큰 불편함 없이 컨텐츠를 계속 볼 수 있습니다.
코드 살펴보기
function throttle(func, wait, options) {
  let leading = true
  let trailing = true

  if (typeof func !== 'function') {
    throw new TypeError('Expected a function')
  }
  if (isObject(options)) {
    leading = 'leading' in options ? !!options.leading : leading
    trailing = 'trailing' in options ? !!options.trailing : trailing
  }
  return debounce(func, wait, {
    leading,
    trailing,
    'maxWait': wait
  })
}

export default throttle
throttle 함수의 내부 코드는 debounce 를 이용 했다는 것을 확인 할 수 있습니다.
마찬가지로 options 에 leading 과 trailing 을 사용 할 수 있습니다.
여기서 maxWait 을 대입한 wait 시간으로 두어서
function remainingWait(time) {
    const timeSinceLastCall = time - lastCallTime
    const timeSinceLastInvoke = time - lastInvokeTime
    const timeWaiting = wait - timeSinceLastCall

    return maxing
      ? Math.min(timeWaiting, maxWait - timeSinceLastInvoke)
      : timeWaiting
  }
shouldInvoke 에서 maxWait 을 확인하게 되고, startTimer 에서 remainingWait 로 일정 시간만큼 계속 이벤트 실행을 반복한다는 점을 확인 할 수 있습니다.
💡 해당 링크에서 코드를 확인 할 수 있습니다!
lodash/throttle.js at master · lodash/lodash
📌 마무리
사용자 측면에서는 throttle , 성능 상으로는 debounce 가 더 유리해 보이지만, 결국은 어떤 목적으로 사용 할 것 인지에 따라 사용 용도도 달라지게 됩니다.
필자의 경우는 입력이 마친 후에 api를 호출하는 것이 목적이기 때문에 debounce 를 이용하였지만,자동 완성 기능 이나 무한 스크롤이 필요한 경우에는 throttle 을 이용 하겠죠.
lodash 말고도 debounce 와 throttle 를 이용한 다른 라이브러리들이 많으니까 직접 찾아보며 차이점을 확인 하는 것도 좋을 것 같습니다.
참조