
Date : 2024.08.20
.SetParent vs .parent
유니티에서 부모 오브젝트를 설정해주는 것은 매우 중요하다. 자식 오브젝트의 Rect Transform은 부모 오브젝트를 기준으로 사용되기도 하고, 부모 오브젝트의 Scale은 자식 오브젝트에 영향을 주기 때문이다.
이 때 Parent를 설정해주는 방법은 크게 세 가지 정도가 있다.
Instantiate할 때 지정
GameObject instance = Instantiate(prefab, parentTransform);

GameObject instance = Instantiate(prefab, position, rotation, parentTransform);
오브젝트가 생성되는 순간 부모를 지정할 수 있다. 부모의 Transform을 즉시 상속받기 때문에 로컬 포지션과 로컬 스케일이 별도의 수정 없이 프리팹 초기값 그대로 부모의 로컬 좌표계에 맞춰 유지된다.
SetParent(transform)사용
instance.transform.SetParent(parentTransform, worldPositionStays);worldPositionStays 매개변수를 통해 자식 오브젝트가 부모의 로컬 좌표계를 따를지, 월드 좌표계를 유지할 지 선택할 수 있다. 이게 굉장히 중요한게 분명히 개발 중에 오브젝트의 부모를 바꿔야하는 상황이 오는데, 이 때 오브젝트의 포지션과 스케일이 뒤죽박죽이 될 수 있기 때문에 이 개념을 잘 이해해야한다.
worldPositionStays = True: 자식 오브젝트는 월드 좌표계에서의 위치와 회전을 유지한다.worldPositionStays = False: 자식 오브젝트는 부모의 로컬 좌표계를 따른다.
.parent = transform사용
instance.transform.parent = parentTransform;이 방식으로 부모를 설정하면 자동으로 부모의 로컬 좌표계를 따른다. 이 동작은 SetParent(tranform, false)와 유사하다. Unity에서는 이 방법보다는 더 명확하고, 좌표계 유지 여부를 제어할 수 있는 SetParent 사용을 권장한다.
결론적으로는 대부분의 경우에는
SetParent를 사용하는 것이 권장된다.
빌드 전 확인
Edit > Preference > External Tools
Android 빌드의 경우에는 JDK, NDK, SDK 설정 필수
Edit > Project Settings > Player
당연하게도 회사 이름, 게임 이름, 버전, 아이콘, 해상도 등, 등의 설정이 필요함
Edit > Project Settings > Player > Resolution and Presentation
세로 게임의 경우 Resolution and Presentation에서 Allowed Orientations for Auto Rotation의 설정을 해주어야 한다.
- Portrait : 디바이스 홈버튼이 아래에 있는 세로 모드로 고
- PortraitUpsideDown : 다바이스 홈버튼이 위에 있는 세로 모드로 고정
- LandscapeLeft : 디바이스 홈 버튼이 오른쪽에 있는 가로모드로 고정
- LandscapeRight : 디바이스 홈버튼이 왼쪽에 있는 가로모드로 고정

위처럼 LandScape Right, Left를 꺼두면 핸드폰이 좌우로 누워도 자동 회전되지 않고 게임이 세로로만 고정된다. 당연하게도 코드로도 설정할 수 있다.
Screen.orientation = ScreenOrientation.Portrait; //세로 방향
Screen.orientation = ScreenOrientation.PortraitUpsideDown; //장치의 윗부분이 아래를 향하는, 세로 방향
Screen.orientation = ScreenOrientation.LandscapeLeft; //가로 방향을 나타내며, 세로 방향으로부터 반 시계방향으로 회전한 상태
Screen.orientation = ScreenOrientation.LandscapeRight; //가로 방향을 나타내며, 세로 방향으로부터 시계방향으로 회전한 상태
Screen.orientation = ScreenOrientation.AutoRotation; //활성화된 방향으로 자동 회전 하도록 설정
Edit > Project Settings > Player > Other Settings
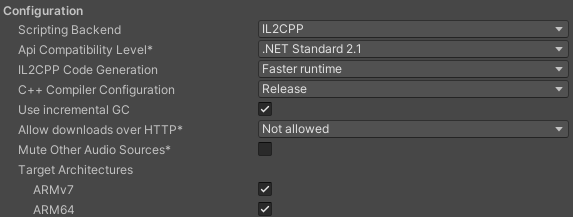
제일 중요한 건데 안드로이드 마켓에 배포하려면 64bit 지원이 필수여야 하기 때문에 IL2CPP로 바꿔주고 Target Architectures의 ARM64에도 체크를 해주어야한다.
Edit > Project Settings > Player > Publish Settings
Keystroe Manager? 안드로이드에서 앱을 배포할 수 있는 권리
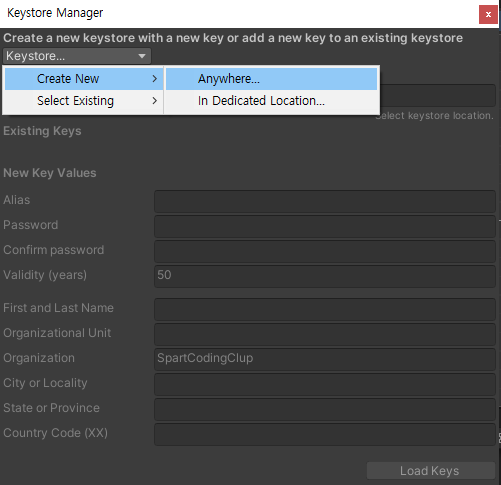
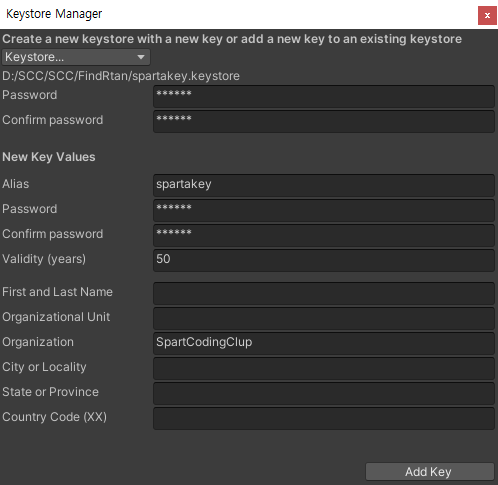
값을 입력해주고 Add key를 해주면 아래와 같이 적용된다.
Keystore에 대한 정보는 유니티의 공식문서와 안드로이드 공식문서를 한 번 정독하면 쉽게 이해된다.
쉽게 아주 간단하게 요약하자면 안드로이드에서 앱을 빌드할 때 사용되는 디지털 서명 파일을 관리하는 도구이다.
즉, 구글 플레이에 앱을 업로드하기 위해선 인증 키가 필요하고 그 역할을 하는게 키스토어 파일이다. apk 파일을 스토어에 올릴 계획이라면 서명이 반드시 필요하다.
이 때 설정하는 비밀번호는 절대로 잊어버리면 안되기 때문에 어딘가에 메모를 해두는게 좋다. 이 키스토어 파일과 비밀번호는 무조건 백업을 해두는게 좋다. 이 둘 중 하나라도 잃어버리면 스토에 올린 프로젝트를 수정하지 못하는 사태가 발생할 수도 있다.
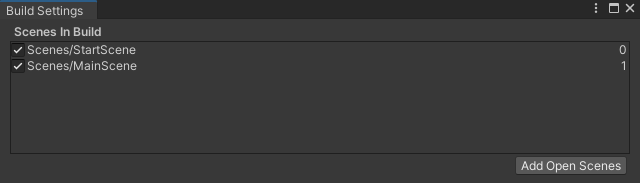
Build Settings
항상 제작한 Scene이 잘 들어가 있는지 확인해야한다.
그리고 안드로이드로 빌드해주려면 Switch Platform을 해주어야한다. (시간이 어느정도 필요하다)
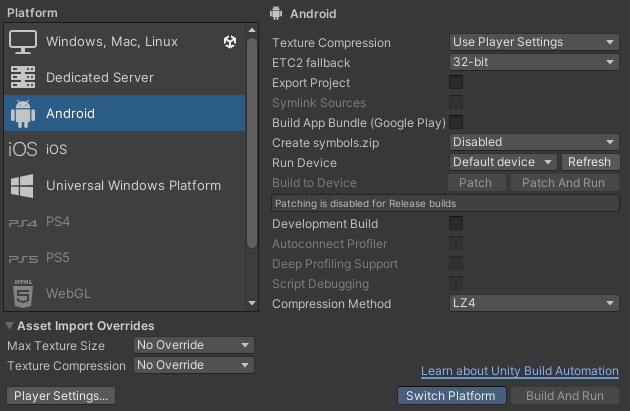
이제 Build 해주면 apk 파일이 만들어진다. 이 .apk 파일을 스토어에 올리면 배포가 된다. 배포의 경우 인터넷의 자료를 참고해서 진행하면 좋다.
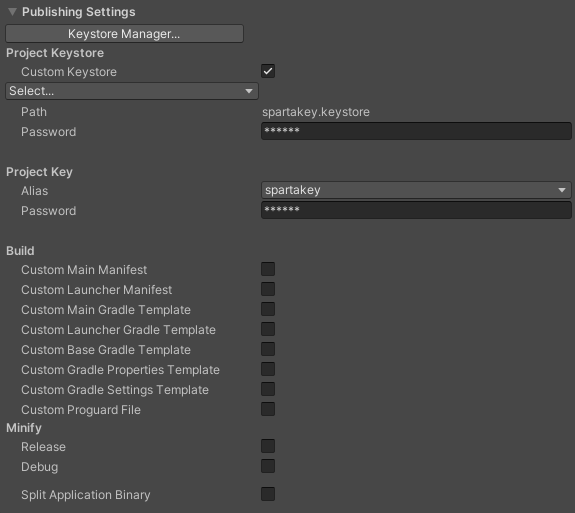
빌드 했을 때 "Can not sign the application" 오류가 뜨는 경우는 keystore 비밀번호가 틀린 경우이니 keystore 비밀번호를 다시 확인해야 한다.
광고 붙이기
Unity Ads
Unity 자체적으로 광고를 붙일 수 있고, 광고비를 정산해주는 시스템을 지원한다.
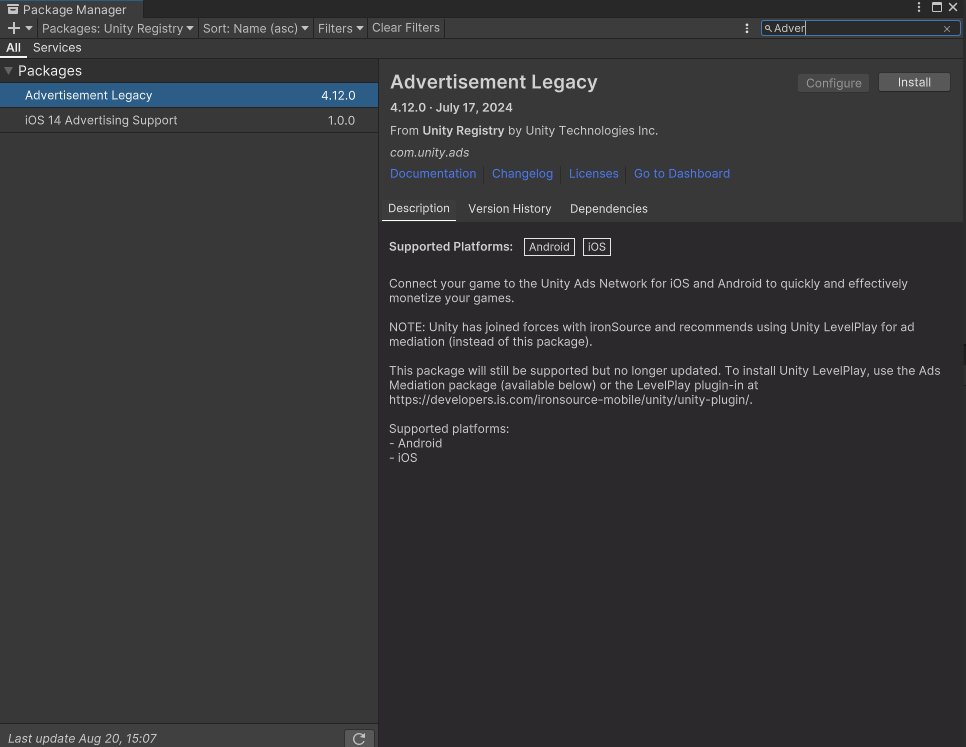
Window > General > Services에서 Advertisement Legacy를 install 해준다.
그런 다음 Conmfigure를 눌러 Project Settings > Services 창을 누른다.
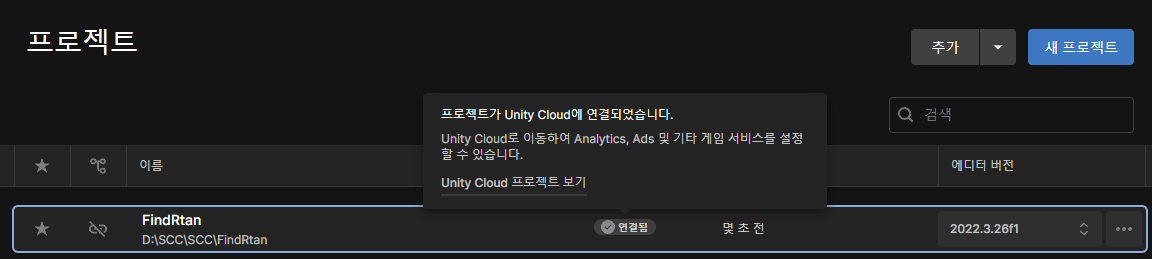
Unity Project ID가 발급되지 않는다면?
Unity Hub에서 해당 프로젝트가CLOUD CONNECTED돼있는지 확인해야 한다. 안되어있다면 연결해주어야 한다.
Dashboard를 눌러 Unity Cloud로 접속 해준다.
AdsManager
광고도 GameMawnager처럼 한 군데서 관리하고, 여러 곳에서 호출해서 사용하는 것이 편리하다.
AdsManager 오브젝트를 만들고 아래 AdsInitialize 스크립트를 붙이면 아래와 같이 나타난다.

AdsManager에 필요한 ID는 유니티 클라우드에서 광고 활성화를 해야 가져올 수 있다.
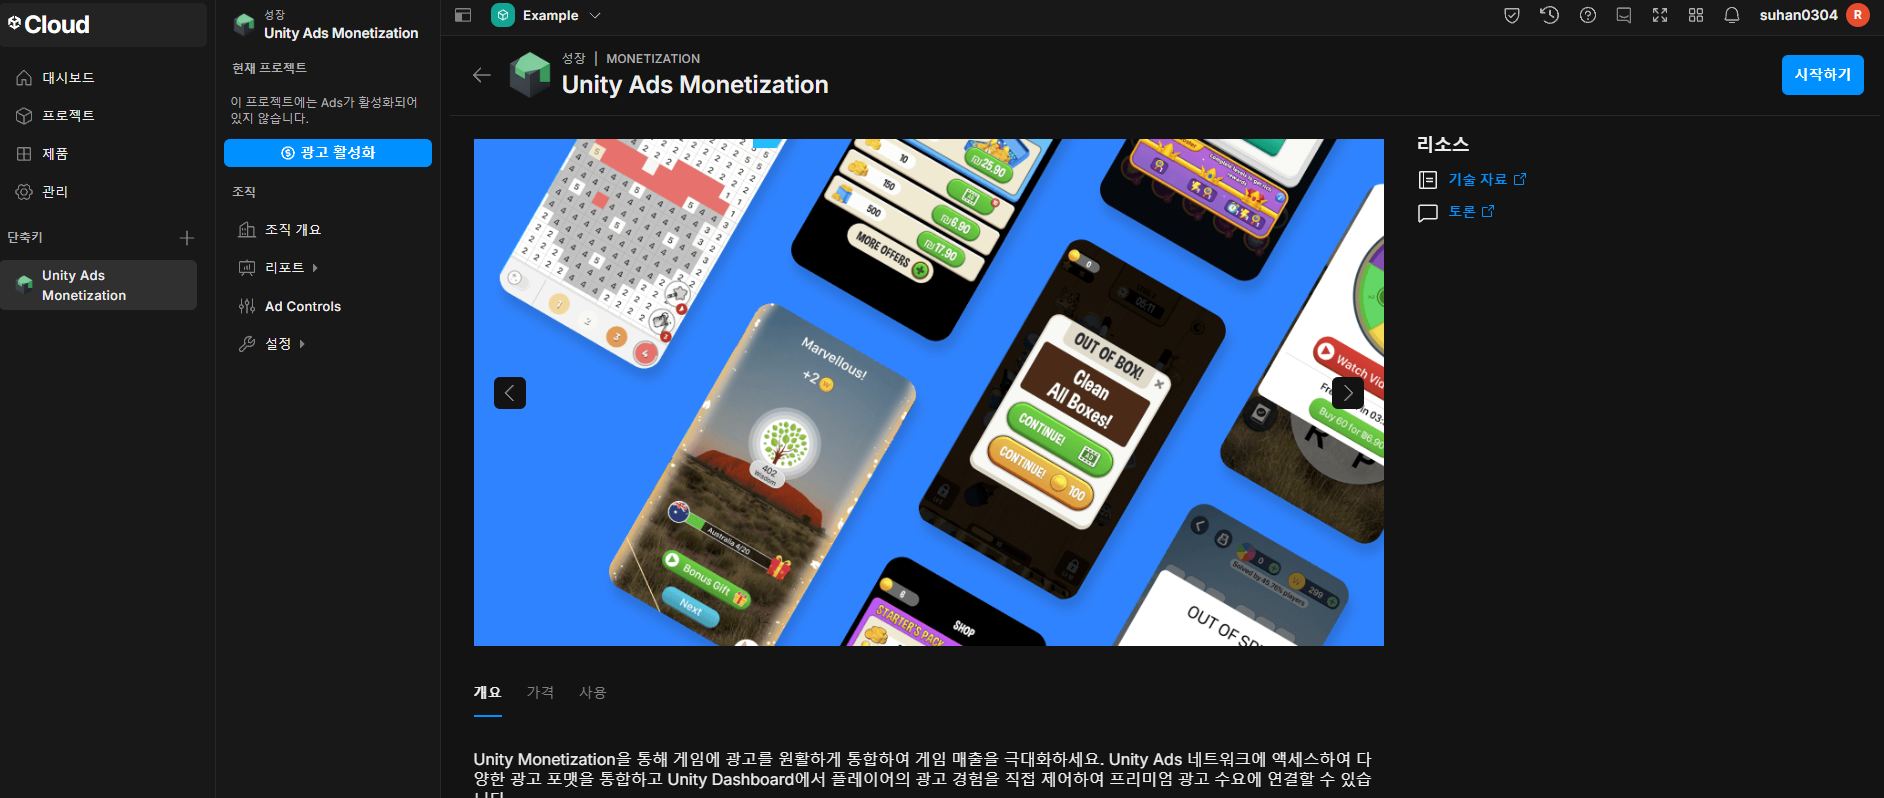
광고 활성화를 해주고 아래와 같이 진행해준다.
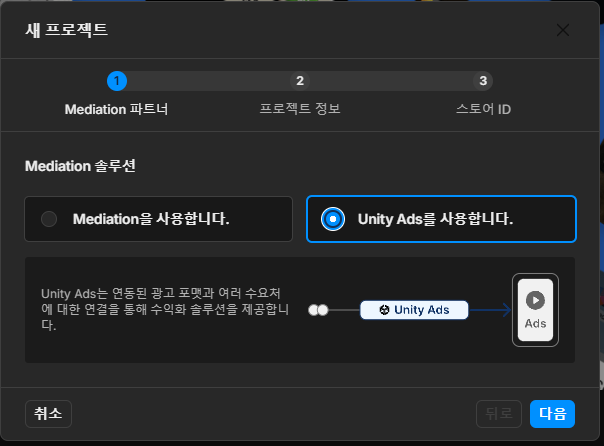

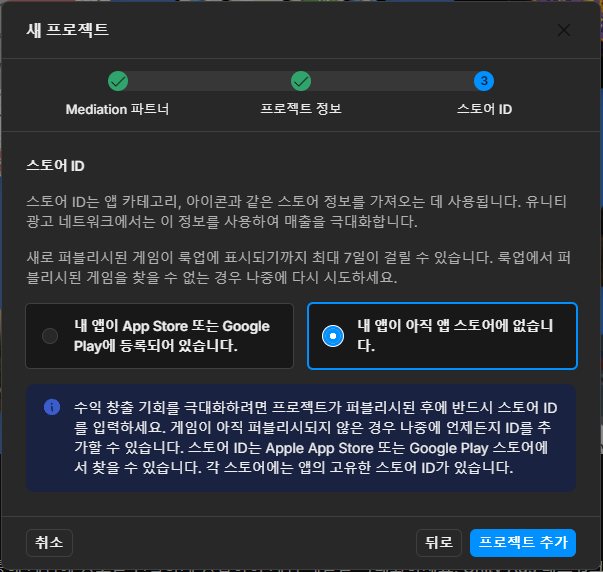
최종적으로 아래와 같이 ID를 발급해준다.
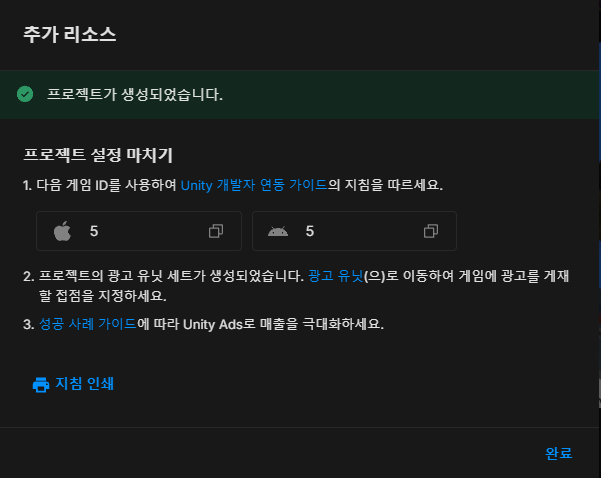
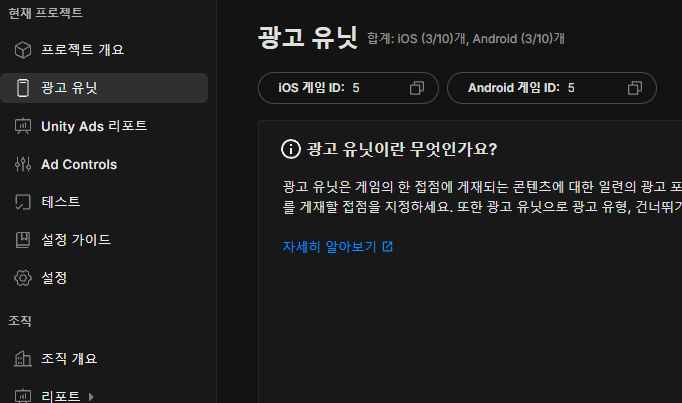
Setup 이후에는 Ad Units에서 확인할 수 있다.
AdsInitialize.cs
using UnityEngine;
using UnityEngine.Advertisements;

public class AdInitialize : MonoBehaviour, IUnityAdsInitializationListener
{
    [SerializeField] string _androidGameId;
    [SerializeField] string _iOSGameId;
    [SerializeField] bool _testMode = true;
    private string _gameId;

    void Awake()
    {
        InitializeAds();
    }

    public void InitializeAds()
    {
#if UNITY_IOS
            _gameId = _iOSGameId;
#elif UNITY_ANDROID
        _gameId = _androidGameId;
#elif UNITY_EDITOR
            _gameId = _androidGameId; //Only for testing the functionality in the Editor
#endif
        if (!Advertisement.isInitialized && Advertisement.isSupported)
        {
            Advertisement.Initialize(_gameId, _testMode, this);
        }
    }


    public void OnInitializationComplete()
    {
        Debug.Log("Unity Ads initialization complete.");
    }

    public void OnInitializationFailed(UnityAdsInitializationError error, string message)
    {
        Debug.Log($"Unity Ads Initialization Failed: {error.ToString()} - {message}");
    }
}
이제 광고를 뜨도록 해보자.
RewardedButton.cs
using UnityEngine;
using UnityEngine.Advertisements;
using UnityEngine.SceneManagement;

public class RewardedButton : MonoBehaviour, IUnityAdsLoadListener, IUnityAdsShowListener
{
    [SerializeField] string _androidAdUnitId = "Rewarded_Android";
    [SerializeField] string _iOSAdUnitId = "Rewarded_iOS";
    string _adUnitId = null; // This will remain null for unsupported platforms

    void Awake()
    {
        // Get the Ad Unit ID for the current platform:
#if UNITY_IOS
        _adUnitId = _iOSAdUnitId;
#elif UNITY_ANDROID || UNITY_EDITOR
        _adUnitId = _androidAdUnitId;
#endif

        // Disable the button until the ad is ready to show:
    }

    // Call this public method when you want to get an ad ready to show.
    public void LoadAd()
    {
        // IMPORTANT! Only load content AFTER initialization (in this example, initialization is handled in a different script).
        Debug.Log("Loading Ad: " + _adUnitId);
        Advertisement.Load(_adUnitId, this);
    }

    // If the ad successfully loads, add a listener to the button and enable it:
    public void OnUnityAdsAdLoaded(string adUnitId)
    {
        Debug.Log("Ad Loaded: " + adUnitId);

        if (adUnitId.Equals(_adUnitId))
        {
            // Configure the button to call the ShowAd() method when clicked:
        }
    }

    // Implement a method to execute when the user clicks the button:
    public void ShowAd()
    {
        // Disable the button:
        // Then show the ad:
        Advertisement.Show(_adUnitId, this);
    }

    // Implement the Show Listener's OnUnityAdsShowComplete callback method to determine if the user gets a reward:
    public void OnUnityAdsShowComplete(string adUnitId, UnityAdsShowCompletionState showCompletionState)
    {
        if (adUnitId.Equals(_adUnitId) && showCompletionState.Equals(UnityAdsShowCompletionState.COMPLETED))
        {
            Debug.Log("Unity Ads Rewarded Ad Completed");
            // Grant a reward.
        }
    }

    // Implement Load and Show Listener error callbacks:
    public void OnUnityAdsFailedToLoad(string adUnitId, UnityAdsLoadError error, string message)
    {
        Debug.Log($"Error loading Ad Unit {adUnitId}: {error.ToString()} - {message}");
        // Use the error details to determine whether to try to load another ad.
    }

    public void OnUnityAdsShowFailure(string adUnitId, UnityAdsShowError error, string message)
    {
        Debug.Log($"Error showing Ad Unit {adUnitId}: {error.ToString()} - {message}");
        // Use the error details to determine whether to try to load another ad.
    }

    public void OnUnityAdsShowStart(string adUnitId) { }
    public void OnUnityAdsShowClick(string adUnitId) { }

    void OnDestroy()
    {
        // Clean up the button listeners:
    }
}
위와 같이 RewardedButton.cs를 만든 다음에 버튼 이벤트에 연결해준다.

이 때 광고 보상은 OnUnityAdsShowComplete 부분에 작성해주면 된다.
// Implement the Show Listener's OnUnityAdsShowComplete callback method to determine if the user gets a reward:
public void OnUnityAdsShowComplete(string adUnitId, UnityAdsShowCompletionState showCompletionState)
{
    if (adUnitId.Equals(_adUnitId) && showCompletionState.Equals(UnityAdsShowCompletionState.COMPLETED))
    {
        Debug.Log("Unity Ads Rewarded Ad Completed");
        // Grant a reward.
        SceneManager.LoadScene("MainScene"); // 광고 시청 완료 시 MainScene 로드
    }
}
연결된 버튼 이벤트가 실행되면 아래와 같이 광고가 나온다.
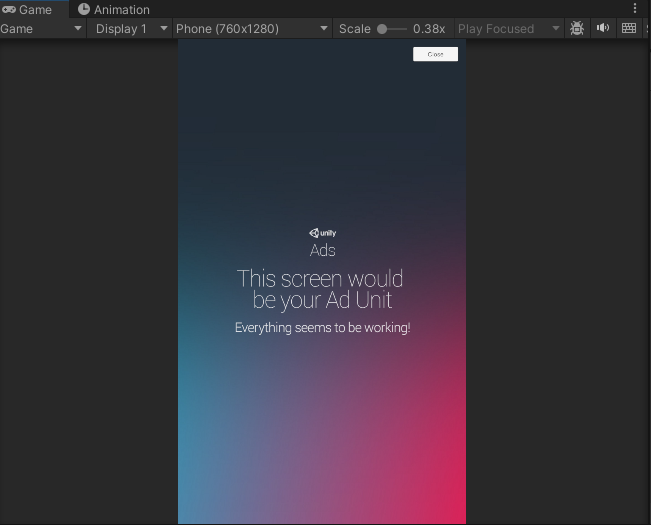
그 다음 Close를 누르면 OnUnityAdsShowComplete 메소드가 실행되고 MainScene이 다시 로드된다.
배포할 때는
AdManager.cs의 TestMode를 False로 설정해주어야 한다.

가능하다면 Google Ads를 다루는 것 도움이 된다. 해당 과정을 잘 정리해놓은 문서가 있어서 이 문서를 참고하면 좋을거 같다. (추후에 한 번 날 잡아서 해보는게 좋을듯)