
👀 들어가며
지난번 블로그의 CRUD API를 만들어 보았다. 이번 포스팅에서는 그 블로그의 글 목록과 글 상세 조회을 볼 수 있는 뷰를 구현해 볼 것이다. 컨트롤러의 메소드 만들기, HTML 뷰 만들기, 뷰 테스트하기의 순서로 진행될 예정이다. 👏
🍃 본격적 블로그 글 목록 뷰 구현!
1. 컨트롤러 메소드 작성
ArticleListViewResponse.java
package me.ansoohyeon.springbootdeveloper.dto;

import lombok.Getter;
import me.ansoohyeon.springbootdeveloper.domain.Article;

@Getter
public class ArticleListViewResponse {

    private final Long id;
    private final String title;
    private final String content;

    public ArticleListViewResponse(Article article){
        this.id = article.getId();
        this.title = article.getTitle();
        this.content = article.getContent();
    }
}
BlogViewController.java
package me.ansoohyeon.springbootdeveloper.controller;

import lombok.RequiredArgsConstructor;
import me.ansoohyeon.springbootdeveloper.dto.ArticleListViewResponse;
import me.ansoohyeon.springbootdeveloper.service.BlogService;
import org.springframework.stereotype.Controller;
import org.springframework.ui.Model;
import org.springframework.web.bind.annotation.GetMapping;

import java.util.List;

@RequiredArgsConstructor
@Controller
public class BlogViewController {

    private final BlogService blogService;

    @GetMapping("/articles")
    public String getArticles(Model model){
        List<ArticleListViewResponse> articles = blogService.findAll().stream()
                .map(ArticleListViewResponse::new)
                .toList();
        model.addAttribute("articles", articles); // 블로그 글 리스트 저장

        return "articleList"; // articleList.html 뷰 조회
    }
}
2. HTML 뷰 생성
articleList.html
<!DOCTYPE html>
<html xmlns:th="http://www.thymeleaf.org">
<head>
    <meta charset="UTF-8">
    <title>블로그 글 목록</title>
    <link rel="stylesheet" href="https://stackpath.bootstrapcdn.com/bootstrap/4.1.3/css/bootstrap.min.css">
</head>
<body>
    <div class="p-5 mb-5 text-center</> bg-light">
        <h1 class="mb-3">My Blog</h1>
        <h4 class="mb-3">블로그에 오신 것을 환영합니다.</h4>
    </div>

    <div class="container">
        <div class="row-6" th:each="item : ${articles}"> <!-- articles 개수만큼 반복 -->
            <div class="card">
                <div class="card-header" th:text="${item.id}"></div> <!-- item의 id 출력 -->
                <div class="card-body">
                    <h5 class="card-title" th:text="${item.title}"></h5>
                    <p class="card-text" th:text="${item.content}"></p>
                    <a href="#" class="btn btn-primary">보러 가기</a>
                </div>
            </div>
        </div>
    </div>
</body>
</html>
3. 뷰 테스트
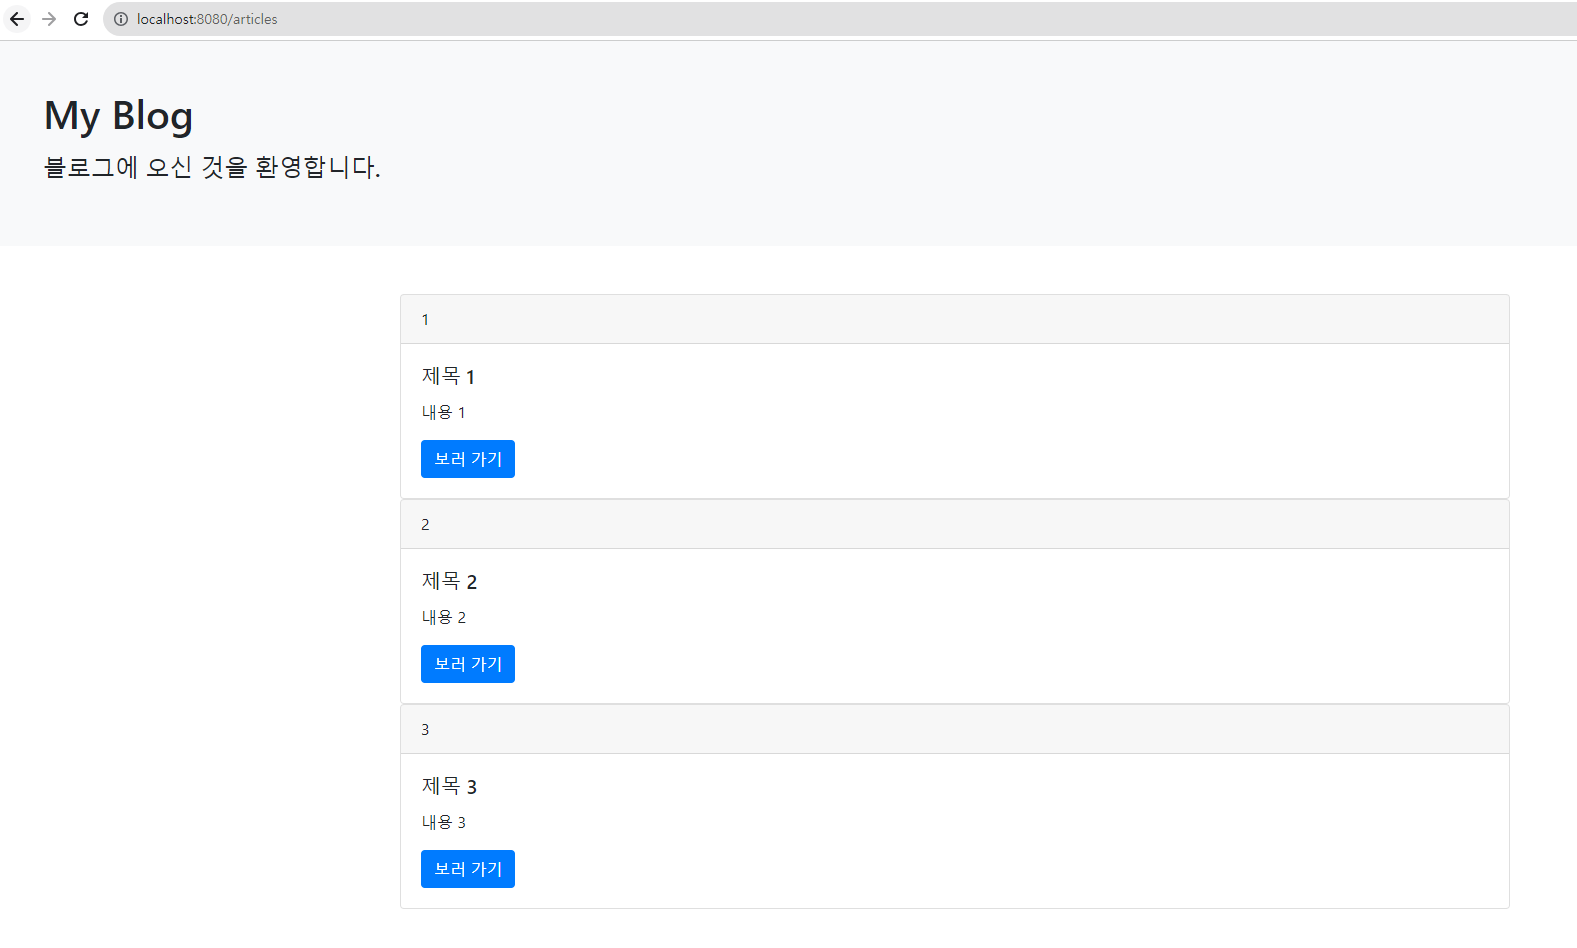
해당 주소로 들어가면 뷰가 제대로 나오고 있는 모습이다.
🍀 이번에는 블로그 글 뷰 구현
이번에는 블로그 목록에서 '보러 가기' 클릭 시 블로그 글 조회 뷰를 구현해 보자!
1. 엔티티 생성, 수정 시간 추가
Article.java
(생략)
    @CreatedDate // 엔티티가 생성될 때 생성 시간 저장
    @Column(name = "created_at")
    private LocalDateTime createdAt;

    @LastModifiedDate // 엔티티가 수정될 때 수정 시간 저장
    @Column(name = "updated_at")
    private LocalDateTime updatedAt;
(생략)
data.sql
INSERT INTO article (title, content, created_at, updated_at) VALUES ('제목 1', '내용 1', NOW(), NOW())
INSERT INTO article (title, content, created_at, updated_at) VALUES ('제목 2', '내용 2', NOW(), NOW())
INSERT INTO article (title, content, created_at, updated_at) VALUES ('제목 3', '내용 3', NOW(), NOW())
SpringBootDeveloperApplication.java
package me.ansoohyeon.springbootdeveloper;

import org.springframework.boot.SpringApplication;
import org.springframework.boot.autoconfigure.SpringBootApplication;
import org.springframework.data.jpa.repository.config.EnableJpaAuditing;

@EnableJpaAuditing // created_at, updated_at 자동 업데이트
@SpringBootApplication
public class SpringBootDeveloperApplication {
    public static void main(String[] args) {
        SpringApplication.run(SpringBootDeveloperApplication.class, args);
    }
}
2. 컨트롤러 메소드 작성
ArticleViewResponse.java
package me.ansoohyeon.springbootdeveloper.dto;

import lombok.Getter;
import lombok.NoArgsConstructor;
import me.ansoohyeon.springbootdeveloper.domain.Article;

import java.time.LocalDateTime;

@NoArgsConstructor
@Getter
public class ArticleViewResponse {

    private Long id;
    private String title;
    private String content;
    private LocalDateTime createdAt;

    public ArticleViewResponse(Article article){
        this.id = article.getId();
        this.title = article.getTitle();
        this.content = article.getContent();
        this.createdAt = article.getCreatedAt();
    }
}
BlogViewController.java
(생략)
    @GetMapping("/articles/{id}")
    public String getArticle(@PathVariable Long id, Model model){
        Article article = blogService.findById(id);
        model.addAttribute("article", new ArticleViewResponse(article));

        return "article";
    }
3. HTML 뷰 생성
article.html
<!DOCTYPE html>
<html xmlns:th="http://www.thymeleaf.org">
<head>
    <meta charset="UTF-8">
    <title>블로그 글</title>
    <link ref="stylesheet" href="https://stackpath.bootstrapcdn.com/bootstrap/4.1.3/css/bootstrap.min.css">
</head>
<body>

<div class="p-5 mb-5 text-center</> bg-light>">
    <h1 class="mb-3">My Blog</h1>
    <h4 class="mb-3">블로그에 오신 것을 환영합니다.</h4>
</div>

<div class="container mt-5">
    <div class="row">
        <div class="col-tg-8">
            <article>
                <header class="mb-4">
                    <h1 class="fw-bolder mb-1" th:text="${article.title}"></h1>
                    <div class="text-muted fst-italic mb-2" th:text="|Posted on ${#temporals.format(article.createdAt, 'yyyy-MM-dd HH:mm')}|"></div>
                </header>

                <section class="mb-5">
                    <p class="fs-5 mb-4" th:text="${article.content}"></p>
                </section>
                <button type="button" class="btn btn-primary btn-sm">수정</button>
                <button type="button" class="btn btn-secondary btn-sm">삭제</button>
            </article>
        </div>
    </div>
</div>

</body>
</html>
articleList.html (보러 가기 url 수정)
(생략)
                <div class="card-body">
                    <h5 class="card-title" th:text="${item.title}"></h5>
                    <p class="card-text" th:text="${item.content}"></p>
                    <a th:href="@{/articles/{id}(id=${item.id})}" class="btn btn-primary">보러 가기</a>
                </div>
(생략)
4. 뷰 테스트
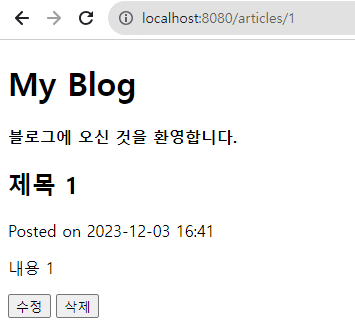
해당 주소로 들어가면 뷰가 제대로 나온다!

풀스택 개발자 기록집 📁