이번 포스팅에서는 웹 사이트에서 회원 가입 시 사용되는 이메일 인증 기능을 구현해 보자.
📨 SMTP
(Simple Mail Transfer Protocol)
- 인터넷 연결을 통하여 이메일을 보낼 때 사용되는 프로토콜
- 발신자가 Gmail, Outlook Express 등을 통해 발신한 이메일을 메일 서버에서 받아서 전달하는 과정의 기술 표준
바로 이 SMTP를 활용해 볼 것이다!
📨 이메일 인증 기능
💡 Step 1
구글 앱 비밀번호 발급 받기
Google 계정으로 로그인 ▶ 우측 상단의 Google 계정 관리 ▶ 보안 ▶ 2단계 인증 완료 ▶ 앱 비밀번호 생성 ▶
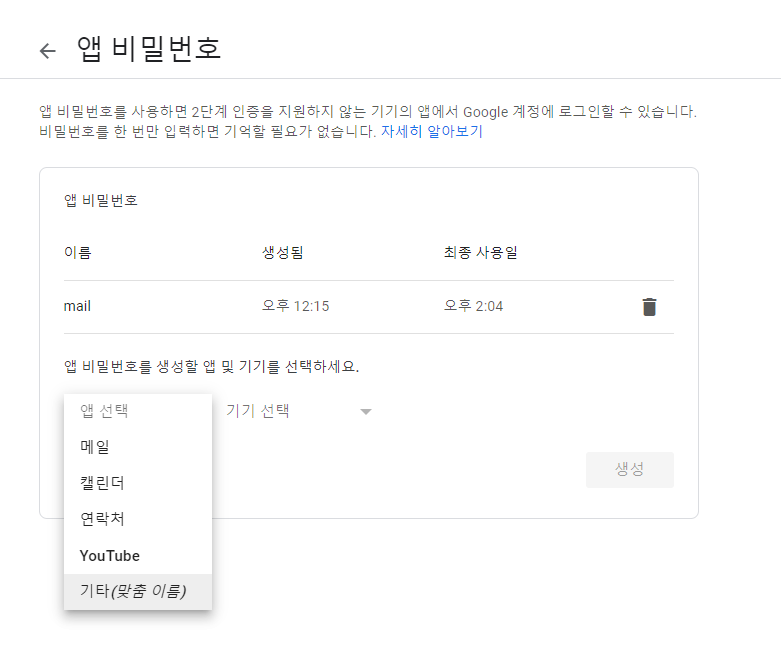
기타(맞춤 이름) 선택 ▶
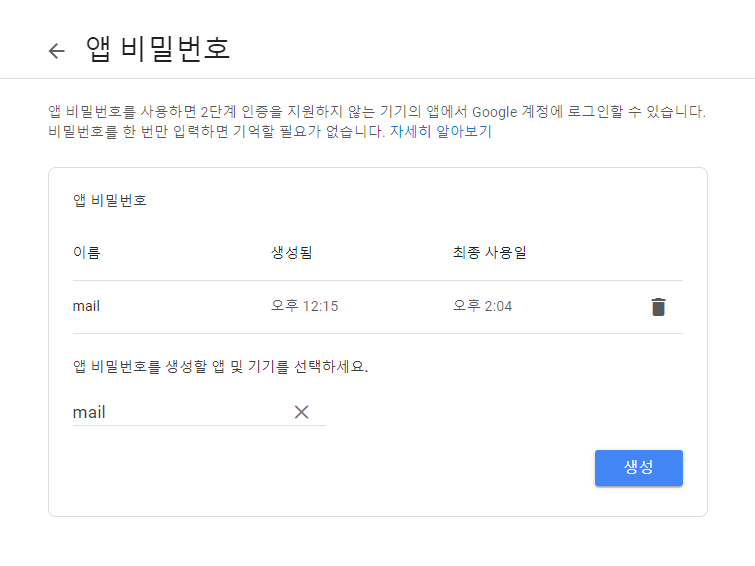
'mail'이라고 작성 ▶
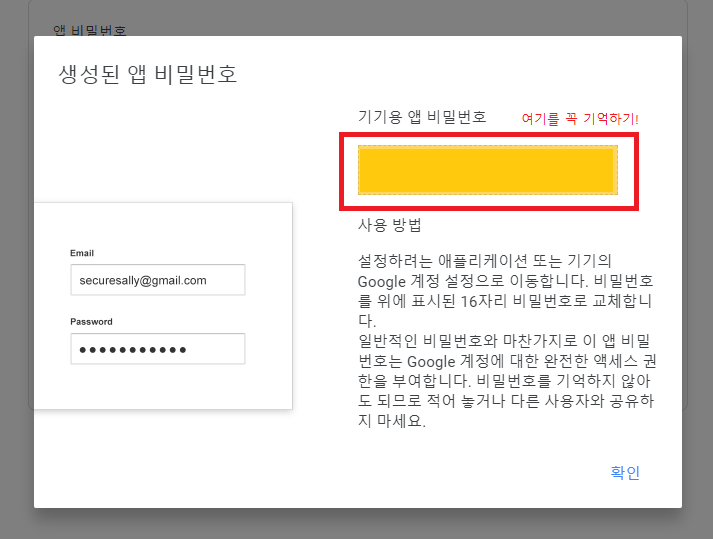
생성된 기기용 앱 비밀번호 확인
-> 이 비밀번호는 이후 다시 볼 수 없으니 어딘가에 꼭 복사해 놓자! 👍
💡 Step 2
pom.xml에 이메일 인증과 관련된 라이브러리 추가하기
Maven Repository - 바로 가기
🔍 pom.xml
...
		<!-- 이메일 인증 -->
		<!-- https://mvnrepository.com/artifact/javax.mail/mail -->
		<dependency>
			<groupId>javax.mail</groupId>
			<artifactId>mail</artifactId>
			<version>1.4.7</version>
		</dependency>

		<!-- https://mvnrepository.com/artifact/org.springframework/spring-context-support -->
		<dependency>
			<groupId>org.springframework</groupId>
			<artifactId>spring-context-support</artifactId>
			<version>${org.springframework-version}</version>
		</dependency>
...
💡 Step 3
Spring에서 email-context.xml 생성하기
🔍 email-context.xml
<?xml version="1.0" encoding="UTF-8"?>
<beans xmlns="http://www.springframework.org/schema/beans"
   xmlns:xsi="http://www.w3.org/2001/XMLSchema-instance"
   xsi:schemaLocation="http://www.springframework.org/schema/beans http://www.springframework.org/schema/beans/spring-beans.xsd">

    <!-- email 인증 관련 bean 생성  -->
    <bean id="mailSender" class="org.springframework.mail.javamail.JavaMailSenderImpl">
        <property name="host" value="smtp.gmail.com" />
        <property name="port" value="587" />
        <property name="username" value="인증 코드를 보낼 메일 주소"/>
        <property name="password" value="발급 받은 구글 앱 비밀번호" />
        <property name="javaMailProperties">
            <props>
                <prop key="mail.transport.protocol">smtp</prop>
                <prop key="mail.smtp.auth">true</prop>
                <prop key="mail.smtp.starttls.enable">true</prop>
                <!-- <prop key="mail.debug">true</prop> -->
                <prop key="mail.smtp.ssl.trust">smtp.gmail.com</prop>
            <prop key="mail.smtp.ssl.protocols">TLSv1.2</prop>
            </props>
        </property>
    </bean>
</beans>
💡 Step 4
web.xml에 email-context.xml 경로 등록
🔍 web.xml
	<context-param>
		<param-name>contextConfigLocation</param-name>
		<param-value>
			classpath:spring/root-context.xml
			classpath:spring/spring-security.xml
			classpath:spring/email-context.xml
		</param-value>
	</context-param>
💡 Step 5
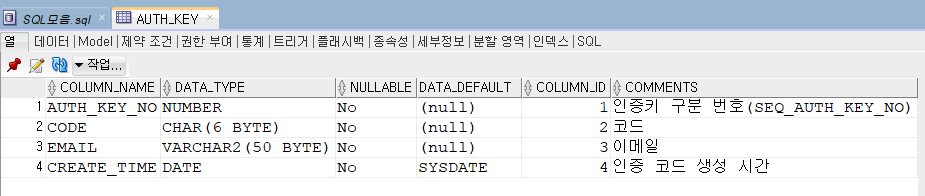
Oracle에서 이메일 인증키 테이블 생성하기
🔍 테이블 생성
-- 이메일 인증키 테이블 생성
DROP TABLE "AUTH_KEY";

CREATE TABLE "AUTH_KEY" (
   "AUTH_KEY_NO"   NUMBER      NOT NULL,
   "CODE"   CHAR(6)      NOT NULL,
   "EMAIL"   VARCHAR2(50)      NOT NULL,
   "CREATE_TIME"   DATE   DEFAULT SYSDATE   NOT NULL
);

COMMENT ON COLUMN "AUTH_KEY"."AUTH_KEY_NO" IS '인증키 구분 번호(SEQ_AUTH_KEY_NO)';
COMMENT ON COLUMN "AUTH_KEY"."CODE" IS '코드';
COMMENT ON COLUMN "AUTH_KEY"."EMAIL" IS '이메일';
COMMENT ON COLUMN "AUTH_KEY"."CREATE_TIME" IS '인증 코드 생성 시간';

ALTER TABLE "AUTH_KEY" ADD CONSTRAINT "PK_AUTH_KEY" PRIMARY KEY (
   "AUTH_KEY_NO"
);

CREATE SEQUENCE SEQ_AUTH_KEY_NO NOCACHE;
🔍 생성된 테이블 확인
💡 Step 6
VS Code에서 jsp와 js 코드 작성하기
🔍 signUp.jsp
...
                <!-- 이메일 입력 -->
                <label for="memberEmail">
                    <span class="required">*</span> 아이디(이메일)
                </label>


                <div class="signUp-input-area">
                    <input type="text" name="memberEmail" id="memberEmail"
                    placeholder="아이디(이메일)" maxlength="30" autocomplete="off">

                    <button id="sendAuthKeyBtn" type="button">인증번호 받기</button>
                </div>
                <span class="signUp-message" id="emailMessage">메일을 받을 수 있는 이메일을 입력해주세요.</span>

                <!-- 인증번호 입력 -->
                <label for="emailCheck">
                    <span class="required">*</span> 인증번호
                </label>


                <div class="signUp-input-area">
                    <input type="text" name="authKey" id="authKey" s placeholder="인증번호 입력" maxlength="6" autocomplete="off" >

                    <button id="checkAuthKeyBtn" type="button">인증하기</button>
                </div>
                <span class="signUp-message" id="authKeyMessage"></span>
                                <!-- 인증번호가 일치하지 않습니다 -->
...
🔍 signUp.js
// 인증번호 발송
const sendAuthKeyBtn = document.getElementById("sendAuthKeyBtn");
const authKeyMessage = document.getElementById("authKeyMessage");
let authTimer;
let authMin = 4;
let authSec = 59;

// 인증번호를 발송한 이메일 저장
let tempEmail;

sendAuthKeyBtn.addEventListener("click", function(){

    authMin = 4;
    authSec = 59;

    checkObj.authKey = false;

    if(checkObj.memberEmail){ // 중복이 아닌 이메일인 경우

        /* fetch() API 방식 ajax */
        fetch("/sendEmail/signUp?email=" + memberEmail.value)
        .then(resp => resp.text())
        .then(result => {

            if(result > 0){
                console.log("인증 번호가 발송되었습니다.")
                tempEmail = memberEmail.value;
            } else {
                console.log("인증번호 발송 실패")
            }
        })
        .catch(err => {
            console.log("이메일 발송 중 에러 발생");
            console.log(err);
        });

        alert("인증번호가 발송 되었습니다.");

        authKeyMessage.innerText = "05:00";
        authKeyMessage.classList.remove("confirm");

        authTimer = window.setInterval(()=>{

            authKeyMessage.innerText = "0" + authMin + ":" + (authSec<10 ? "0" + authSec : authSec);

            // 남은 시간이 0분 0초인 경우
            if(authMin == 0 && authSec == 0){
                checkObj.authKey = false;
                clearInterval(authTimer);
                return;
            }

            // 0초인 경우
            if(authSec == 0){
                authSec = 60;
                authMin--;
            }

            authSec--; // 1초 감소

        }, 1000)

    } else {
        alert("중복되지 않은 이메일을 작성해주세요.");
        memberEmail.focus();
    }

});

// 인증 확인
const authKey = document.getElementById("authKey");
const checkAuthKeyBtn = document.getElementById("checkAuthKeyBtn");

checkAuthKeyBtn.addEventListener("click", function(){

    if(authMin > 0 || authSec > 0){ // 시간 제한이 지나지 않은 경우에만 인증번호 검사 진행
        /* fetch API */
        const obj = {"inputKey":authKey.value, "email":tempEmail}
        const query = new URLSearchParams(obj).toString()
        // inputKey=123456&email=user01

        fetch("/sendEmail/checkAuthKey?" + query)
        .then(resp => resp.text())
        .then(result => {
            if(result > 0){
                clearInterval(authTimer);
                authKeyMessage.innerText = "인증되었습니다.";
                authKeyMessage.classList.add("confirm");
                checkObj.authKey = true;

            } else{
                alert("인증번호가 일치하지 않습니다.")
                checkObj.authKey = false;
            }
        })
        .catch(err => console.log(err));

    } else{
        alert("인증 시간이 만료되었습니다. 다시 시도해주세요.")
    }

});
💡 Step 7
다시 Spring에서 Controller부터 mapper까지 파일 생성 후 코드 작성하기
🔍 EmailController.java
package edu.kh.project.member.controller;

import java.util.Map;

import org.springframework.beans.factory.annotation.Autowired;
import org.springframework.stereotype.Controller;
import org.springframework.ui.Model;
import org.springframework.web.bind.annotation.GetMapping;
import org.springframework.web.bind.annotation.RequestMapping;
import org.springframework.web.bind.annotation.RequestParam;
import org.springframework.web.bind.annotation.ResponseBody;
import org.springframework.web.bind.annotation.SessionAttributes;

import edu.kh.project.member.model.service.EmailService;

@Controller
@RequestMapping("/sendEmail")
@SessionAttributes("authKey")
public class EmailController {

    @Autowired
    private EmailService service;

    @GetMapping("/signUp")
    @ResponseBody
    public int signUp(String email) {
        return service.signUp(email, "회원 가입");
    }

    @GetMapping("/checkAuthKey")
    @ResponseBody
    public int checkAuthKey(@RequestParam Map<String, Object> paramMap){

       System.out.println(paramMap); // {inputKey=wc3rxG, email=knbdh@nate.com}

        return service.checkAuthKey(paramMap);
    }

}
🔍 EmailService.java
package edu.kh.project.member.model.service;

import java.util.Map;

public interface EmailService {

   int signUp(String email, String title);

   String createAuthKey();

   int checkAuthKey(Map<String, Object> paramMap);
}
🔍 EmailServiceImpl.java
package edu.kh.project.member.model.service;

import java.util.HashMap;
import java.util.Map;

import javax.mail.Message;
import javax.mail.internet.InternetAddress;
import javax.mail.internet.MimeMessage;

import org.springframework.beans.factory.annotation.Autowired;
import org.springframework.mail.javamail.JavaMailSender;
import org.springframework.stereotype.Service;
import org.springframework.transaction.annotation.Transactional;

import edu.kh.project.member.model.dao.EmailDAO;

@Service
public class EmailServiceImpl implements EmailService {

    @Autowired
    private EmailDAO dao;

    @Autowired
    private JavaMailSender mailSender;

    private String fromEmail = "인증 코드를 보낼 메일 주소";
    private String fromUsername = "수업용프로젝트";

    @Override
    public String createAuthKey() {

        String key = "";

        for(int i=0 ; i<6 ; i++) {

            int sel1 = (int)(Math.random() * 3); // 0:숫자 / 1,2:영어

            if(sel1 == 0) {

                int num = (int)(Math.random() * 10); // 0~9
                key += num;

            } else {

                char ch = (char)(Math.random() * 26 + 65); // A~Z

                int sel2 = (int)(Math.random() * 2); // 0:소문자 / 1:대문자

                if(sel2 == 0) {
                    ch = (char)(ch + ('a' - 'A')); // 소문자로 변경
                }

                key += ch;
            }

        }

        return key;
    }

    @Transactional
    @Override
    public int signUp(String email, String title) {

        //6자리 난수 인증번호 생성
        String authKey = createAuthKey();

        try {

            // 인증 메일 보내기
            MimeMessage mail = mailSender.createMimeMessage();

            // 제목
            String subject = "[Board Project]"+title+" 인증코드";

            // 문자 인코딩
            String charset = "UTF-8";

            // 메일 내용
            String mailContent
                = "<p>Board Project "+title+" 인증코드입니다.</p>"
                + "<h3 style='color:blue'>" + authKey + "</h3>";

            // 송신자(보내는 사람) 지정
            mail.setFrom(new InternetAddress(fromEmail, fromUsername));
            mail.addRecipient(Message.RecipientType.TO, new InternetAddress(email));

            // 수신자(받는 사람) 지정

            // 이메일 제목 세팅
            mail.setSubject(subject, charset);

            // 내용 세팅
            mail.setText(mailContent, charset, "html"); // "html" 추가 시 HTML 태그가 해석됨

            mailSender.send(mail);

        } catch (Exception e) {
            e.printStackTrace();

            return 0;
        }

        Map<String, String> map = new HashMap<String, String>();
        map.put("authKey", authKey);
        map.put("email", email);

        System.out.println(map);

        int result = dao.updateAuthKey(map);

        if(result == 0) { // 발급받은 인증코드가 없을 경우 새로운 인증코드를 발급받아야 함
           result = dao.insertAuthKey(map);
        }

        return result;
    }


   @Override
   public int checkAuthKey(Map<String, Object> paramMap) {
      return dao.checkAuthKey(paramMap);
   }

   // 테스트
}
🔍 EmailDAO.java
package edu.kh.project.member.model.dao;

import java.util.Map;

import org.mybatis.spring.SqlSessionTemplate;
import org.springframework.beans.factory.annotation.Autowired;
import org.springframework.stereotype.Repository;

@Repository
public class EmailDAO {

   @Autowired
    private SqlSessionTemplate sqlSession;

   public int updateAuthKey(Map<String, String> map) {
      return sqlSession.update("emailMapper.updateAuthKey", map);
   }

   public int insertAuthKey(Map<String, String> map) {
      return sqlSession.update("emailMapper.insertAuthKey", map);
   }

   public int checkAuthKey(Map<String, Object> paramMap) {
      return sqlSession.selectOne("emailMapper.checkAuthKey", paramMap);
   }
}
🔍 email-mapper.xml
<?xml version="1.0" encoding="UTF-8"?>
<!DOCTYPE mapper PUBLIC "-//mybatis.org//DTD Mapper 3.0//EN" "http://mybatis.org/dtd/mybatis-3-mapper.dtd" >
<mapper namespace="emailMapper">

   <update id="updateAuthKey">
      UPDATE  "AUTH_KEY" SET
      CODE = #{authKey},
      CREATE_TIME = sysdate
      WHERE EMAIL = #{email}
   </update>

   <insert id="insertAuthKey">
      INSERT INTO "AUTH_KEY" VALUES(SEQ_AUTH_KEY_NO.NEXTVAL, #{authKey}, #{email}, DEFAULT)
   </insert>

   <select id="checkAuthKey" resultType="int">
      SELECT COUNT(*) FROM "AUTH_KEY"
      WHERE EMAIL = #{email}
      AND CODE = #{inputKey}
   </select>

</mapper>
💡 Step 8
mapper를 생성했으면 무엇을 해야 한다?
mybatis-config.xml에 경로를 등록해 주어야 한다!
mybatis-config.xml에 boardMapper 경로 등록하기
🔍 mybatis-config.xml
	<!-- mapper 파일(SQL 작성되는파일) 위치 등록 부분 -->
	<mappers>
		<mapper resource="/mappers/member-mapper.xml" />
		<mapper resource="/mappers/myPage-mapper.xml" />
		<mapper resource="/mappers/ajax-mapper.xml" />
		<mapper resource="/mappers/email-mapper.xml" />
		<mapper resource="/mappers/board-mapper.xml" />
	</mappers>
💡 Step 9
마지막으로 서버를 실행하여 제대로 구현되었는지 확인해 보기

회원 가입 중 이메일을 입력할 수 있는 input 창이 보인다.
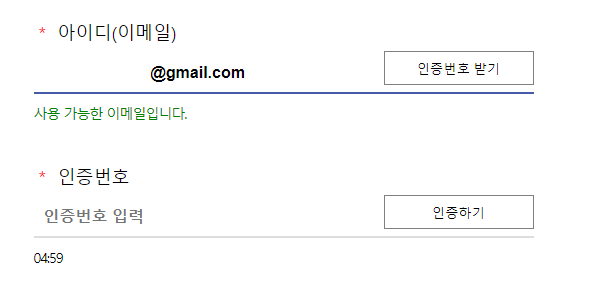
여기에 인증번호를 받을 이메일을 입력한 뒤 '인증번호 받기' 버튼을 클릭해 보자.
그러자 인증번호 입력 input 창 아래에 05:00 타이머가 생기며 1초씩 줄어드는 모습을 볼 수 있다.
인증 시간이 끝나기 전에 진짜로 인증번호가 왔는지 메일을 확인해 보자!
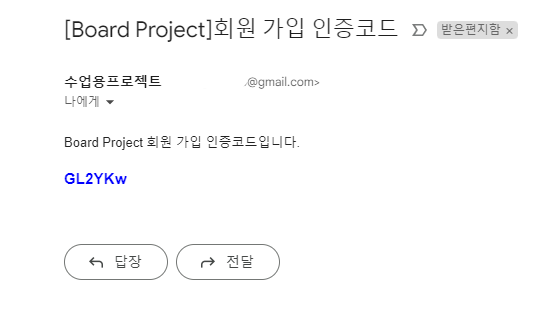
입력한 이메일로 가 보니 진짜로 회원 가입 인증코드가 전송되어 있는 모습이다. 인증코드를 인증하러 가 보자.
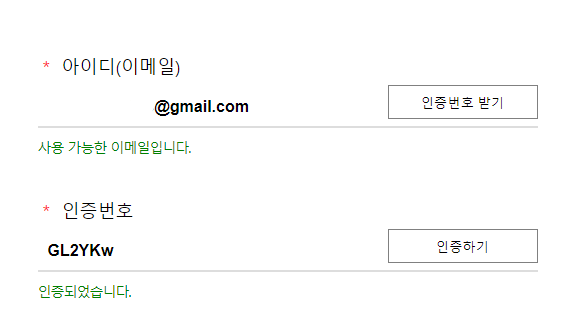
인증번호 입력 input 창에 방금 받은 인증번호를 넣으니 '인증되었습니다.' 문구가 출력되며 성공적으로 이메일 인증이 된 것을 볼 수 있다. 😉
