
AOP 원리
AOP의 원리는 항상 "프록시 → 어드바이스 → 타깃"
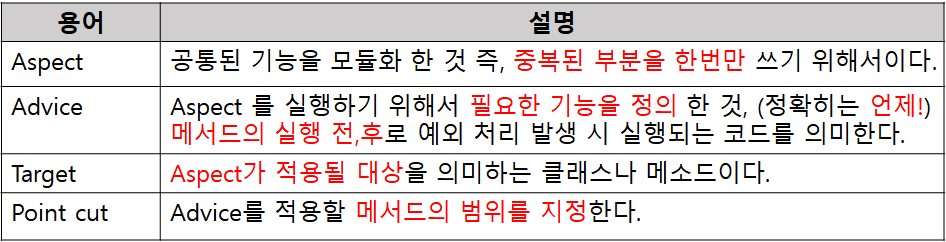
AOP 관련 용어💡
기능 구현 과정
- 타깃(target) 클래스를 지정한다.
<bean id="calcTarget" class="com.test.pro04.ex01.Calculator" />- 어드바이스(Advice) 클래스를 지정한다.
<bean id="logAdvice" class="com.test.pro04.ex01.LoggingAdvice" />- 설정 파일에서 포인트컷(Pointcut)을 설정한다.
 <aop:pointcut id="calcMethods"
               expression="execution(* com.test.Calculator.*(..))" />
expression="execution(* com.test.Calculator.*(..))"
→com.test.Calculator클래스의 모든 메서드에 AOP 적용
- 설정 파일에서 어드바이스와 포인트컷을 결합하는 어드바이저를 설정한다.
<aop:advisor advice-ref="logAdvice" pointcut-ref="calcMethods" />advice-ref="logAdvice"→ 어드바이스 지정pointcut-ref="calcMethods"→ 포인트컷 지정logAdvice와 calcTarget을 각각LoggingAdvice,Calculator클래스로 등록
- 설정 파일에서 스프링의 ProxyFactoryBean 클래스를 이용해 타깃에 어드바이스를 설정한다.
<!-- 1. 타깃 객체 (원본 클래스) -->
<bean id="calcTarget" class="com.test.Calculator" />

<!-- 2. 어드바이스 객체 (부가기능) -->
<bean id="logAdvice" class="com.test.LoggingAdvice" />

<!-- 3. ProxyFactoryBean을 이용해 타깃과 어드바이스 결합 -->
<bean id="proxyCal" class="org.springframework.aop.framework.ProxyFactoryBean">
    <!-- (1) 타깃 객체 설정 (핵심 기능) -->
    <property name="target" ref="calcTarget" />

    <!-- (2) 어드바이스 설정 (부가기능) -->
    <property name="interceptorNames">
        <list>
            <value>logAdvice</value>  <!-- logAdvice 적용 -->
        </list>
    </property>
</bean>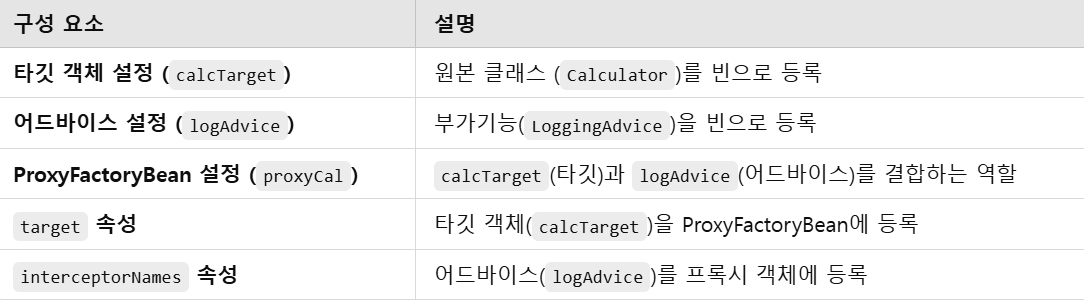
- getBean() 메서드로 빈 객체에 접근해 사용한다.
ProxyFacrotyBean ❓
프록시 구조 (프록시 → 어드바이스 → 타깃)
┌────────────────────────────────┐
│         프록시 객체(proxyCal)    │
│ ┌──────────────────────────┐  │
│ │      어드바이스(logAdvice)  │  │
│ ├──────────────────────────┤  │
│ │      타깃 객체(calcTarget)   │  │
│ └──────────────────────────┘  │
└────────────────────────────────┘
✔️ 프록시 객체가 요청을 받으면, 먼저 어드바이스 실행 → 타깃 객체 실행
✔️ 모든 요청이 프록시를 거쳐 가므로, 항상 어드바이스가 먼저 실행된다.
interceptorNames ❓
- interceptorNames 속성은 어드바이스(부가기능)를 설정하는 부분이다.
- 등록한 어드바이스들은 프록시 객체를 통해 자동으로 적용된다
- 여러 개의 어드바이스를 설정할 수도 있다 (순서대로 실행된다)
예제)
→ 어드바이스(부가기능)로 사용할 빈을 등록하는 역할
<property name="interceptorNames">
    <list>
        <value>logAdvice</value>  <!-- 어드바이스 등록 -->
    </list>
</property><value>logAdvice</value>→"logAdvice"라는 ID를 가진 빈을 어드바이스로 추가
주요 어노테이션
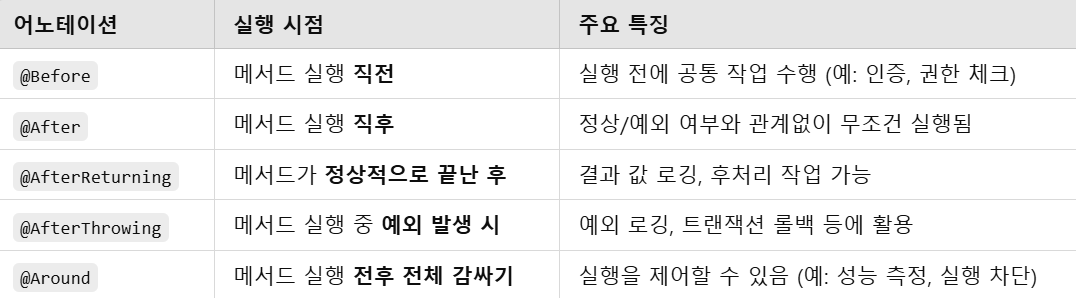
@Before
✅ 1) @Before (메서드 실행 전에 실행)
@Aspect
@Component
public class LoggingAspect {
    @Before("execution(* com.example.service.*.*(..))")
    public void logBeforeMethod() {
        System.out.println("[AOP] 메서드 실행 전에 로그 남김!");
    }
}
📌 실행
[AOP] 메서드 실행 전에 로그 남김!
→ 원래 메서드 실행
@After
✅ 2) @After (메서드 실행 후 실행)
@After("execution(* com.example.service.*.*(..))")
public void logAfterMethod() {
    System.out.println("[AOP] 메서드 실행 후에 로그 남김!");
}
📌 실행
→ 원래 메서드 실행
[AOP] 메서드 실행 후에 로그 남김!
@AfterReturning
✅ 3) @AfterReturning (메서드가 정상적으로 끝난 후 실행)
@AfterReturning("execution(* com.example.service.*.*(..))")
public void logAfterReturning() {
    System.out.println("[AOP] 메서드가 정상적으로 끝남!");
}
📌 실행
→ 원래 메서드 실행
[AOP] 메서드가 정상적으로 끝남! (예외가 발생하지 않은 경우)
@AfterThrowing
✅ 4) @AfterThrowing (메서드 실행 중 예외 발생 시 실행)
@AfterThrowing("execution(* com.example.service.*.*(..))")
public void logAfterThrowing() {
    System.out.println("[AOP] 메서드 실행 중 예외 발생!");
}
📌 실행
→ 원래 메서드 실행 중 예외 발생
[AOP] 메서드 실행 중 예외 발생!
@Around
✅ 5) @Around (메서드 실행 전후 전체 감싸기)
@Around("execution(* com.example.service.*.*(..))")
public Object logAroundMethod(ProceedingJoinPoint joinPoint) throws Throwable {
    System.out.println("[AOP] 메서드 실행 전");
    Object result = joinPoint.proceed(); // 실제 메서드 실행
    System.out.println("[AOP] 메서드 실행 후");
    return result;
}
📌 실행
[AOP] 메서드 실행 전
→ 원래 메서드 실행
[AOP] 메서드 실행 후
포인트컷 표현식
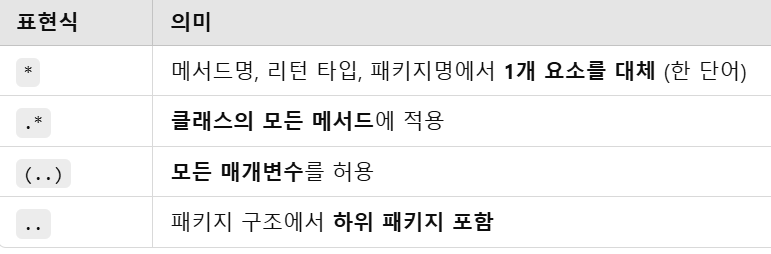
포인트컷은 AOP를 적용할 메서드를 지정하는 표현식
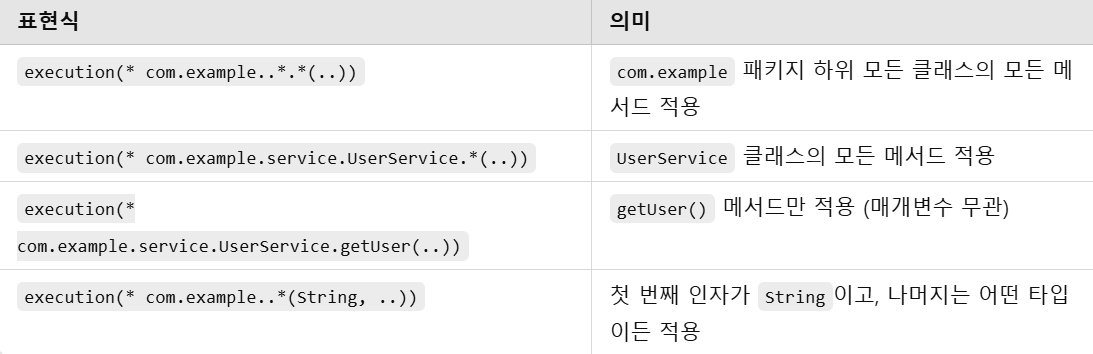
execution(* com.example.service.UserService.*(..))*.*는 클래스 내 모든 메서드를 의미execution(* com.example.service.UserService.*(..))
: 모든 메서드(*)에 대해 AOP를 적용- 모든 매개변수
((..))도 허용
execution(* com.example.service.UserService.getUser(..))UserService클래스의getUser()메서드의 매개변수가 몇 개든 어떤 타입이든 상관없이 AOP 적용 대상이 된다.
➡ 즉, 아래의 코드의 모든getUser()메서드가 적용됨
public void getUser();
public void getUser(String id);
public void getUser(String id, int age);
*.*는 클래스 내 모든 메서드를 의미
(..)는 메서드의 매개변수 개수와 타입에 관계없이 모든 경우를 허용
* VS . . VS ( . . )
AOP를 사용하면 코드 중복을 줄이고, 핵심 로직과 부가 기능(로깅, 트랜잭션, 예외 처리)을 분리할 수 있다! 🚀

개발 공부중•••